3D Printing Lithophanes - All You Need to Know

The first Lithophanes in the 1820s were made out of porcelain material. It was a pretty labor-intensive and expensive process. But, with the rise of 3D printing technology and affordable 3D printers, you can single-handedly 3D print exquisite lithophanes at your home.
That said, 3D printing quality Lithophanes is still a relatively challenging process. You need to fine-tune several little parameters and carefully set your slicer settings to get the best-looking Lithophane on your 3D printer.
In this article, we’ll break down the science behind 3D printing lithophanes. We’ll look at the various tools you can use to prepare a lithophane and understand the crucial factors to consider while 3D printing it.
Let’s print some 3D images.
What Is a Lithophane?
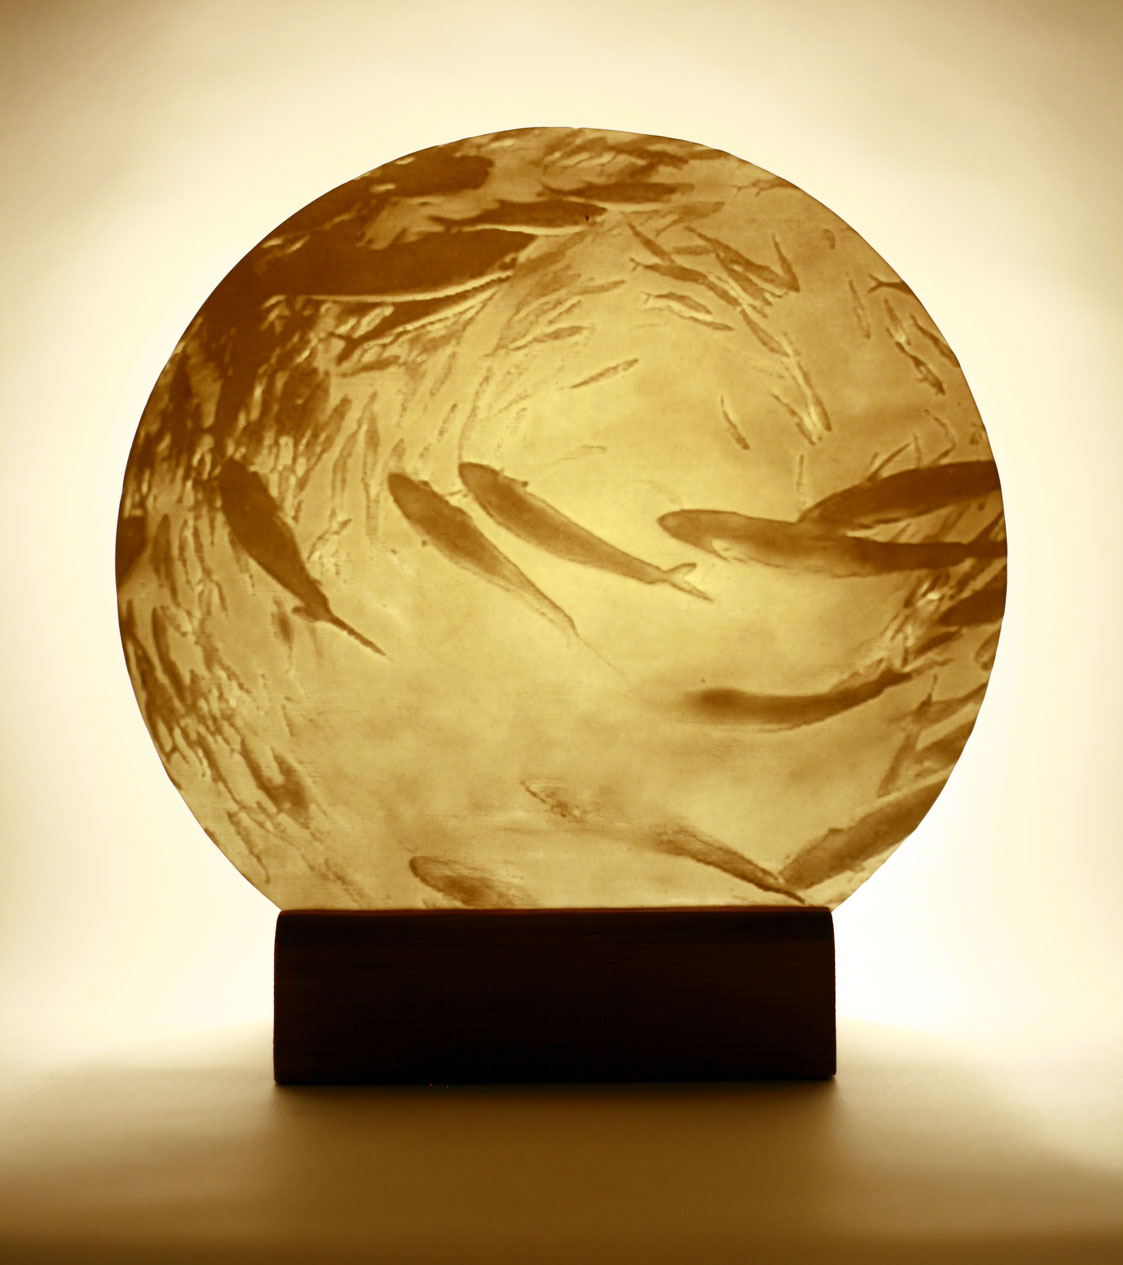 Photo Courtesy Andyatram via Wikimedia Commons
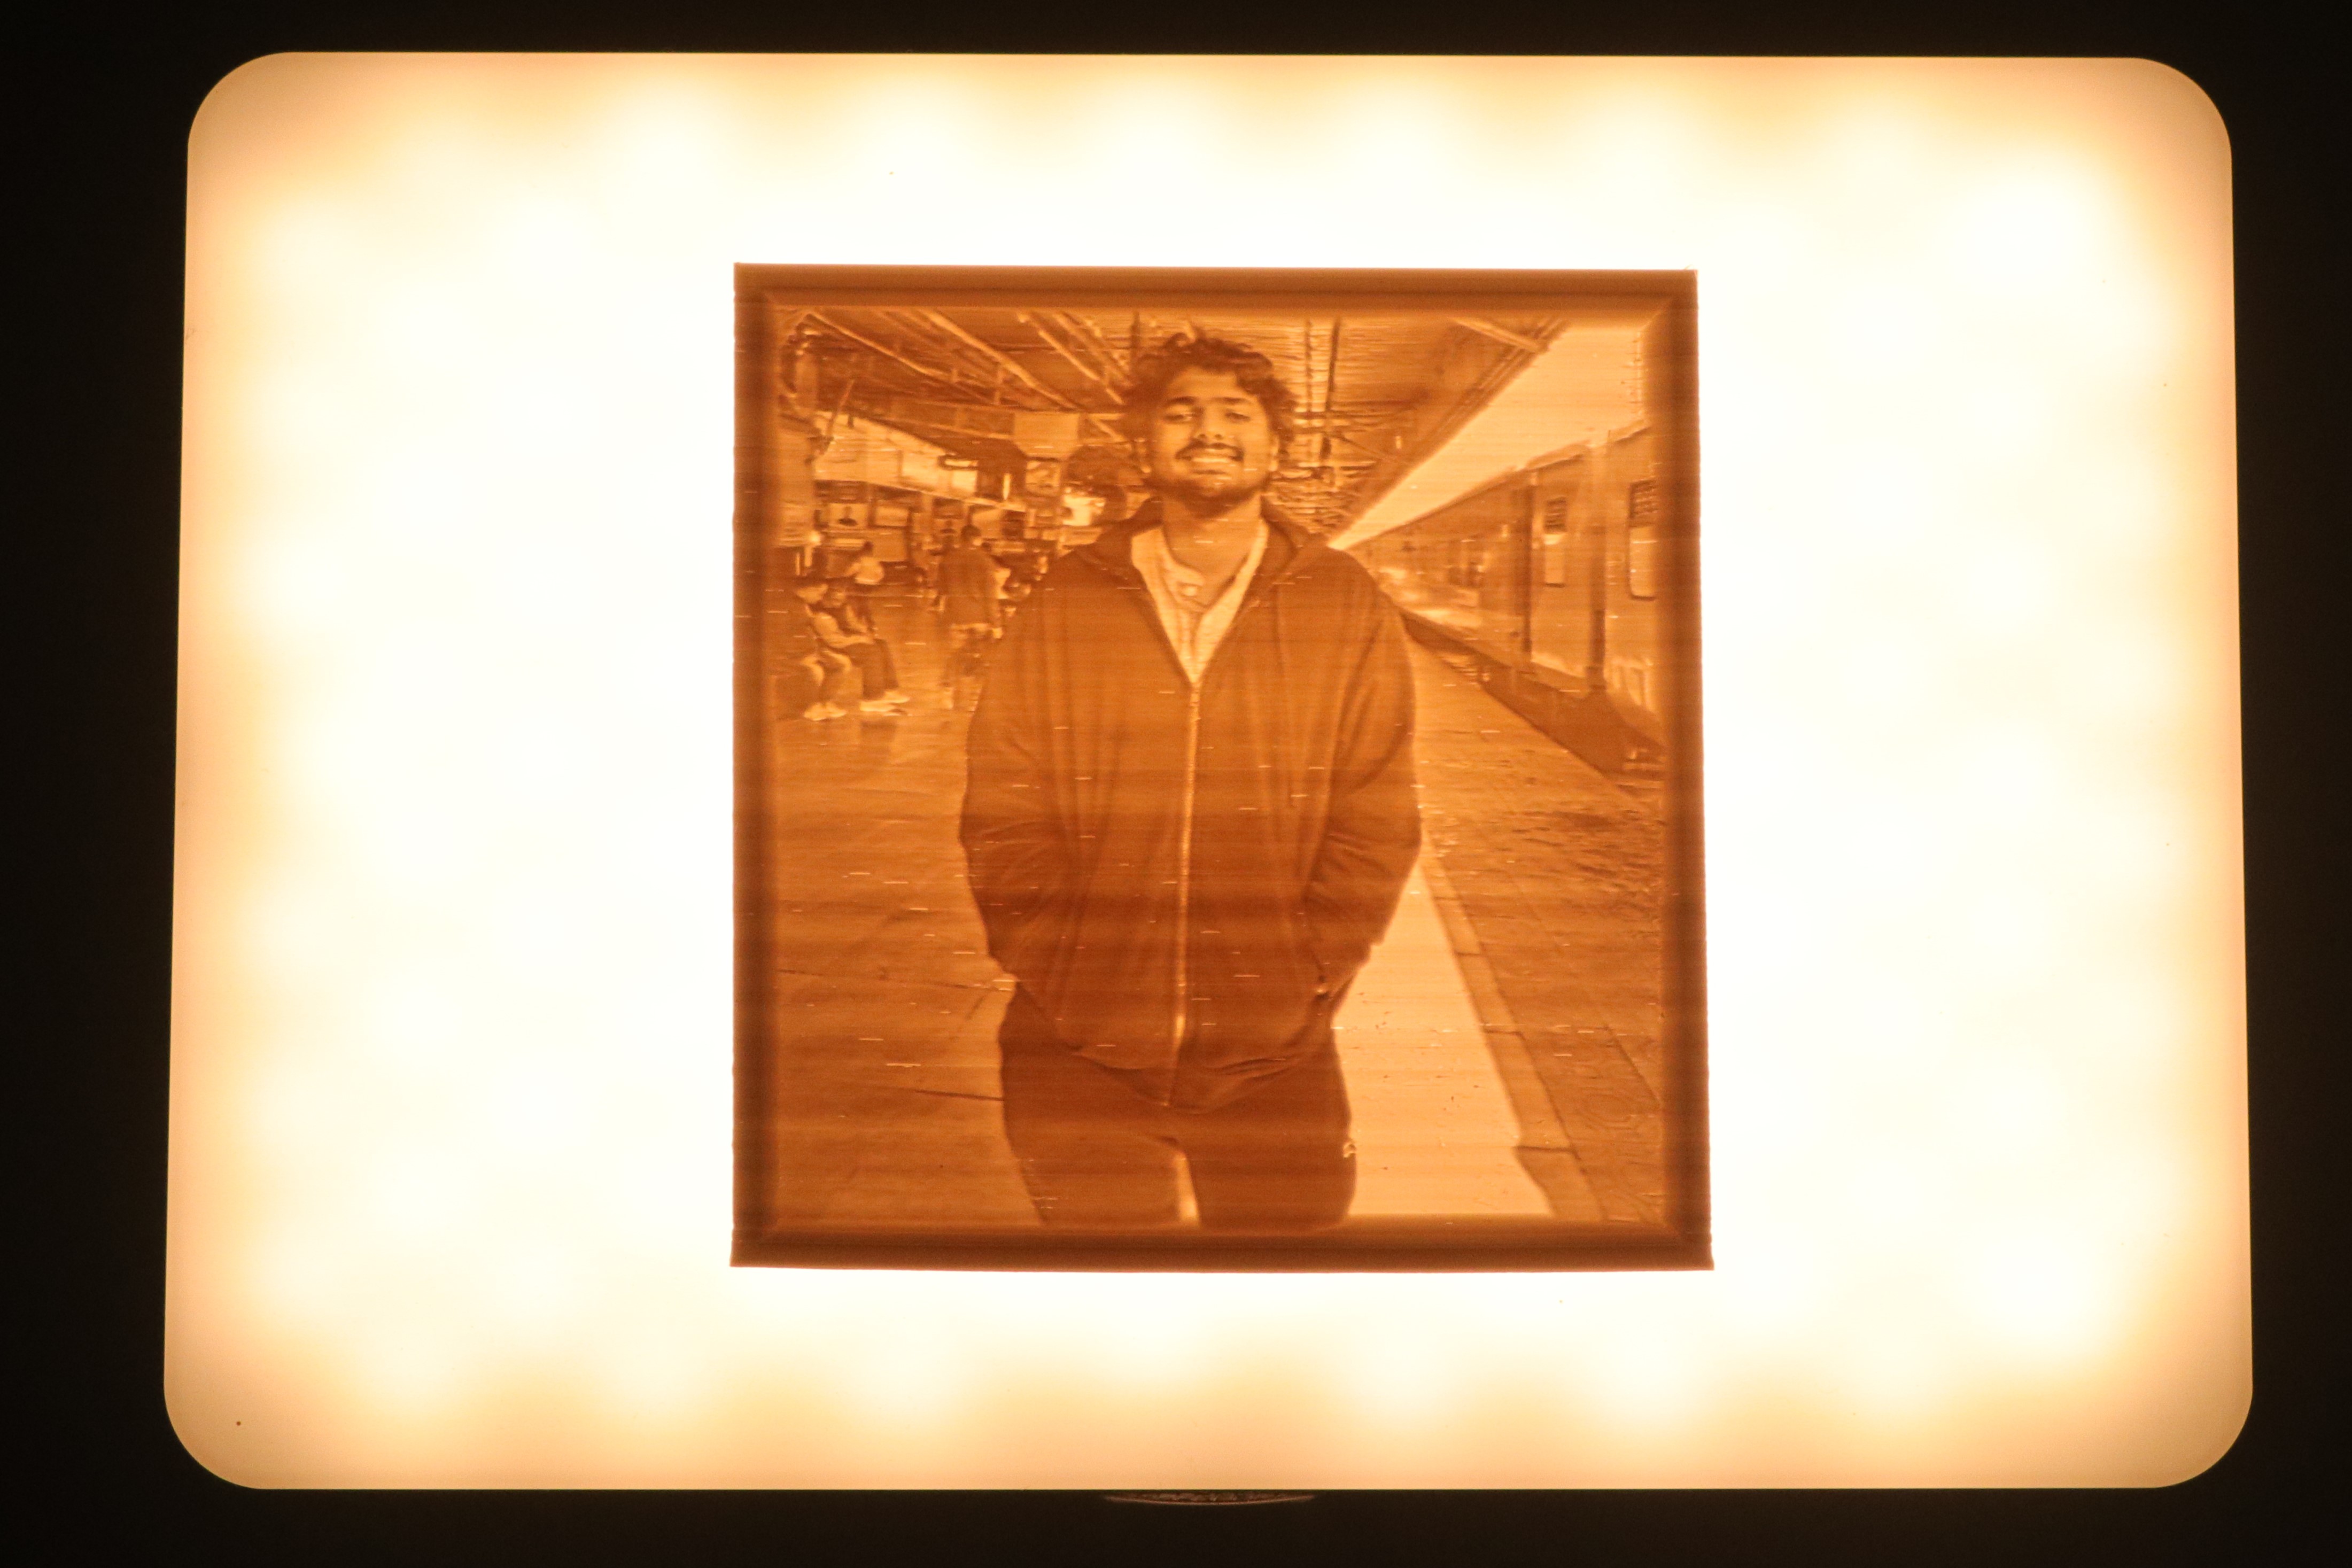
A lithophane is a translucent etching that lightens up when you shine a bright light through it. The etched work is often an art piece, event, or image that appears as soon as it’s placed in front of a light source.
In the earlier days, artisans would carve an image onto wax, make a mold out of plaster gypsum, and cast porcelain material to produce a Lithophane. This created an image with a certain depth and thickness. To simplify it, a Lithophane, at its core, is a 3D representation of a regular image.
For a lithophane, any image is simplified into a black-and-white picture. As such, the picture will contain certain darker (black) areas and lighter (white) areas. The dark portions in the image are thicker and have more depth than the whites in the picture.
When you backlight a lithophane, these thicker areas restrict the light from passing through them. While the light quickly passes through the thinner sections of the Lithophane. As a result, you get the exact representation of your original image in a Grayscale format.
3D printing only makes this process more accurate and interesting and results in better quality Lithophanes that are easier to produce. Let’s understand the benefits of 3D printing a lithophane.
Why 3D Print Lithophane?
 Photo CourtesyAlphamusPrime via Reddit
3D printing a lithophane yields better quality, crisp-looking, and highly detailed lithophanes that are challenging to achieve via other methods. Additionally, it’s highly flexible and allows you to finely control the outcome of your lithophane image.
As mentioned earlier, the original process of producing a lithophane was laborious, involved multiple manufacturing techniques, and needed highly skilled artisans. The porcelain material was also a limiting factor in determining the quality and complexity of the lithophanes.
3D printing solves all these issues by automating the manufacturing process of creating a lithophane. The fine detailing required for high-quality lithophanes is more accessible via 3D printing, along with the flexibility in material and color choices.
Furthermore, you can 3D print lithophanes using FDM and resin 3D printing techniques. With FDM, you can have a bigger size and easier post-processing. At the same time, resin 3D printing results in better quality and clean-looking lithophanes than FDM ones. Let’s understand the difference between the FDM vs. Resin lithophanes in detail.
FDM or Resin Lithophane: Which Is Better?
FDM and Resin 3D printing each have their own sets of pros and cons when it comes to 3D printing lithophanes. In this section, we’ll evaluate these two techniques on some essential criteria, helping you choose the one that suits your needs better.
Print Quality
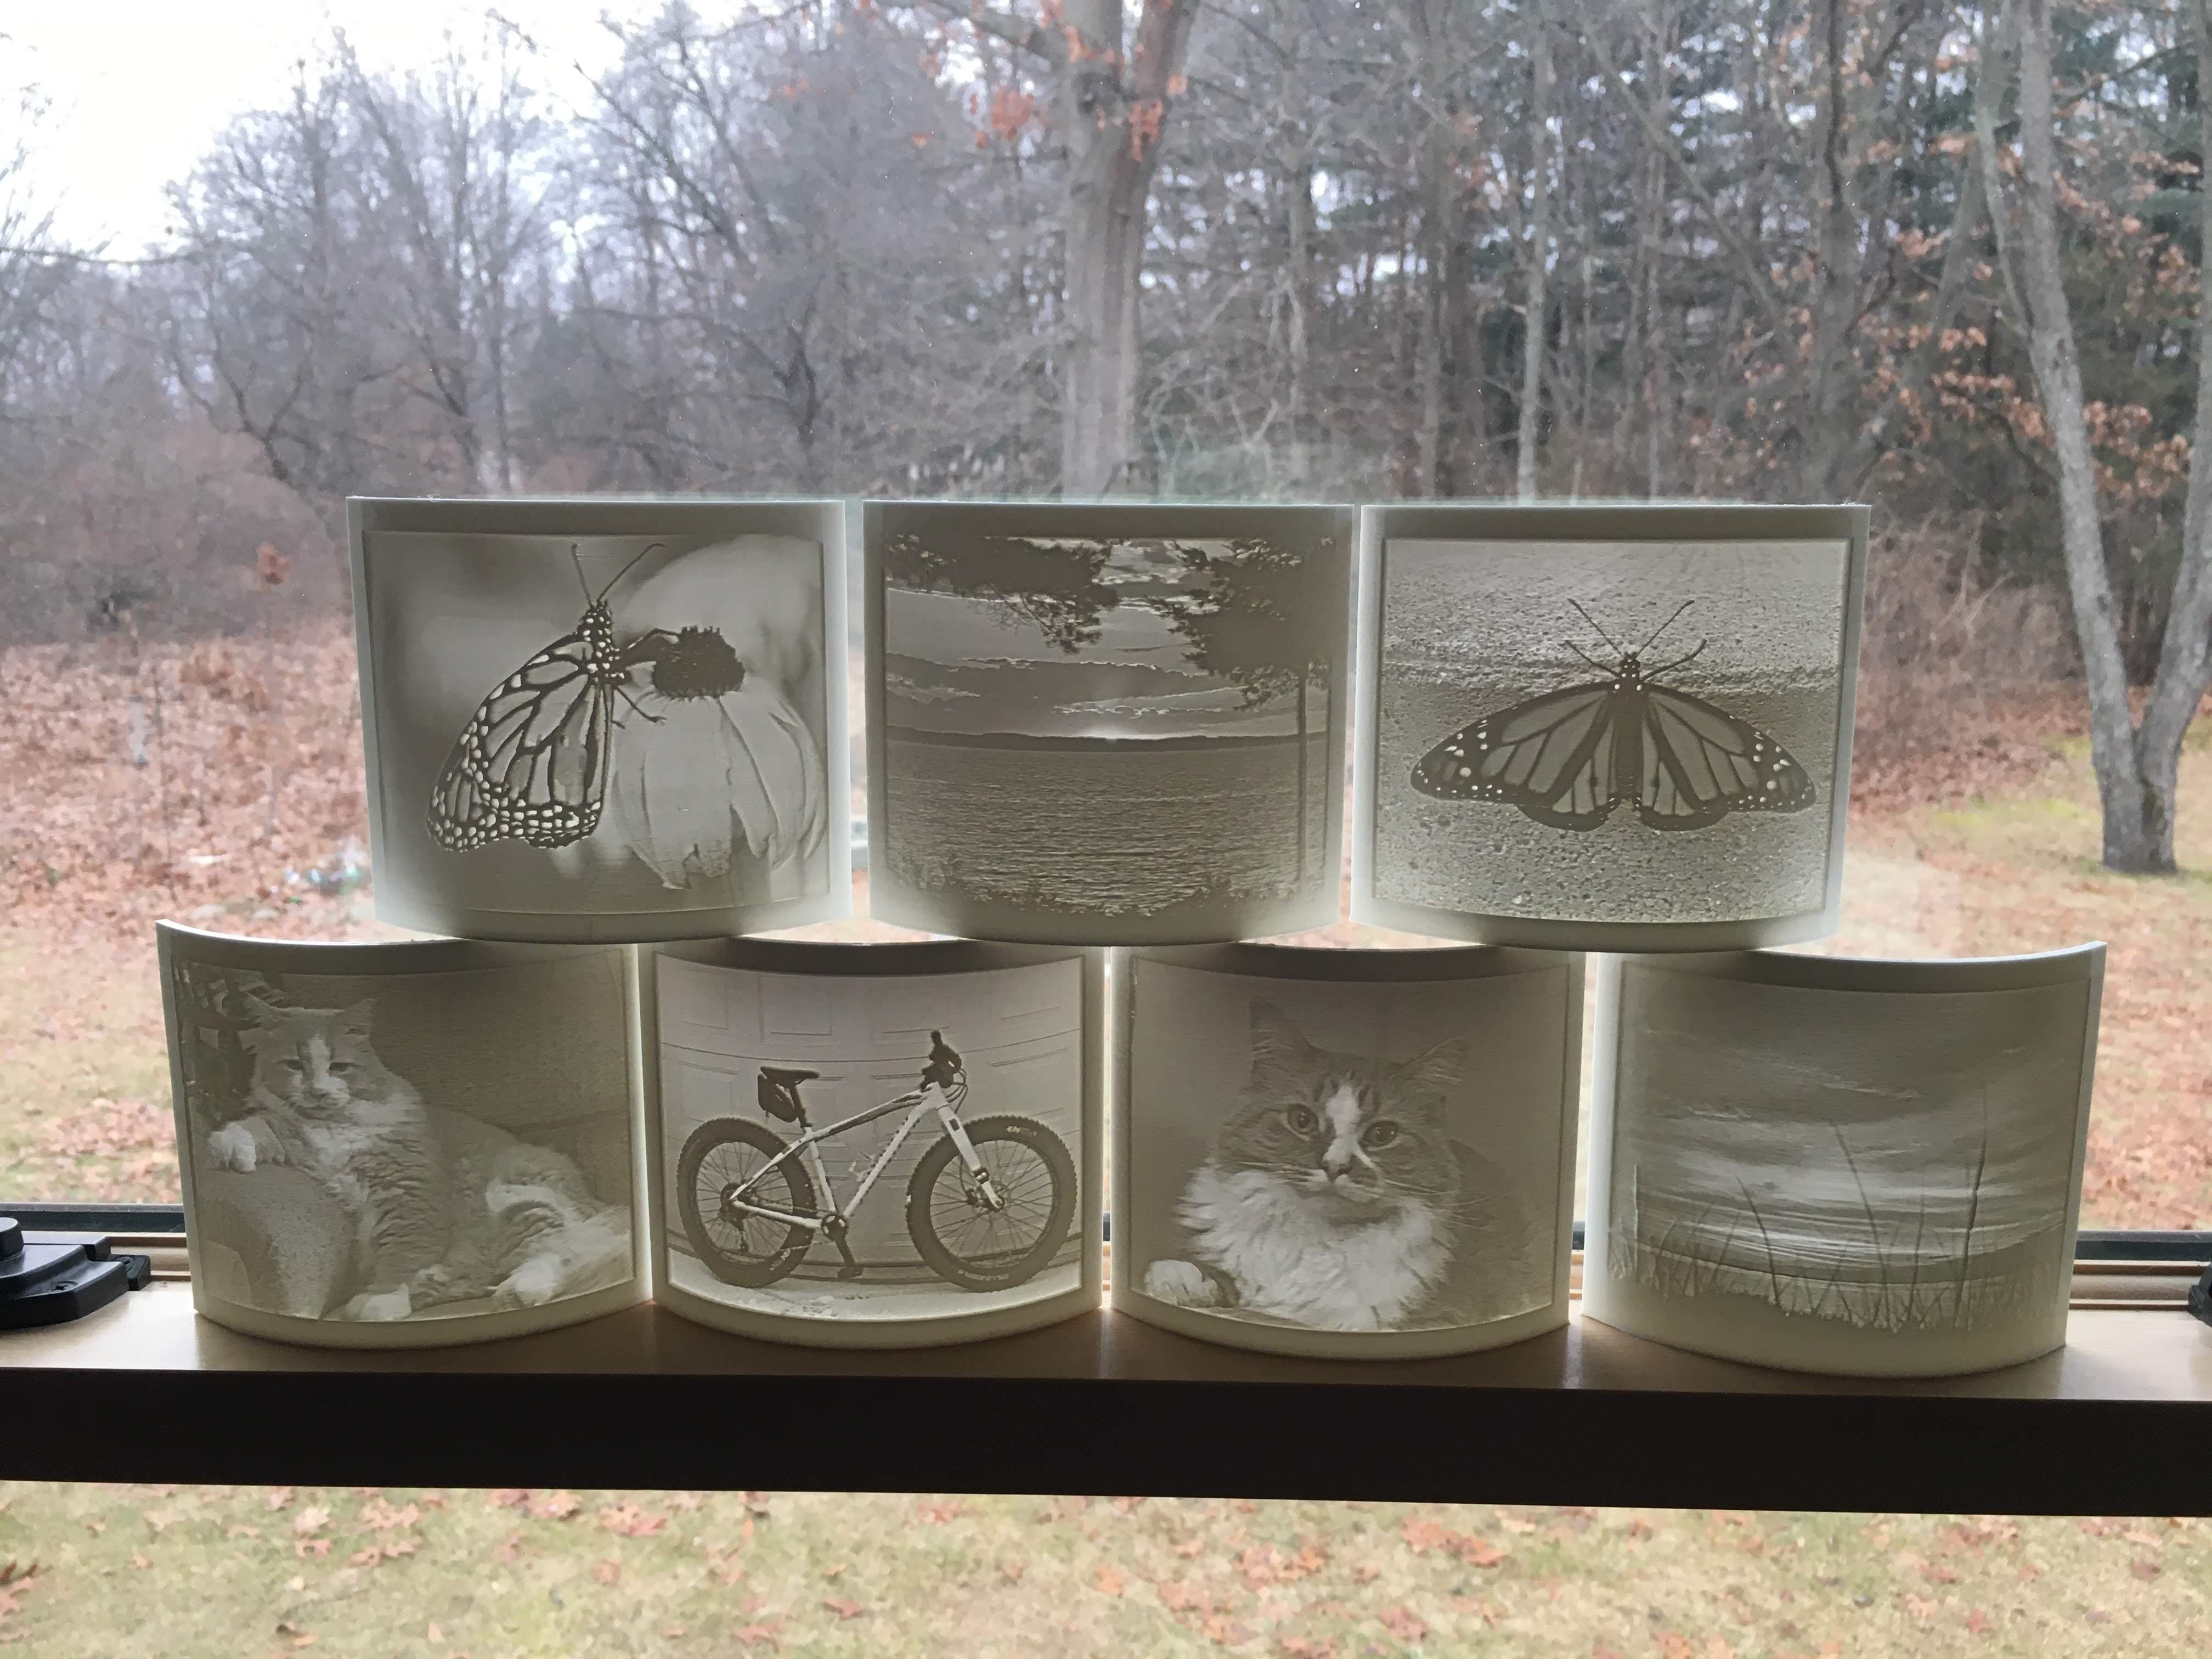 Photo CourtesySalimonyous via Reddit
Resin 3D printers are well known for excellent output quality and highly detailed prints. 3D printed resin lithophanes, too, benefit from the quality of resin printing. The lack of printer movements and a higher resolution produce crisp images on lithophanes. The print quality you can get from a budget resin printer will rival even the high-end FDM 3D printers.
The print quality on FDM 3D printers is pretty decent. The print parameters are relatively easier to understand than the resin settings. Once you dial in your 3D printer and fine-tune the slicing settings, you can yield a comparable print quality to resin printers.
However, in terms of the sheer print quality of Lithophanes, resin printing has a clear edge over FDM 3D printers.
Lithophane Orientation
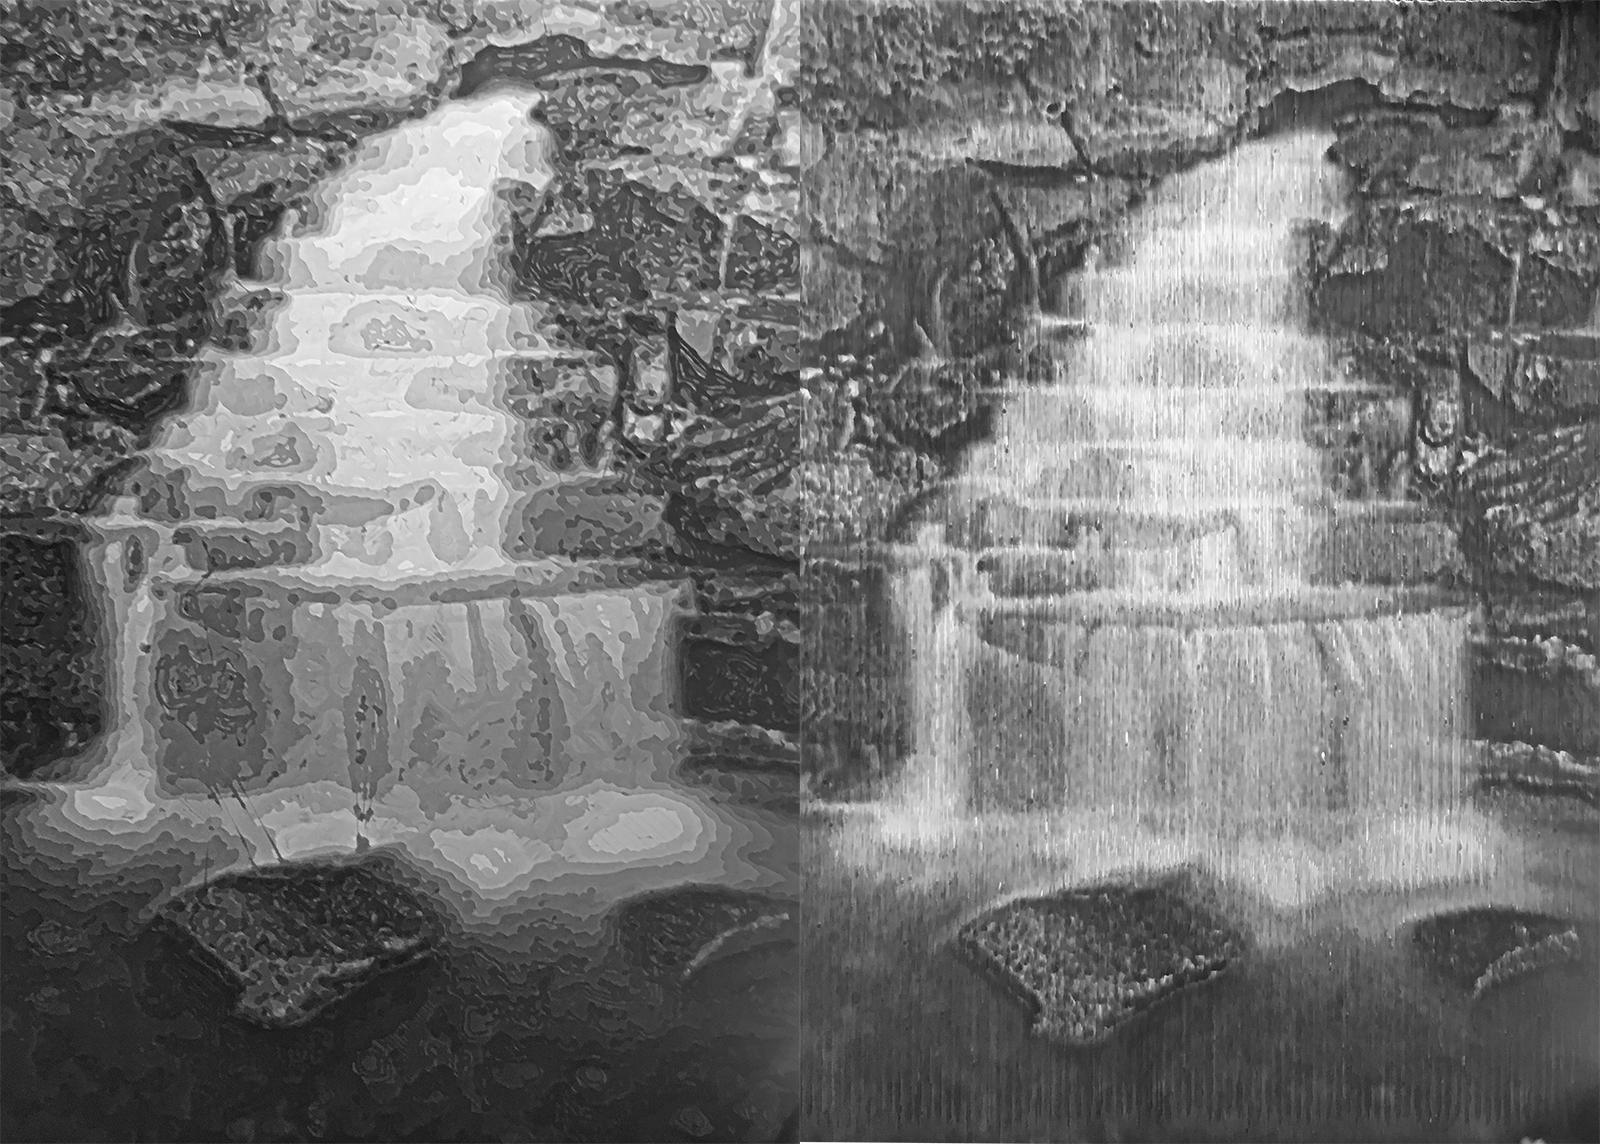 Photo CourtesyB_Huij via Reddit
Due to the lack of moving parts and how the resin printers work, you have multiple orientation options available. You can either print your Lithophane horizontally and flat on the build plate. Or you can orient your lithophane vertically on the build platform.
In either case, the print quality remains unaffected, but the printing time reduces significantly. You can see the results posted by the user nur00 in his Reddit post. By laying the Lithophane flat on the build platform, he was able to 3D print it in under 15 minutes without sacrificing the print quality.
These results would be challenging to achieve on an FDM 3D printer. In horizontal orientation, the layer height affects the quality of lithophanes, and you can see ridge-like structures if you lay the print flat on the bed. Therefore, FDM 3D printing outputs better print quality when the lithophanes are printed vertically, perpendicular to the print bed.
You can notice the difference in print quality in this Reddit post by Acidanthris. The vertical Lithophane has better details, looks cleaner, and has a better print quality overall than the horizontal one.
Printing Time
The lack of moving parts in a resin 3D printer leads to faster print times for your models. Furthermore, the printing time in resin printing is based on the print height, not the model quantity. As a result, you can 3D print a bunch of similar-sized lithophanes together. The print time per Lithophane will be significantly less than that of an FDM 3D printer.
In comparison, lithophanes take longer to print with FDM printing. To get better print quality, you need to slow down the print speeds and accelerations. And unlike resin printers, each Lithophane on the build plate adds to the overall print time of the entire printing process.
Longer print times and the inability to scale efficiently make printing lithophanes on an FDM 3D printer impracticable. Therefore, resin 3D printing is better suited for large quantities of lithophanes at once.
Post-processing
Resin printing involves significant post-processing after the printing process. You need to drain the resin from the model, clean it with IPA solution and cure the resin print with UV light. Moreover, the consumables needed during the post-processing add to the overall print costs and increase the expenditure on your prints.
In contrast, FDM 3D prints are almost ready to go once the printing process is completed. With lithophanes, there’s no need to remove any supports or clean strings, and you can directly use the finished piece as soon as it's done printing. It simplifies the user experience while keeping the post-processing costs low.
To sum it up, if print quality and time are of utmost importance to you, and you’re alright with the post-processing involved, resin printing better suits for 3D printing your lithophanes.
Whereas, if you’re okay with taking the time to fine-tune your print quality and want to keep your printing costs within limits, FDM 3D printers will be a better choice for your needs.
Now that we understand the basics of 3D printing lithophanes let’s look at the various tools and techniques you can use to 3D print them.
3D Printing Lithophane Tools
The growing popularity of 3D-printed lithophanes has also given rise to several image converter tools. These tools let you quickly prepare a lithophane from the image of your choice and download the final STL model for free.
These tools allow you to customize your image parameters, lithophane size, and shape and add frames if you want to. Let’s go over each tool and understand how you can use them to 3D print some of the best-looking lithophanes on your printer.
3dp.rocks
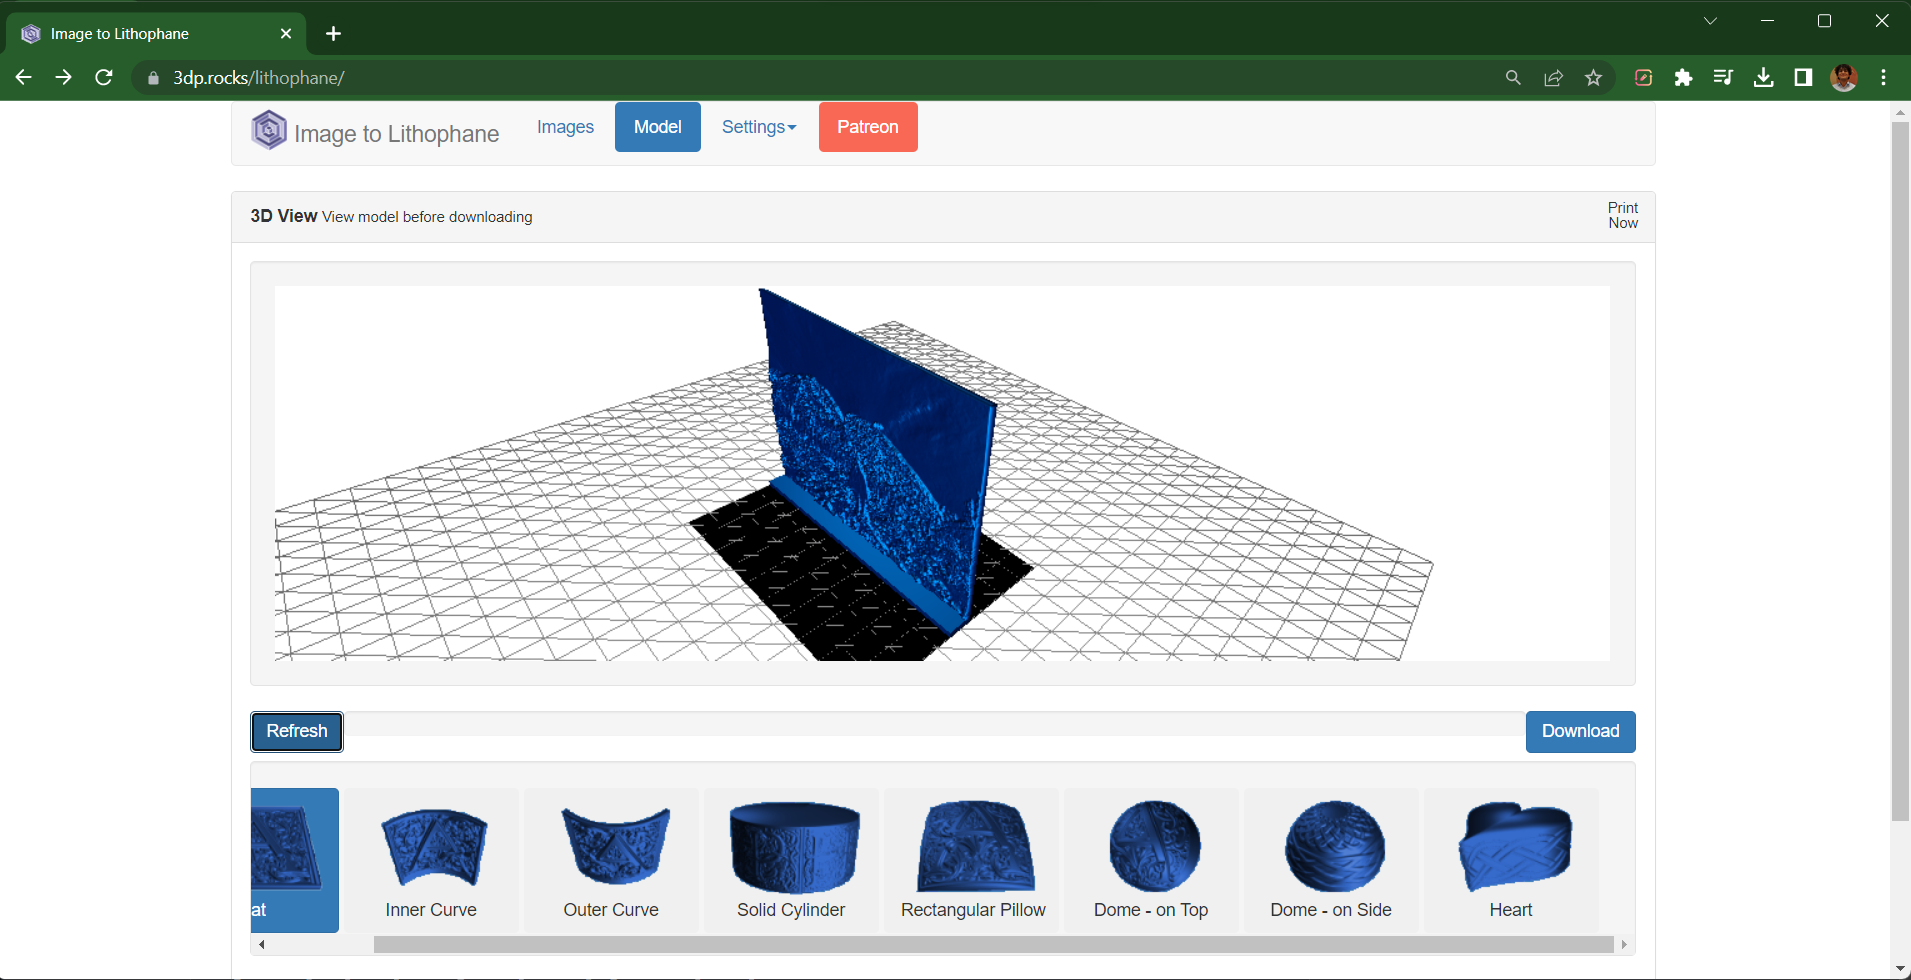
3dprocks is one of the most simple yet powerful lithophane tools. It was created around 2015 by Mark Durbin as a pet project to convert 2D images into 3D models. To date, it remains a well-known tool for creating lithophanes owing to its neatly laid out user interface and ease of use.
Mark has ensured that you can easily navigate the various features of this tool and configure the lithophane parameters with minimal hassle. The entire user experience of the 3dprocks website makes it well-suited for beginners and professionals alike.
You can choose from eight different shapes and designs, with further customization available for each design. You can set the dimensions of your Lithophane, adjust its resolution, add borders to your 3D model and even add a solid base to your lithophanes.
There are limited options available to customize your image parameters. So, you will need to source a high-quality image for a detailed lithophane. While it limits you from enhancing your image quality, the lack of extra options helps to keep the overall tool simple and fluff-free.
The 3dprocks is excellent if you’re printing lithophanes for the first time and personal use. The simple design, good process flow, and ease of use keep things smooth while helping you get excellent-looking lithophanes within minutes.
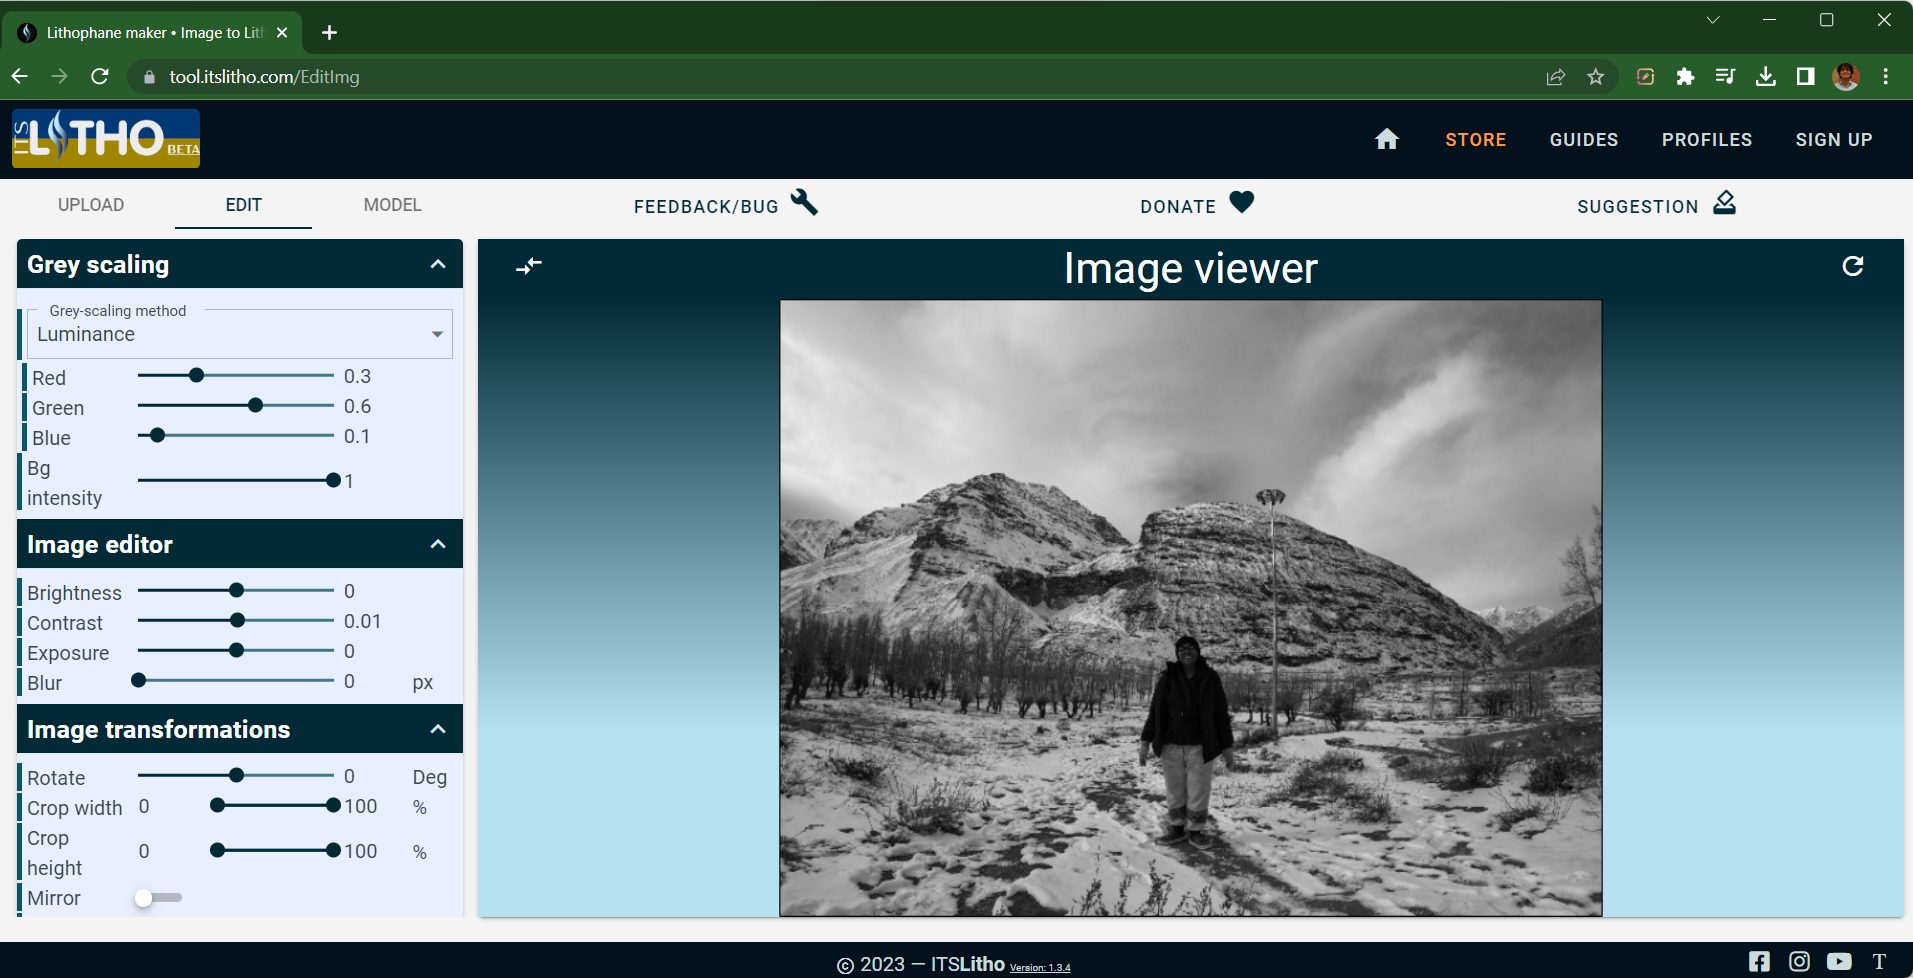
ItsLitho
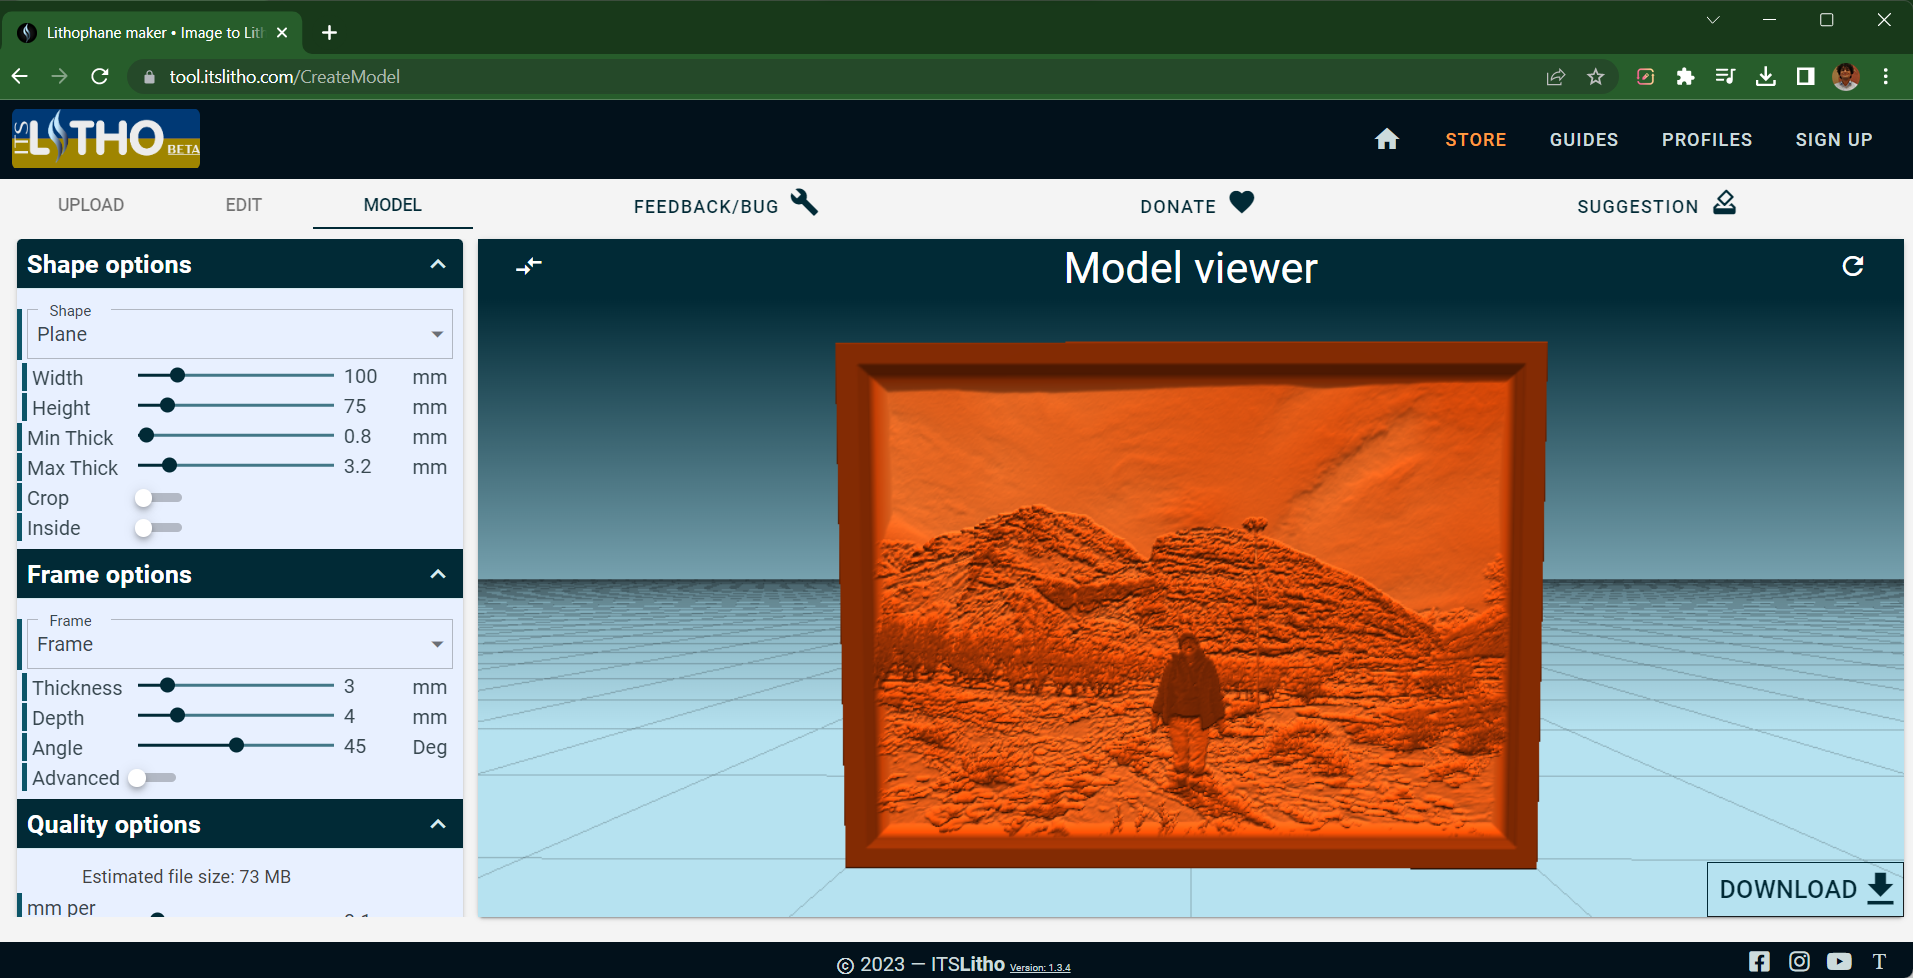
ItsLitho tool is an extremely well-designed and polished image-to-lithophane converter tool available currently. The website has a great user interface, and converting an image to Lithophane is smooth and intuitive.
The tool is mainly divided into two sections - Image and 3D Model. Once you upload your chosen image on the ItsLitho website, you can access these tools right within the design environment.
For example, in the image editing section, you can enhance your image to better suit the printing needs of a lithophane. You can adjust the image contrast, brightness, exposure, and size per your needs. The gray scaling options, too, give you better control over the black-and-white areas of your model, letting you finely tune the image quality.
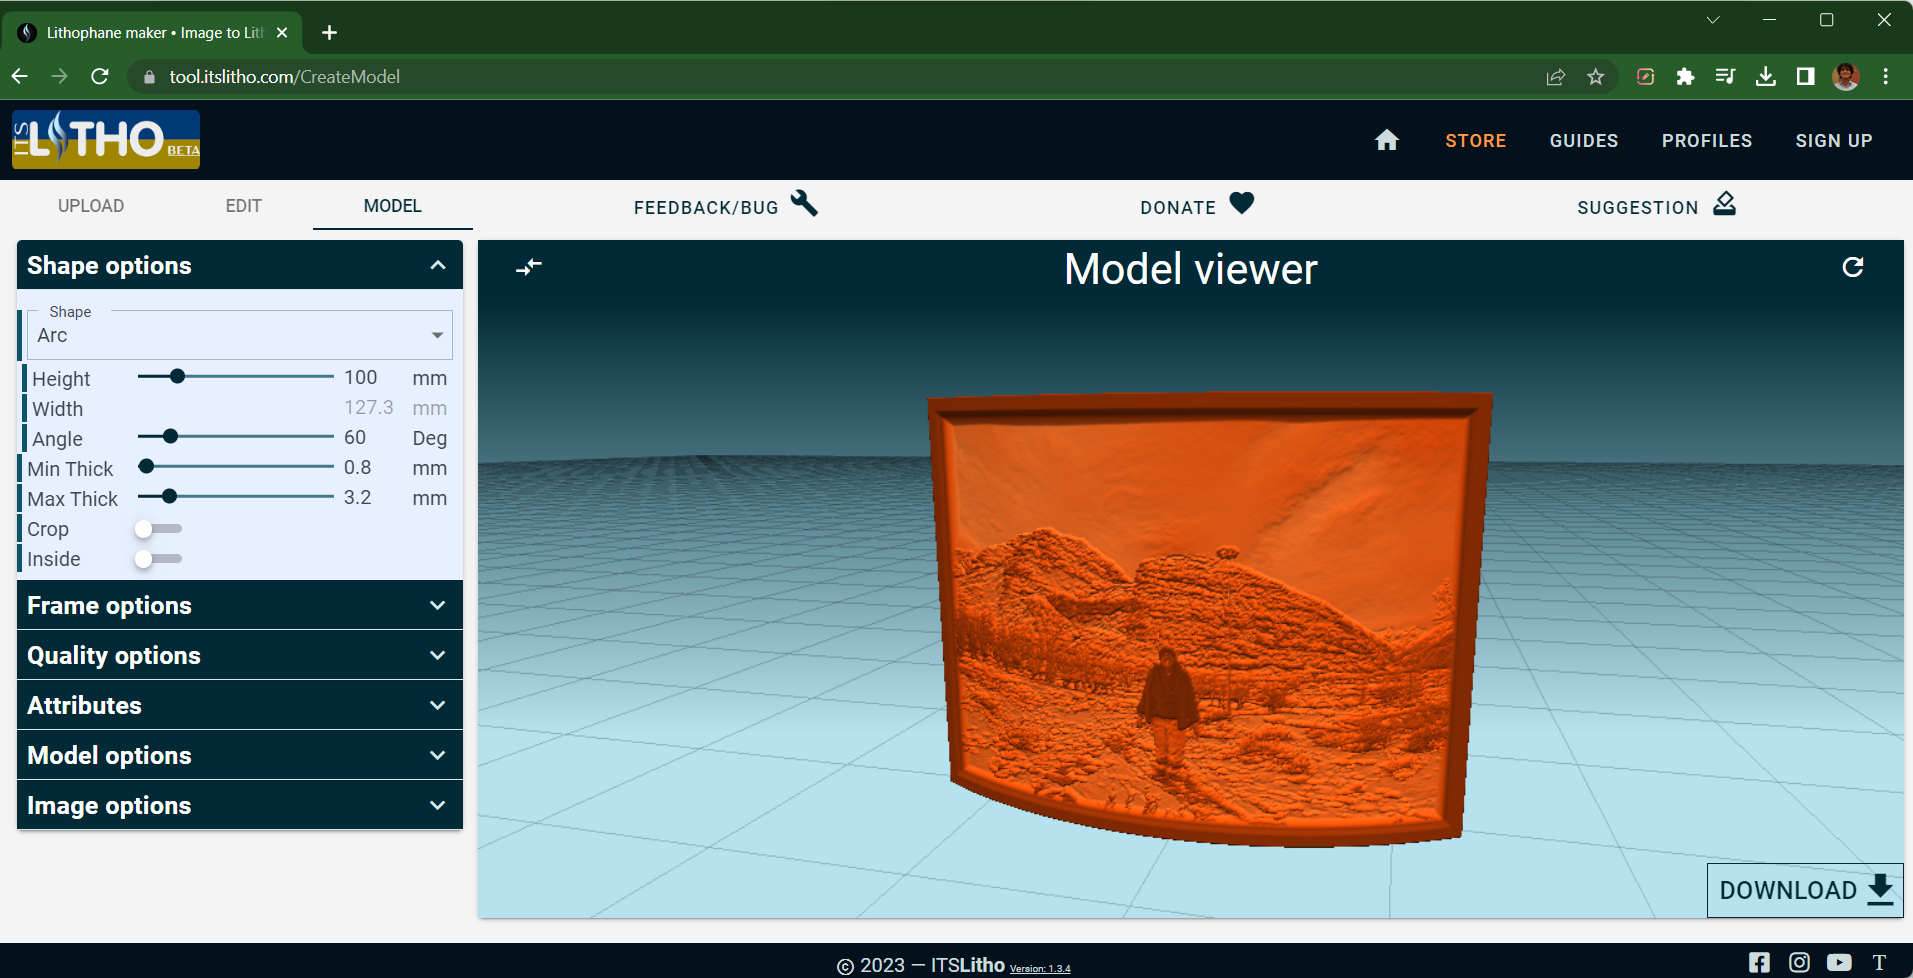
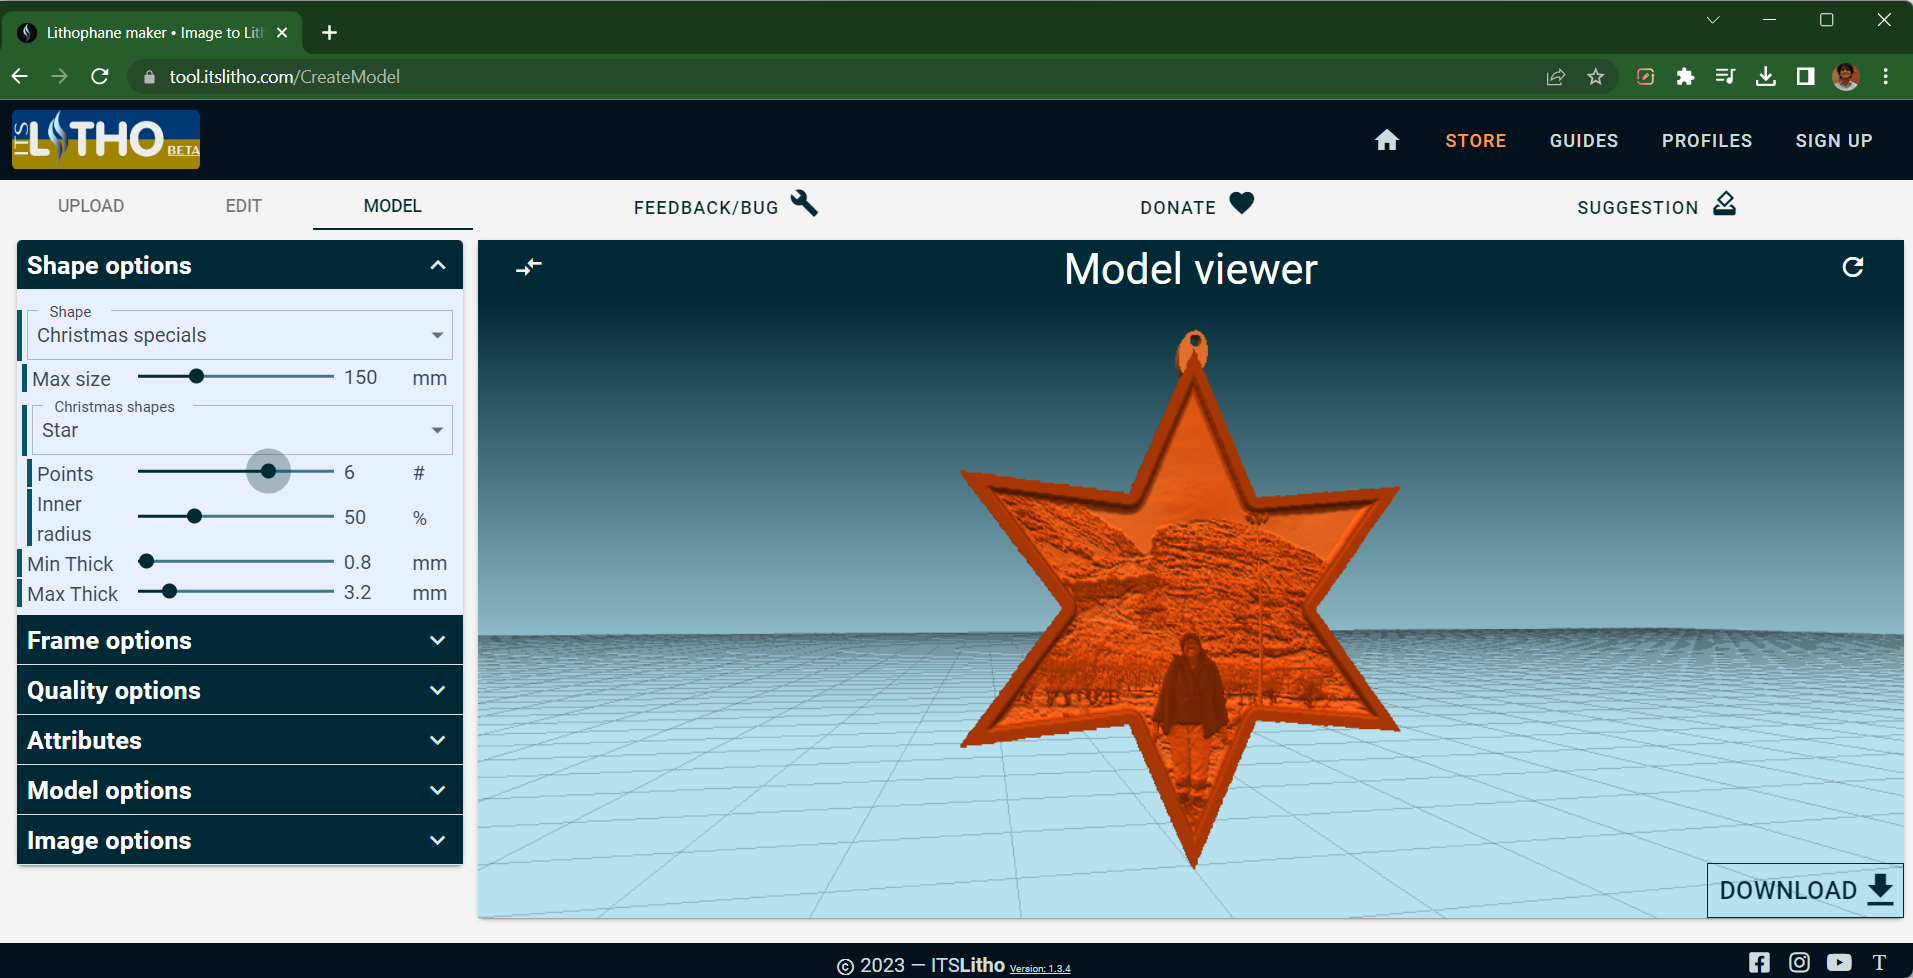
In the model section, you can choose from ten different shapes for your lithophanes. You can customize these shapes, add frames to your models and control the quality of your 3D-printed Lithophane.
One unique aspect of ItsLitho is its attributes which make your lithophanes ready to use. Depending upon your lighting method, ItsLitho lets you customize the mounting options for your Lithophanes and adds the mounts to your model accordingly. This feature makes it easy to display your Lithophanes and gives the tool an edge over other options.
All-in-all, ItsLitho makes the process of creating professional-looking lithophanes a breeze. The ability to customize minute details is combined well with the simplicity of use.
Lithophane Maker
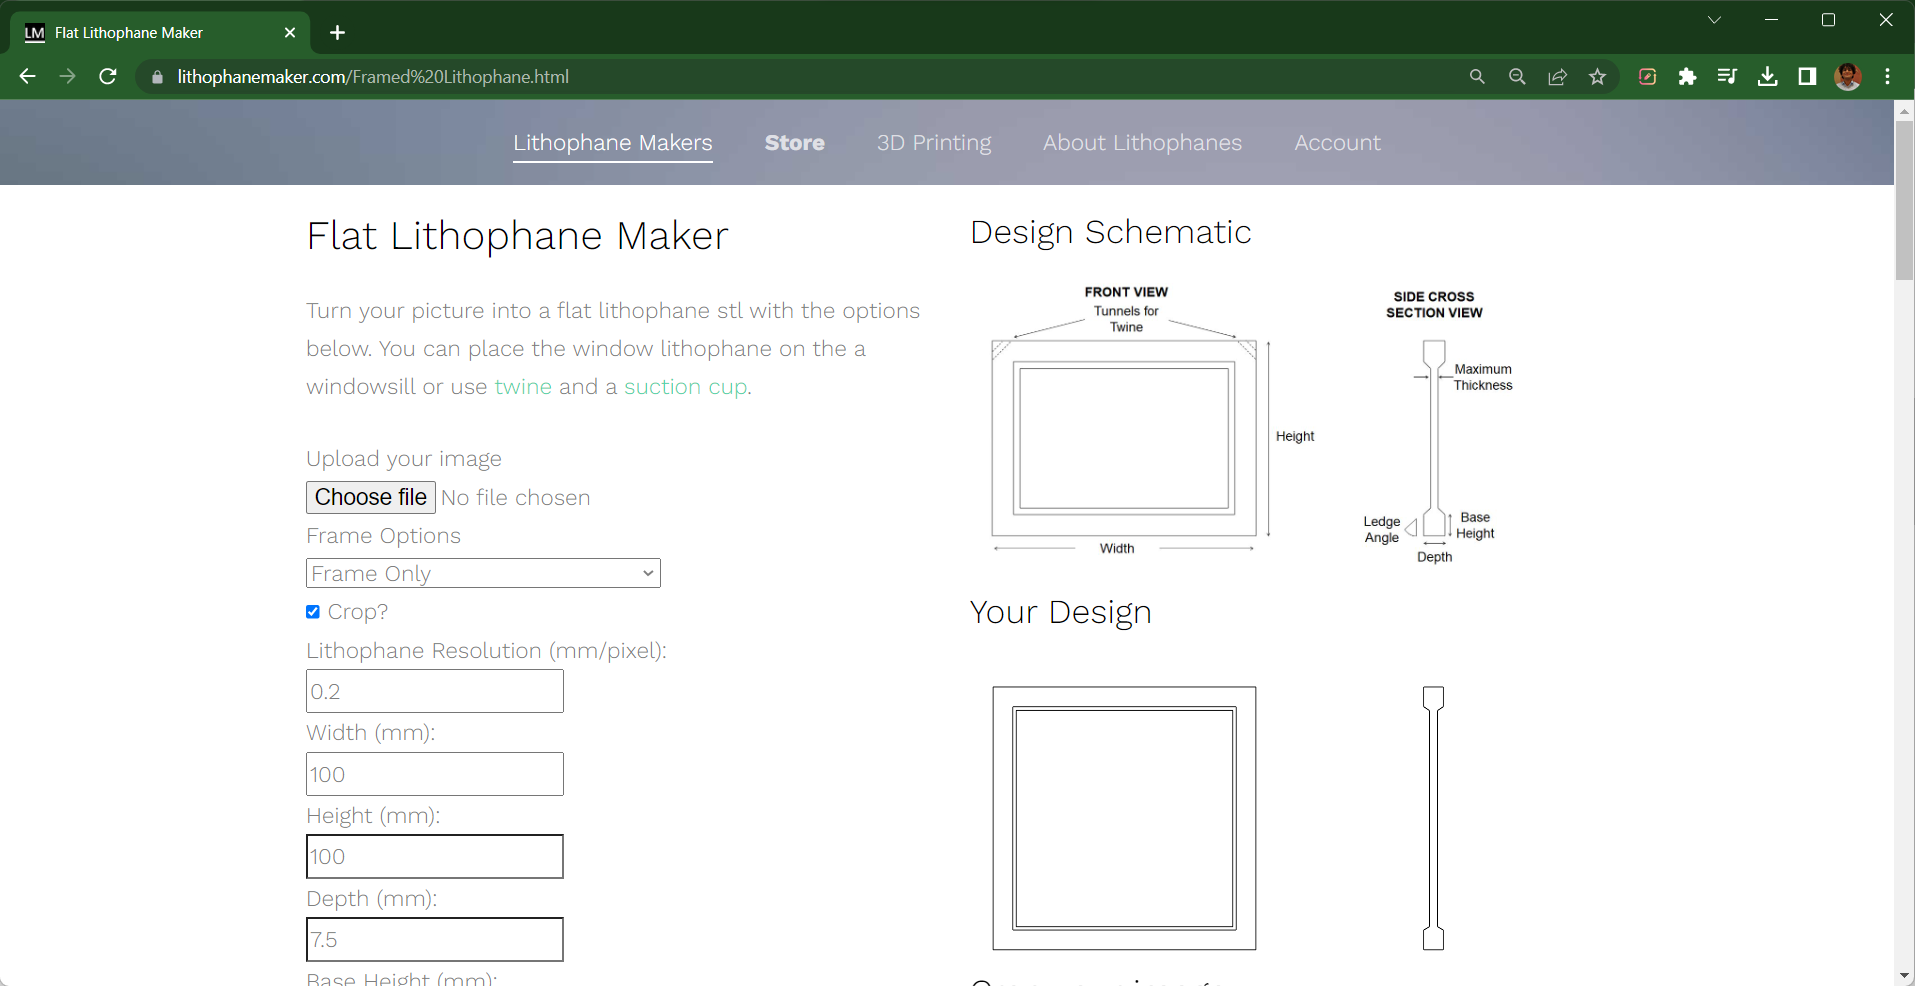
Lastly, we have the Lithophane Maker tool, which sits between the 3dprocks and ItsLitho tools. It retains the ease of use of 3dprocks but gives you plenty of design options like ItsLitho.
The home page greets you with a list of multiple lithophane designs. Once you choose the one you wish to print, you’re taken to a separate window where you can customize your Lithophane’s settings.
Lithophane Maker keeps the model customization options limited to the basics. You can set the resolution and dimensions and add different frames to your lithophanes. It also does a decent job of helping you visualize the appearance of your finished Lithophane model.
However, there’s no live preview of your Lithophane print like in other tools. It takes away from the user experience and doesn’t give you a clear idea of your final output. Lithophane Maker also has almost no image editing options, and you’re stuck with the image quality you input into the tool.
As a whole, Lithophane Maker keeps things as basic as possible. But these basics take away from the tool's utility, and it feels pretty limiting if you want to customize your lithophanes.
Nonetheless, for quick generation of lithophane lamps, and boxes, Lithophane is a great tool that does not compromise the quality of your STL files. It’s great for beginners and users looking for a minimalistic tool to convert their images into 3D models.
How to 3D Print a Lithophane?
We’ve looked at the various tools you can use to prepare your STL files. Each image converter tool uses a similar workflow, albeit with some differences. This section aims to give you a brief overview of the Lithophane printing process without diving too much into the details.
It’ll help you get an idea of using the tools and creating a lithophane without overwhelming you with the technicalities.
Step 1: Image Preparation
It would be helpful to have a high-resolution image with plenty of contrast. As lithophanes work by modulating the thickness between a dark and lighter area, an image with high contrast will give you the best results possible.
3dprocks and Lithophane Maker do not allow you to customize your image parameters on the website. Therefore, you must prepare your image and ensure it’s well-suited for your purpose.
ItsLitho gives you plenty of options to customize your image parameters within the work area. The live preview also helps you to quickly visualize your changes and prepare an image that will give you the best results.
Once you’ve finalized your image details, the next step is preparing your STL.
###Step 2: Model Settings
Each lithophane tool, apart from its unique capabilities, shares specific design parameters that determine the final quality of your lithophanes. Understanding these model parameters will help you 3D print high-quality 3D images and give you an insight into the various settings that need to be looked out for a while preparing your lithophane models.
Lithophane Shape
Every tool allows you to customize the design and shape of your Lithophane. The common ones are flat, curved, and spherical lithophanes. While other shapes, like the heart ones, come in different designs for every tool.
Some designs, like the spherical and curved shapes, are great for lamps and night lights. In contrast, flat lithophanes are more straightforward and can be printed and stacked easily.
Before deciding on the Lithophane’s shape, it would be best if you finalized the purpose and application of your final print. It’ll help you choose a shape better suited for your purpose and design the Lithophane accordingly.
Resolution
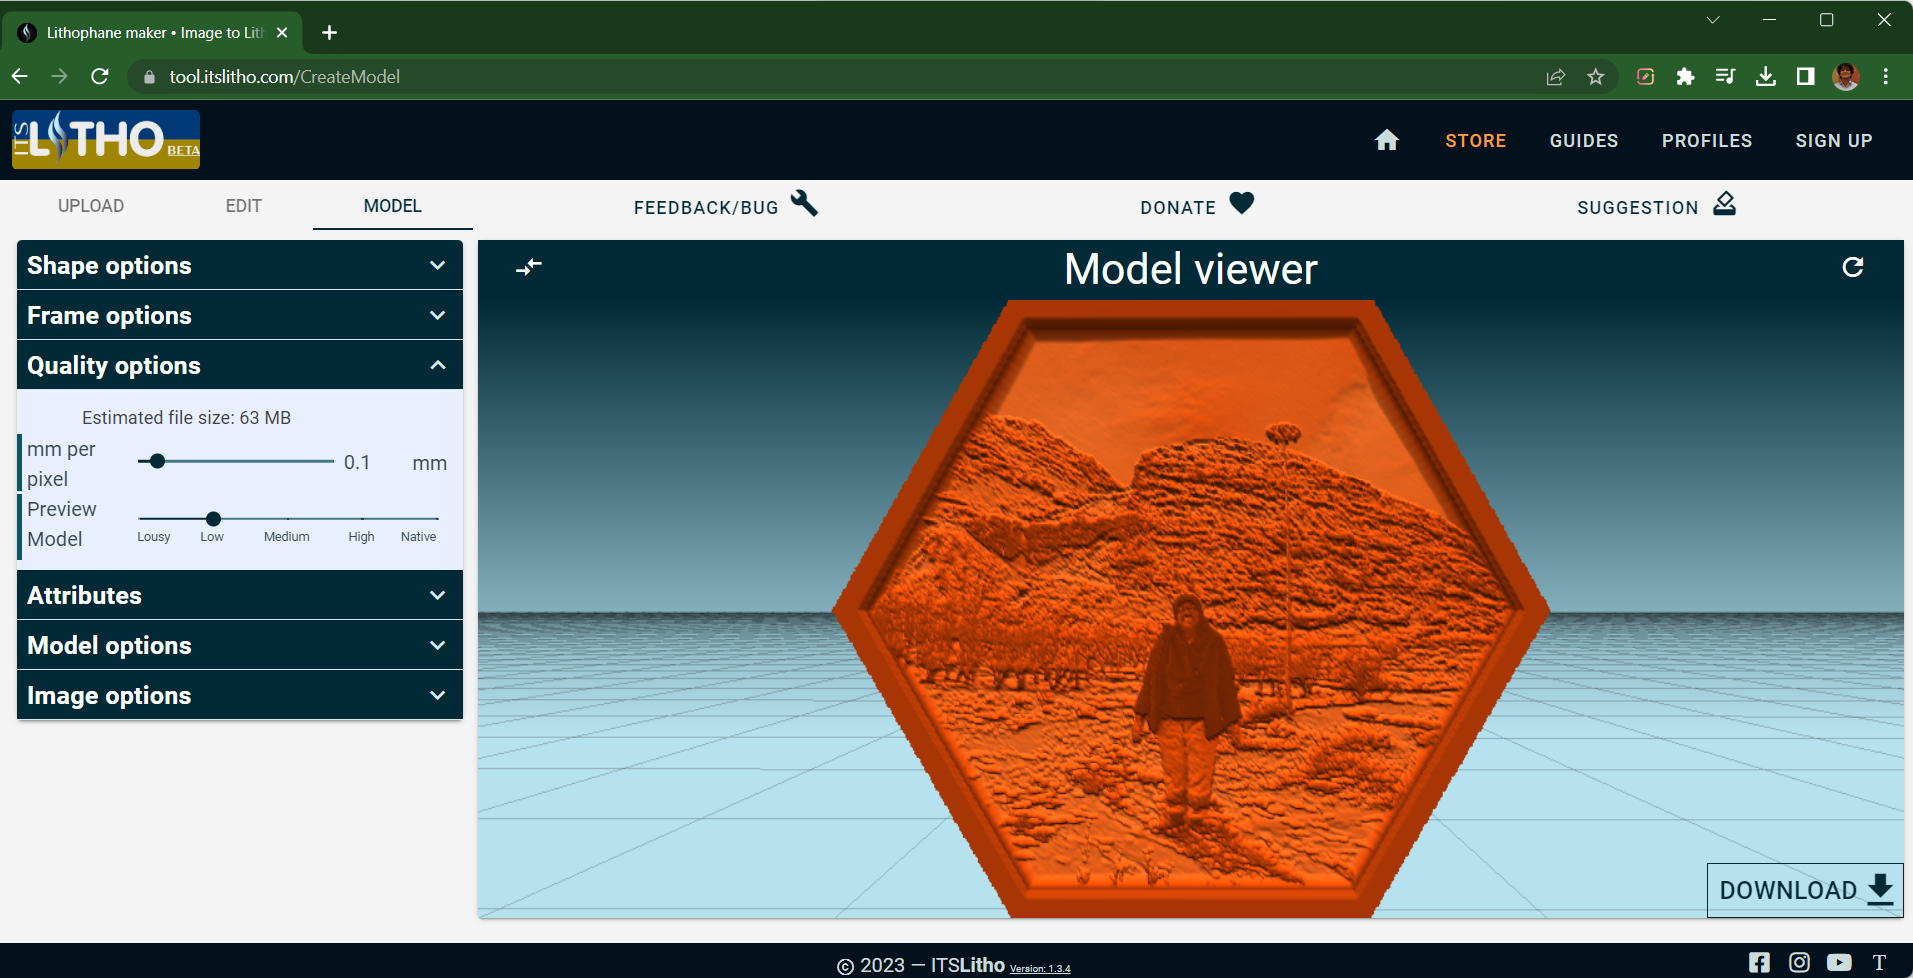
Resolution is a critical factor that affects the print quality of your lithophanes. It decides the resolution of the vectors in your STL file based on the pixels in your images.
For example, in 3dprocks, you can customize the number of vectors per pixel. This parameter decides the number of 3D points you want for each pixel. The higher this value, the more will be the 3D points, thus resulting in better quality lithophanes.
ItsLitho and Lithophane maker use a slightly different method. These tools let you control the distance between each pixel in your image. A 0.1 mm/pixel value will result in better print quality than a 0.3 mm/pixel distance.
In most cases, a 0.1 or 0.2 mm/pixel value yields good enough results without increasing your file size and slicing difficulty.
Note: Increasing the resolution of your lithophanes increases their STL file size and the slicing time. Some tools have a limit on the maximum file size to prevent crashing your browser.
Lithophane Frame
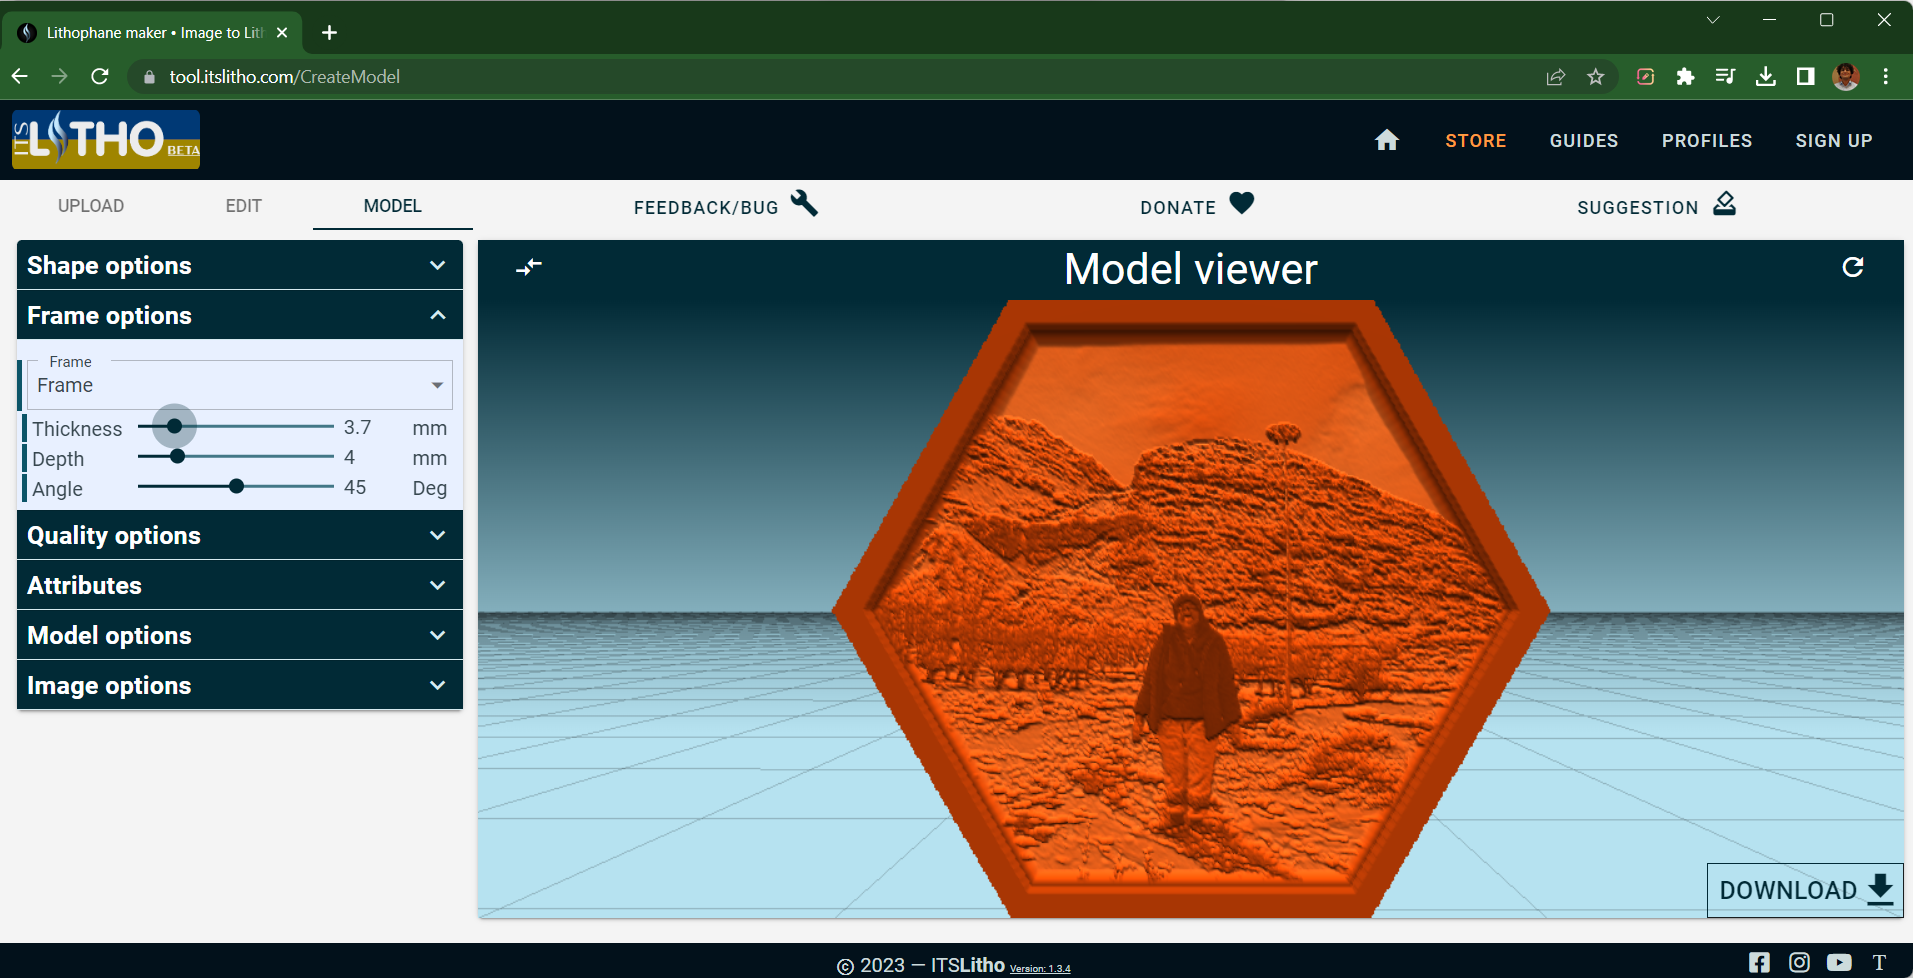
Framing your lithophane images gives them a clean look and adds finesse to your prints. The bottom frame also acts as a base for the Lithophane during the printing process, further helping with the bed adhesion process.
You can customize the thickness, size, and angle of your lithophane frame, along with its overhang angle. Keeping the overhang angle below 45° will prevent filament drooling and eliminate the need for supports.
Minimum and Maximum Thickness
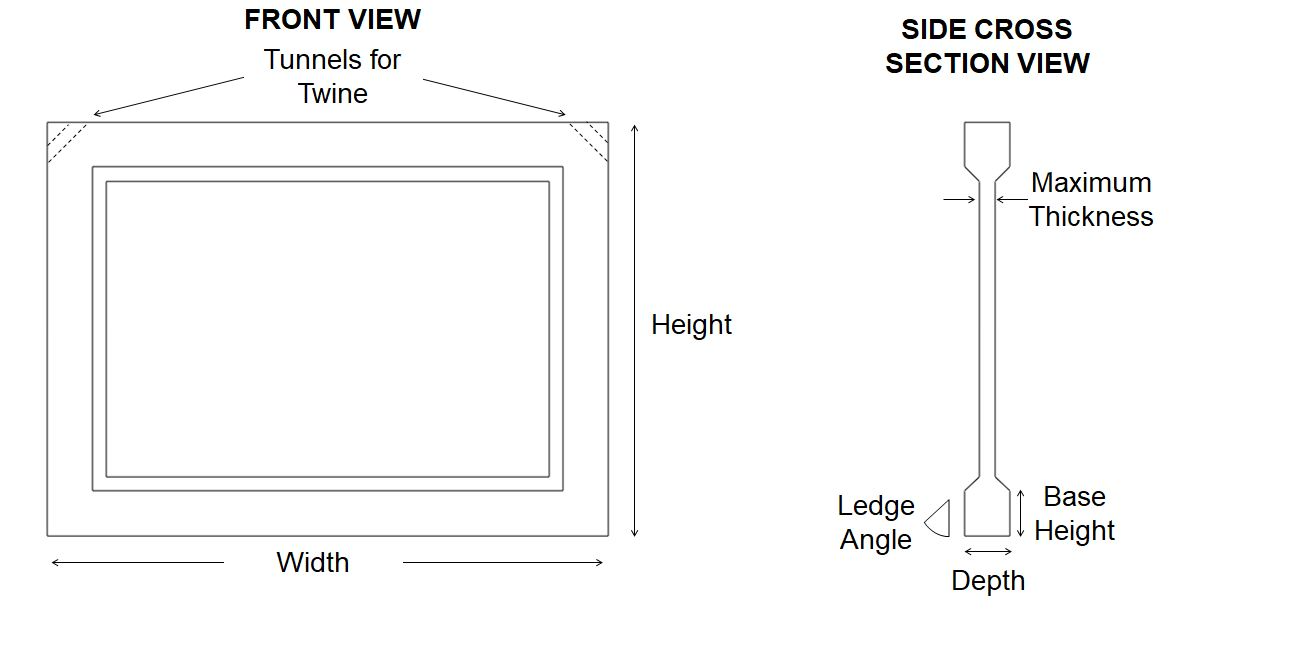 Photo CourtesyLithophane Maker
These parameters decide the amount of light that will pass through your Lithophane. It’s crucial to ensure you have dialed in the thickness settings for your filament to produce lithophanes having a good contrast.
If you set the minimum thickness too low, more light will pass through the lighter areas in your image. Whereas, if you set it too high, the contrast might not be good enough with the darker sections.
Similarly, if you have a high maximum thickness value, the dark areas in your image might appear too black and won’t let enough light pass through them. Furthermore, if you set the maximum thickness too high, your model will have overhang areas leading to filament-drooling issues in your prints.
Therefore, it’s a good practice to calibrate your lithophane thickness before using a new filament. You can use the Lithophane Thickness Calibration Tile design on Thingiverse to determine the best settings for your lithophanes.
Dialing in these settings will take some trial and error. But, once you’ve perfected these settings, you can replicate the results for every image and get high-quality STL files for your Lithophane each time. Onto the slicing settings.
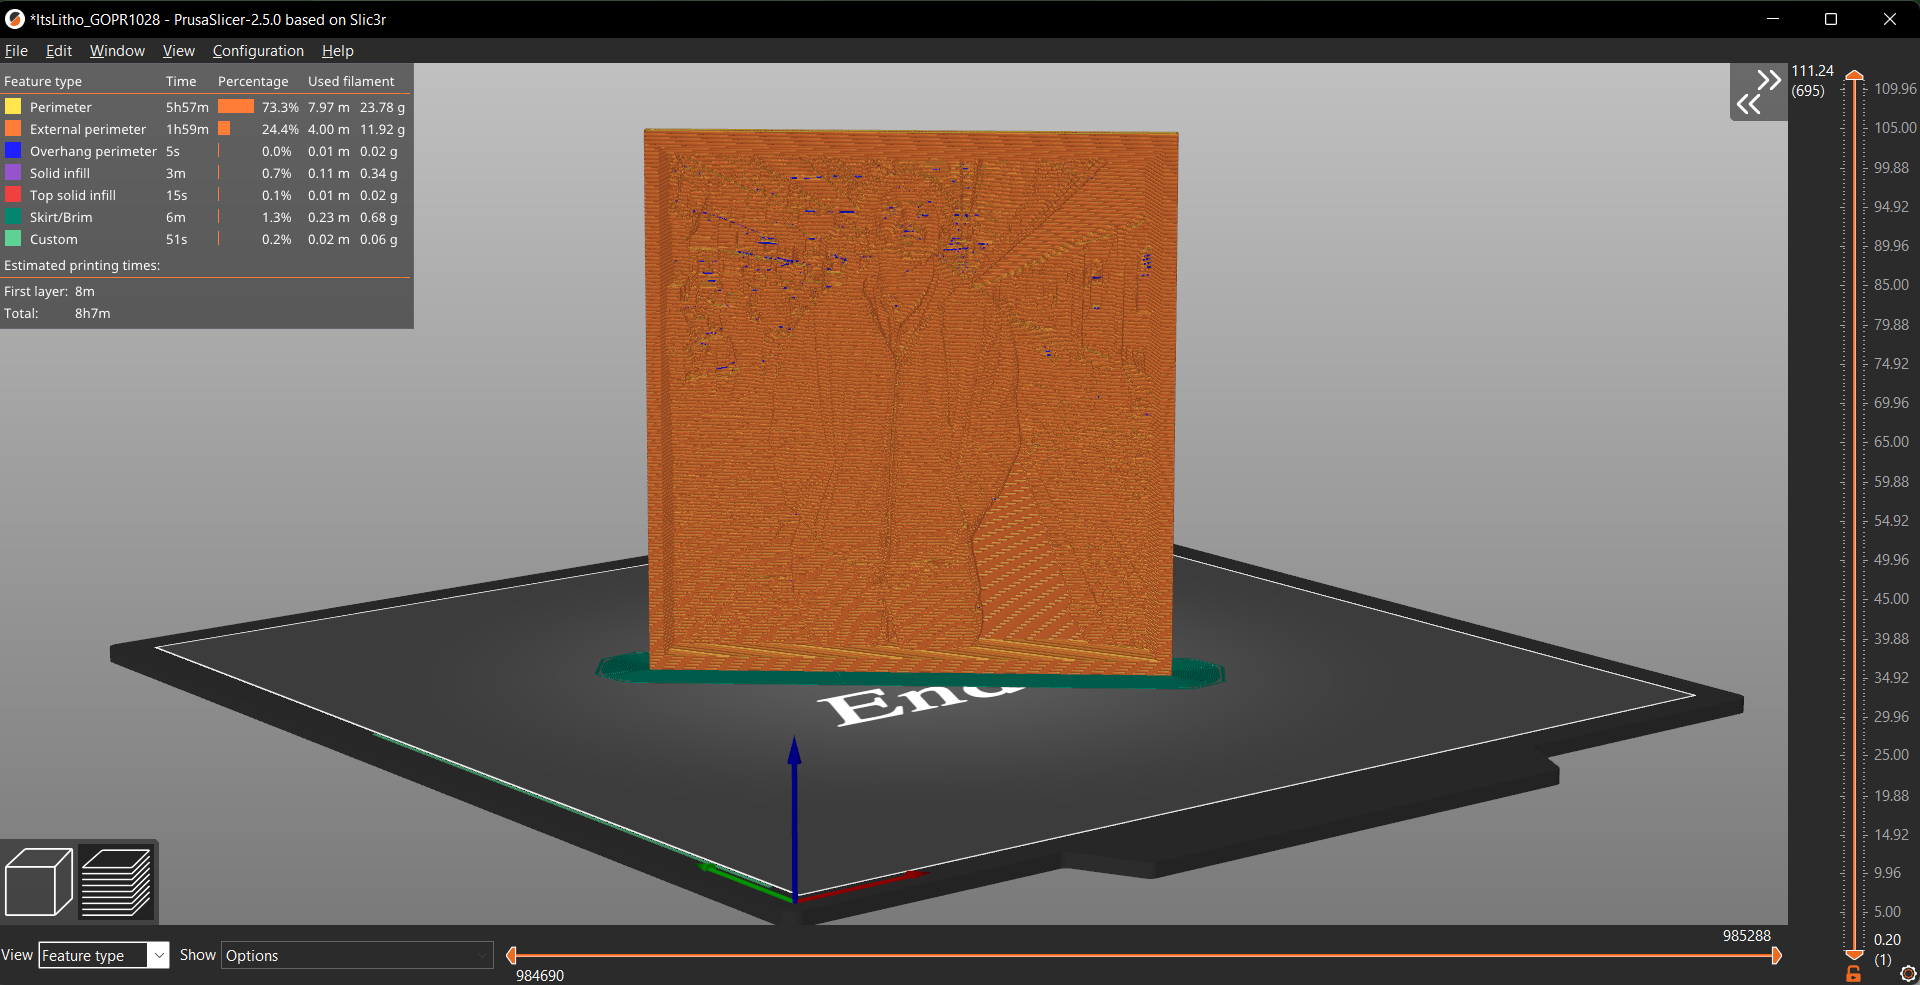
Step 3: Slicing Settings
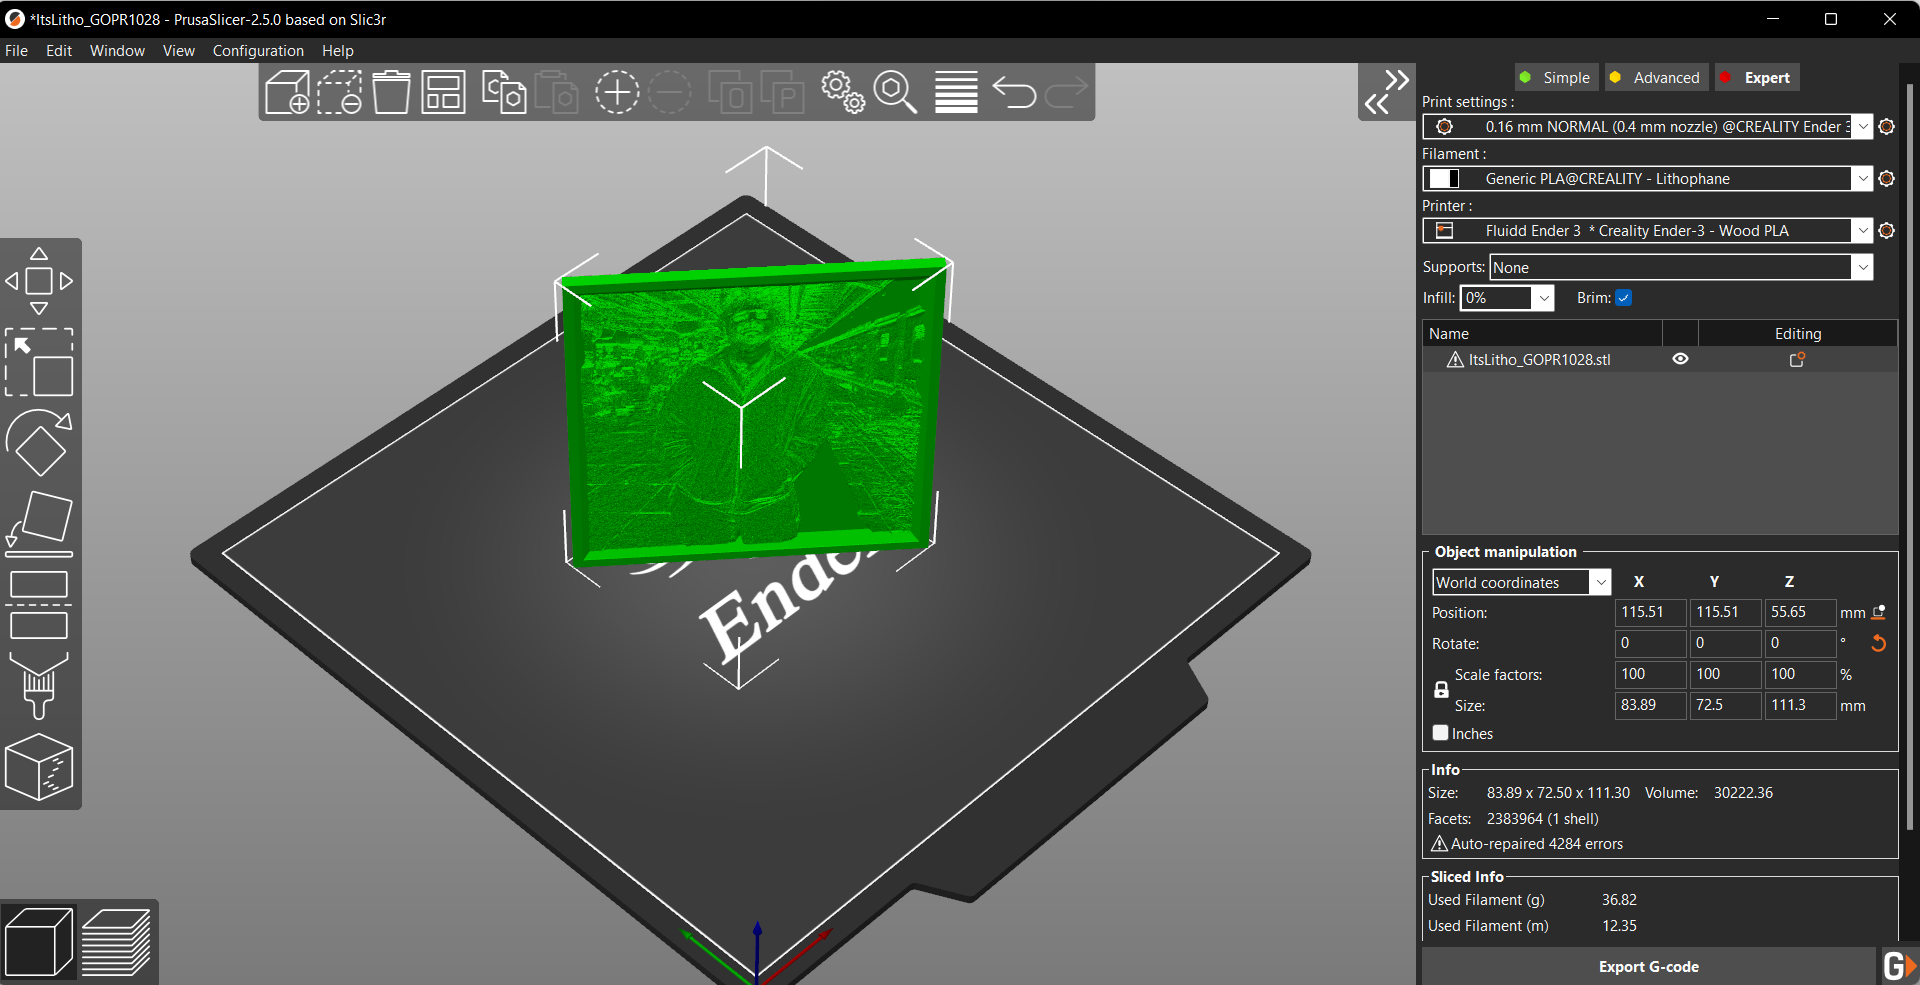
The final step of slicing your Lithophane STL influences your print quality. Like in the model settings, a few slicing parameters greatly determine the final quality of your 3D-printed lithophanes. Let’s take a look at the FDM slicer settings.
Layer Height
Layer height decides the resolution of the final 3D-printed Lithophane. A lower value of 0.12 - 0.16 mm will hide the layer lines in your 3D print, resulting in a better-looking lithophane.
Print Speed
Lower print speeds result in a stable and smooth motion of your 3D printers and further help produce better-looking lithophanes. You don’t have to worry about ringing/ghosting issues at slower speeds of 25-40 mm/s. Additionally, given the thin cross-section of flat lithophanes, slow speed will help your model's stability and reduce the chances of its failure.
Perimeters/Infill
Setting 4 or 5 perimeters for your Lithophane will ensure no gaps in your print. Ideally, you should avoid gaps in your lithophanes, as they alter the amount of light passing through them and ruin their quality.
Alternatively, you can set the infill value to 100% to eliminate any hollowness and ensure the model is solid throughout its thickness.
However, setting a higher number of walls/perimeters is better in comparison, as it leads to smoother print motion due to fewer direction changes and marginally better print quality.
Bed Adhesion
Flat and curved lithophanes, when printed vertically, will have a smaller cross-section on the build plate. Increasing the contact area of the Lithophane with the build plate will ensure better chances of print success and reduce the risk of the print getting knocked off from the print bed.
Use a wide brim at the bottom of your Lithophane to give it a large surface area and stabilize it during printing.
That’s It! Remember these points, note down the settings, and you’re all set to 3D print
exquisite-looking lithophanes that are perfect for capturing your loved memories.
Final Thoughts
It’s best to remember that even though 3D printing simplifies the process of creating lithophanes, it still is an art. And like with any other art, you will need constant experimentation and experience to output the highest quality lithophanes.
Trying to use various tools, 3D printing different designs, and experimenting with different materials and lighting options is the only way to know the best configuration that works for you.
We hope this article guides you through creating your lithophanes and converting your memories to 3D-printed designs. Feel free to share your creations with us in the comments below. If you’d like to see anything else or have some tips, leave a comment below, and we’ll be glad to connect with you.