AI Failure Detection and Remote Control for Bambu Lab 3D Printers
So, you’ve got a Bambu Lab 3D printer—maybe a fancy X1 Carbon, or maybe a more modest A1 or P1P—and you’re absolutely in love with how quickly and smoothly it prints. These machines are kind of like the Ferraris of the consumer 3D printing world, right? Super-fast, often come with neat features like built-in cameras, enclosed builds, multi-color printing capabilities, and even some AI-based magic that tries to detect when your print turns into the dreaded “spaghetti monster.” You know what I’m talking about: that moment when your once-promising print becomes a pile of tangled filament resembling something you’d serve with meatballs.
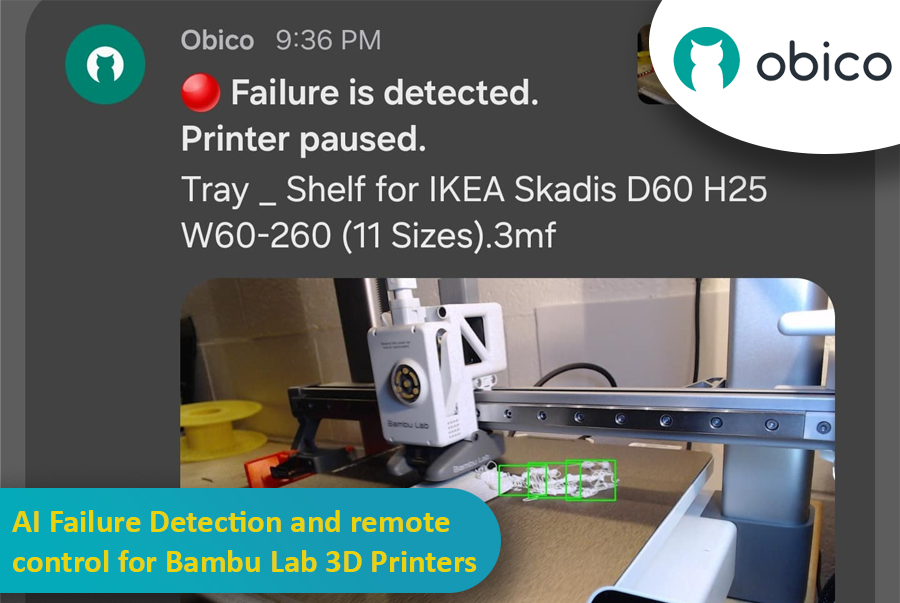
But here’s the catch: Not all Bambu Lab printers have the same level of AI detection built in. Models like the Bambu X1 Carbon are decked out with advanced AI spaghetti detection and even LiDAR to inspect that first layer. Meanwhile, other models—like the Bambu A1 series or the P1P—lack AI features altogether. Maybe you went from a Creality printer that you’d meticulously set up with OctoPrint and had all sorts of plugins running, including advanced failure detection. Then you jumped ship to a Bambu Lab machine and realized you miss that robust ecosystem. Or maybe you just love tinkering and want to integrate Obico’s AI-based spaghetti detection and remote monitoring into your Bambu workflow.
Well, good news: With a bit of creativity, a spare single-board computer (like a Raspberry Pi or Orange Pi), a camera (such as a trusty old Logitech C920), and some software tweaking, you can get AI failure detection working via Obico on your Bambu printer—no matter which model you have. This can transform your Bambu printer setup into something that feels both luxurious and smart, catching failures before they waste days of print time and tons of filament.
In this “case study” or super-long how-to, I’ll walk you through a scenario: Let’s imagine you have a Bambu A1 printer. You love it, but you want AI failure detection similar to what you might have had with other printers integrated with Obico. We’ll talk about using OctoPrint as a virtual “bridge,” installing plugins, setting up a camera, and linking everything to Obico’s cloud so you can watch your prints from anywhere, get notifications if something goes wrong, and even pause or stop the printer remotely. And if you’re on a higher-tier Bambu like the X1 Carbon, you might not need this as much—but it’s still super cool to have another layer of AI detection from Obico’s machine-learning setup.
I’ll also share some links to relevant GitHub repos, documentation pages, and other helpful guides.
Let’s get started!
Why Obico and AI Failure Detection?
If you’re not familiar, Obico is a service that started out as The Spaghetti Detective. Its main party trick is using machine learning and computer vision to detect when your print starts messing up big time. Instead of coming home after 12 hours expecting a perfect print and finding a giant blob of wasted filament, Obico can send you a push notification (if you use the mobile app) or an email alert, showing you a snapshot of the print failure. You can then remotely pause or stop the job before it does more damage. Or adjust settings for automatic pausing. It’s a brilliant tool for peace of mind.
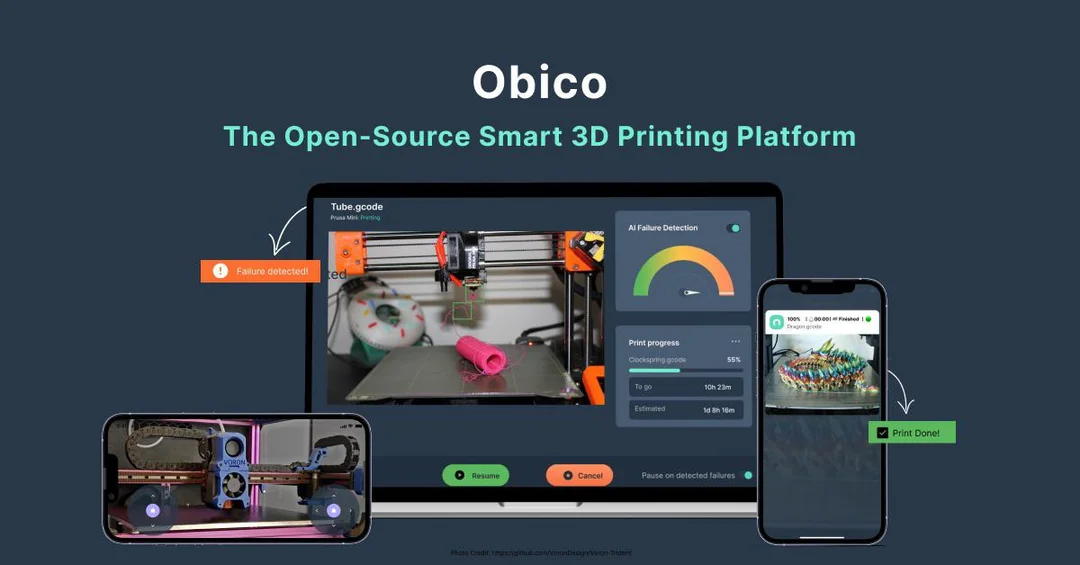
For OctoPrint users, Obico integrates neatly as a plugin. For Bambu Lab printers, which have their own ecosystem and app, it’s not as straightforward. The Bambu printers often rely on their native Bambu Studio and Bambu Handy app. But thanks to the community and some clever hacks, you can run OctoPrint alongside your Bambu Lab printer, create a virtual printer, and trick Obico into thinking it’s monitoring a normal OctoPrint setup. This allows you to leverage the full Obico detection pipeline. It’s a bit of a Frankenstein’s monster approach, but hey, we’re makers. That’s what we do.
What You’ll Need
- A Bambu Lab 3D printer. Let’s say you have a Bambu A1 for the sake of example. If you’ve got a P1P or something else, that’s cool, too.
- A computer to run OctoPrint. A Raspberry Pi is a good and common choice. There are also good alternatives like an Orange Pi, a Rock Pi, or even an old laptop running Linux will do. The point is to have a machine that can run OctoPrint 24/7, ideally connected via Ethernet or Wi-Fi to your home network, and accessible to the Bambu printer and your camera.
- A webcam. Obico needs a video feed to perform AI detection. It can’t do magic without seeing what’s going on. A common choice is the Logitech C920 because it’s widely supported and has decent quality. Any USB webcam that works with OctoPrint’s MJPG-Streamer or similar setup should be fine. If you’d prefer a Raspberry Pi camera, that could work too—just make sure it’s compatible with OctoPrint.
- OctoPrint installed and working.
If you haven’t set up OctoPrint before, check out the official guide: OctoPrint Setup Guide for Raspberry Pi.
note
If you’re using another board like Orange Pi, follow our guide: OctoPrint Setup Guide for Orange Pi.
- Obico plugin for OctoPrint. Once OctoPrint is set up and accessible from your browser, installing the Obico plugin is simple. We’ll detail that soon.
- OctoPrint-BambuPrinter Plugin. This is a crucial piece. It allows OctoPrint to talk to Bambu printers. Check out the GitHub repo: OctoPrint-BambuPrinter. Install this plugin after you have OctoPrint running.
- Your Bambu printer’s IP address, serial number, and access code. You’ll need to retrieve these from your printer’s interface or the Bambu app. The OctoPrint-BambuPrinter plugin uses these to communicate with the printer.
- An Obico account. Sign up at Obico—you can do it via their mobile app or web interface. They have both free and premium tiers.
The Basic Idea
The workflow we’re aiming for is something like this:
- OctoPrint acts as a virtual middleman. It doesn’t physically control the printer’s USB port like it would on a Creality. Instead, it communicates over the network with your Bambu printer.
- The BambuPrinter plugin for OctoPrint sets up a virtual “serial connection” to your Bambu printer. This gives OctoPrint enough info to think it’s running the show.
- The Obico plugin on OctoPrint sends video snapshots to the Obico cloud for AI failure analysis. If a failure is detected, Obico sends commands back through OctoPrint to pause or stop the print job.
- You get notifications on your phone (via the Obico mobile app) or via email/slack/whatever when a failure is detected.
- You can watch and control your printer’s progress from anywhere in the world, because Obico streams the video feed.
Step-by-Step Setup
Let’s break down the process in more detail. I’m going to talk to you like we’re hanging out in a garage, tinkering with a 3D printer on a workbench.
1. Set Up OctoPrint
Assuming you’re using a Raspberry Pi. For a simplified setup, consult the Setup OctoPrint for Raspberry Pi. This guide offers a pre-built image and installation instructions.
Once OctoPrint’s web interface is up and running, you’re good to go.
2. Connect a Webcam to OctoPrint
Plug in your USB webcam. If you have the Logitech C920, just connect it to the Pi’s USB port. By default, OctoPi distributions come with MJPG-Streamer configured to stream from /dev/video0. You can usually access the camera feed by going to:
http://octopi.local/webcam/?action=stream
Make sure you have decent lighting. If your printer is in a dark corner of the basement, maybe set up a small LED lamp or strip that turns on when the printer runs. Obico’s AI detection works best with a clear view of the print in progress. You don’t want it guessing in the dark. Some folks rig their printers with smart lights that turn on automatically. The key is: no darkness, please.
3. Install the Obico for OctoPrint Plugin
Inside OctoPrint’s web interface:
- Click the wrench icon to open settings.
- Find Plugin Manager, click Get More…, and search for “Obico.”
- You should see Obico for OctoPrint. Click install, and after it’s done, restart OctoPrint.
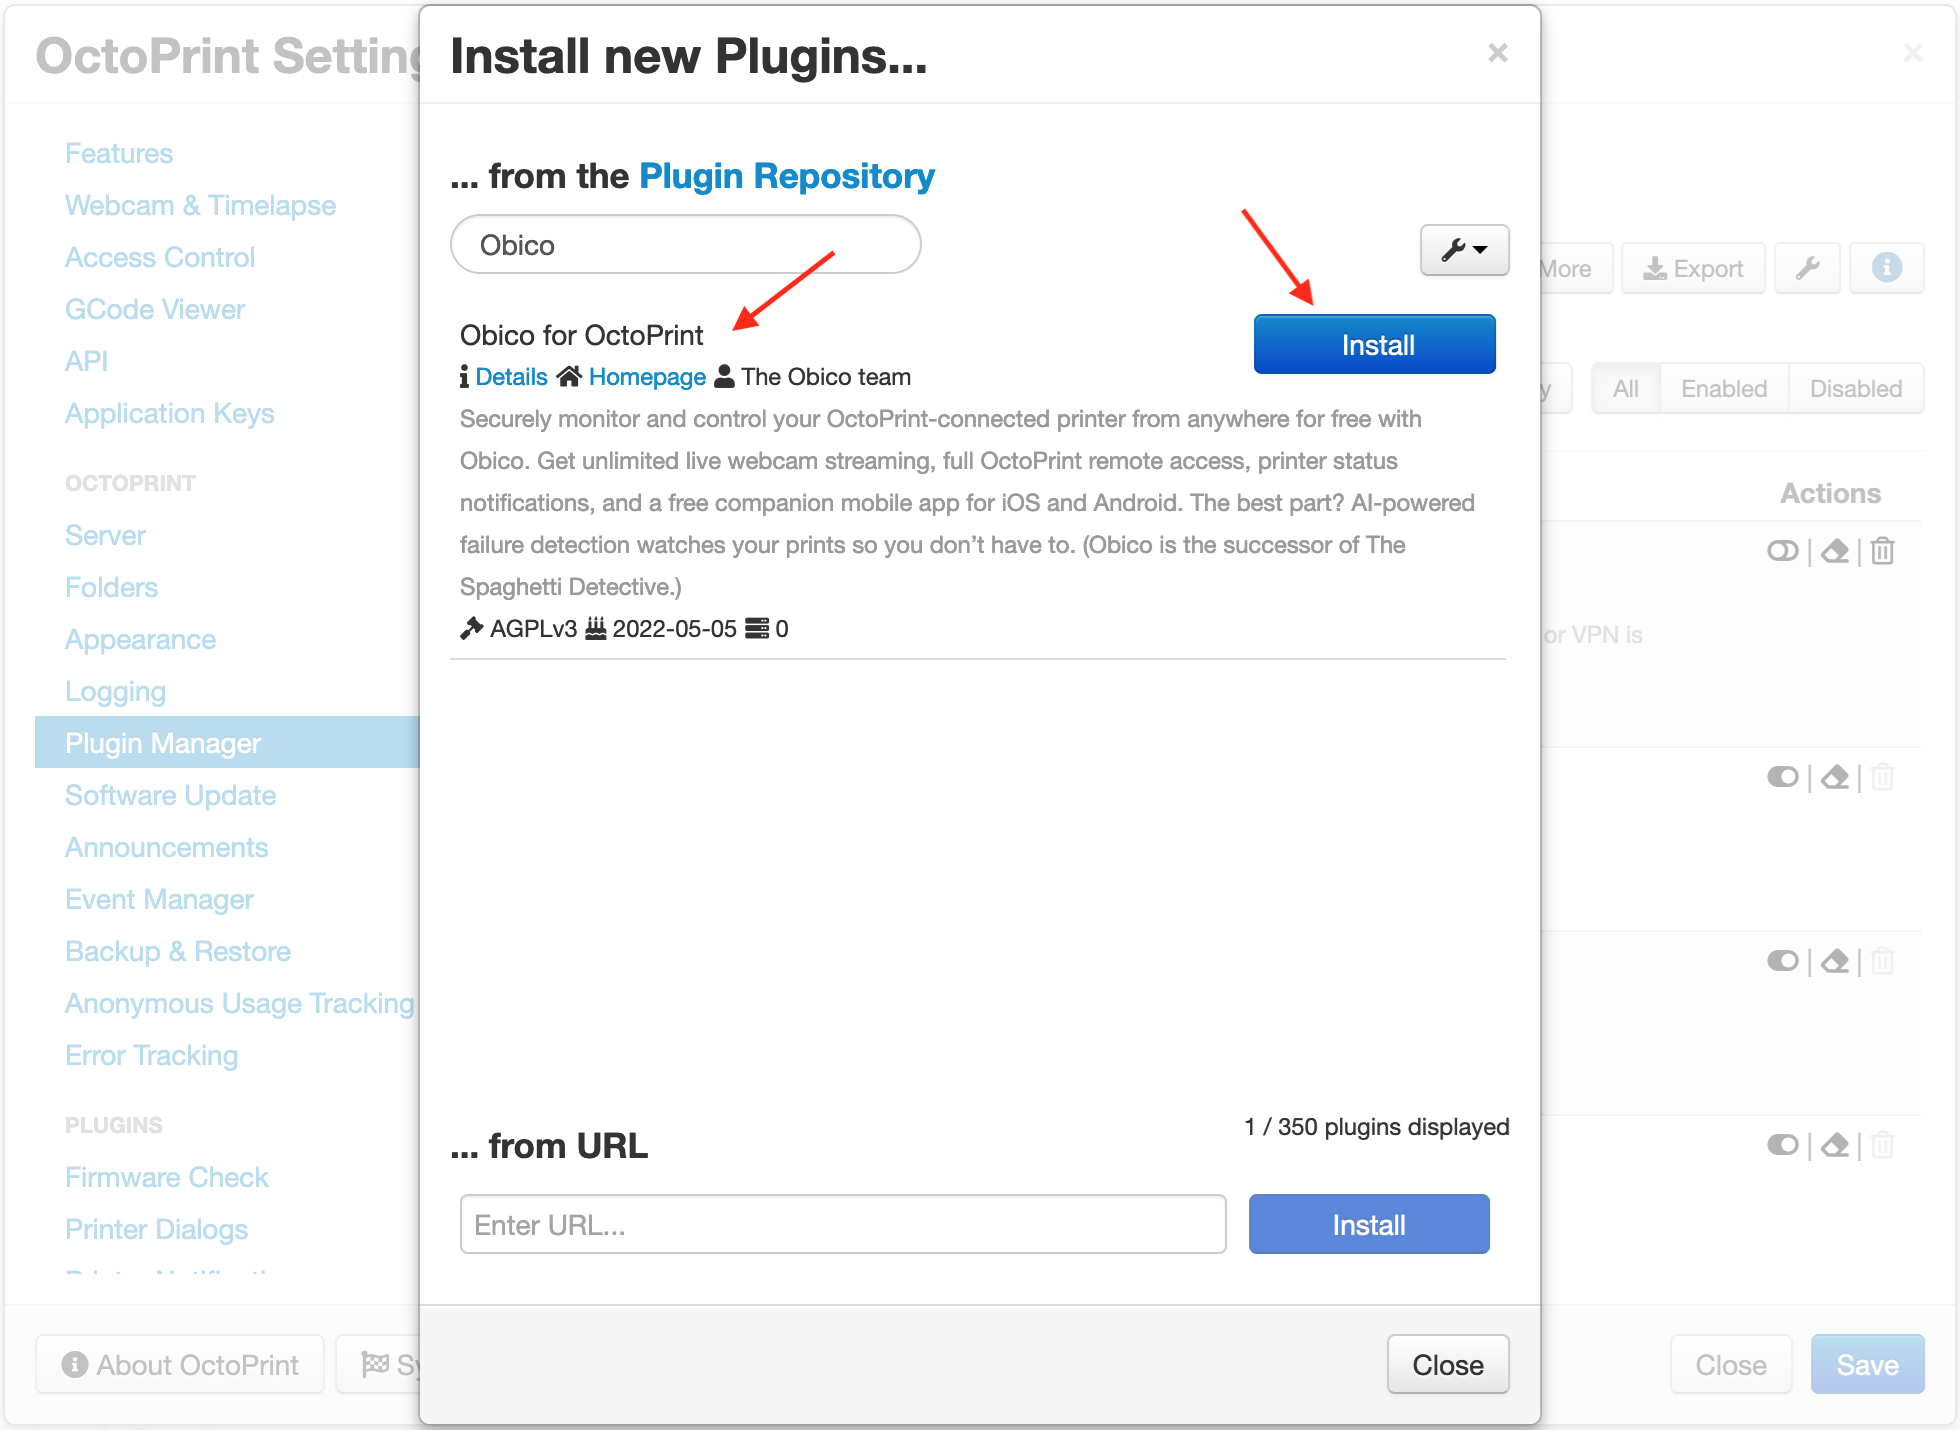
Here’s the official setup guide: Set up Obico for OctoPrint. This page walks you through the process. Once installed, the plugin will ask you to link your Obico account. You can sign up at Obico Sign Up if you haven’t already. You can do it either from the mobile app or the web interface.
If you have the mobile app and your phone is on the same network as OctoPrint, Obico can automatically detect your OctoPrint instance and link it up. If not, you can enter a 6-digit code to do it manually. Either way, after linking, your OctoPrint instance is connected to the Obico cloud.
4. Install the BambuPrinter Plugin for OctoPrint
This is the secret sauce that lets OctoPrint talk to Bambu printers. Head over to the OctoPrint settings again, Plugin Manager, “Get More…,” and type in the URL for the plugin’s zip archive. That’s usually:
https://github.com/jneilliii/OctoPrint-BambuPrinter/archive/master.zip
Click Install and wait. After installation, restart OctoPrint. Now you should see a new plugin in the settings called “Bambu Printer.” Open it, and you’ll be asked for the printer’s IP address, serial number, and access code. The IP address is whatever your Bambu printer is assigned on your LAN. The serial and access code you can find in your Bambu Handy app or from the printer’s display/interface.
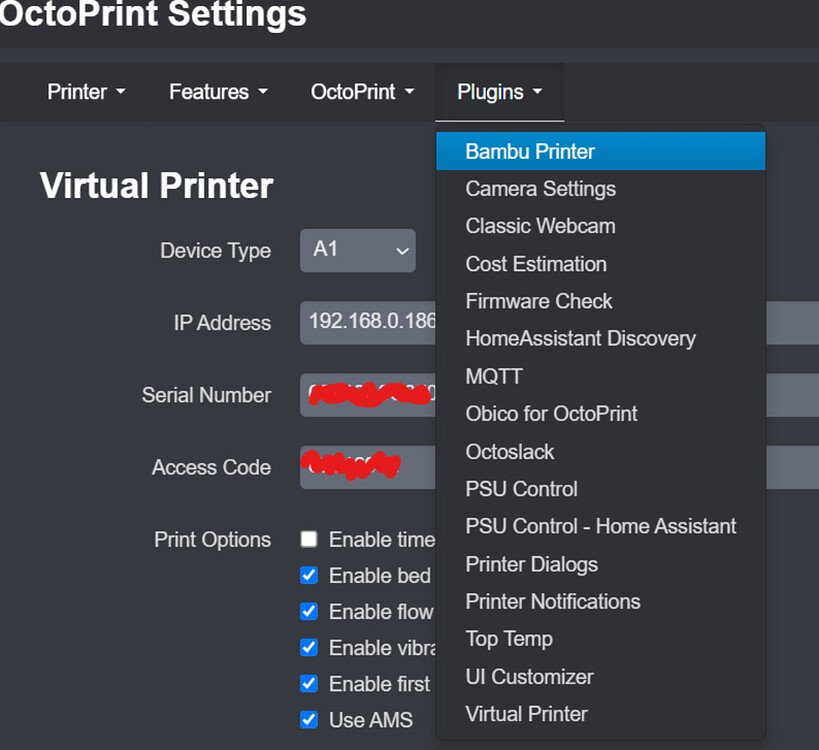
Image Source: Bambu Lab Forum - User Gboy
Enter the details and save. This plugin will create a virtual serial port called “BAMBU” in your Printer Connection settings. Switch your printer profile in OctoPrint to use that port and set the correct baudrate (the plugin’s documentation should give you hints).
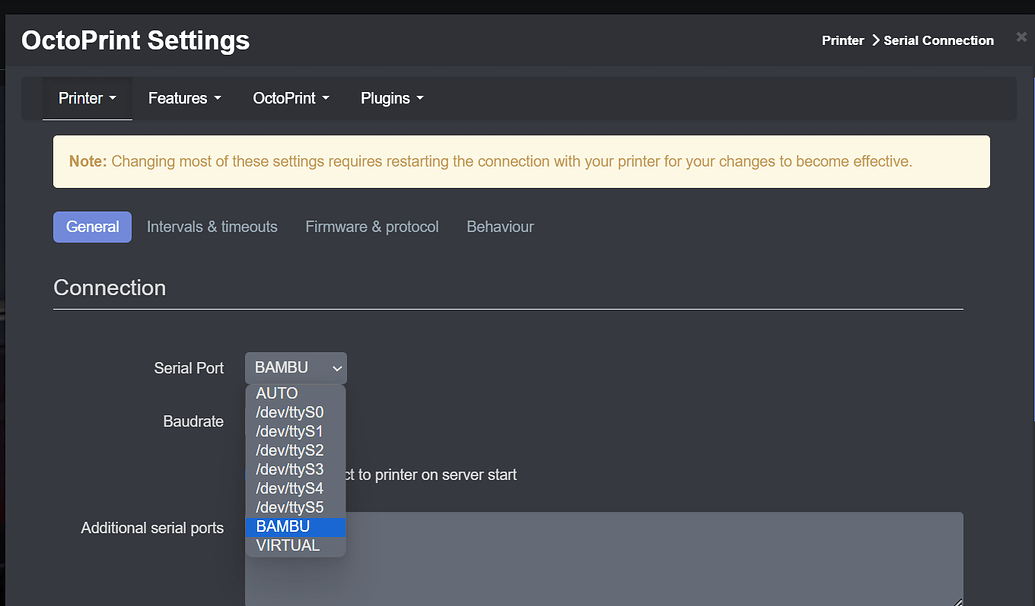
Image Source: Bambu Lab Forum - User Gboy
Once this is done, you can try starting a “print” from OctoPrint’s perspective. Even though OctoPrint isn’t directly controlling the printer’s stepper motors via USB, it can send commands over the network through the Bambu plugin. With this setup, Obico will think it’s dealing with a normal printer controlled by OctoPrint, and thus will monitor and manage it accordingly.
5. Start Printing with Obico AI Detection
Fire up a test print. Start a print using your Bambu Studio slicer and send it directly to your printer as usual. Then, also start a dummy “print job” on OctoPrint (using the virtual printer mode) or let OctoPrint know that a print is in progress.
As the print goes on, Obico will send you periodic snapshots. If the AI model detects something funky—like filament spaghetti appearing—it will alert you. Depending on how you configure Obico’s settings, it can automatically pause or even cancel the print. You’ll get a notification on your phone (if you have the Obico mobile app installed and notifications enabled) or via email, whatever you prefer.
At this point, congratulate yourself. You’ve just replicated the fancy AI detection features that might be missing from some lower-tier Bambu models or enhanced the features on your higher-end Bambu printer.
Some Notes, Tips, and Weirdness You Might Encounter
Virtual Printer and Serial Timeouts
There’s a known issue sometimes when using the virtual printer or non-standard connections in OctoPrint. You might get serial timeout errors. If that happens, you might need to tweak the /home/pi/oprint/lib/python3.9/site-packages/octoprint/plugins/virtual_printer/virtual.py file and change the following lines:
read_timeout=150.0,
write_timeout=150.0,
This might need to be repeated after each OctoPrint update until an official fix is released.
Check out OctoPrint Issue #4907 for more details.
Lighting Conditions
AI detection works best with a clear view. If your camera feed is super dark or has poor contrast, expect more false positives or missed failures. Consider adding a small LED strip that turns on whenever the printer runs. Or print during the day. Or maybe set up a smart plug to turn on a lamp next to the printer. Get creative.
Camera Positioning
You don’t have to use the Bambu printer’s built-in camera (if it even has one). With a USB webcam, you can position it at a flattering angle that captures the nozzle and print bed clearly. This might even be better than the built-in camera angle. Some people 3D print camera mounts designed specifically for their printer. For instance, if you have a Bambu A1 Mini, you could find a mount on Printables or Thingiverse. Just Google “Bambu A1 Mini camera mount.”
Testing the Setup Before a Long Print
Before trusting the system with a 72-hour print job, do some short test prints. Intentionally mess up a small print (e.g., print something tall and thin that might topple) and see if Obico alerts you. Or just watch the detection accuracy over time. This way, you know it works when it really matters.
Pausing, Resuming, and Stopping Prints Remotely
One of the coolest features of this setup is the ability to pause, resume, or stop prints remotely. If Obico says, “Hey, I think your print’s failed!” and you agree by checking the webcam feed, you can hit pause or stop right from your phone at the office. No rushing home. No wasted filament.
What About LiDAR and Advanced AI on Bambu?
If you have a higher-end Bambu printer like the X1 Carbon, you might say, “Hey, I already have built-in AI spaghetti detection. Why bother?” True, Bambu Lab’s integrated detection is pretty neat. But Obico’s detection can be an additional layer of security, and it integrates well with external notifications and remote control. Plus, Obico’s machine learning model is always improving, and you can even contribute to improving it if you want. Having multiple safety nets never hurts, especially when you’re printing something valuable or time-consuming.
Privacy Considerations
Keep in mind that using Obico or any cloud-based service involves sending images or streaming video to their servers. If you’re concerned about privacy, check the terms of service and privacy policy. You can also self-host Obico if you’re technically inclined. Self-hosting gives you full control and keeps all the data local or on your own server. But that’s a more advanced topic.
Creative Print Monitoring Ideas
With this setup, you’re not limited to just failure detection. You can open your Obico feed on a tablet in your living room and watch your print in real-time like a reality TV show: “Bambu Wars: Battle of the Filaments.” Mount a tablet in your workshop or send the feed to your family members so they can watch the magic of additive manufacturing unfold. Who knows, maybe grandma will get excited about 3D printing.
Comparing AI Features in the Bambu X1 Carbon vs. A1 Series
Bambu Lab offers everything from entry-level printers to top-of-the-line models, each with different levels of AI capabilities. Here’s how two of their models compare:
Bambu X1 Carbon
The big daddy. It’s got AI spaghetti detection built-in, a camera that can do some clever image processing, and even a LiDAR sensor to check your first layer. It’s like having a self-driving car of 3D printers. If you have this printer, Obico’s setup is more of a nice-to-have than a must-have. But it’s still cool to integrate.
Bambu A1 Series
The A1 Series isn’t as stacked with AI features out of the box, making it an ideal candidate for pairing with Obico. By hooking it up, you’re giving your A1 printer advanced monitoring and detection capabilities that it wouldn’t have otherwise.
Obico works like a universal upgrade. If your Bambu printer already has AI smarts, Obico can enhance them and make your life easier. If it doesn’t, Obico essentially gives your printer a new “brain,” helping you achieve smarter printing, better control, and more peace of mind—no matter which Bambu model you own.
A Big Thank You to the Community
This guide wouldn’t have been as comprehensive or actionable without the incredible contributions from members of the 3D printing community. First, a huge shoutout to gboy from the Bambu Lab Forum. His post about setting up OctoPrint with the BambuPrinter plugin and Obico for spaghetti detection was a game-changer for Bambu A1 users. gboy’s experience, detailed walkthrough, and troubleshooting tips have made this process accessible to so many of us tinkering enthusiasts.
Another heartfelt thanks goes to jneilliii, the brilliant developer behind the OctoPrint-BambuPrinter plugin. Their work has provided a crucial bridge, enabling OctoPrint to communicate seamlessly with Bambu Lab printers. Without their dedication and coding expertise, this integration wouldn’t even be possible. The plugin has been pivotal in bringing advanced features like Obico’s AI failure detection to printers that otherwise lack such capabilities.
It’s contributions like these—both practical tips from users like gboy and technical innovations from developers like jneilliii—that make the 3D printing community so special. Whether you’re a maker, a developer, or just someone curious about the possibilities of additive manufacturing, this shared knowledge pushes the boundaries of what’s possible.
So, here’s a big thank you to everyone involved for helping make 3D printing smarter, more accessible, and just plain awesome!
FAQs
Q1: Do I really need Obico if my Bambu X1 Carbon already has AI features?
Answer: If you own a Bambu X1 Carbon, it’s already loaded with smart detection tools. Obico isn’t a must-have, but it can still enhance your experience, offering remote control, additional monitoring features, and peace of mind.
Q2: I have a Bambu A1 Series printer. It doesn’t have built-in AI detection. Can Obico help?
Answer: Absolutely! The A1 Series is a perfect match for Obico. With a bit of setup, you’ll add AI failure detection, remote monitoring, and control—giving your A1 Series printer a serious upgrade in smarts and convenience.
Q3: Do I need a Raspberry Pi, or can I use something else for OctoPrint?
Answer: While a Raspberry Pi is the “classic” choice, you can use alternatives like an Orange Pi or any other compatible single-board computer. The goal is simply to run OctoPrint and connect it to your Bambu printer and camera.
Q4: Does Obico require a camera?
Answer: Yes. To detect print failures, Obico needs a visual feed. A popular option is a USB webcam like the Logitech C920. If your Bambu printer doesn’t have a built-in camera, adding one is easy, and it ensures Obico can “see” what’s happening.
Q5: Will I be sending images of my print to the cloud?
Answer: Obico’s AI detection happens on their servers, meaning snapshots and video streams are sent to the cloud. If privacy is a concern, consider their self-hosted options, which give you more control over your data.
Q6: Can I pause or stop prints remotely if I’m alerted to a problem?
Answer: Yes! Once integrated, you can pause or stop your print directly from your phone or computer. Whether you’re at work, on vacation, or just in another room, Obico ensures you’re never caught off guard by a failed print.
Final Thoughts
Bambu Lab printers are already pushing the envelope when it comes to speed, quality, and innovation. Integrating Obico takes these machines a step further, especially for models without built-in AI detection. By using OctoPrint as a kind of “universal translator,” you give your Bambu printer smarter eyes and more flexible controls.
The result? You spend less time worrying about “spaghetti monsters” and more time enjoying flawless prints.
Whether you own the high-end X1 Carbon or a more entry-level A1 Series, adding Obico can streamline your workflow, let you monitor your prints from anywhere, and help you catch failures before they turn into costly, time-consuming messes. It’s a marriage of convenience, intelligence, and good old tinkering—something every maker can appreciate.
