Input Shaping: What it is and How to Use it
Over the past decade, the hobbyist 3D printing community has seen several technological advances that have increased the quality and speed of hobby-level printing by leaps and bounds. One of these advances has been input shaping. Input shaping has the ability to make your 3D printer faster and more accurate, and the best part of all is that it’s incredibly cheap and easy to implement! In this article we’ll discuss what input shaping is, as well as how to use it.

A Metaphor: Driving a Car
Imagine you’re driving a car. It’s a car that you drive frequently, so you’re very familiar with the controls. You know exactly how much to engage the brake when you want to slow down, and you know exactly how much to turn the steering wheel when you want to execute a turn.
Now, imagine you’re moving and you need to rent a large box truck. If you try and drive the large box truck just like you drive the car you’re familiar with, it might be a disaster! You might not brake early enough and end up overshooting where you want to stop. You might turn the steering wheel too much and take a turn much sharper than intended.
But, over time, you will adapt to driving the truck and begin doing things like braking earlier and steering the correct amount. Your brain will learn how to interact with the truck’s controls to do exactly what you want.
We rely on mental models of systems all the time. When you drive a car, you rely heavily on your understanding of how that car behaves. It is important to have an accurate understanding of this to successfully drive a vehicle. As we will see, building this accurate understanding is exactly what input shaping is all about.
What is Input Shaping?
Input shaping leverages a virtual model of a system to condition input to that system to achieve a desired result. Although we know it from 3D printing, input shaping is used widely in control theory and is a specific case of a control scheme called Model Predictive Control. Below is a short video demonstrating input shaping in a more general spring-mass system:
While in 3D printers our nozzles are not mounted to the end of springs, the goal is fundamentally the same: to reduce vibrations while printing to be able to print faster and achieve higher quality.
How does Input Shaping Work?
Input shaping on 3D printers consists of three basic steps:
Run the printer through a series of frequency sweeps Measure the resulting vibrations of the printer Condition future input to avoid these frequencies
Let’s break this down. A frequency sweep simply means commanding the moving parts of the printer (usually the toolhead and print bed) to vibrate at a certain frequency, then increase that frequency over time to measure resulting vibrations across a range of commanded frequencies. The structure of the printer will resonate more or less with the motion of the toolhead and bed at different frequencies.
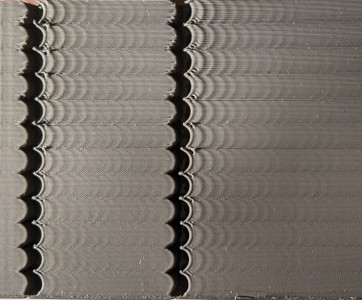
There are two primary approaches to measure these resonances. The cheap but more complicated way is to print an input shaping tuning print, like the one shown below.

By looking at the “ghost” curves to the right of the curves present in the model, we can understand the magnitude of these resonances across the frequency spectrum. Klipper has an in-depth guide on how to interpret these ghosted lines and properly compensate for them (here), but this method is generally time consuming and imprecise, even if it is free.
Instead, it is now possible to measure the resonances directly using an accelerometer. As the name might suggest, an accelerometer is a device that can measure accelerations, and several inexpensive accelerometer units such as the ADLX345 device can be used. Simply affix the device to your printhead or print bed and run the automatic tuning functionality on your compatible firmware.
This technique is so popular that 3D printer manufacturers are beginning to provide toolhead printed circuit boards that come with accelerometers already installed, so users can have the simplest possible setup experience.
Guides for your Firmware
Some commercial printers, such as the Bambu Labs printers, come with input shaping built in. If you’ve ever wondered why the printer vibrates the toolhead and the bed before prints, it is doing the exact process we described earlier.
However, there are still options available to hobbyists running their own firmware. Below is a list of several common firmwares and how to use accelerometer-based input shaping:
Conclusion
Input shaping is changing the landscape of modern hobbyist 3D printing, and it is only becoming easier to use as more and more firmwares add support and list in-depth guides on how to implement it. No matter what printer you have, input shaping has the chance to significantly improve its speed and quality for very little cost.