Installing and Configuring Klipper on BTT Pi 2 with Obico AI Integration
Introduction
3D printing is a fast-moving field, with new developments constantly pushing the boundaries of what is possible. One such development is the partnership between Obico and BigTreeTech (BTT), which brings Obico's advanced AI capabilities within reach of 3D printer enthusiasts through the BTT Pi 2.

This guide gives complete step-by-step instructions on how to install Klipper onto your BTT Pi 2 and then integrate Obico AI onto it. It includes detailed instructions for setting up an Ender 3 V2 3D printer as an example. Additionally, we will provide guidance on configuring other printer models to ensure all users can benefit from this setup. Whether you're a novice or an experienced user, this guide aims to simplify the process and enhance your 3D printing experience.
Before diving into the detailed guide, let's take a moment to explore the collaboration between Obico and BBT, and also look at some key specifications about BTT Pi 2.
The Obico and BTT Collaboration
Obico and BigTreeTech have joined forces to offer a comprehensive solution for 3D printing monitoring and failure detection. This partnership combines Obico's AI-driven software with BTT's robust hardware, specifically the BTT Pi 2, a powerful single-board computer designed with 3D printing in mind.

Source: biqu.equipment.com
The BTT Pi 2 is equipped with Klipper firmware and Obico AI pre-installed in one image, providing users with out-of-the-box features that enable users to manage more advanced aspects of their prints.
BTT Pi 2 Specifications
The BTT Pi 2 is known for its amazing specifications that are designed for 3D printing applications.
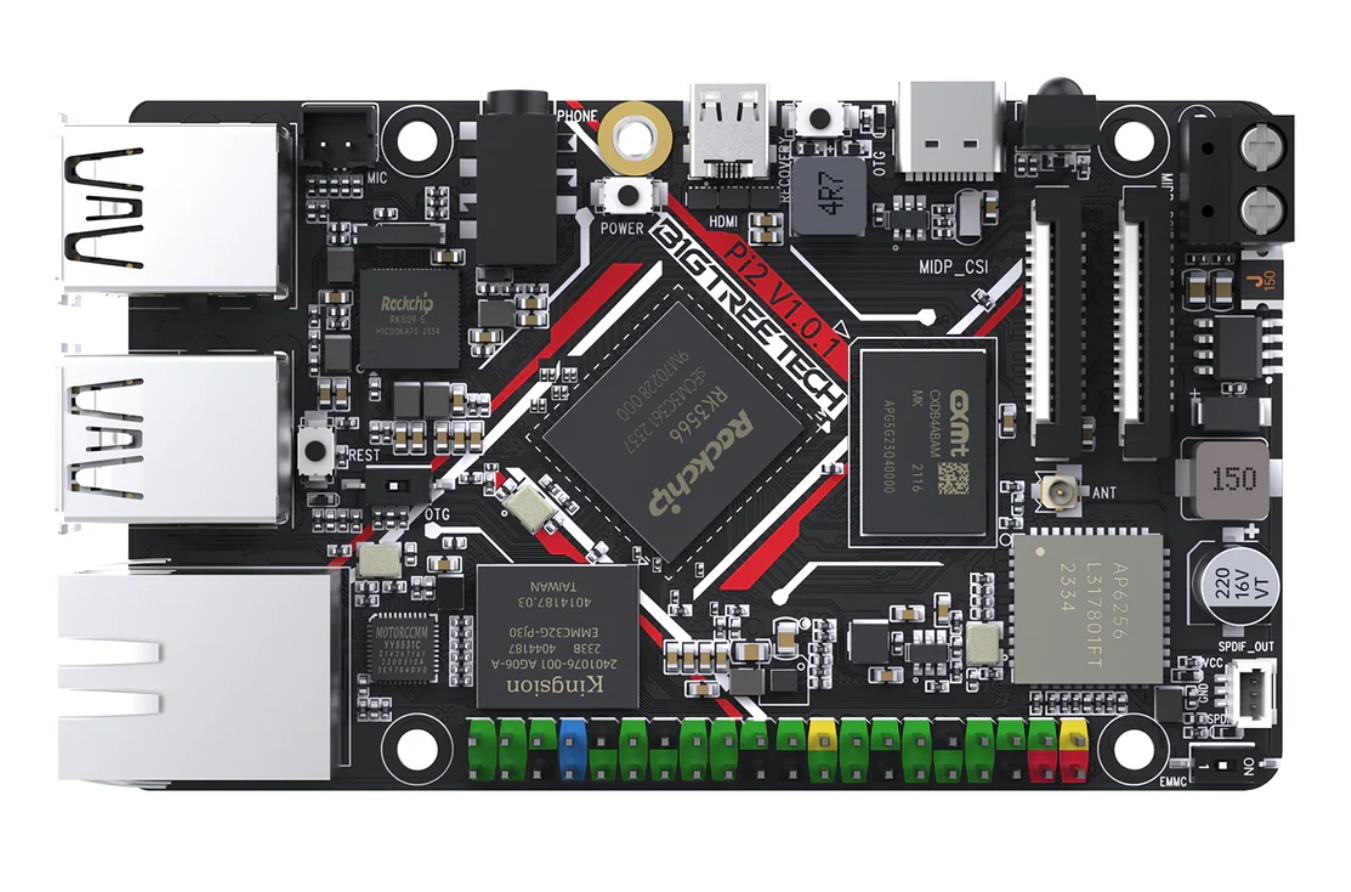
Source: biqu.equipment.com
Processor: Rockchip RK3566, quad-core Cortex-A55 @1.8GHz, ensuring high-speed performance.
RAM: 2GB LPDDR4, with customizable options for more memory.
Storage: Onboard 32GB eMMC, expandable via SD card and M.2 SSD.
Connectivity: Dual-band WiFi (2.4G/5G), Bluetooth 5.2, Gigabit Ethernet.
Interfaces: Multiple USB ports (3x USB 2.0, 1x USB 3.0), HDMI 2.0, PCIe 2.1 for SSD attachment, DSI/CSI for display and camera connections.
Power Supply: Compatible with 12V/24V 3D printer power systems, simplifying integration.
These features make the BTT Pi 2 perfect for running Klipper firmware and adding AI capabilities in order to enhance performance, connectivity, and ease of use. If you are interested in reading more details about the BTT Pi 2 specifications or making a purchase, you can follow this link to the official website: BIGTREETECH Pi 2/CB2
Well then, let’s start with our guide.
Setting Up Your BTT Pi 2
Step 1: Download the Official BTT Pi 2 Image
First things first, you need to download the official BTT Pi image, which comes with Klipper and Obico AI pre-installed.
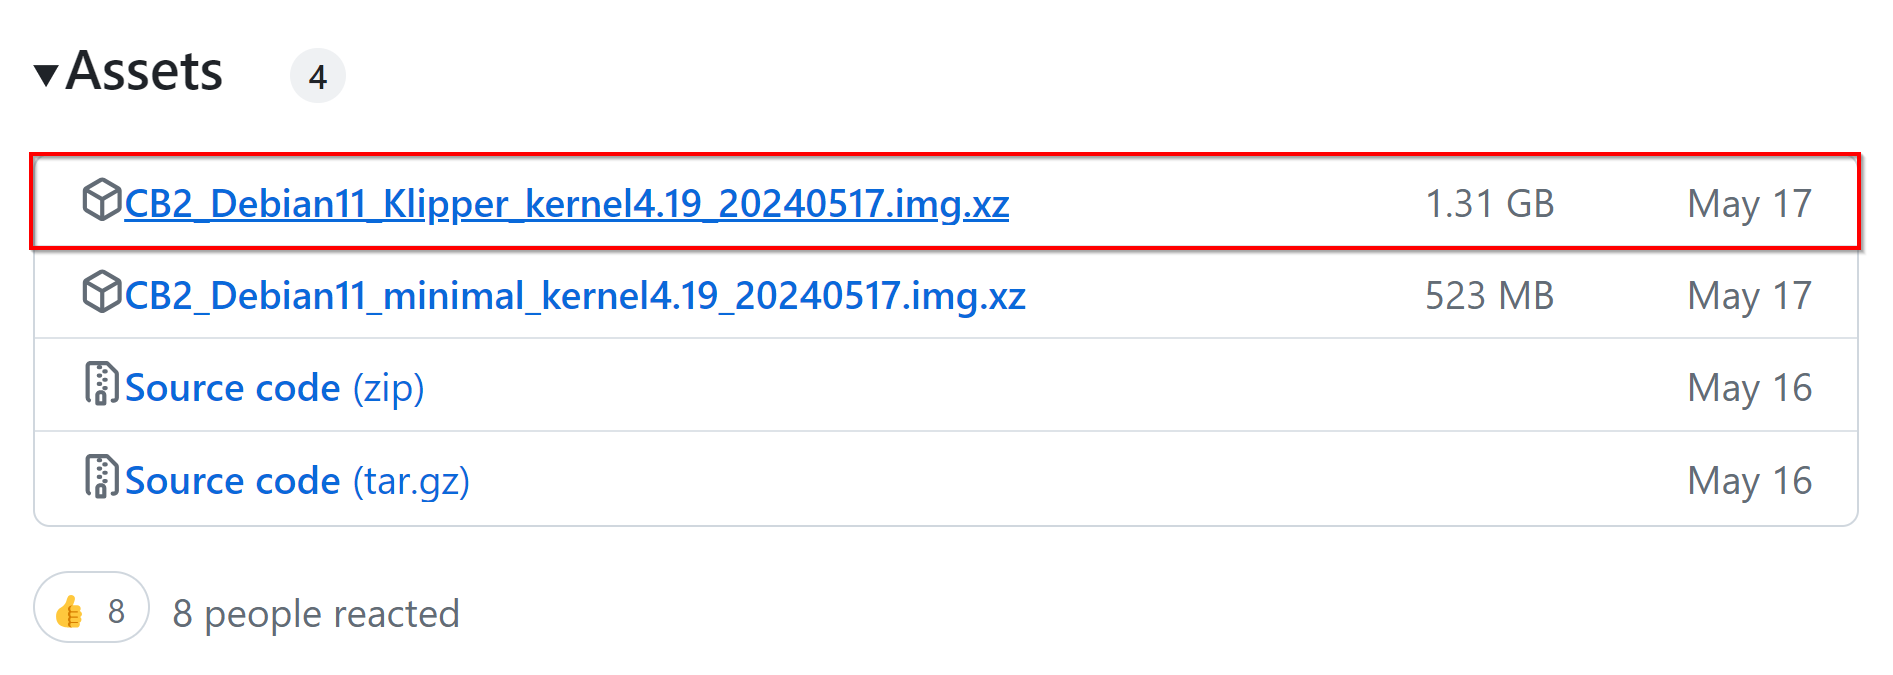
Visit the BigTreeTech GitHub repository and download the latest release from the Assets.
Step 2: Install the Image on an SD Card
Use Raspberry Pi Imager or balenaEtcher to install the image on an SD card, as they are both user-friendly tools that get the job done efficiently.
1. Download and install the software:
2. Prepare the MicroSD card:
Insert the MicroSD card into your computer using a card reader.
3. Write the image:
Open the imager software, choose the downloaded BTT Pi image, and select the MicroSD card as the target device. Click on “Flash” and wait for this process to complete (it may take several minutes).
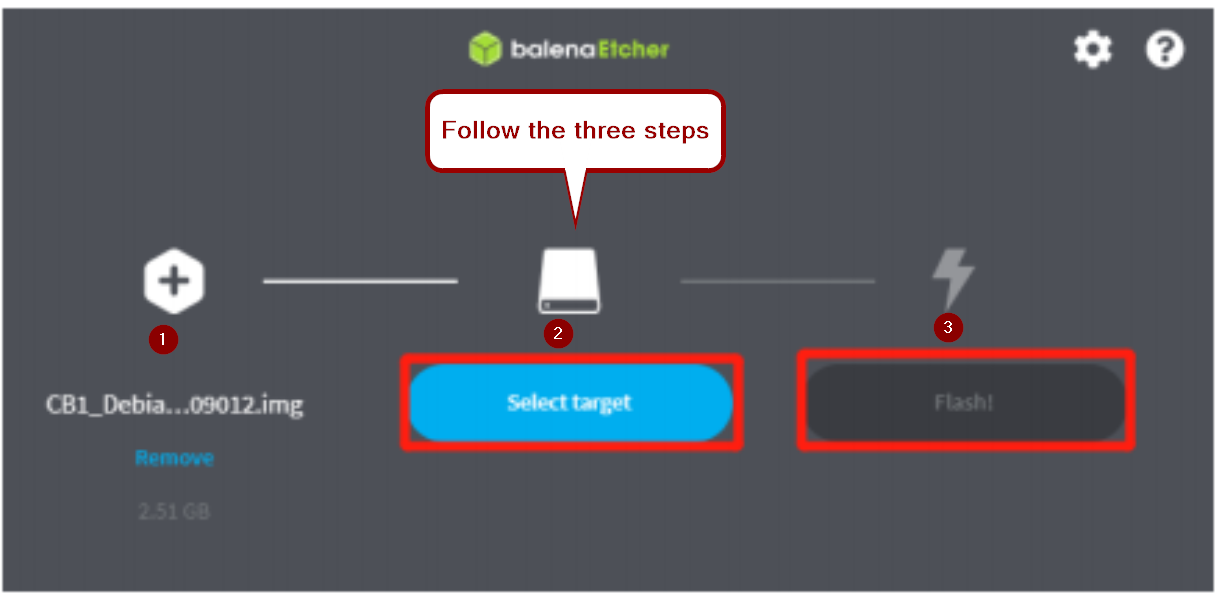
Source: bttwiki.com
Step 3: Set Up WiFi on the BTT Pi 2
After flashing the image, you need to set up WiFi on the BTT Pi 2 to connect it to your network.
1. Access the MicroSD card:
Once the image is written, a new FAT32 partition will be created on the card. Open this partition on your computer.
2. Edit the WiFi configuration:
Locate the system.cfg file and open it with a text editor. Replace your SSID with your WiFi network name and YourPassword with your WiFi password. Save and close this file.
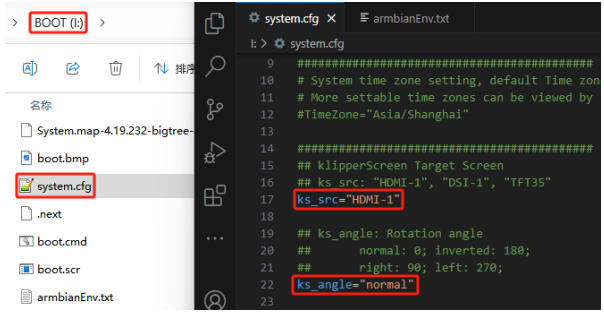
Source: bttwiki.com
The BTT Pi 2 comes with a reliable Gigabit Ethernet port, but it is plug-and-play and requires no additional setup.
Step 4: Configure Klipper for Ender 3 V2
Your BTT Pi 2 has Klipper and Obico installed, so now it’s time to configure and then compile Klipper for your specific 3D printer model. Here we’ll use the popular Ender 3 V2 printer as an example. Just follow these simple steps:
1. Insert the MicroSD card:
Place the MicroSD card into the BTT Pi 2 and power it on.
2. SSH into the BTT Pi 2 using PuTTY:
-
Download and install PuTTY.
-
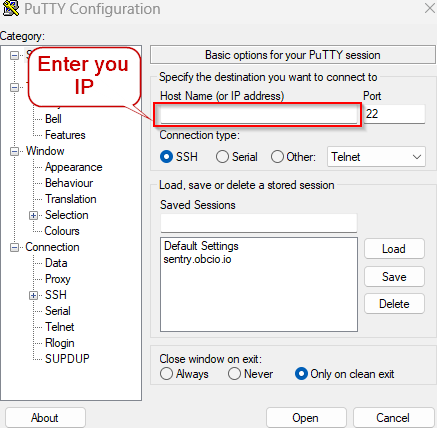
Open PuTTY and enter the IP address of your BTT Pi 2 in the "Host Name (or IP address)" field (you can find this IP address in your router's connected devices list or by using a network scanning tool such as Angry IP Scanner).
-
Click "Open" to start the session.
-
When prompted for login credentials:
Username: biqu
Password: biqu
3. Access the Klipper configuration:
Once logged in, navigate to the Klipper configuration directory by typing the following command and pressing Enter:
cd /home/pi/klipper_config
4. Download the configuration file for Ender 3 V2:
Obtain the Ender 3 V2 Klipper configuration file from the Klipper GitHub repository.
You can download the file directly to your computer and then transfer it to the BTT Pi 2 using an SCP (Secure Copy) tool, or download it directly to the BTT Pi 2 by running:
wget https://github.com/Klipper3d/klipper/blob/master/config/printer-creality-ender3-v2-2020.cfg -O printer.cfg
5. Modify the configuration for Ender 3 V2:
Open the configuration file in a text editor by typing:
nano printer.cfg
- Tweak the config file based on your printer’s specifications, such as pin assignments, sensor types, etc., which are specific to your Ender 3 V2. You should have knowledge about the hardware details of your printer before making these changes.
This step is required only if you have made special upgrades or edits to your printer. If not, you can skip it.
- Save the file by pressing CTRL + X, then Y, and then Enter.
6. Compile Klipper Firmware:
Once the previous step is complete, enter the command:
cd ~/klipper/
Then, enter the command:
make menuconfig
Use your device’s arrow keys and enter button to navigate the pop-up menu, and go to the “Micro-controller section”.
- The Ender 3 V2 uses an STM 32-bit board, so click the “STMicroelectronics STM32” option.
- After being automatically taken back to the new home menu, click the “Bootloader” option and select the “28 KiB” choice.
- On the home menu again, go to “USB connection” and choose the “serial” interaction option.
- Click the escape key on your device to exit the menu, and, when prompted, click the “Y” button to save your changes.
- Back in the PuTTY main terminal, enter the
makecommand.
Step 3: Uploading the New Firmware
- Open the WinSCP application and start a “New Site”. 2. Enter your BBT Pi board’s IP address for the “Host Name” and change the “File protocol” to “SFTP”. 3. Insert “biqu” for the username and “biqu” for the password, and click “Login”. 4. Open the “klipper” folder, then the “out” folder. Locate the BIN firmware file, labeled “klipper.bin”.
- Insert your printer’s mainboard’s microSD card into your device and clear it of any files.
- Copy and paste (or drag and drop) the “klipper.bin” file to your inserted microSD card, change the name to anything other than “firmware”, and eject the card from your device.
- On your printer, unplug the cable connected to the Ender 3 V2’s color display. You won’t need this LCD because Klipper doesn’t require a direct interface to operate, and the V2’s LCD isn’t compatible with Klipper.
- Insert the microSD card into your machine and power it on.
- Wait a few minutes to be sure the firmware is updated on your printer, and then connect your BBT Pi 2 board to your Ender 3 V2 with a Micro-USB cable.
Configuring Klipper for Other Printers
If you have a different 3D printer model, the process is similar to that of the Ender 3 V2 (you will do the same first three steps). Here's how to do it:
1. Find the appropriate configuration file:
- Visit the Klipper Configuration Repository.
- Locate and download the configuration file for your specific printer model.
2. Transfer the configuration file:
- Use SCP or direct download methods to transfer the configuration file to the BTT Pi 2.
wget <your-printer-configuration-file-link> -O printer.cfg
- Replace
<your-printer-configuration-file-link>with the actual link to your printer's configuration file from the Klipper Configuration Repository.
3. Modify the configuration file:
- Open the configuration file in a text editor by typing:
nano printer.cfg
- Adjust settings according to your printer’s specifications, i.e., pin assignments, sensor types, and other unique features.
This step is required only if you have made special upgrades or edits to your printer. If not, you can skip it.
- Save the file by pressing CTRL + X, then Y, and then Enter.
4. Compile Klipper Firmware:
- Once the previous download is complete, enter the command:
cd ~/klipper/
- Then, enter the command:
make menuconfig
- Use your device’s arrow keys and enter button to navigate the pop-up menu, and follow the compiling instruction provided in the configuration file you downloaded from the Klipper Configuration Repository.
- Click the escape key on your device to exit the menu, and, when prompted, click the “Y” button to save your changes.
- Back in the PuTTY main terminal, enter the
makecommand.
With these steps, anyone can configure Klipper on the BTT Pi 2, regardless of their 3D printer model.
Every printer has unique instructions for compiling Klipper to its mainboard. You will find these instructions as comments at the top of the configuration file you downloaded from the Klipper GitHub repository.
As for example, you can find in the following images the compile instructions for BigtreeTech Manta M8P V1.1 and the BigtreeTech Octopus.
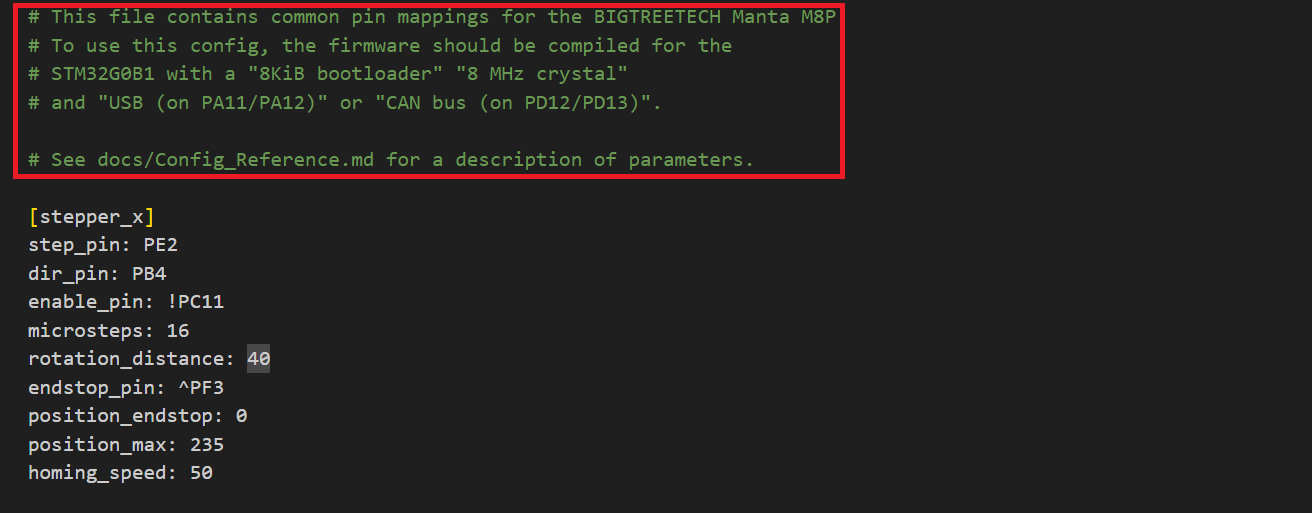
BigtreeTech Manta M8P V1.1 compiling instructions
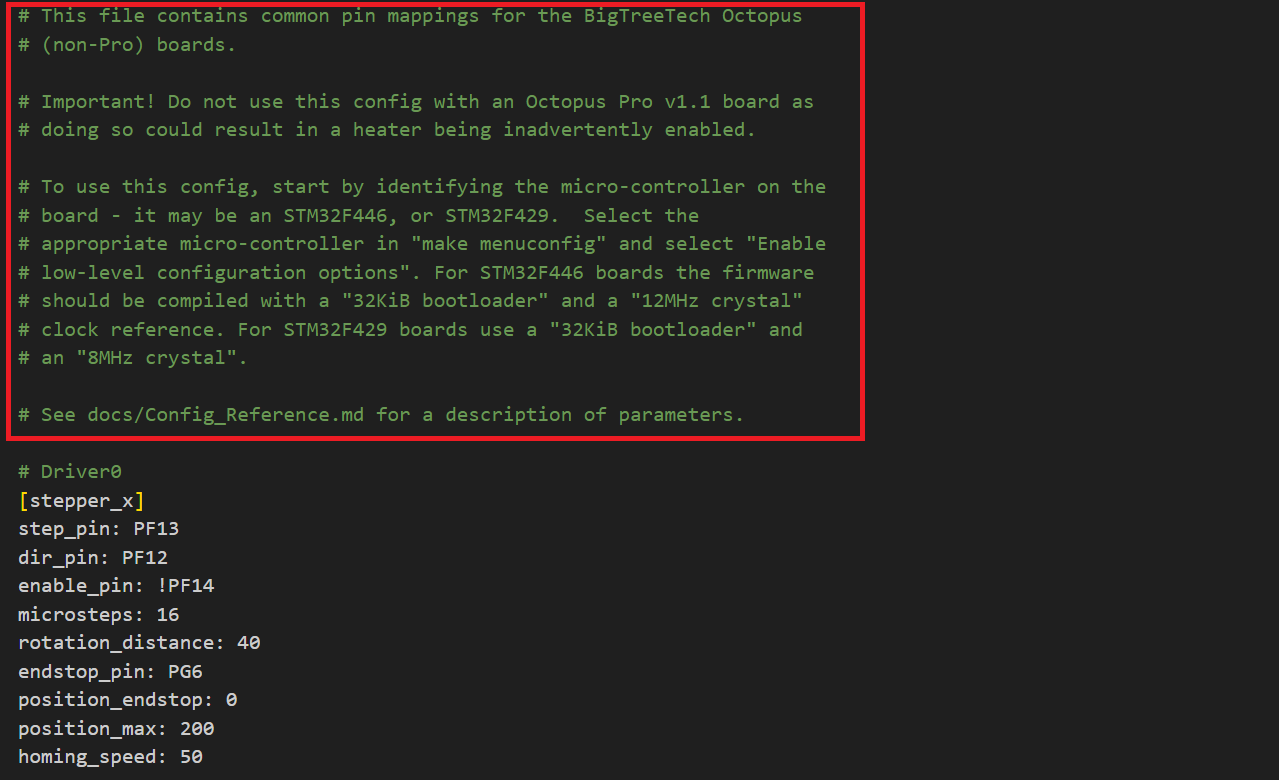
BigtreeTech Octopus v1.1 compiling instructions
Optional: Adding a KlipperScreen to Your BTT Pi 2
The BTT Pi 2 image comes with KlipperScreen pre-installed, allowing for a more interactive experience. You can simply plug it into the BTT Pi 2 through the HDMI interface and boot KlipperScreen immediately.
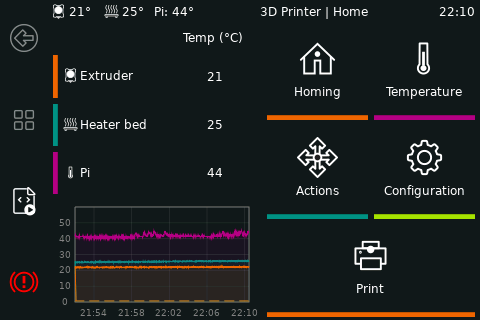
Source: KlipperScreen GitHub
KlipperScreen is a touchscreen GUI that interfaces with Klipper via Moonraker. It allows you to switch between multiple printers and access them from a single location. Notably, it doesn't need to run on the same host as your printer; you can install it on another device and configure the IP address to connect to the printer.
Connect the screen:
- Attach the screen to the BTT Pi 2 using the HDMI interface.
Boot the system:
- Simply power on the BTT Pi 2, and KlipperScreen will launch automatically.
For more details, visit the KlipperScreen GitHub page.
Integrating Obico AI with BTT Pi 2
Integrating Obico AI with your BTT Pi 2 allows you to access powerful monitoring and failure detection capabilities for your 3D printing setup. As previously mentioned, the Obico software comes pre-installed with the BTT Pi 2 image, giving all users access to AI failure detection and remote 3D printer management.
Follow the steps below to set up and link Obico to your BTT Pi 2. You will enjoy all Obico features and capabilities, such as Obico’s General AI Detection System and Obico’s Nozzle Ninja - First Layer AI Detection System.
Step 1: Sign Up for an Obico Account
To get started, you need to sign up for an Obico account. This account will be used for both the mobile and web apps.
📱 Mobile App:
1. Download the Obico App:
Available on the Apple App Store or Google Play Store.
2. Open the Mobile App:
- Click through the first-time tour and tap “Let’s Go!”.
- On the "Hardware Required" screen, tap "YES!".
- Tap "Sign Up/Sign In" to proceed to the registration page.
3. Sign Up:
Sign up using your email, Google, or Facebook account. If you already have an account, sign in using your credentials.
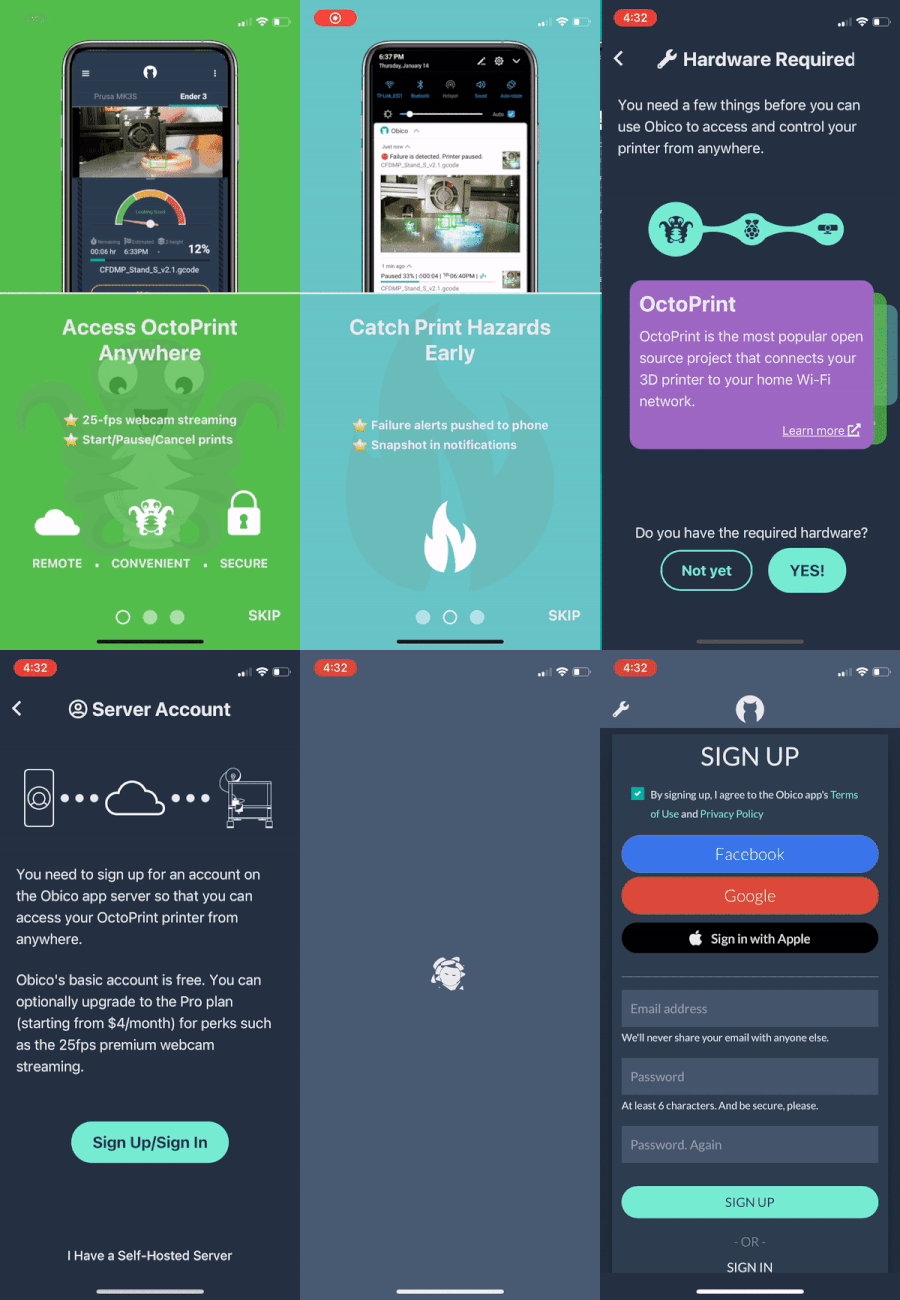
If you are connecting to a self-hosted Obico server, press the wrench icon (🔧) on the top-left corner of the sign-up screen to change the server address.
🌐 Web App:
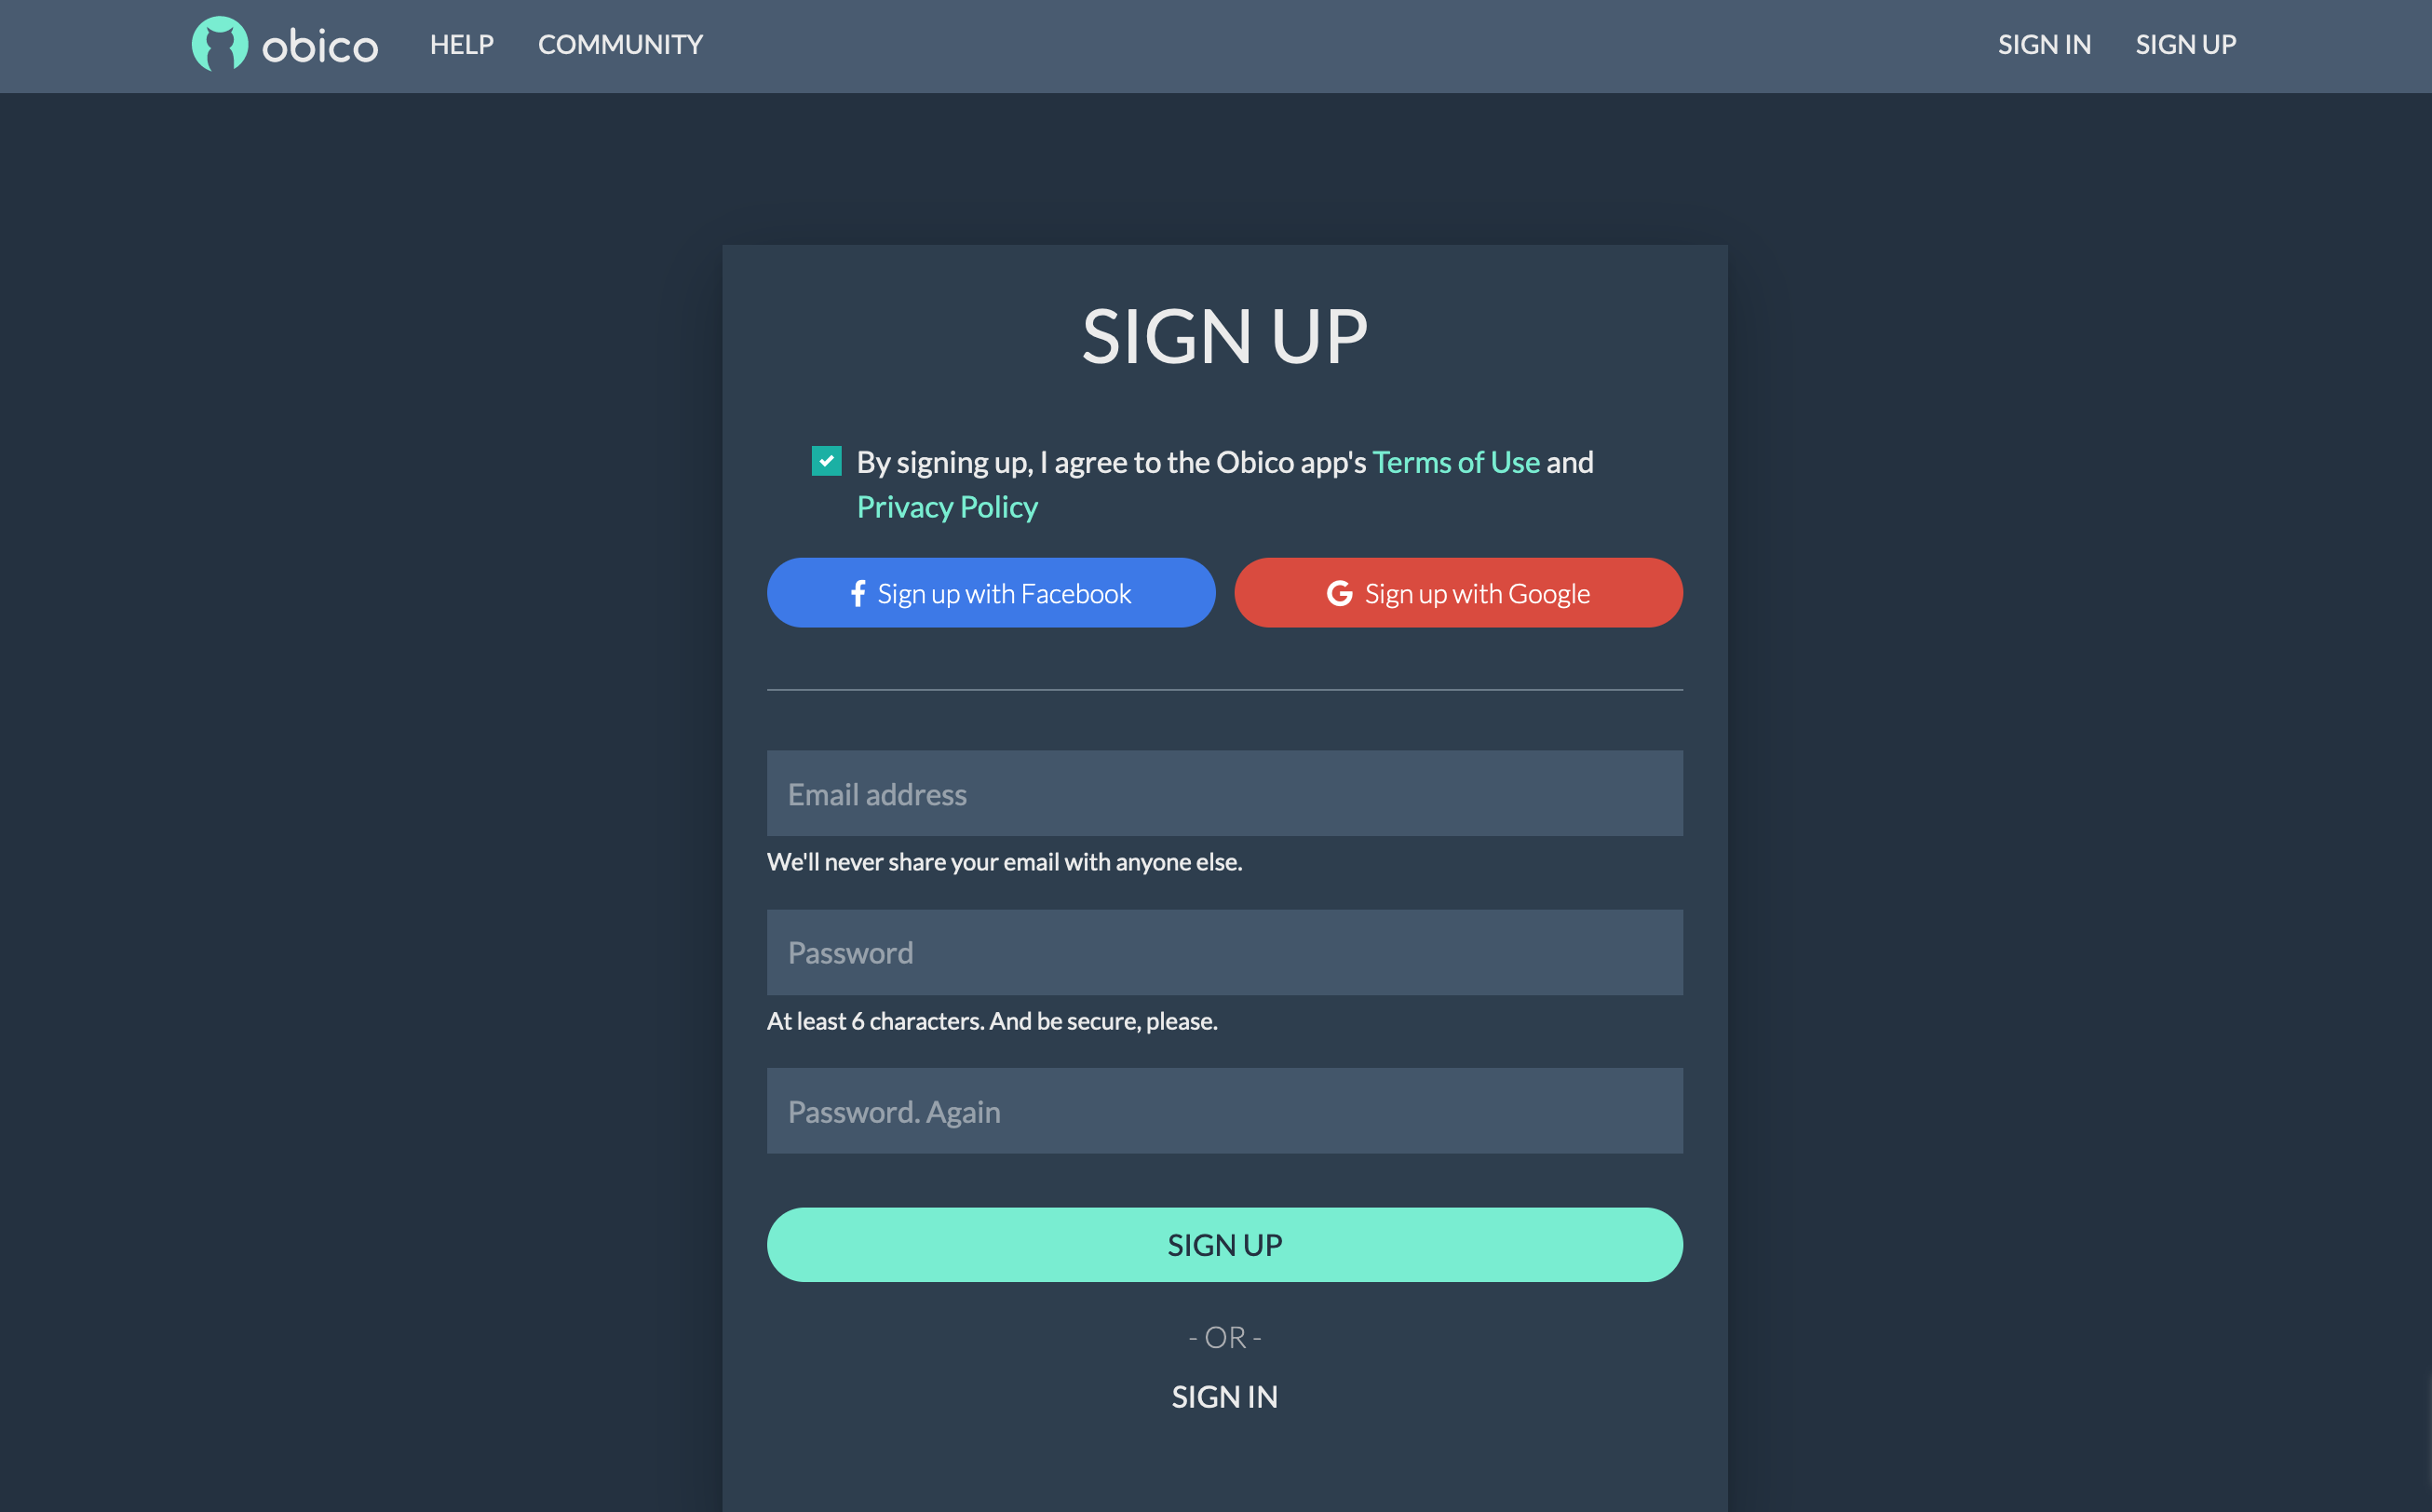
1. Open the Obico Web App:
Visit the Obico website in your browser.
2. Sign Up/Sign In:
Click "Sign Up" and register using your email, Google, or Facebook account. If you already have an account, click "Sign In" and log in with your credentials.
Step 2: Launch the "Link Printer" Wizard in the Obico App
To link your printer, follow these steps, whether you are using the mobile or the web app:
If your phone or computer is on the same local network as your Klipper, the Obico app can find your Klipper machine automatically. This is the easiest way to link your printer to your Obico account.
📱 Mobile App:
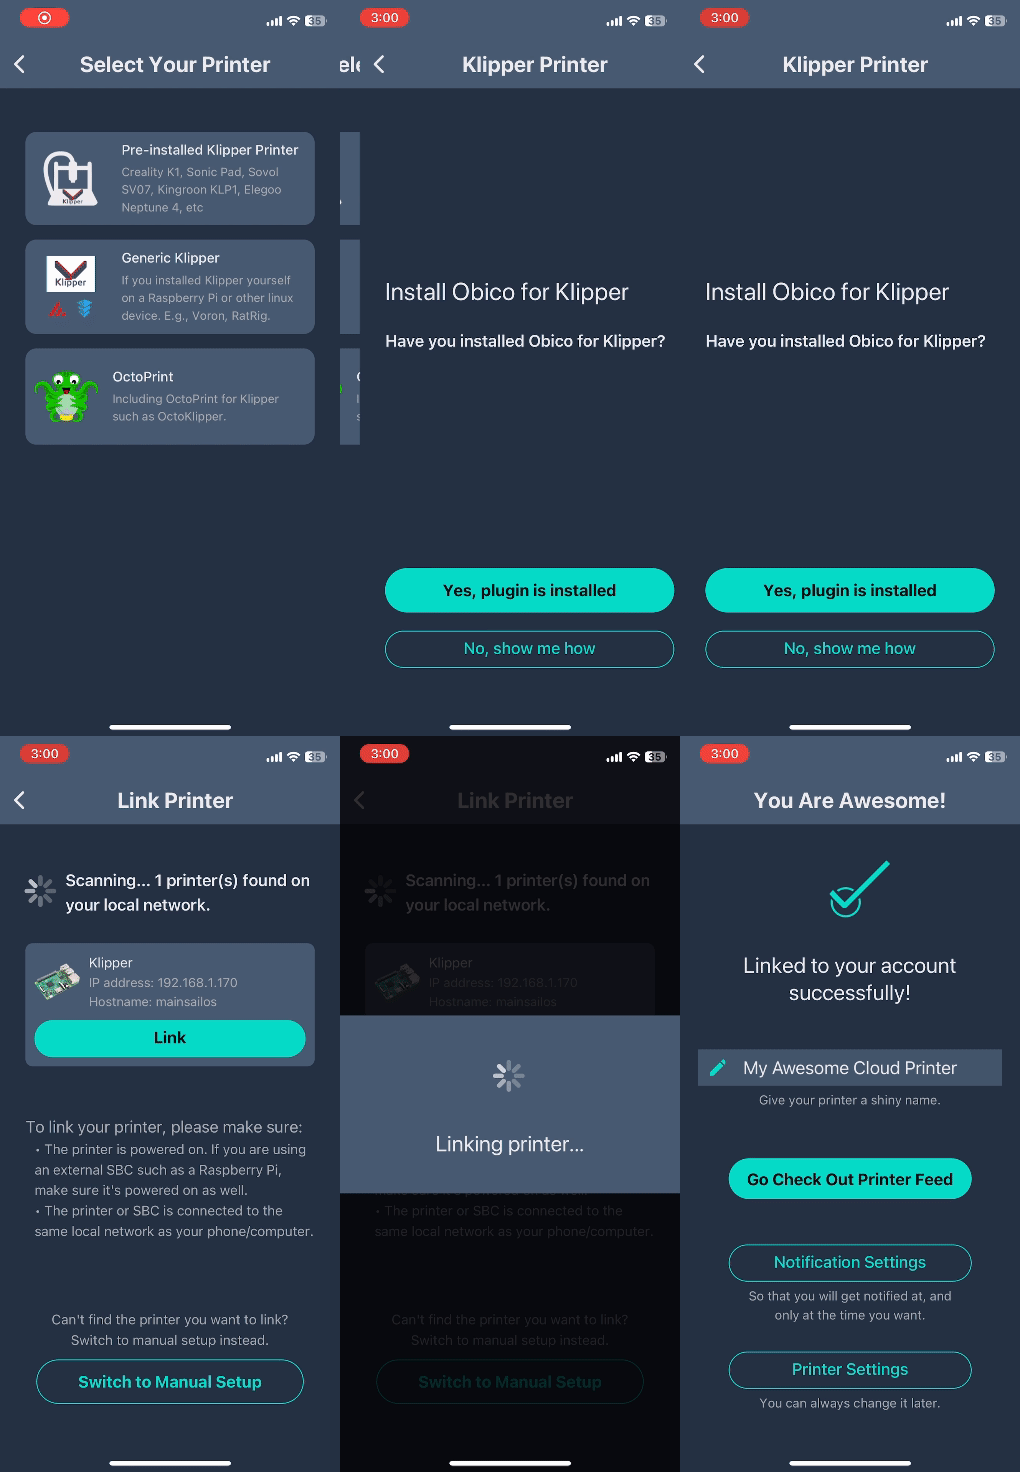
- Open the Obico app.
- Press the "Link Printer" button on the welcome screen. If you don't see it, tap the menu icon (☰) and select "Link New Printer".
- Choose “BTT Pi 2” from the list.
- Tap "Next".
- The app will start scanning for the Klipper printer connected to the same local network.
- If a printer is found, simply click the "Link" button and the app will do the rest for you.
🌐 Web App:
- Open the Obico web app and log in.
- Click the "Link Printer" button on the welcome screen.
- Choose “BTT Pi 2” from the list.
- Click "Next".
- The app will start scanning for your Klipper connected to the same local network.
- If your Klipper printer is found, simply click the "Link" button and the app will do the rest for you.
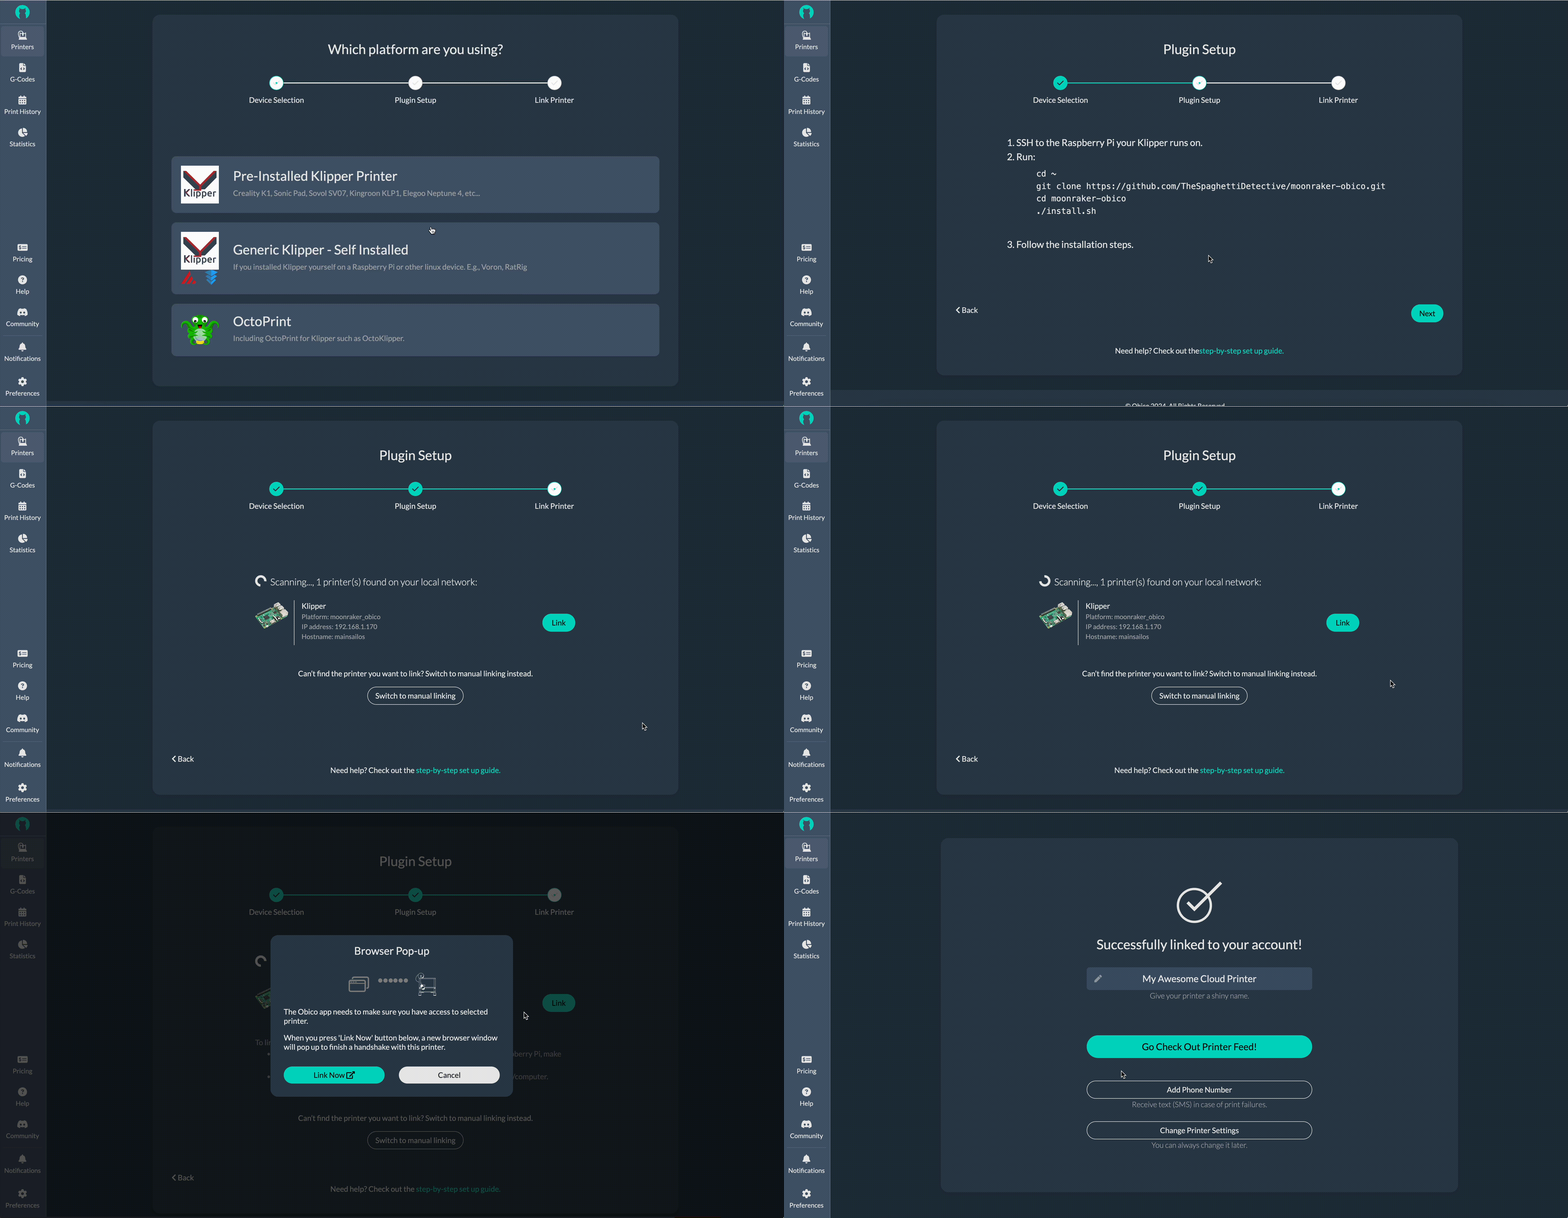
Optionally, you can now give your printer a name. If you skip this step, your printer will have the default name "My Awesome Cloud Printer".
If the app doesn't find your printer, follow the following manual setup guide to link your printer using a one-time passcode.
Step 3: Restart the BTT Pi 2
Once the setup is complete, restart your BTT Pi 2. After it boots up, you should see your printer and webcam stream in the Obico app.
Manual Printer Linking
If the automatic linking doesn't work, you can manually link your printer.
Using KlipperScreen:
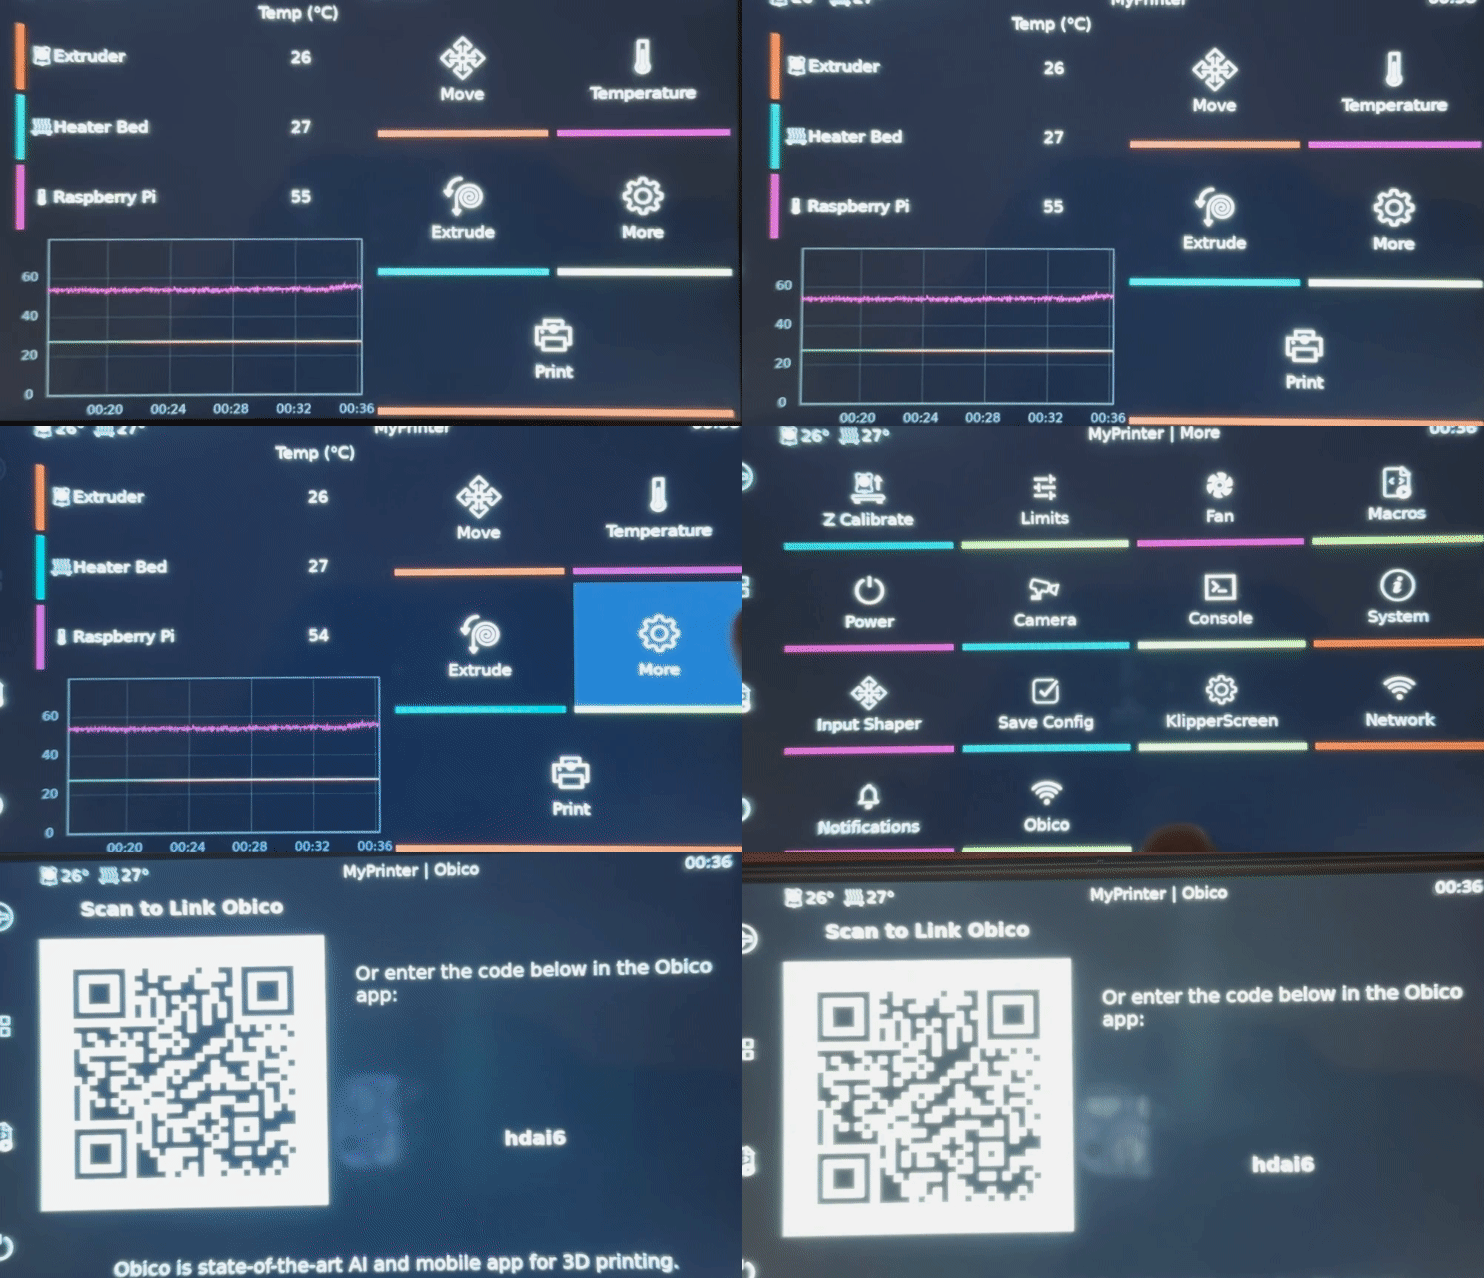
1. Navigate to KlipperScreen:
On KlipperScreen, navigate to the main printer dashboard.
2. Access Obico:
Tap "More" and then "Obico".
3. Scan the QR Code:
A QR code will appear on the screen.
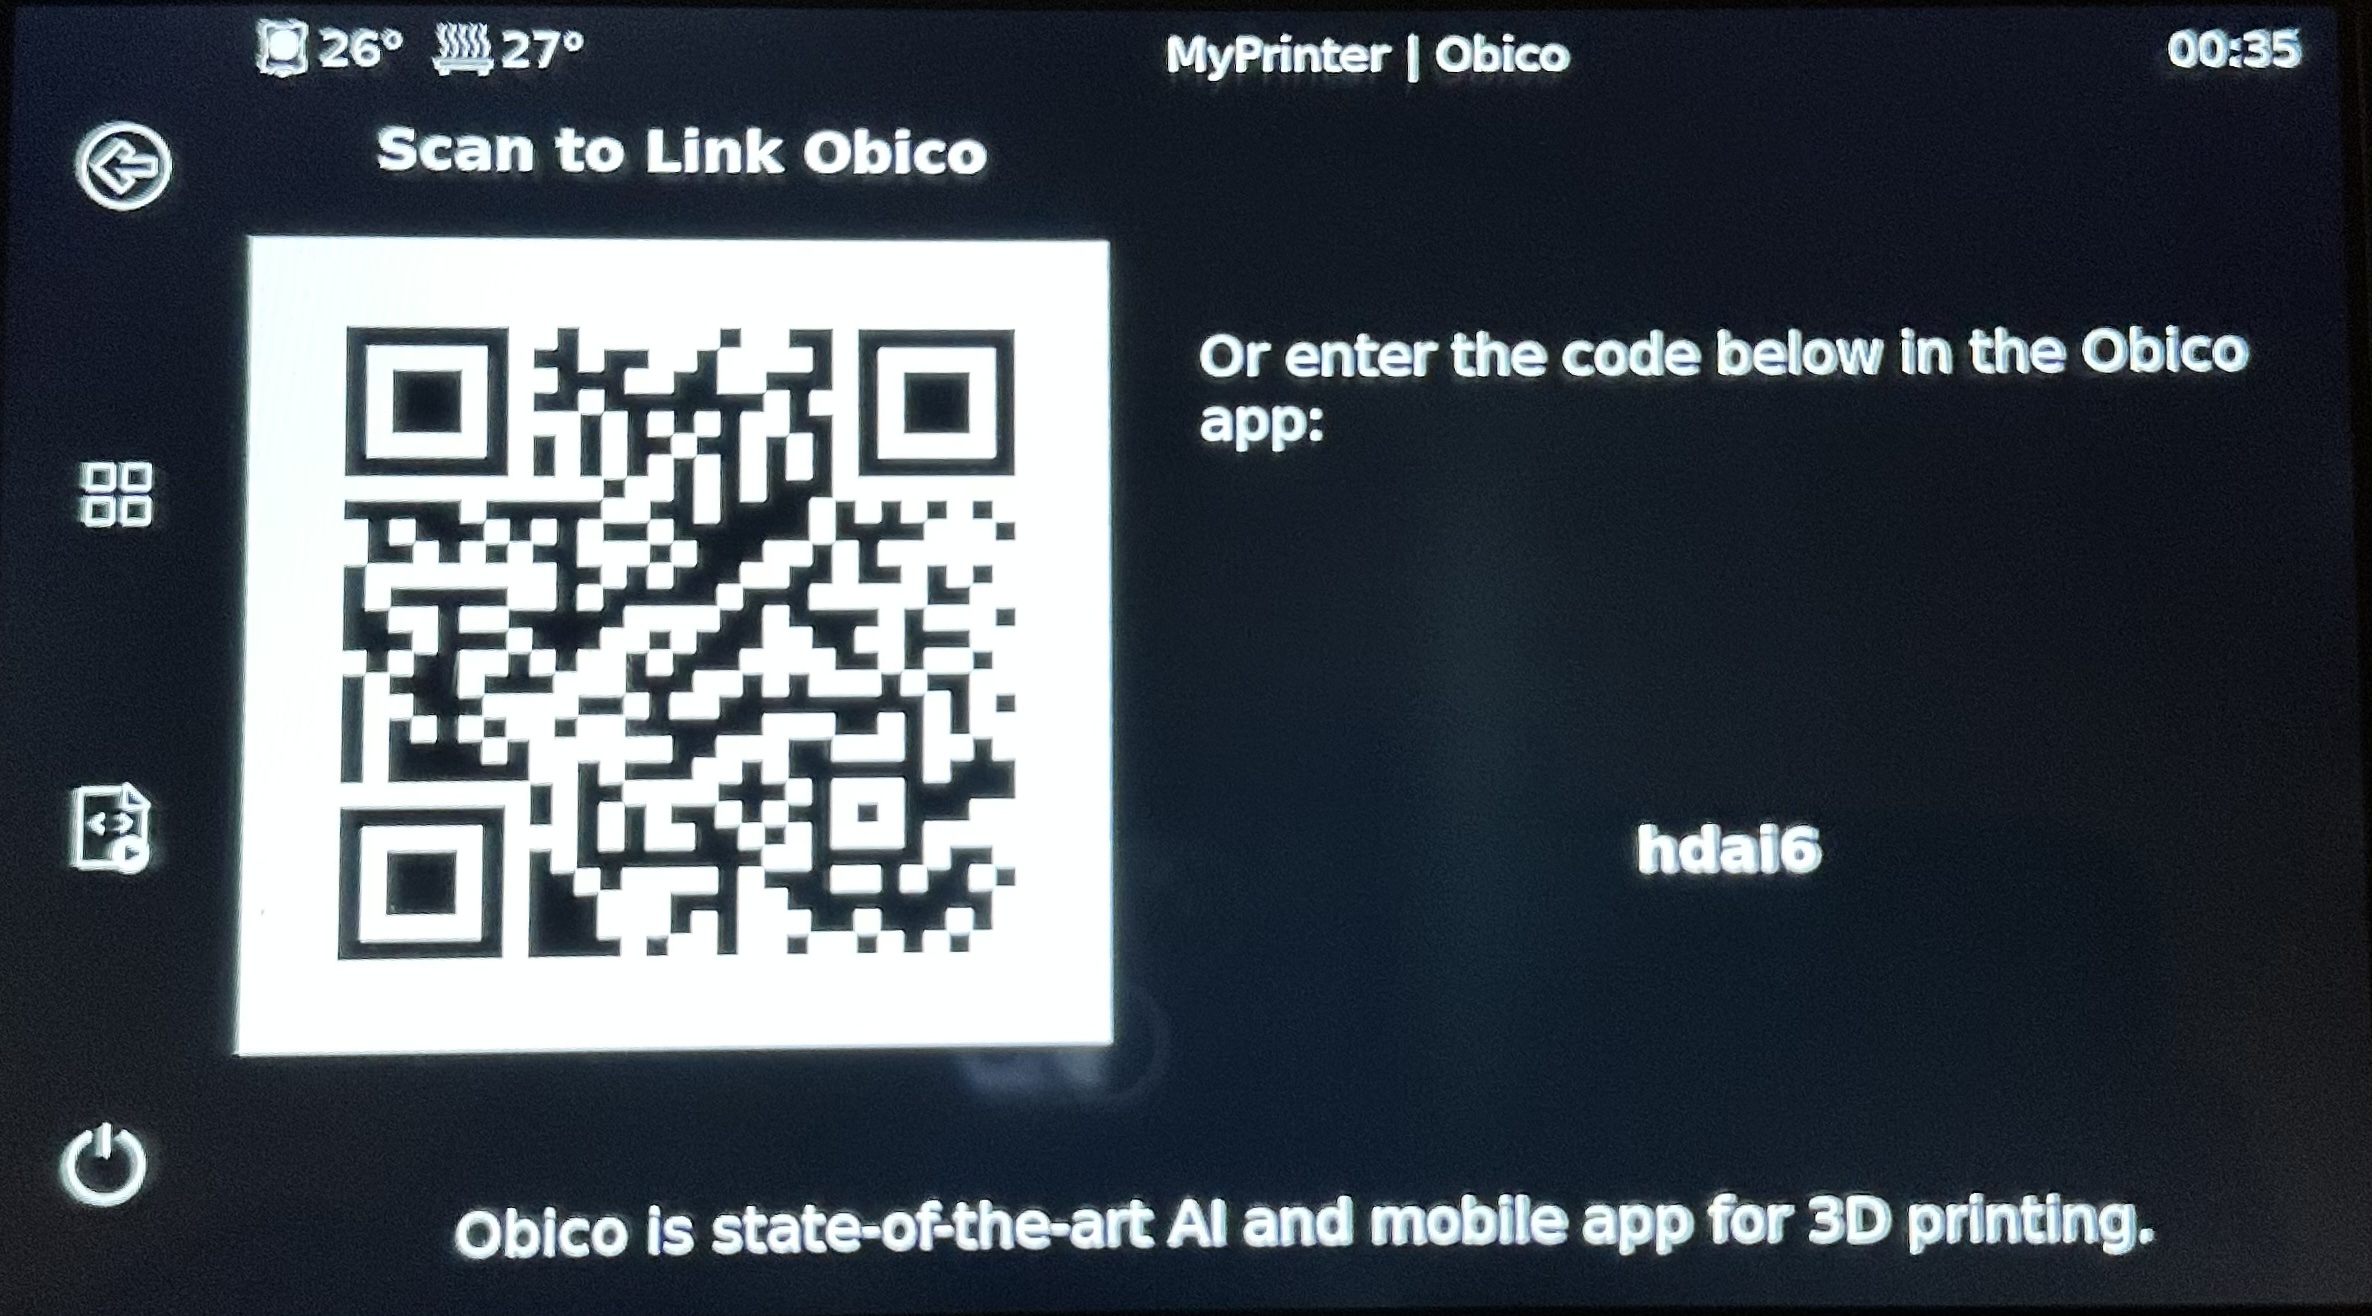
Go back to the printer scanning screen in the mobile app (Step 2), tap "switch to manual linking" and then "Touch Screen". Allow the app to access your camera and scan the QR code.
4. Restart the BTT Pi 2
Once the setup is complete, restart your BTT Pi 2. After it boots up, you should see your printer and webcam stream in the Obico app.
Without KlipperScreen:
1. SSH into the BTT Pi 2:
- Connect to the BTT Pi 2 using an SSH client like PuTTY.
Username: Biqu
Password: Biqu
- Run the Installation Script:
cd moonraker-obico
./install.sh
2. Follow the Instructions:
The script will guide you through the setup process, including obtaining a one-time passcode.
3. Link Your Printer:
- Open the Obico app on your mobile device. Go back to the printer scanning screen in the mobile app (from Step 2), tap "switch to manual linking".
- Tap "KIAUH or ./install.sh"
- Enter the one-time passcode shown on the terminal screen into the Obico app.
4. Restart the BTT Pi 2
Once the setup is complete, restart your BTT Pi 2. After it boots up, you should see your printer and webcam stream in the Obico app.
FAQs
1. What is the BTT Pi 2?
The BTT Pi 2 is a powerful single-board computer designed for 3D printing. It comes with Klipper firmware and Obico AI pre-installed in one image, providing advanced 3D printing management and AI failure detection right out of the box.
2. What is Klipper?
Klipper is a 3D printer firmware that combines the power of a general-purpose computer with a microcontroller, offering high-speed performance and precision. It improves print quality and allows for advanced features like pressure advance and input shaping.
3. What is Obico AI?
Obico AI is a software that provides remote monitoring and AI failure detection for 3D printers. It allows you to keep an eye on your printer from anywhere and receive alerts if something goes wrong.
4. How do I set up WiFi on the BTT Pi 2?
After flashing the BTT Pi 2 image to your MicroSD card, open the new FAT32 partition on your computer. Edit the system.cfg file, replacing Your SSID with your WiFi network name and YourPassword with your WiFi password. Save and close the file.
5. How do I configure Klipper for my Ender 3 V2?
- Insert the MicroSD card into the BTT Pi 2 and power it on.
- SSH into the BTT Pi 2 using an SSH client like PuTTY.
- Navigate to the Klipper configuration directory with
cd /home/pi/klipper_config. - Download the Ender 3 V2 configuration file using:
wget https://github.com/Klipper3d/klipper/blob/master/config/printer-creality-ender3-v2-2020.cfg -O printer.cfg
- Modify the configuration file to match your printer’s specifications.
- Save and restart Klipper using
sudo service klipper restart.
6. How do I link Obico AI to my printer using the mobile app?
- Download the Obico app from the Apple App Store or Google Play Store.
- Sign up or sign in to your Obico account.
- Press the "Link Printer" button on the welcome screen.
- Choose “BTT Pi 2” and follow the prompts to link your printer.
7. How do I link Obico AI to my printer using the web app?
- Open the Obico web app and sign up or sign in.
- Click the "Link Printer" button on the welcome screen.
- Choose “BTT Pi 2” and follow the prompts to link your printer.
8. What should I do if the app can't find my printer?
If the app can't find your printer, follow the manual setup guide:
- SSH into the BTT Pi 2 using an SSH client like PuTTY.
- Run the installation script with
cd moonraker-obicoand./install.sh. - Follow the instructions to obtain a one-time passcode.
- Open the Obico app, go to the printer scanning screen, tap "switch to manual linking", and enter the one-time passcode.
9. How do I add a screen to my BTT Pi 2?
- The BTT Pi 2 image comes with KlipperScreen pre-installed.
- Connect the screen to the BTT Pi 2 using the HDMI interface.
- Power on the BTT Pi 2, and KlipperScreen will launch automatically.
10. Where can I find more resources and help?
- BigTreeTech Pi 2 User Manual: BTT Wiki
- Obico AI Setup Guide: Obico Docs
- Obico AI Setup Video: YouTube
Conclusion
Your 3D printing experience can be greatly improved by installing Klipper on the BTT Pi 2 and combining it with Obico AI. This will provide better performance and accuracy through Klipper's strong features, while Obico AI will do advanced monitoring to ensure that your prints always come out perfect.
Additional Resources
BTT Pi 2 Obico AI Setup Guide - Video Version
This guide provides the necessary steps to install Klipper on the BTT Pi 2 and integrate Obico AI for enhanced 3D printing capabilities. Follow each step carefully to ensure a successful setup.
Happy printing!
