Klipper Webcam Setup using Mainsail
Introduction
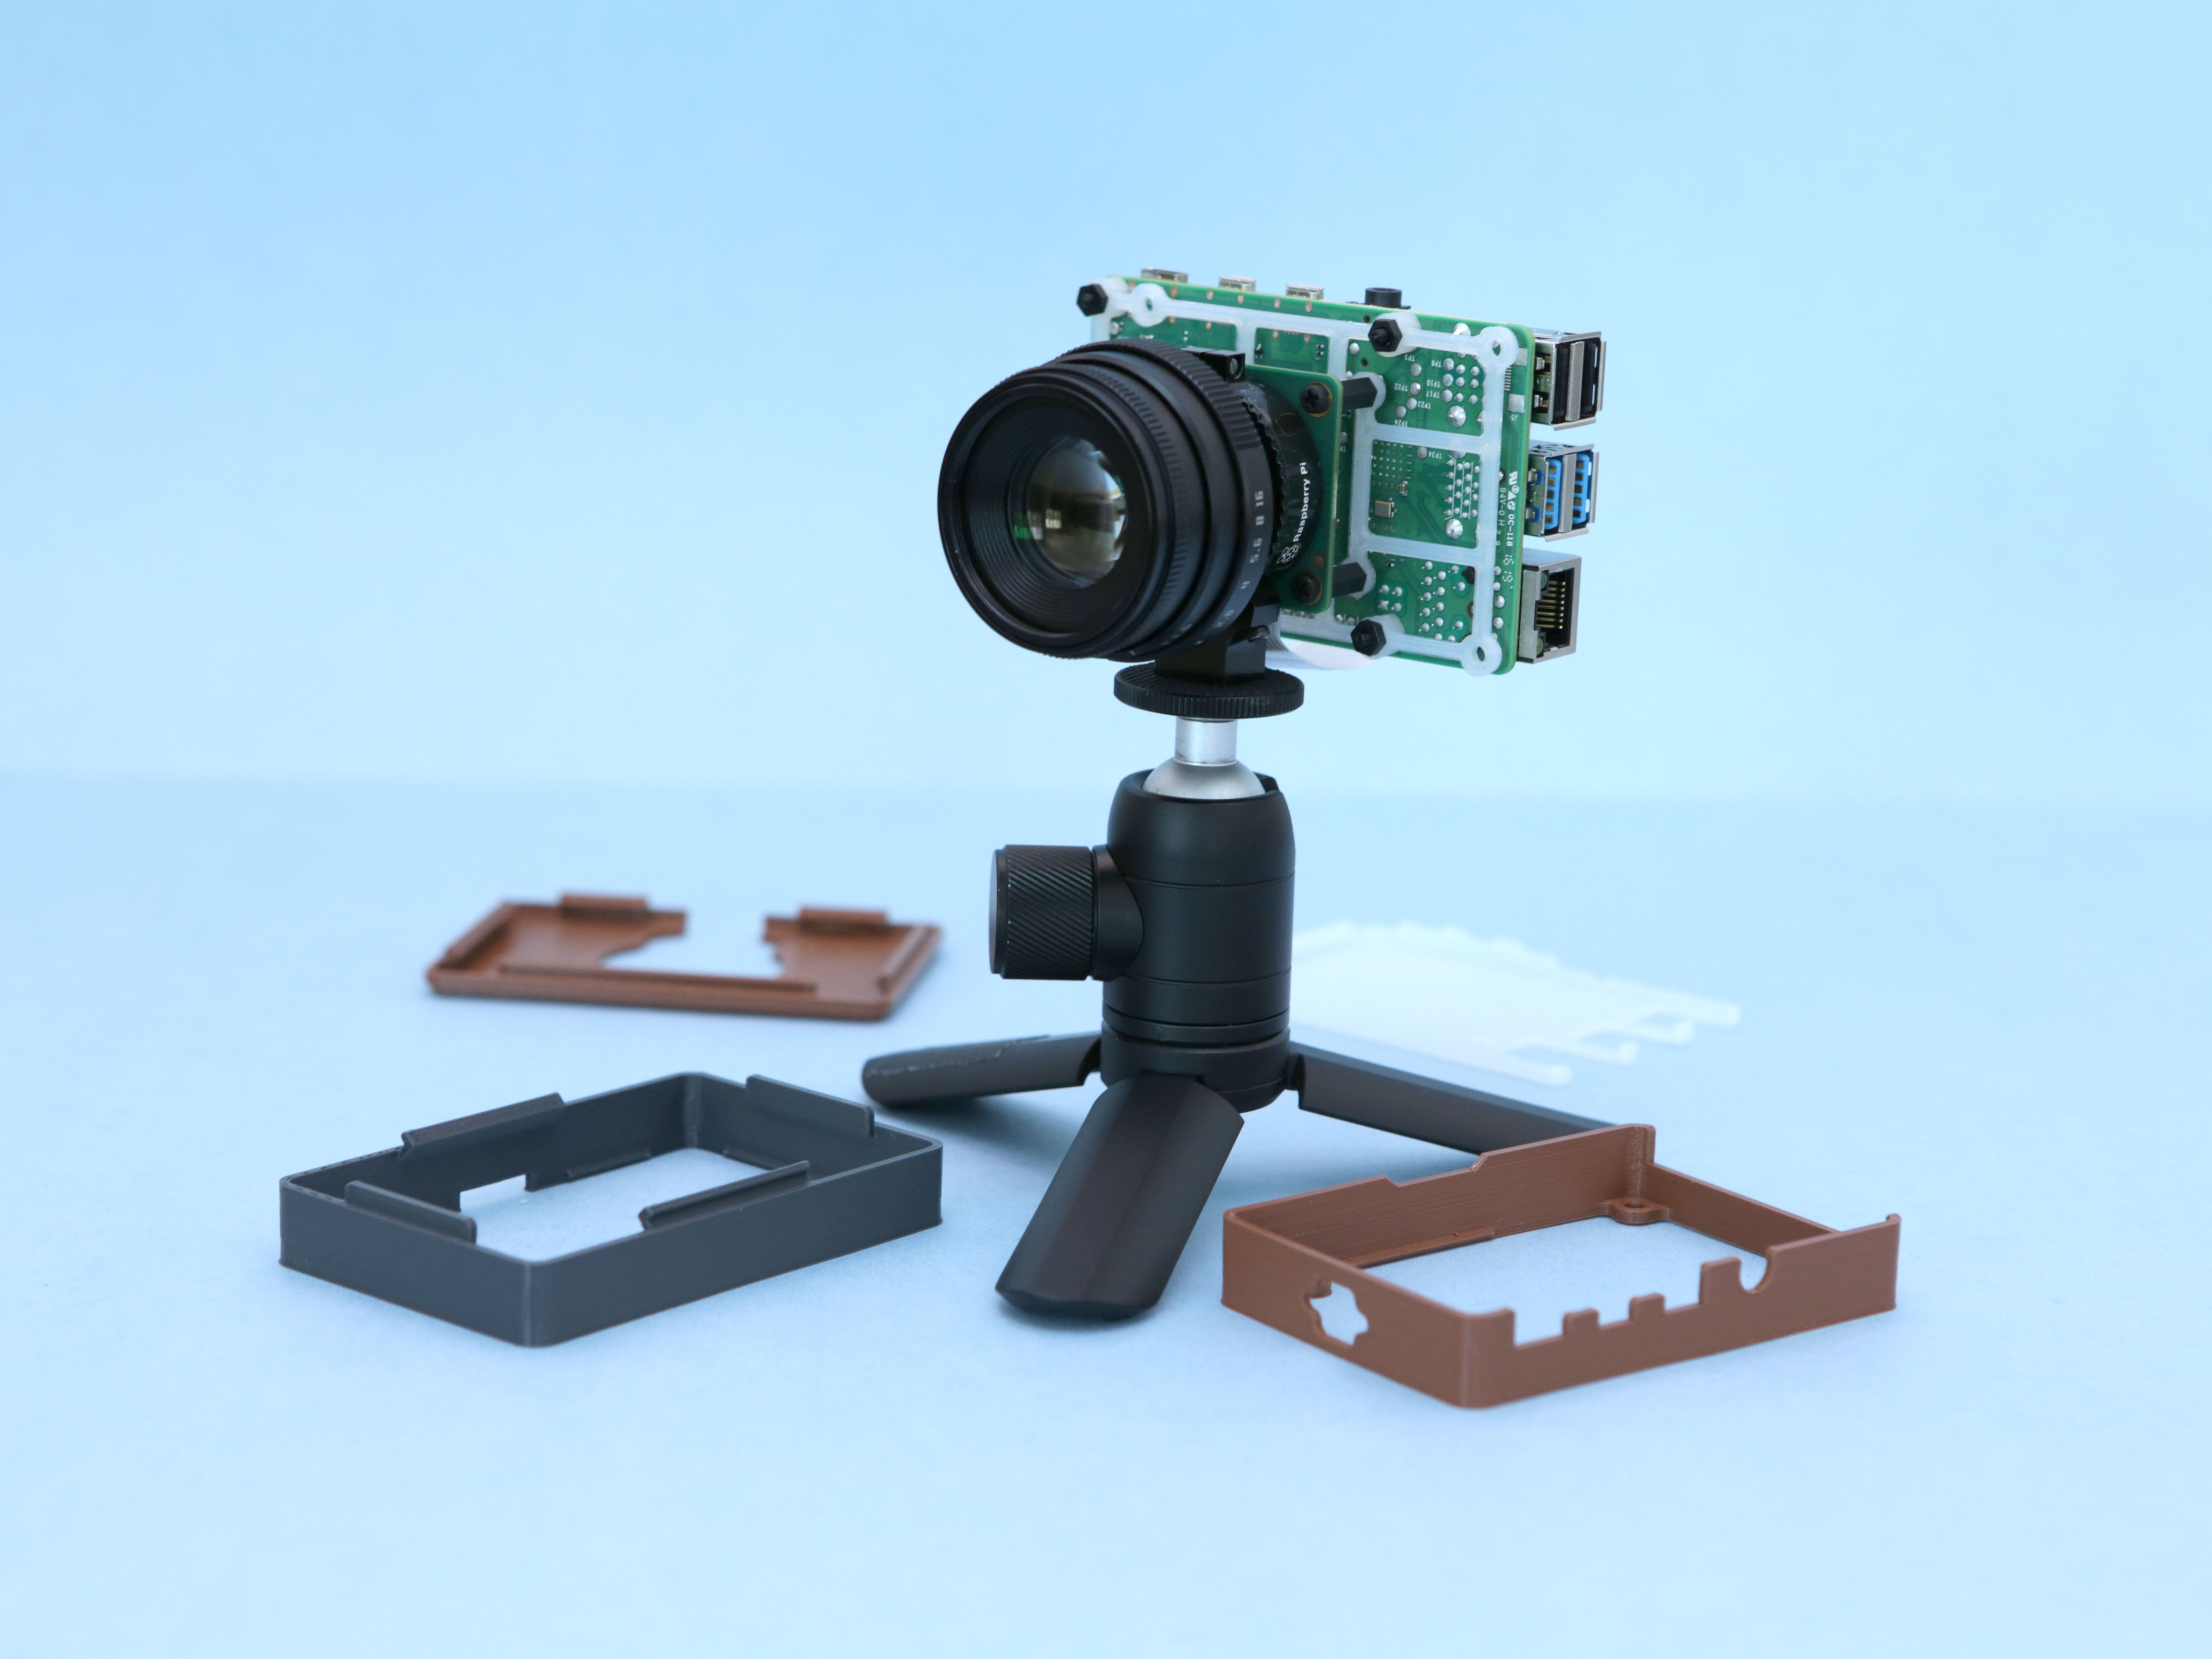
Klipper and Mainsail are one of the best software pairings for 3D printers you can find today. Both of these programs keep getting better over time so that users can have a better printing experience.
Today, we're going to look at the camera streaming part of Mainsail-Klipper. Mainsail's Crowsnest streaming service recently added the camera-streamer project. This makes it easy to get high-quality video from your webcam without using a lot of data.
Everything you need to know about this revision is included in this article. We'll look at how to add a single camera or multiple cameras, as well as how to get a high-quality video stream of your 3D printer to your laptop.
Let's set sail and get the cameras ready!
Why Setup Camera in Mainsail Klipper?
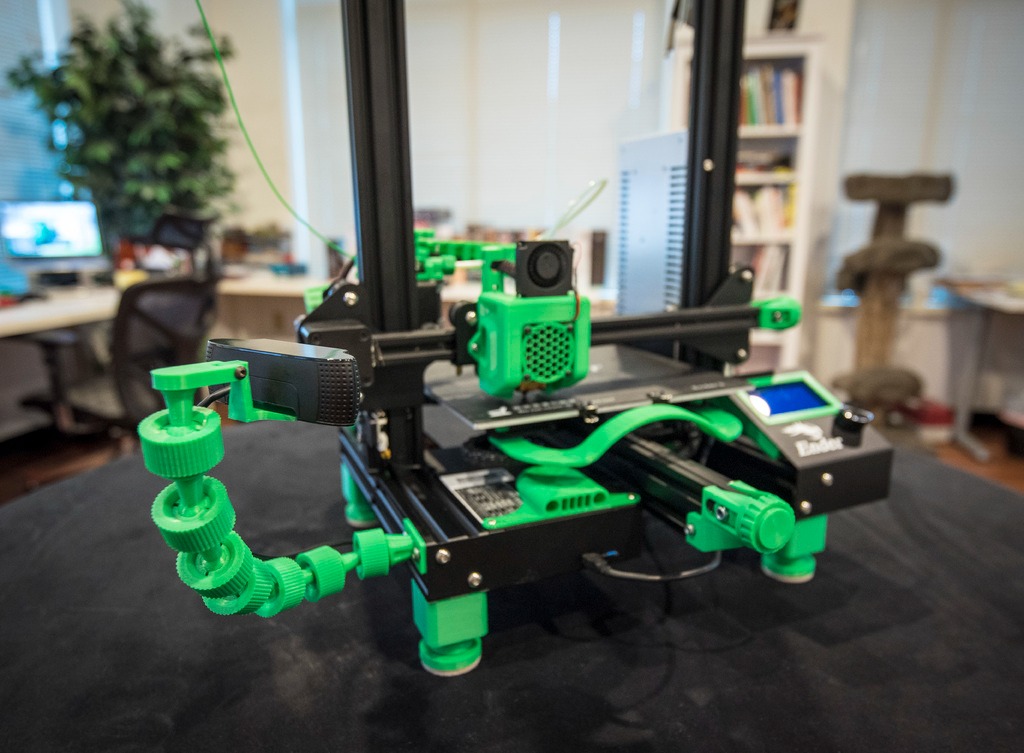
Klipper firmware is designed in ways for remote 3D printing. You don't have to be in the same room as your 3D printer to run it. A camera adds to this remote capability by letting you see how your printing is going.
You can keep an eye on your prints from far away with a camera. Your printer could be in a different place, and you could be working in a different room. You can still see how your prints are coming along.
On top of that, apps like Obico make your webcam even more useful when used with Klipper. Obico can find failed prints in real-time and let you know about them. At the end of the piece, we'll look at this in more depth.
Last but not least, Mainsail recently updated its Crowsnest camera streaming service to include the latest camera-streamer mode. With this mode, you can now send videos of excellent quality from your webcam without using a lot of data. This is the latest buzz in the 3D printing world. The video stream has very little delay, and you can watch your printer move in real-time.
If that wasn't enough, you can also record timelapse videos of your 3D prints by adding a webcam or camera to your Klipper printer. Time lapses are a great way to see the whole printing process in just a few seconds. They can also help you figure out where a print job went wrong.
You can set up more than one camera to shoot the videos from different views to make them easier to understand. You can even hook up a DSLR camera to your Klipper machine to record the printing process in the best quality possible and get a good video stream of your 3D printer.
There are a lot of perks, and setting it up is easy. Installing a camera on your Klipper-Mainsail 3D printer will almost certainly help you get the most out of your printing. Let's get going.
Crowsnest in Mainsail
Installing Crowsnest is the first and most important step to setting up a camera with Mainsail. Crowsnest is a webcam streaming service specially configured for the Mainsail OS and Raspberry Pi OS.
It does all the magic behind the scenes to get the video stream from your webcam to your computer. Crowsnest makes it easy to set up a camera for your Klipper 3D printer and keep track of multiple cameras.
Ideally, Crowsnest comes with the Mainsail startup file. But if you have problems or want to do a clean installation, follow the steps below carefully. We'll be putting in the latest version of the Crowsnest service, which is v4. The camera-streamer method works with this version.
There are two ways through which you can install Crowsnest on your Mainsail system. Let's look at these two things on their own.
The KIAUH method
Klipper Installation and Update Helper (KIAUH) is a great tool that all Klipper users should have. It makes it easy to run Klipper and other software that works with it, and it gives you a single window where you can do everything to do with Klipper. Installing KIAUH on your Klipper system will be the first step.
Install KIAUH on your Raspberry Pi

- SSH to your Raspberry Pi using PuTTY. If you’ve installed Klipper, you must be familiar with this step. If not, please refer to this step from our Klipper Installation guide.
- Once logged in, install ‘git’ by typing the following command in your PuTTY terminal.
sudo apt-get update && sudo apt-get install git -y - After that, type the next command to get KIAUH into your home directory.
cd ~ && git clone https://github.com/th33xitus/kiauh.git - Once KIAUH is installed, you can run it by using the following command.
/kiauh/kiauh.sh
Installing Crowsnest using KIAUH
- On the KIAUH home screen you can see the various software you have installed on your Raspberry Pi. As we have already set up Crowsnest, its status is displayed as Installed.
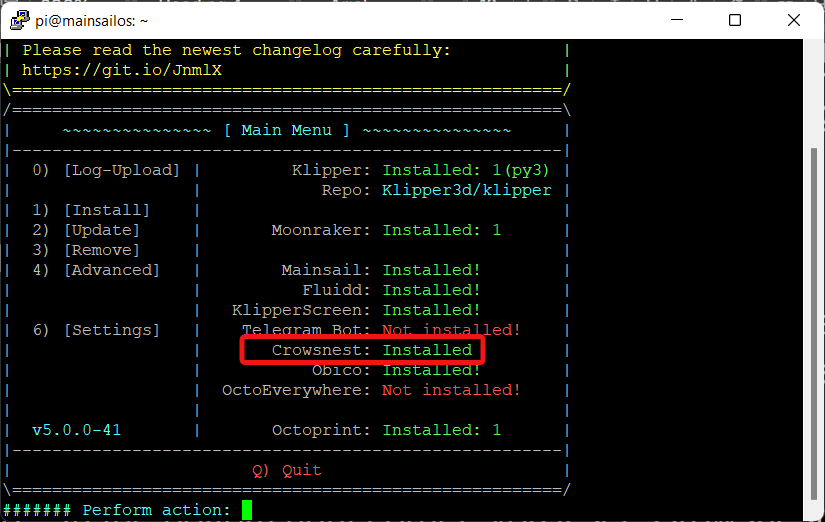
- For you to set up crowsnest, type ‘1’ and press enter on the main screen. This will take you to the installation window.
- In the bottom right corner, you’ll see Crowsnest under the webcam streamer option. Type 11 in the window and press enter.
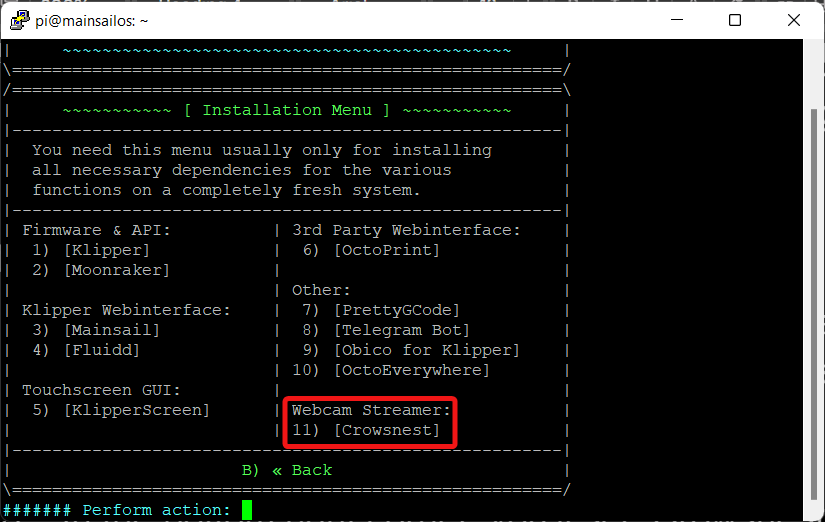
- The streaming service will now begin installing on your Pi.
- You might get a pop-up asking for configuring the update manager in moonraker.conf. Select Yes and proceed with installation.
- At the end of the installation, you can see a message indicating the process's success.
Direct Installation
This is a straightforward method for installing crowsnest and does not require you to install KIAUH first.
- Connect to your Pi from your device using PuTTY. If you’ve installed Klipper, you should be familiar with this stuff. If not, refer to our Configure Klipper section from this guide.
- Make sure you have git installed in your system. Type in the following command in the PuTTY terminal to install/update git.
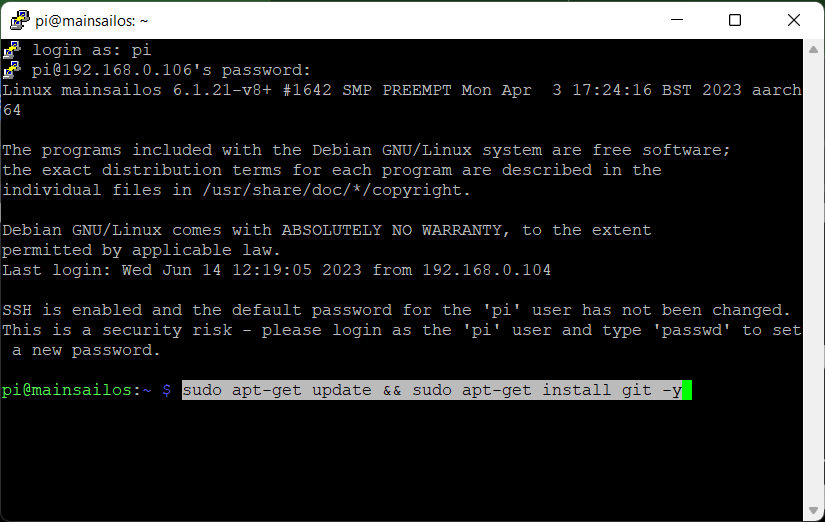
sudo apt-get update && sudo apt-get install git -y - Once the above step is completed, execute the below commands, one line at a time.
    cd ~
    git clone https://github.com/mainsail-crew/crowsnest.git
    cd ~/crowsnest
    sudo make install
- Once everything’s installed, open the moonraker.conf file from your Mainsail interface.
- Copy-paste the following section in the file. It’ll help you automatically update the crowsnest service whenever a new version is released.
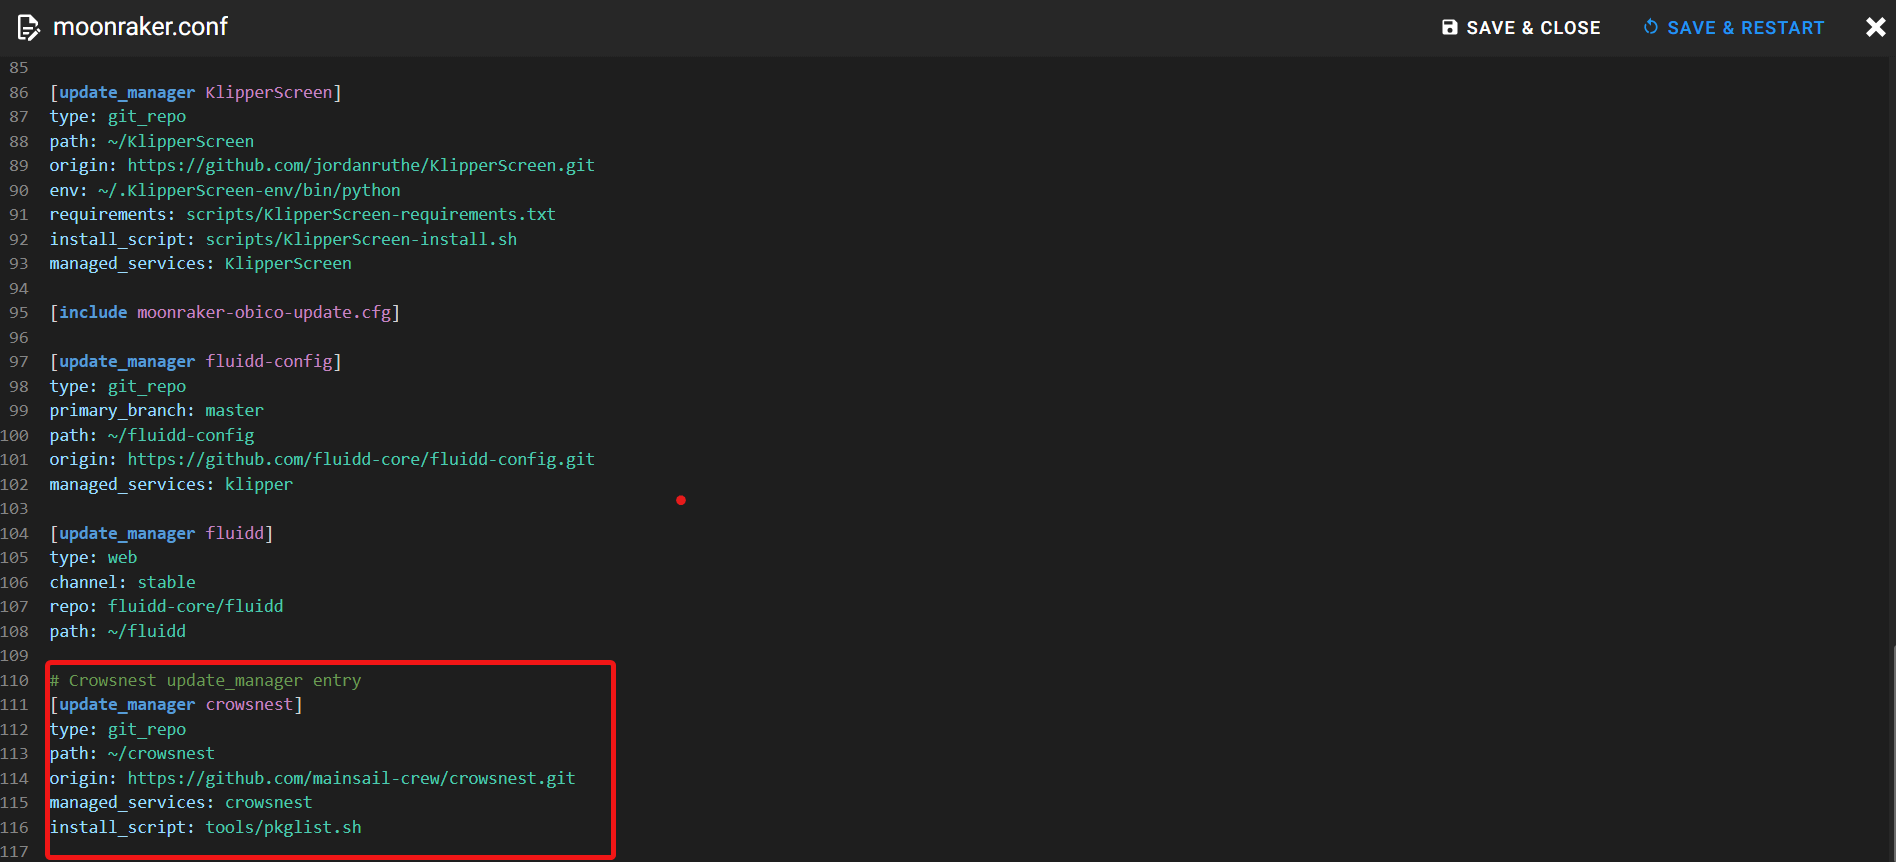
[update_manager crowsnest]
type: git_repo
path: ~/crowsnest
origin: https://github.com/mainsail-crew/crowsnest.git
install_script: tools/pkglist.sh
You can use either of these methods to install/reinstall crowsnest on your Mainsail Klipper printer. The direct installation process is simpler, but the KIAUH automates almost every part of the process.
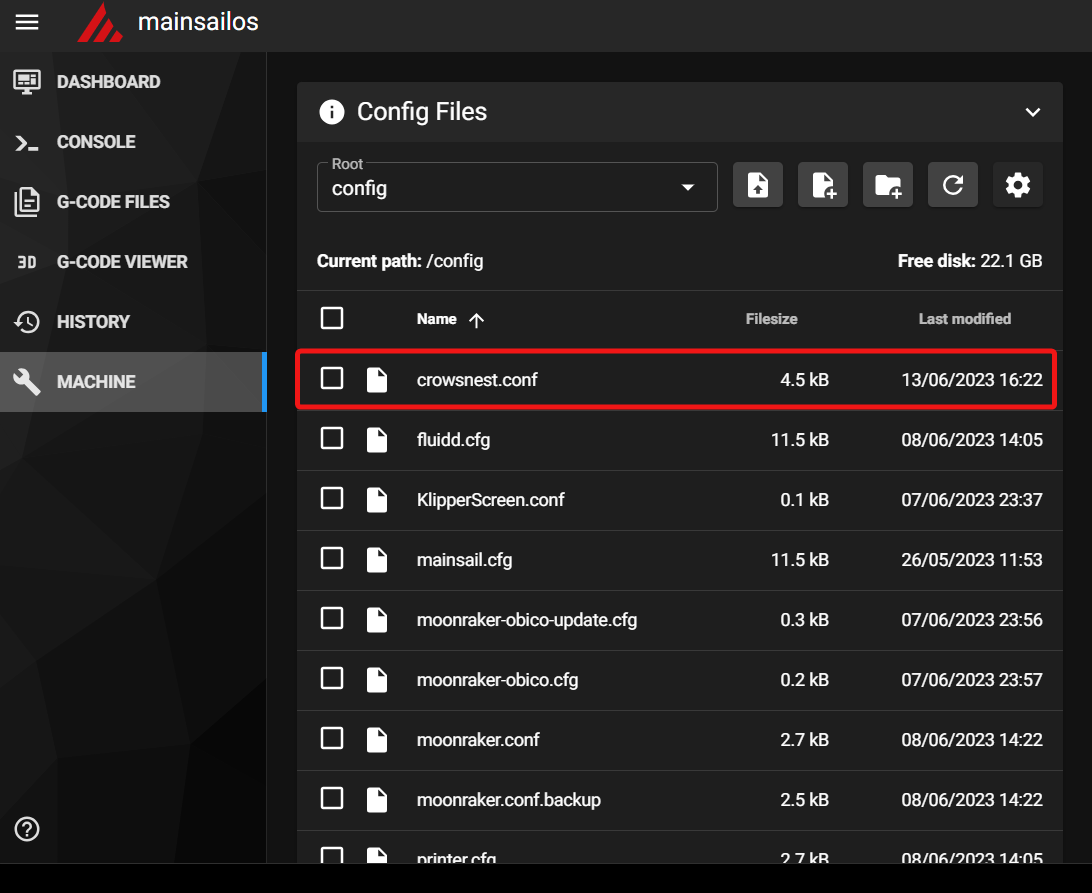 You’ll notice a new file named as crowsnest.conf in your machine section of the Mainsail interface. This file will be your go-to location for configuring the camera settings. At this point, you’re ready to configure your camera/webcam for your Klipper 3D printer.
Upgrade from an pre-V4 Crowsnest version.
You need to take a few extra steps to upgrade to Crowsnest V4 from any early version:
cd ~/crowsnest
make uninstall # very important. Otherwise Crowsnest v4 won't work!

# update Crowsnest via update manager

cd ~/crowsnest
sudo make install
Please follow the steps above. The V4 is a breaking change so you can't update crowsnest in the same way you have always taken.
Camera Parameters in Crowsnest
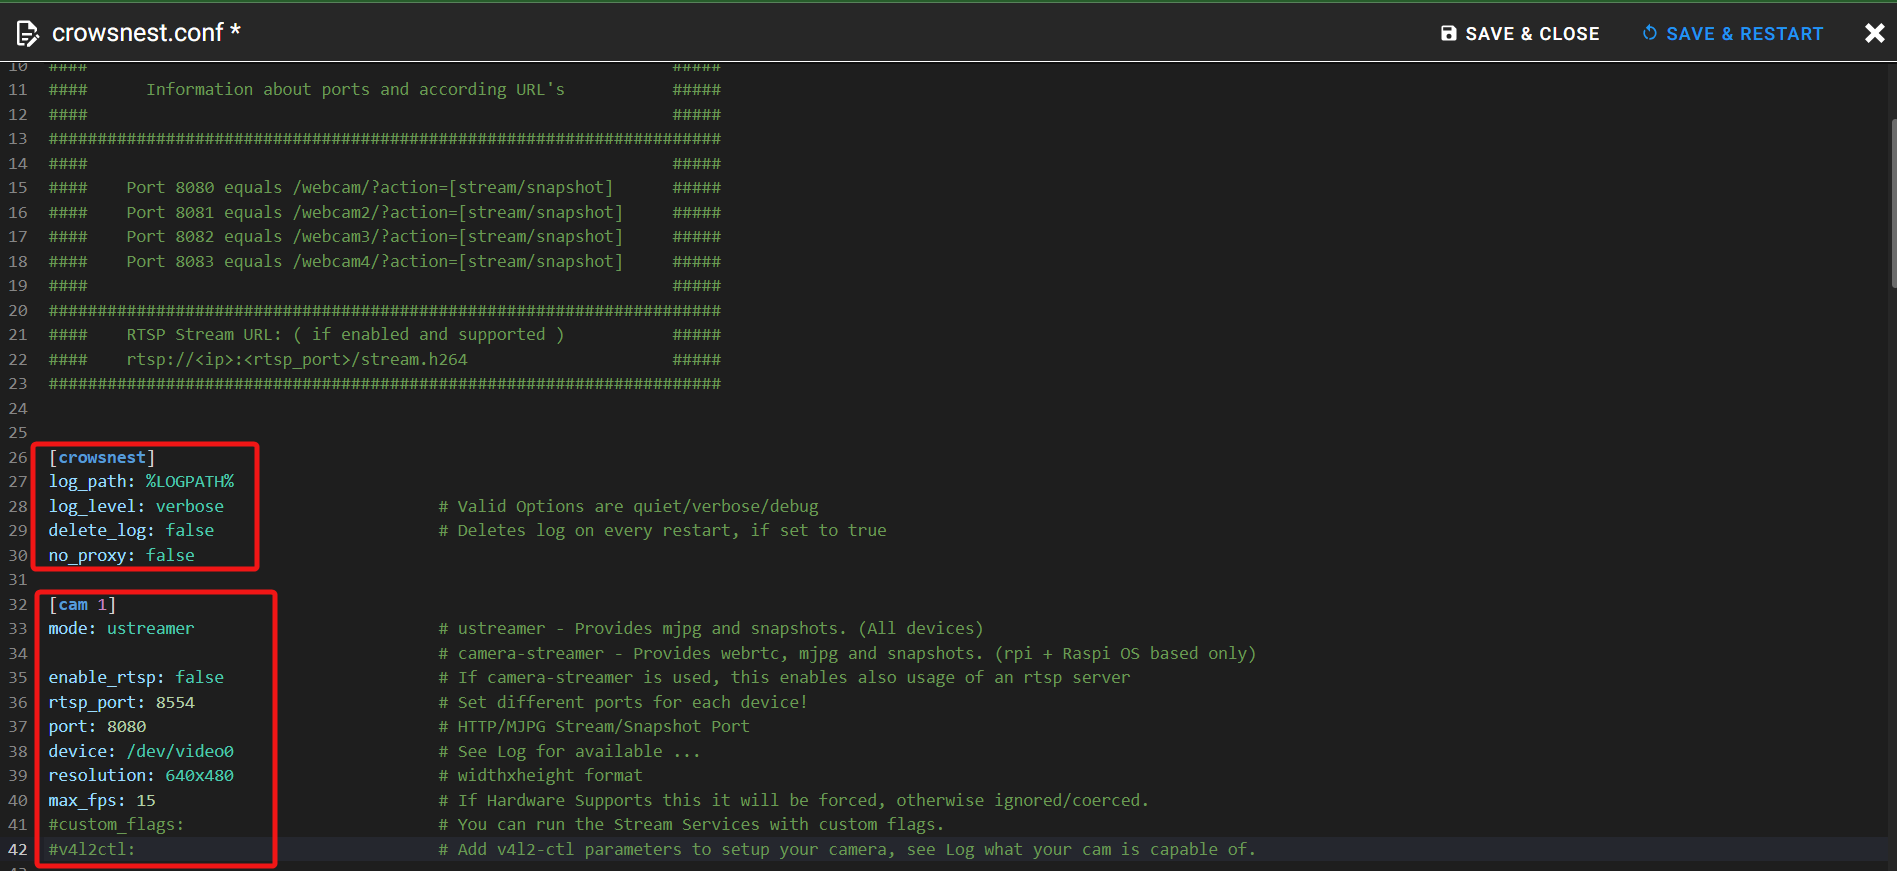
Crowsnest uses two types of modes to stream your webcam feed. One is a ustreamer and another, camera-streamer.
Ustreamer streams a continuous series of jpeg images to your Mainsail interface. These images consume a lot of network bandwidth and are relatively heavy on your Pi’s resources. It’s the default option in Mainsail as of now.
Camera-streamer is a new streaming method that uses your Pi’s GPU to deliver a high-quality video stream of your printer. It allows you to stream the video feed in WebRTC, which gives you the benefits of less network bandwidth usage, higher picture quality, and high FPS.
It’s okay if we don’t get into the technicalities of these various terms. For now, it’s sufficient to know that camera-streamer is a superior streaming protocol and gives your webcam streaming an extra edge.
mode
[cam raspi]

mode: camera-streamer

...

[cam logiC270]

mode: ustreamer
Crowsnest uses two types of modes to stream your webcam feed. One is u-streamer, another camera-streamer.
U-streamer streams a continuous series of jpeg images to your Mainsail interface. These images consume a lot of network bandwidth and are relatively heavy on your Pi’s resources. It’s the default option in Mainsail as of now.
Camera-streamer is a new streaming method, which uses your Pi’s GPU to deliver a high-quality video stream of your printer. It allows you to stream the video feed in webrtc, which gives you the benefits of less network bandwidth usage, higher picture quality and high FPS.
It’s okay if we don’t get into the technicalities of these various terms. For now, it’s sufficient to know that camera-streamer is a superior streaming protocol, and gives your webcam streaming an extra edge.
Set mode to camera-streamer only when crowsnest is running on a Raspberry Pi. Camera-streamer doesn't support any other SBCs as of now.
enable_rtsp
Real-Time Streaming Protocol (RTSP) is a protocol that’s developed to transmit audio and video between two endpoints within a system or over the internet. It’s an extremely efficient way of transmitting your video feed, as you can view your printer’s movement without any delays. You can transmit high-quality video and use a higher FPS rate when using RTSP.
It’ll only work if you’re using the mode as camera-streamer. Set the value to true if you wish to access an RTSP feed of your printer’s camera.
If you are using the Obico app, as you should, you should test the webcam stream in the Obico app with RTSP turned on. You will be amazed by how instant the webcam stream is, even if your phone is on a cellular network with spotty connection! However, some unlucky users may run into an known issue of camera-streamer that will crash the stream when RTSP is on for a long time (see the warning below).
If you have turned on RTSP and your webcam goes dark after a few hours, you are one of the unlucky users with the Raspberry Pi 4Bs that don't work well with RTSP. In this case, you will have to keep RTSP off.
rtsp_port
rtsp_port: 8554
This parameter sets the port through which you can access the RTSP feed of your camera. This also works only when you’ve enabled camera-streamer mode. Leave it at its default value for now.
port
This is the network port through which your default camera feed is accessible. The default value for [cam1] is set as 8080. Likewise, each new camera will have its individual port ID.
For example, 8080 for [cam1], 8081 for [cam2], 8082 for [cam3] and so on.
Further, each port has its separate streaming URL and snapshot URL. They’re as follows.
| Port | Stream URL | Snapshot URL |
|---|---|---|
| 8080 | /webcam/?action=stream | /webcam/?action=snapshot |
| 8081 | /webcam2/?action=stream | /webcam2/?action=snapshot |
| 8082 | /webcam3/?action=stream | /webcam3/?action=snapshot |
| 8083 | /webcam4/?action=stream | /webcam4/?action=snapshot |
We don’t need the URL information right now. We’ll use it when setting up the camera in the Mainsail interface later in the article.
device
device: /dev/v4l/by-id/usb-PixArt_Imaging_Inc._USB2.0_Camera-video-index0
This parameter is to set the device ID of your camera. Each webcam has its unique device ID and you will need to configure them in order to get the correct stream.
The default pathway is /dev/video0. Typically, you increase the end value of 0 to 1, 2 based on your camera numbers. While it’s okay for a single webcam, it’s not recommended for multiple cameras.
You’ll need to use the full device ID of your webcam. You can access it through the crowsnest.log file. Connect the USB camera to your Raspberry Pi and reboot the crowsnest service. It’ll detect your cameras and make a note of their device ID in the log file.
Alternatively, you can SSH to your Pi using PuTTY and get the device IDs of your webcams by inputting the following command -
ls /dev/v4l/by-id
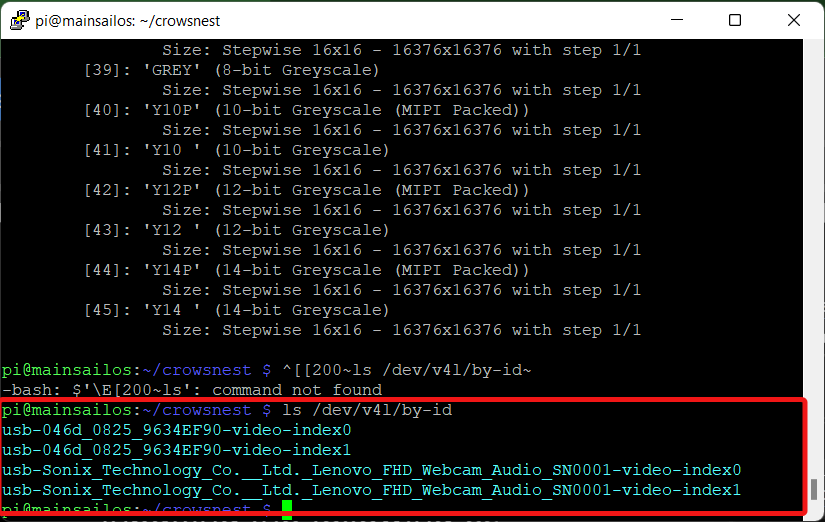
We have connected two webcams, so we’re getting two device IDs. Input any one of the device IDs in the [cam1] section and another in the [cam2] section.
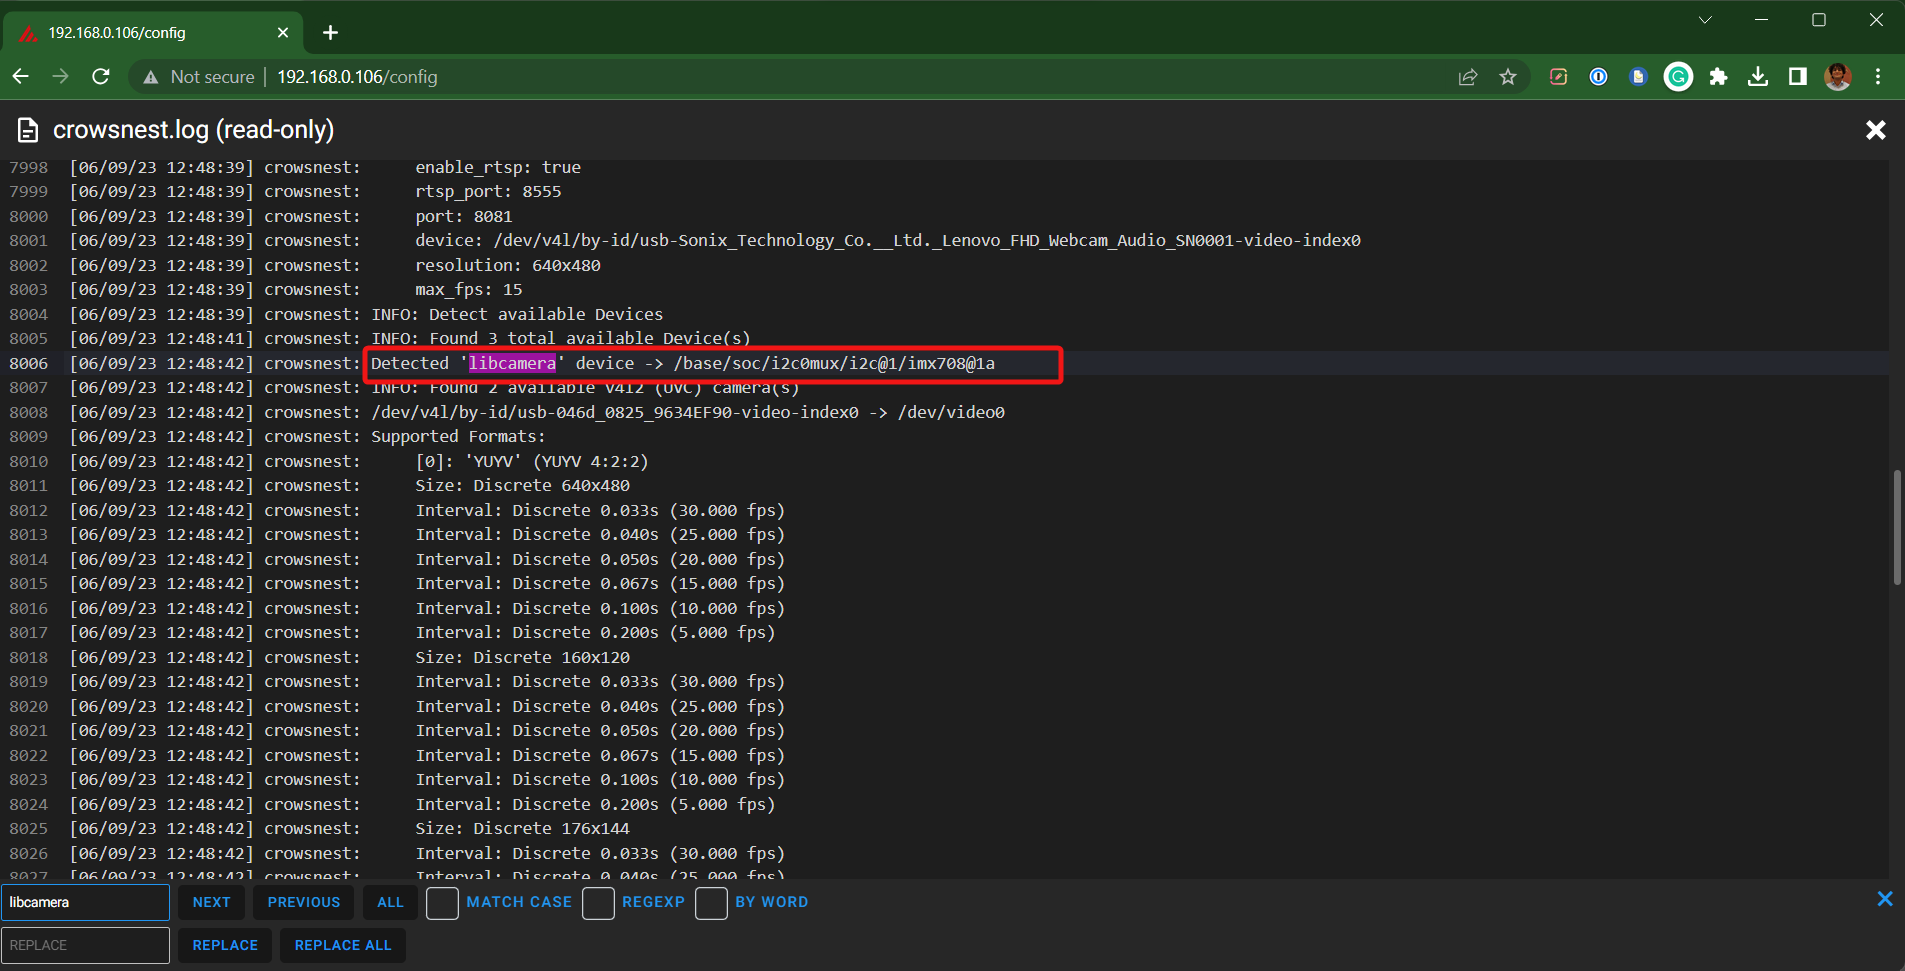
Raspberry V3 camera will not show up with the following command. It’s better to open the crowsnest.log file and search for ‘libcamera’. This will give you the device ID of your Raspberry Pi camera module
You can also use the dev-helper.sh from the tools directory. Use the following command to access these tools.
cd ~/crowsnest
tools/dev-helper.sh -c
The sample output should look something like this.
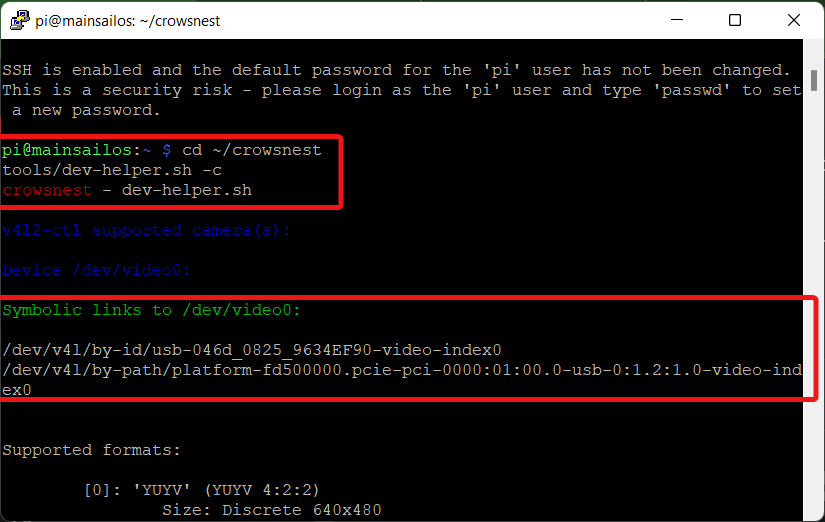
resolution and max_fps
You can set the preferred resolution of the camera in this area. Lower resolution will give you a faster streaming speed, at the cost of the video quality. Whereas a high resolution will result in good video quality but use extra bandwidth over your network.
Same goes for the fps setting. A higher frame rate gives you smoother videos but uses a lot of bandwidth. A lower frame rate produces a stuttered video, but uses less network bandwidth.
You can view the resolution and fps supported by the webcam in the crowsnest.log file. For example, 640x480 (5,10,15,20 fps), 1280x720, etc. Use small ‘x’ as this parameter is case sensitive.
custom_flags

You can use this option to change particular image camera settings like its brightness, contrast, exposure, saturation and such. You can see in the image that we’ve configured the camera to use powerline frequency as 50 Hz and set the exposure value to 300.
Likewise, there are several other custom flags options which you can use from the ustreamer manpage. To use the custom flags option, you’ll need to uncomment this line and add your camera parameters.
v4l2ctl
This one’s quite an advanced configuration option in crowsnest. It allows you to bypass a few of your camera’s core settings and set the camera as per your needs. For example, in an autofocus camera you can disable the auto-focus option using this parameter and have a fixed focused point.
It’s uncommented by default, and not using it won’t have much of an effect on your overall streaming experience.
That’s it for the parameters under the [cam] section. With all these settings in mind, we’ll now install a camera in Mainsail.
Setting Up Webcam in Mainsail
We’ll divide this part into two sections. One section for the recommended camera settings that you should use in crowsnest and the other for how to configure the camera in the Mainsail interface.
Crowsnest Webcam Configuration

The following is a sample configuration for Logitech C270 webcam in crowsnest.conf file.
[cam Logitech]
mode: camera-streamer  # ustreamer - Provides mjpg and snapshots. (All devices)
                     # camera-streamer - Provides webrtc, mjpg and snapshots. (rpi +Raspi OS based only)
enable_rtsp: true             # If camera-streamer is used, this enables also usage of an rtsp server
rtsp_port: 8554                # Set different ports for each device!
port: 8080                        # HTTP/MJPG Stream/Snapshot Port
device: /dev/v4l/by-id/usb-046d_0825_9634EF90-video-index0  # See Log for available ...
resolution: 640x480         # widthxheight format
max_fps: 15                     # If Hardware Supports this it will be forced, otherwise ignored/coerced.
#custom_flags:                # You can run the Stream Services with custom flags.
#v4l2ctl:                           # Add v4l2-ctl parameters to setup your camera, see Log what your cam is capable of.
Once you’ve entered your preferred camera settings, save and restart the crowsnest.conf file. Now onto the Mainsail webcam settings.
Mainsail Webcam Configuration
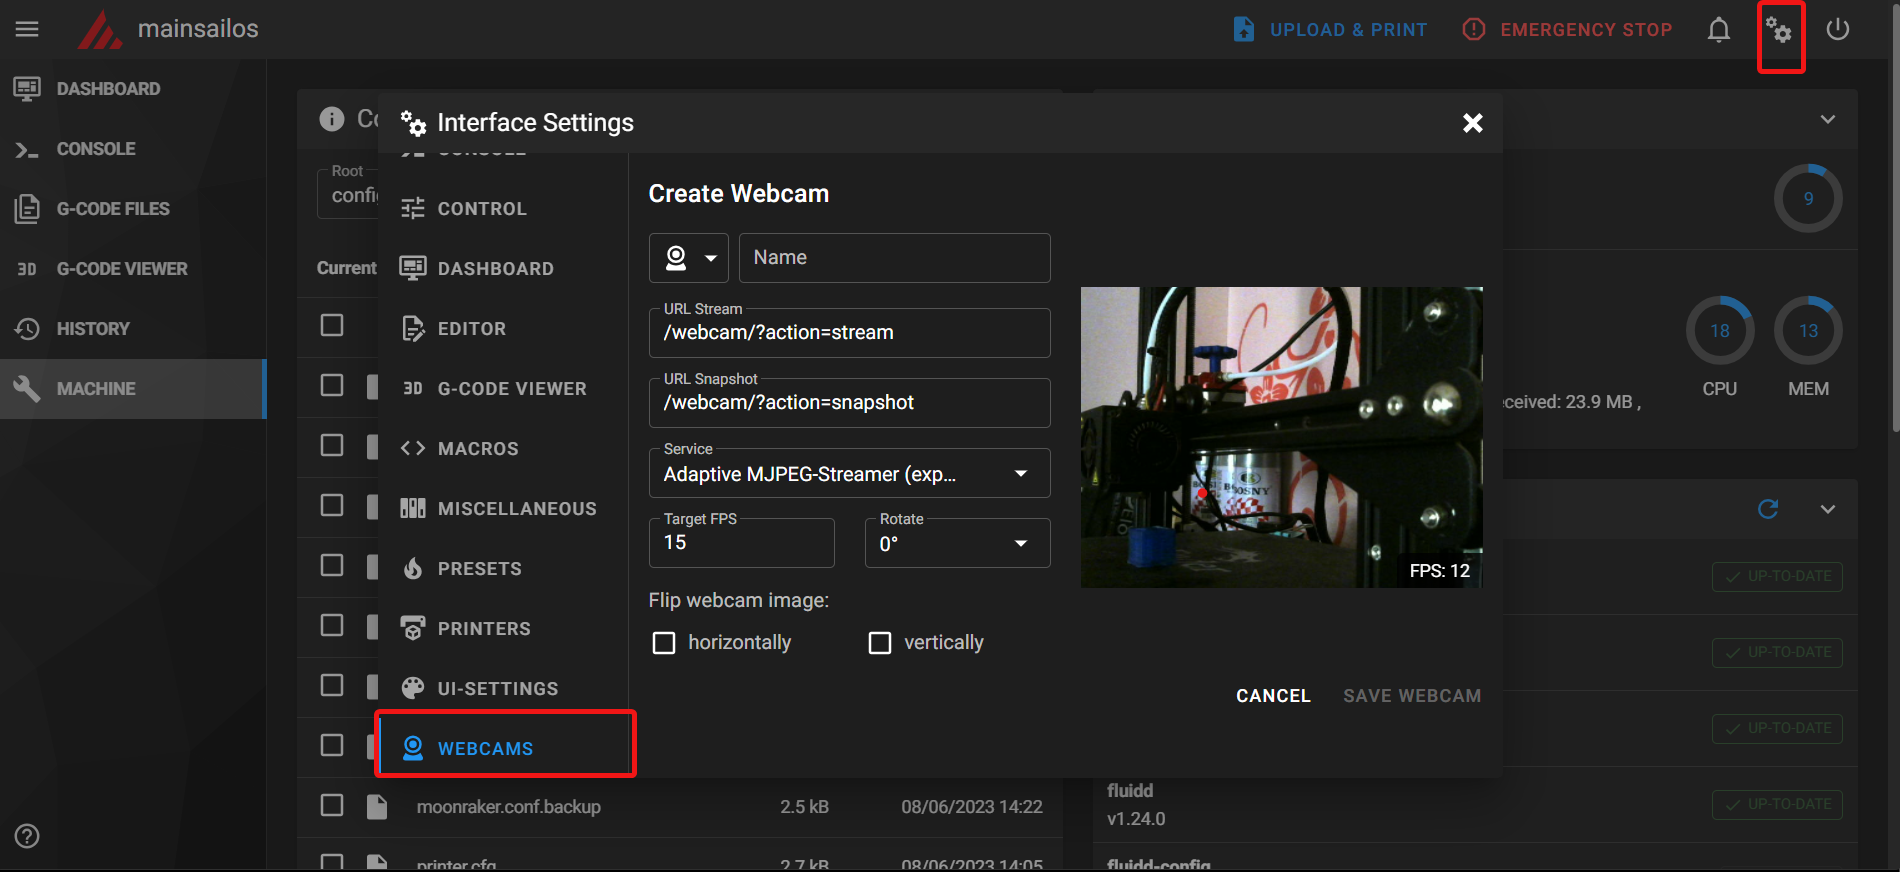
- Click on the Gear icon on the top-right corner of the Mainsail interface. It’ll open the settings menu of the Mainsail.
- Scroll to the bottom and open the Webcams option. Select the Add Webcam option.
- Name your camera the same as you’ve named in the crowsnest.conf file. It helps to keep things straightforward. In this case, Logitech.
- URL stream link will vary based on the streaming mode you’ve selected.
- If you’re using ustreamer it should be
/webcam/?action=stream. - In case of camera-streamer option, it’ll be
/webcam/webrtc.
- If you’re using ustreamer it should be
- URL Snapshot is the same regardless of the streaming mode you choose.
/webcam/?action=snapshot - In the Service section, you select the streaming mode through which you’ll access the camera feed in your Mainsail dashboard. It’s also dependent on whether you’re using an IP camera or a regular webcam. We’ll be using a simple webcam to keep things simple.
- In case of ustreamer, use the default Adaptive MJPEG Streamer.
- If you’re using the camera-streamer mode, switch to the WebRTC option.
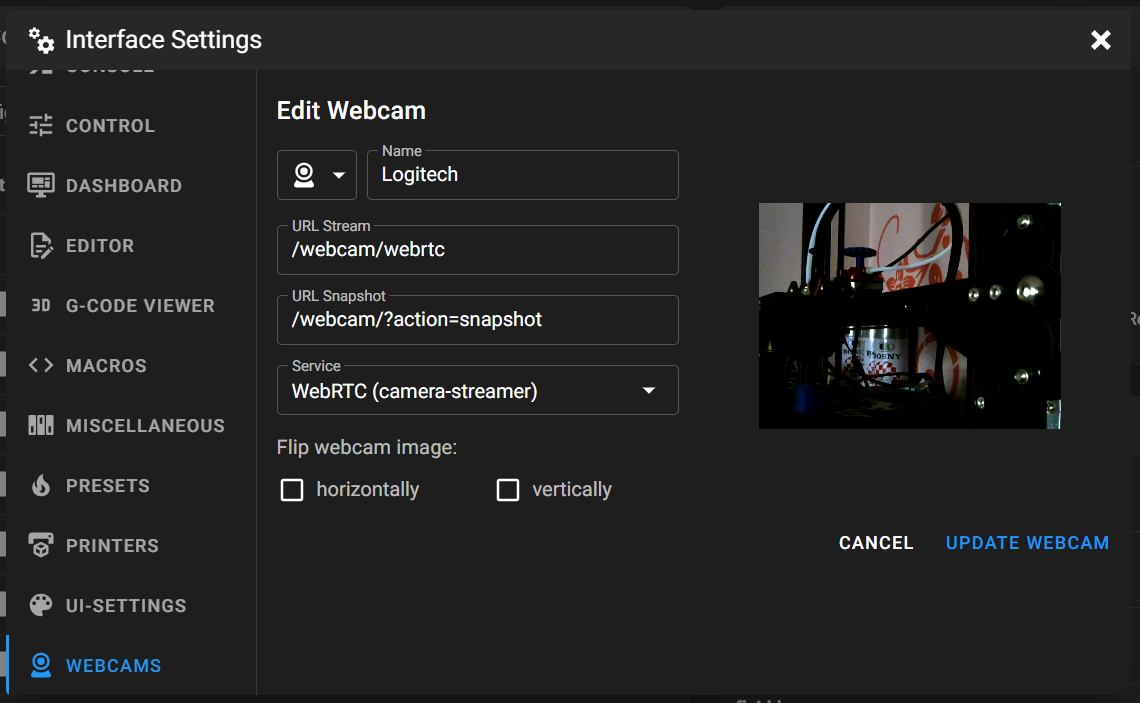
If you’ve configured everything correctly up until now, a preview of the connected webcam should be visible on the right. Simply, click Update Webcam and you’re done. You’ll see the live feed of your webcam stream in your Mainsail Dashboard.
Note: Use the camera-streamer mode for the latest generation of Raspberry Pi cameras. The V3 camera uses libcamera libraries, and works only with camera-streamer mode.
Setting Up Multiple Webcams in Mainsail
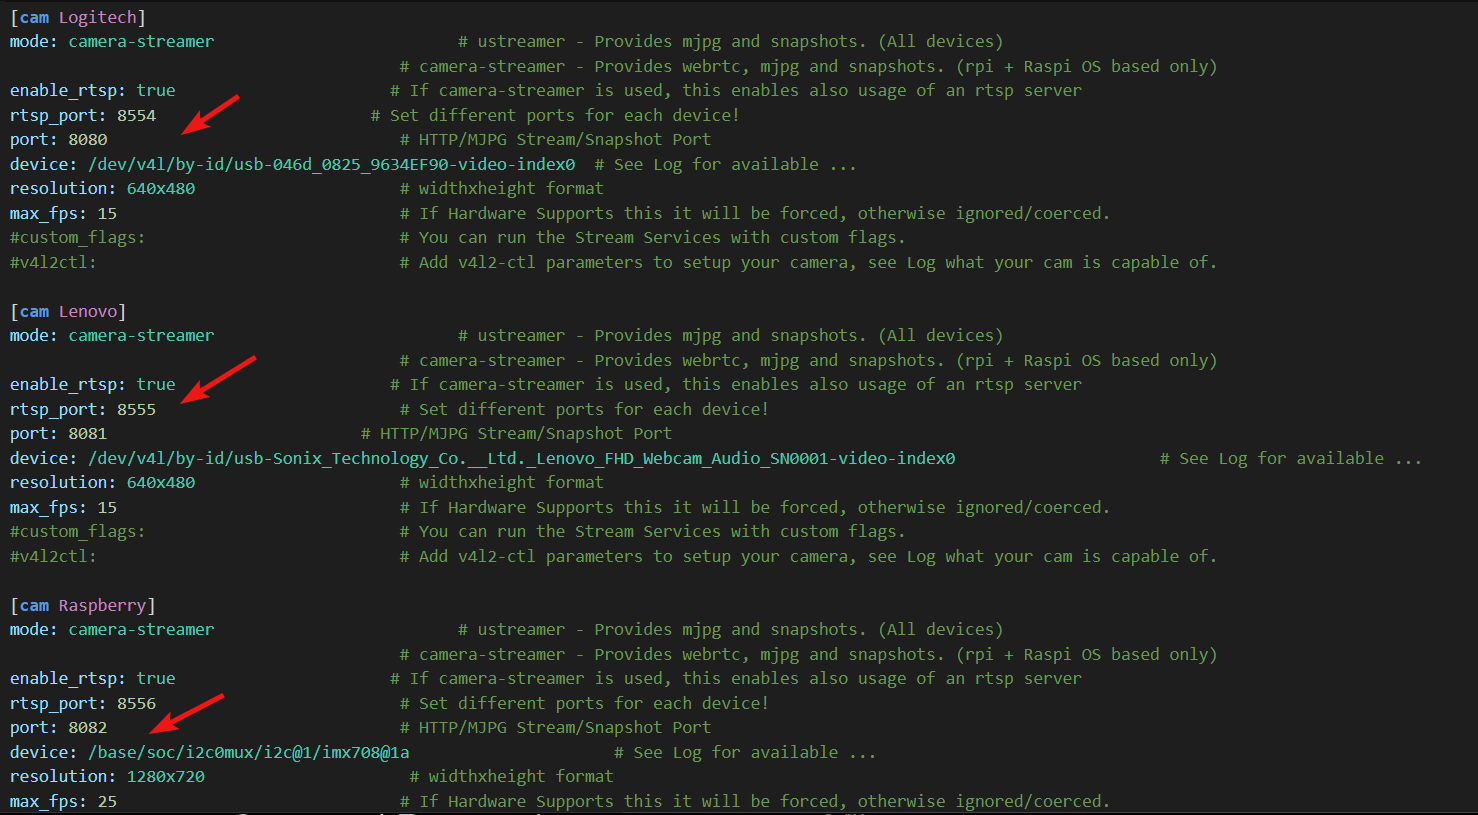
The process for setting and configuring two or more webcams is fairly similar to a single camera. There are only a few minor things you need to keep in mind.
- Create an additional [cam 2] section, by copy-pasting the [cam 1] part. You’ll need to use a different camera name for the new webcam.
- Change the following values in the [cam 2] section in crowsnest.conf file.
- rtsp_port: 8554 → 8555 for 2nd camera, 8556 for 3rd and so on.
- port: 8080 → 8081 for 2nd webcam, 8081 for 3rd…
- device - Paste the device ID you get from the crowsnest.log file or open up PuTTY and use the
ls /dev/v4l/by-idcommand to get another id.
- Optionally, you can change the resolution and FPS settings.
- Save and Restart the crowsnest.conf file.
- In the Mainsail’s Webcam window, the basic procedure remains the same as above.
- Set the camera name.
- Change the URL stream to → /webcam2/webrtc for 2nd camera. /webcam3/webrtc…
- Change the Snapshot URL to → /webcam2/?action=snapshot for 2nd webcam and /webcam3/?action=snapshot…
- Select the service as per your streaming mode and you’re done.
You can now view two different perspectives in the Mainsail Dashboard UI. Using this method, you can set up to 3-4 webcams on a single webcam without causing the bottleneck to the Pi’s resources.
Additionally, the benefit of a camera-streamer shines with multiple cameras. Camera-streamer mode does not stress the CPU of the Pi much. It streams WebRTC (h.264) video feed, which requires fewer resources and bandwidth.
The Obico Benefit
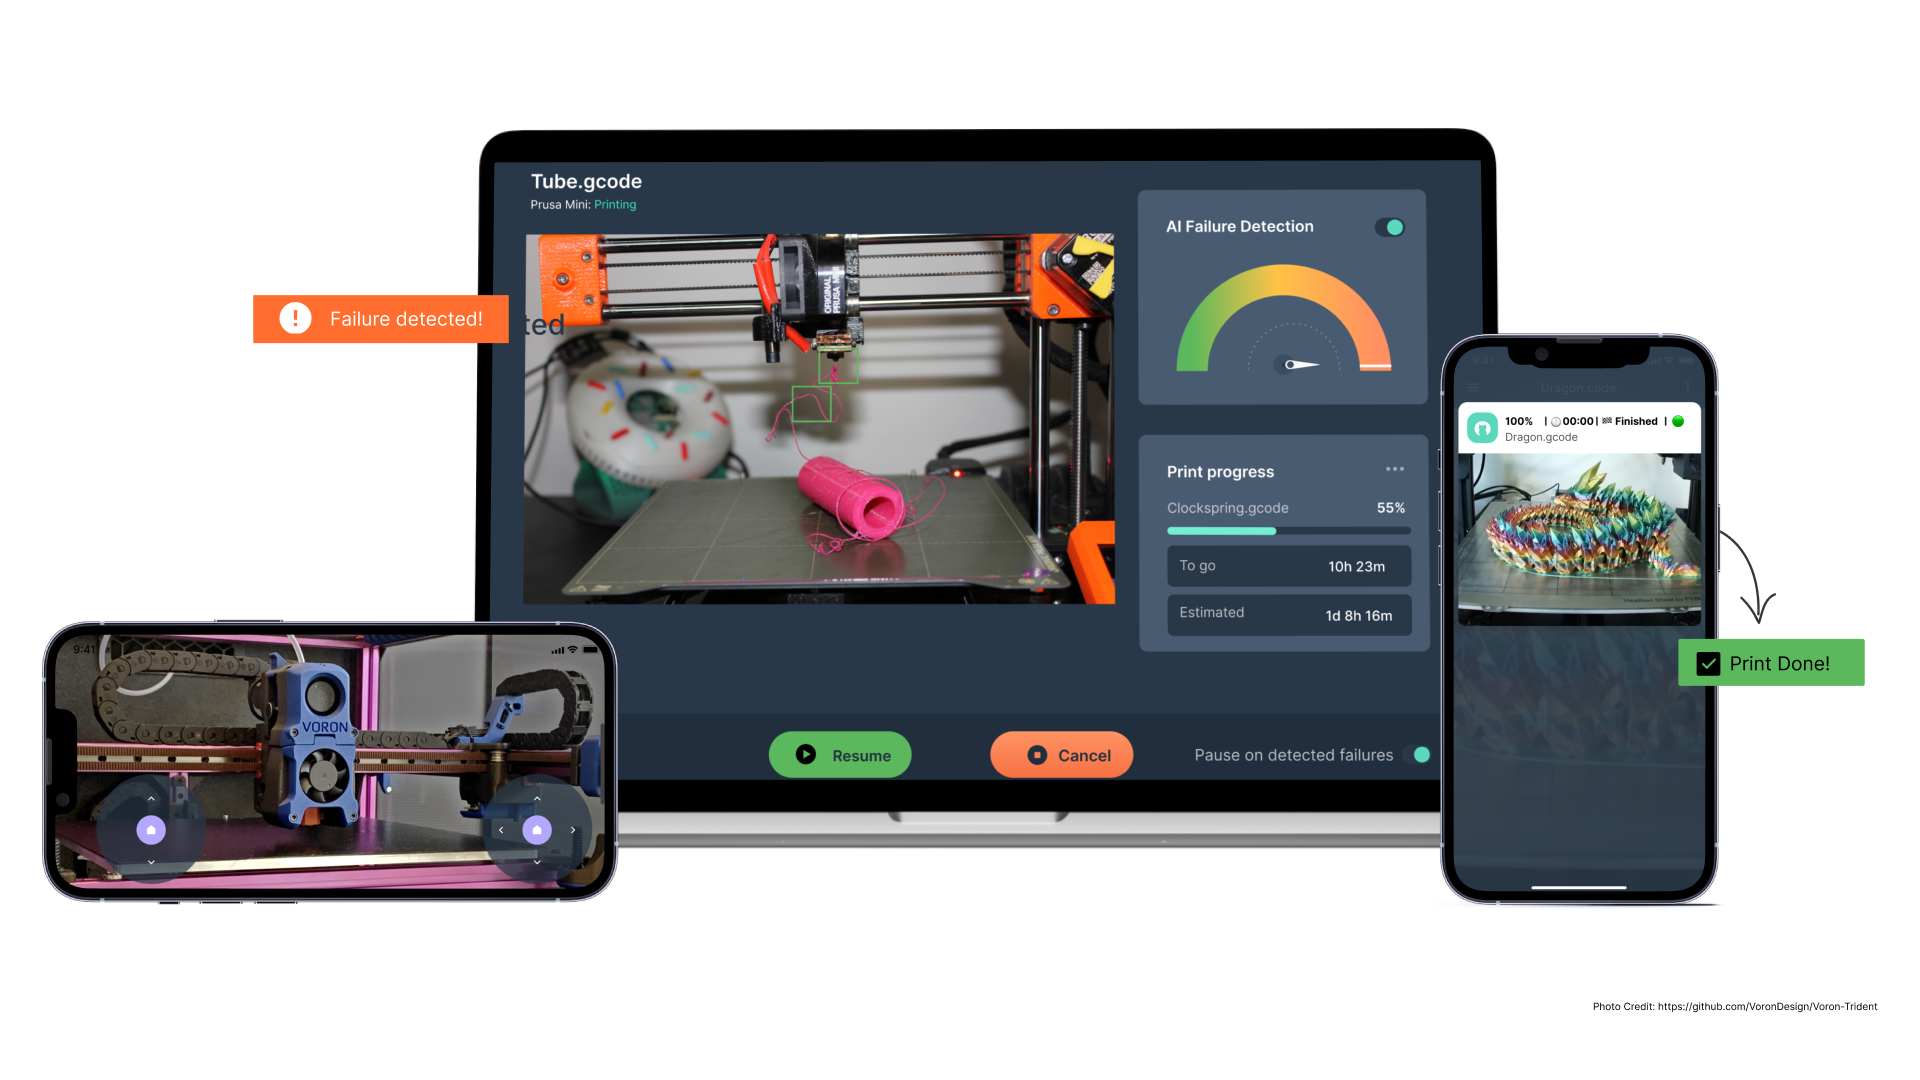 Obico is a one-stop shop for keeping an eye on your 3D printer from afar. When used with Klipper and Mainsail, Obico can help you get a rich printing experience on any device and from anywhere.
Obico is more than just a 3D printer failure detector. It lets you run your 3D printer and keep an eye on it from anywhere in the world. Both Klipper and Mainsail have the same restriction of being used only within a single network. But with Obico, you can print your favorite Warcraft mini at home and watch a live stream of the printing on your smartphone at work.
In the most recent update for Klipper, Obico added WebRTC video support. You can get a high-quality video feed of your 3D printer without using much of your network data, which is a clear benefit. The stream is smooth and almost in real time, and there aren't many if any, lost frames.
Obico's capacity for identifying failures is an additional advantage. Now, the WebRTC stream uses less of Obico's resources, and you can use AI failure detection on more than one camera at the same time. It was also possible in the past, but Obico does it better now.
Amongst its other benefits, the Obico community is growing more than ever now. You can ask questions, view others’ queries, and get almost instant support on its Discord server. It helps both new and experienced users get the most out of printing on their computers.
Obico’s almost like a remote 3D printing assistant for your printers. It keeps an eye on your prints, finds problems, and can even stop them if something goes wrong. If you do a lot of remote printing and can't keep an eye on your prints all the time, Obico will be a great addition to your printer.
Obico for Klipper and Obico for Octoprint are both easy to set up. You can get the game on both the PlayStore and the iOS App Store. You can also run Obico on your own computer if you want to. It's fully cost-free; you may modify it to your liking, and it's open-source.
