Klipper Macros - What They Are and How to Use Them

Klipper macros are an incredible firmware feature that allow you to swiftly automate complex and repetitive processes with a single click. Whether you're a beginner or an experienced user, these macros can help you streamline your workflow and save considerable printing time.
In this article, we'll learn more about the Klipper macros, their benefits, and lead you through the installation process step by step. We'll also include some handy Klipper macro examples near the end to help you better understand these macros.
Follow along if you're ready to "macrofy" your 3D printer and learn how to implement it into your own 3D printing endeavors.
What are Klipper Macros?
Klipper macros are a collection of commands and sequences that can be used to perform repetitive tasks on your 3D printers. These macros are written in Jinja2 template language and can be added to the printer's existing configuration.
Don't worry if it seems too technical at this point. Unless you wish to build macros, there's no reason to learn this language and its code.
As an example, you can program a START_PRINT macro in Klipper firmware and put it in the configuration file for your printer. Klipper will run the specified series of sequences as programmed by you whenever this command appears in your 3D print's gcode file.
Similarly, you can develop macros to customize your bed leveling operation, loading and unloading filament, or heating and cooling your printer's element. In brief, Klipper allows you to create customized macros for almost anything.
Klipper's Discourse group has a great macro creation tutorial that goes into great detail on this subject. It goes through all of the nitty-gritty aspects of the Klipper macros and leads you through the entire process of building one.
You can refer to it for a better understanding. However, for the sake of simplicity, we'll rely on macros that have already been developed and shared within the Klipper community. It keeps things simple and allows newcomers to make the most of this function.
Why Should You Use Macros?
We have a basic understanding of Klipper macros. They make it possible to execute procedures with the push of a button. But what practical advantages does using macros have?
Enhanced Customization
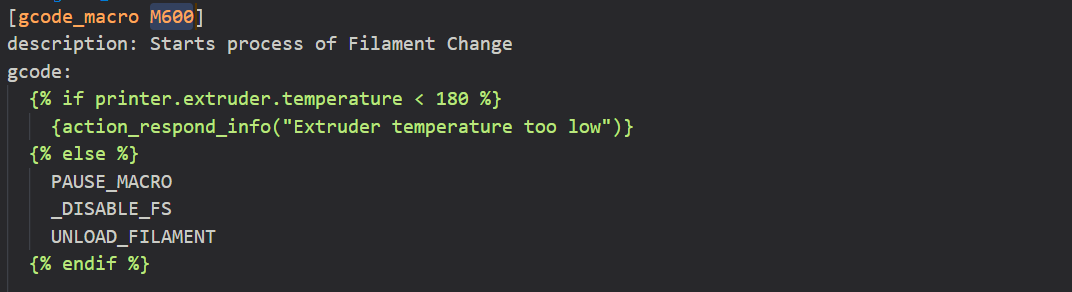
Klipper macros allow you to easily alter certain gcode commands in your sliced files. Assume you've included a filament change (M600) command in your sliced file. When this M600 appears in your Gcode file, you can use Klipper to trigger a unique sequence of movements.
It allows you to fine-tune the filament replacement sequence to meet your specific requirements. If you need to make changes to this command in the future, you won't even need to re-slice the file in your slicer before printing.
Improved Functionality
Picture Courtesy: failuretoscoop via Reddit
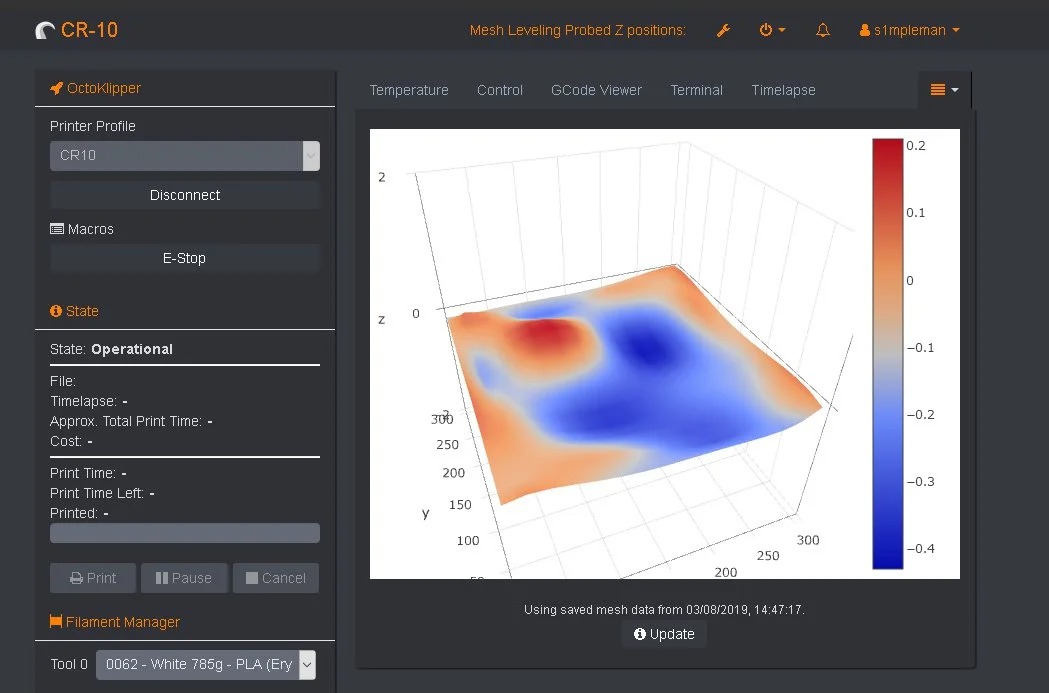
Klipper is already a feature-rich firmware. Its macros, however, provide for considerably greater flexibility. You can write macros to accomplish a specific set of operations that may not be available in the Klipper firmware. One such fantastic example is the Fast Bed Mesh Calibrate macro.
This macro changes the size of the area for leveling the mesh bed based on the size of your model. For example, if you're printing a 3DBenchy model, the leveling probe will only measure the Benchy's print area rather than the whole print bed. It's useful for printing small models on a large print bed and can cut down on print preparation time significantly.
Using these macros, you can also translate several Marlin firmware-specific features into Klipper. The M600 macro to change the filament is one of these examples.
Easy Configuration

With Klipper, using macros is a breeze. Simply paste the copied code into the appropriate section of the printer's configuration file, and you'll have a working macro in no time.
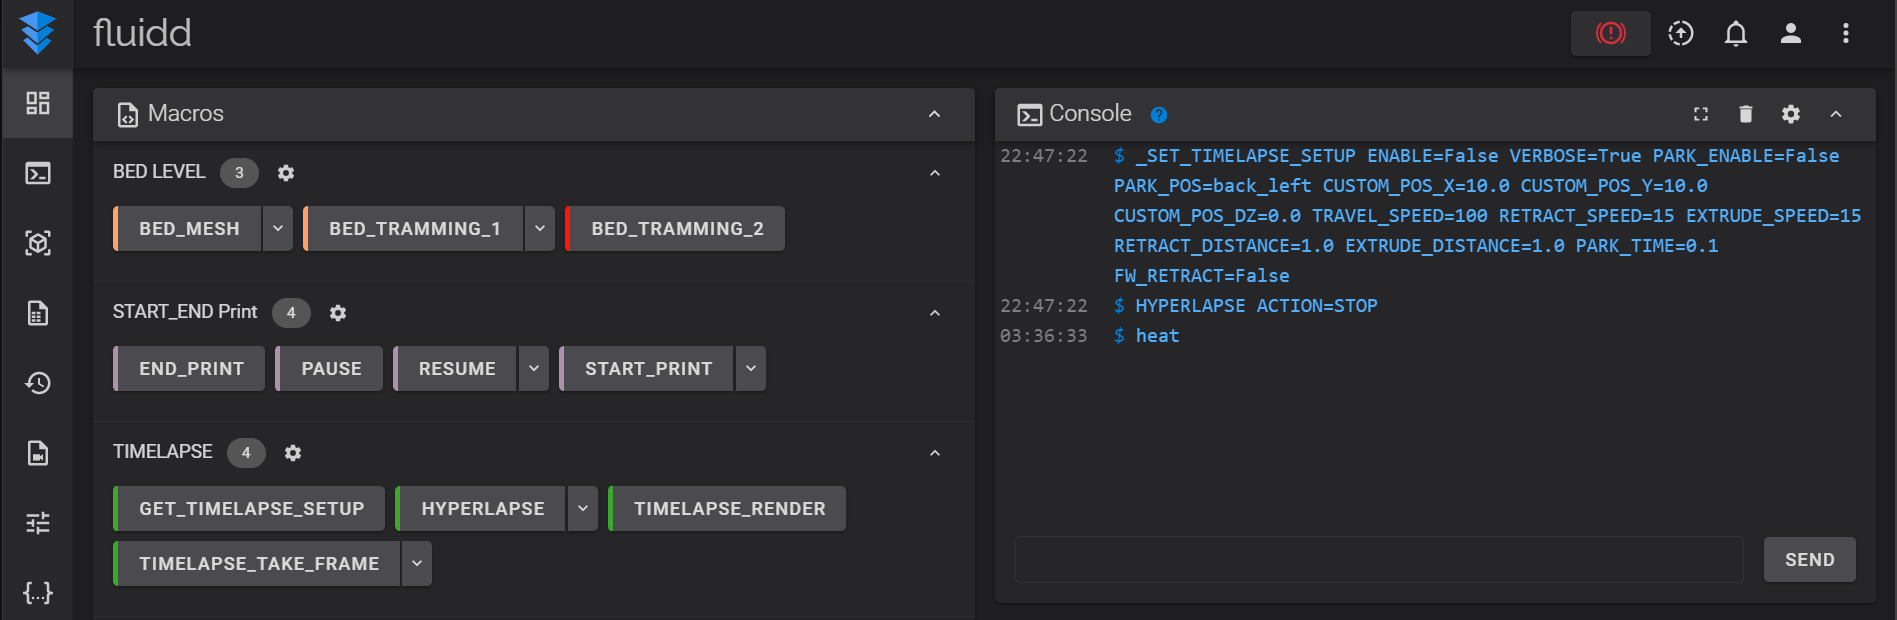
You can easily edit these macros in the firmware and configure them from your Klipper interface on the fly. For example, you can set the heating temperatures for the "Heat'' macro right from the Fluidd interface. You do not need to manually edit the configuration file settings.
Better Organization
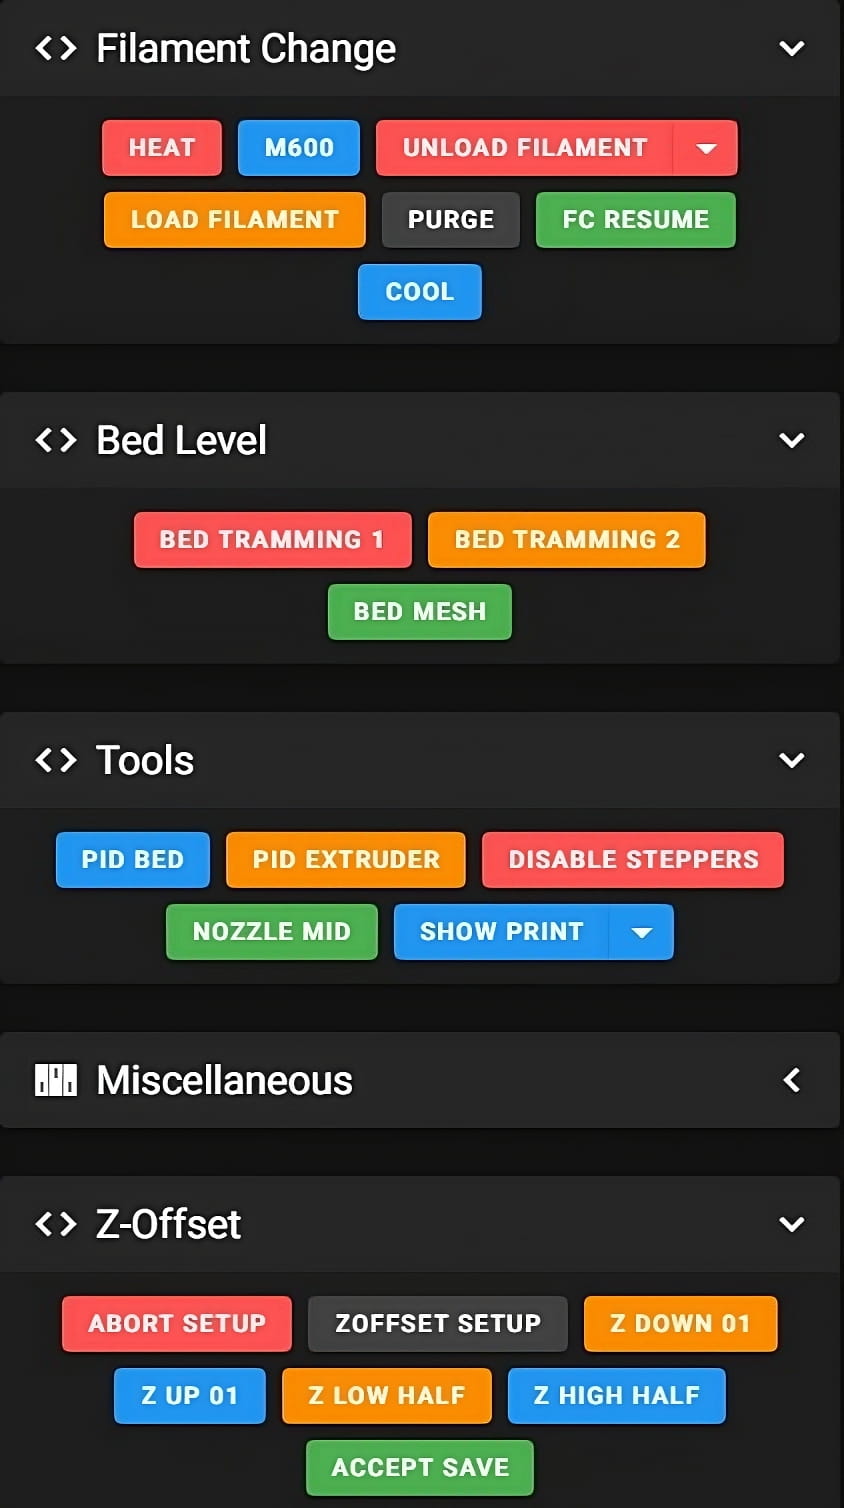
Using macros, you can gather together a specified set of jobs for your 3D printer. It makes it easier to organize tasks and lets you quickly find and do related things with the push of a button.
For example, you could write a set of macros to control the LED lights on your 3D printer. Another macros group is associated with filament modifications. The next one could be for bed leveling processes.
Using these macros, you can group tasks that are similar in one place. This makes your screen less cluttered and makes you more productive.
These are just a handful of the advantages of Klipper macros. Given how useful and versatile they are, there is still a lot to learn about them. But that's a topic for another article. For now, we'll start by configuring macros in Klipper and using them in our projects.
Setting up macros in Klipper
In Klipper, configuring macros is as simple as pasting a few lines of code into the configuration file. However, it may become cluttered and difficult to decipher very quickly.
In this part, we'll look at two unique but related approaches to configuring macros in Klipper. The first technique involves incorporating a collection of prepared macros into Klipper, but the second method gives you greater flexibility and allows you to select unique macros for your needs. Let's start.
Jschuh (Justin Schuh) Macro Collection
Justin has created a great library of useful macros for multiple functions. There are almost 60 different macros in his collection. And he’s made it extremely easy to configure and integrate into the Klipper firmware. Let’s break it down step-by-step.
Cloning the Git Repository
- Power on your Klipper firmware and connect to your Pi using PuTTY.
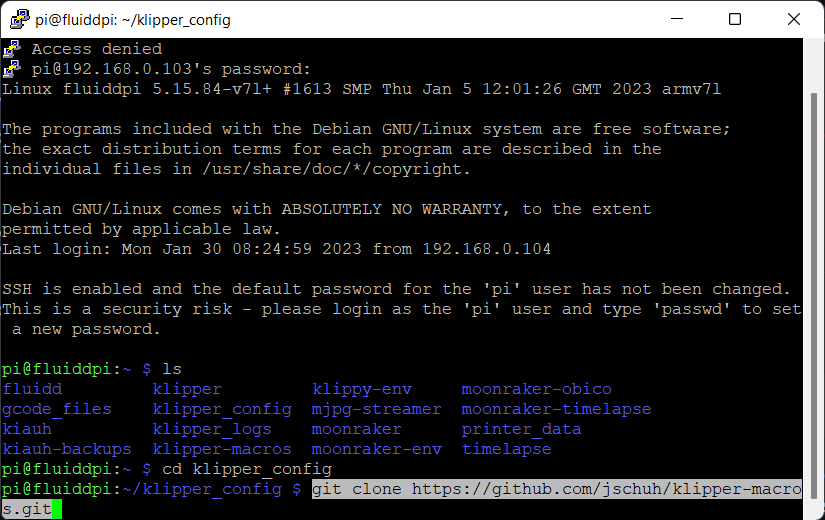
- After logging in, open the file directory by inputting the command
ls
- Open the Klipper configuration folder. Type the following command:
cd printer_data/config
- Once inside, clone the github repository by inputting the following code:
git clone https://github.com/jschuh/klipper-macros.git
- Close the PuTTY terminal and restart your Klipper instance.
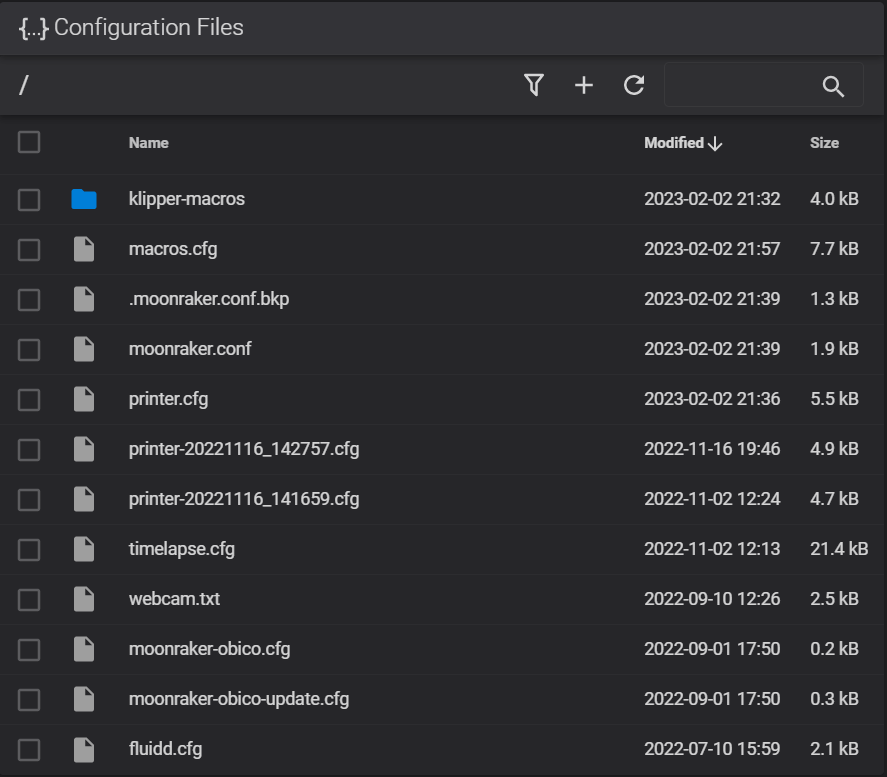
- Head over to the configuration section. You’ll notice a new folder by the name "Klipper macros." It indicates you’ve successfully cloned all the macros in your Klipper firmware.
Configuring Klipper Firmware
- Create a macros.cfg file in your configuration section. This file will contain all the information related to your macros.
- Copy and paste the Klipper setup code from Justin’s Github page in the macro file.
- Save and close the file.
- Open the printer.cfg file.
- Type in the following command at the bottom of the file:
[include macros.cfg]
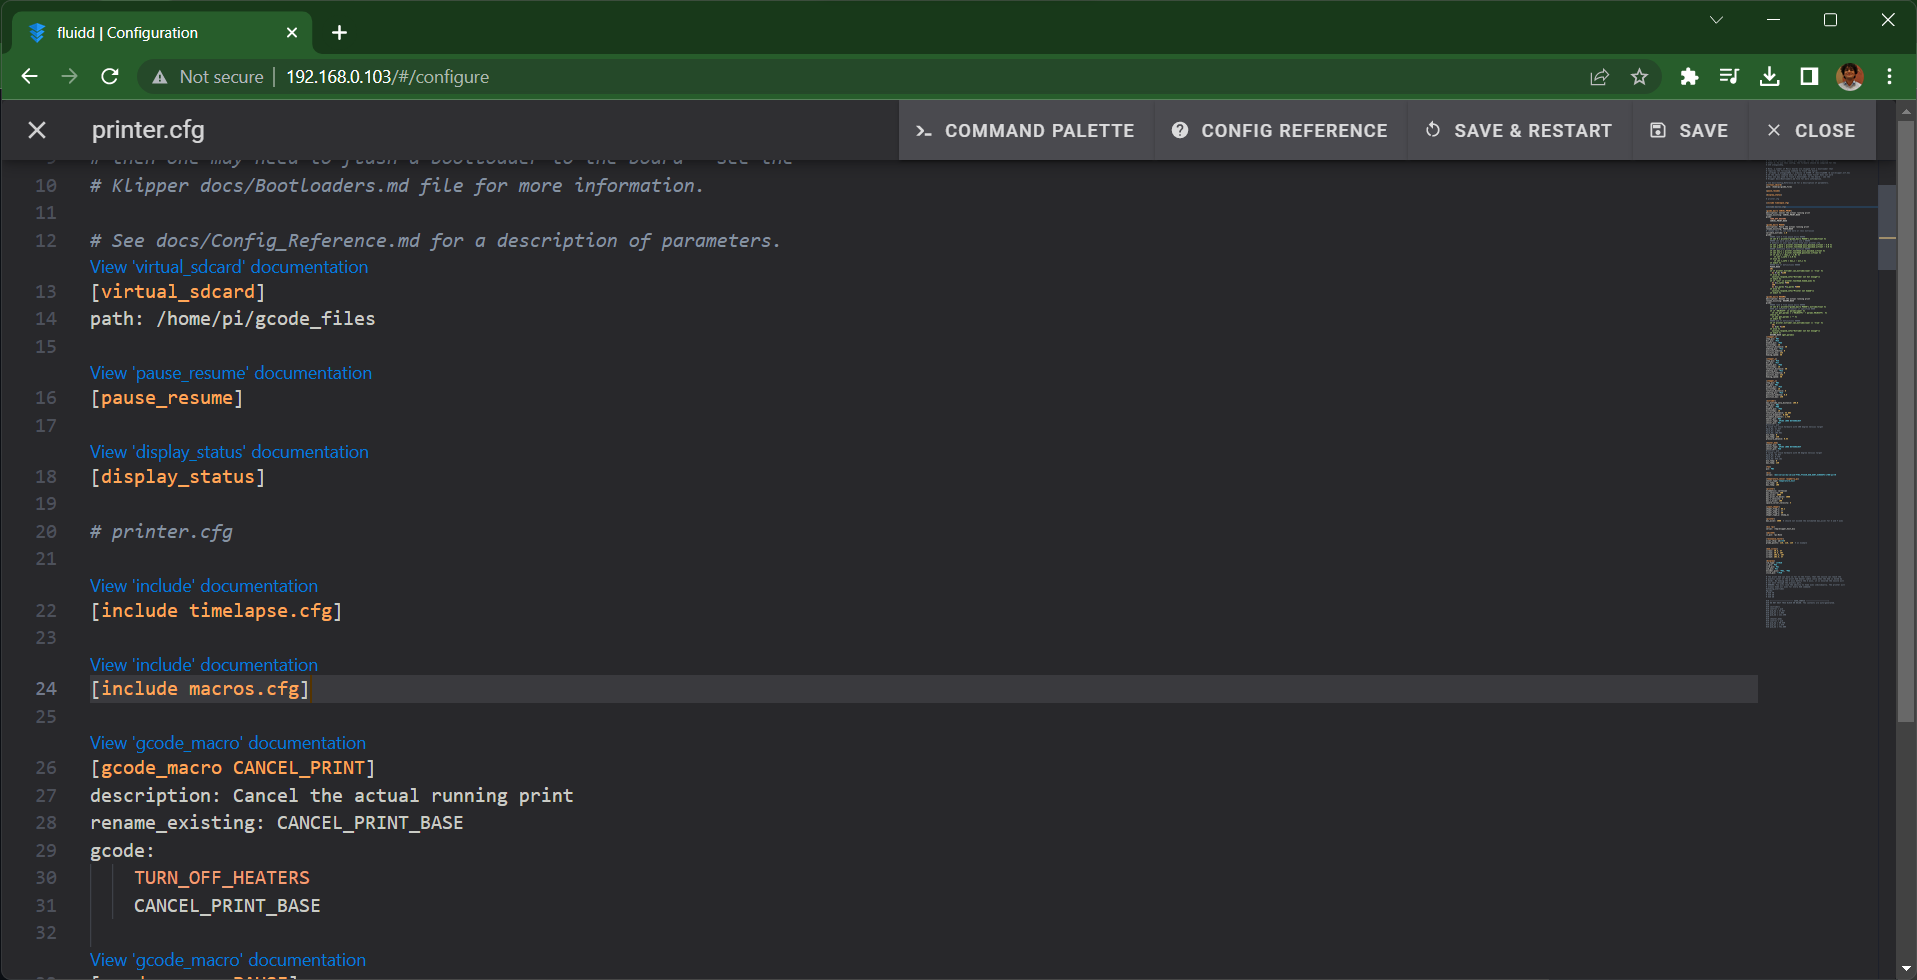
- Save the file and restart the firmware.
Configuring auto-update for these macros
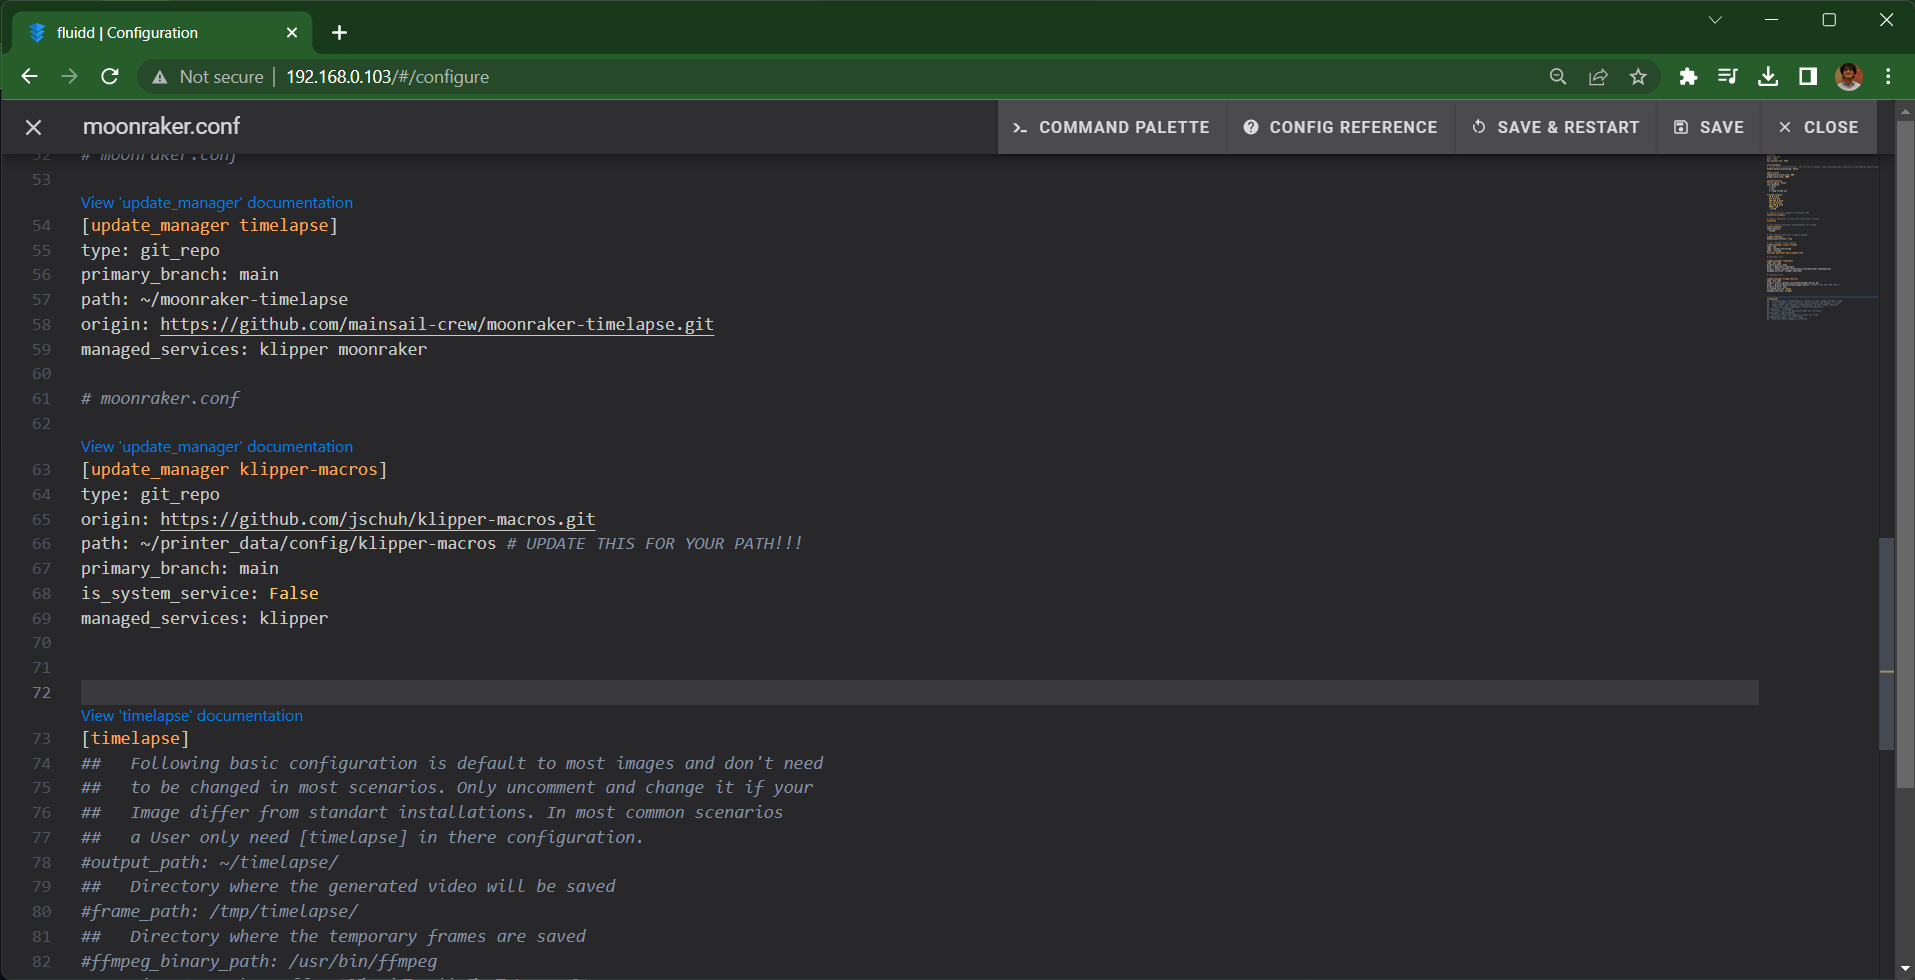
- Open the moonraker.cfg file in the configuration section.
- Copy the following code into it:
[update_manager klipper-macros]
type: git_repo
origin: https://github.com/jschuh/klipper-macros.git
path: ~/printer_data/config/klipper-macros # UPDATE THIS FOR YOUR PATH!!!
primary_branch: main
is_system_service: False
managed_services: klipper
- Save and restart the firmware.
That’s it! You can now see all the macros under the Macro Tab on the dashboard. You can further individually control the macros by going into Klipper's settings and choosing which ones to show and which to hide.
Klipper will also automatically notify you whenever there’s an update for these macros. It’ll help you use new macros as soon as they are released. Onto the second method.
Custom macros in Klipper
While Justin’s collection is top-notch, it can get overwhelming for a new user to get their head around understanding all these macros. Some users might want only a limited set of macros and would like to keep things simple.
For this article, we’ll be using thesample macros as listed on Klipper’s GitHub. They’re a collection of basic macros that are handy to give you an idea of how to use them for your printer.
Configuring macros in Klipper
- Create a macros.cfg file in the configuration section.
- Copy the entire file from Klipper’s sample macros page into this file.
- Save and close the file.
- Open the printer.cfg file.
- Type in the following command at the bottom of the file:
[include macros.cfg]
- Save the file and restart the firmware.
All of the macros are viewable in the Fluidd Firmware's macros section. You can now change their properties to your liking and utilize them in your 3D printing.
You can add, update, or delete these macros in your macro.cfg file at any time, and it will have no effect on the printer's configuration file. You can use a variety of Klipper macros created by various users in this way to increase your printer's functionality.
Let's look at how you can put these macros to use in your own 3D printing processes.
Macro Examples
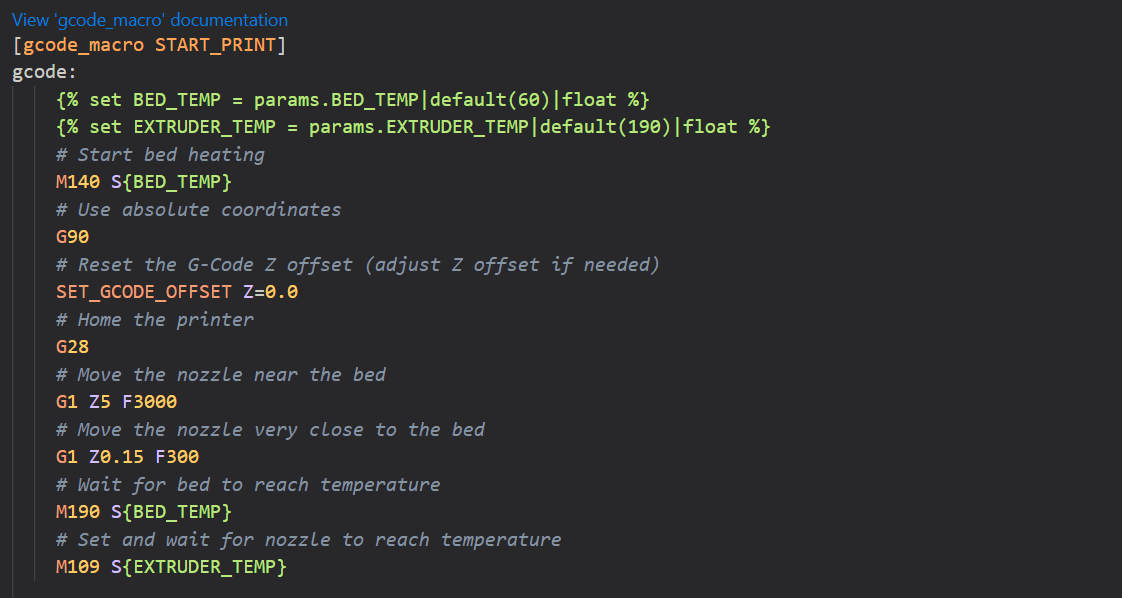
START_PRINT
For example, let's say you're using Klipper firmware on an Ender 3 to print. You are utilizing the PrusaSlicer to slice your models and generate the necessary Gcode files.
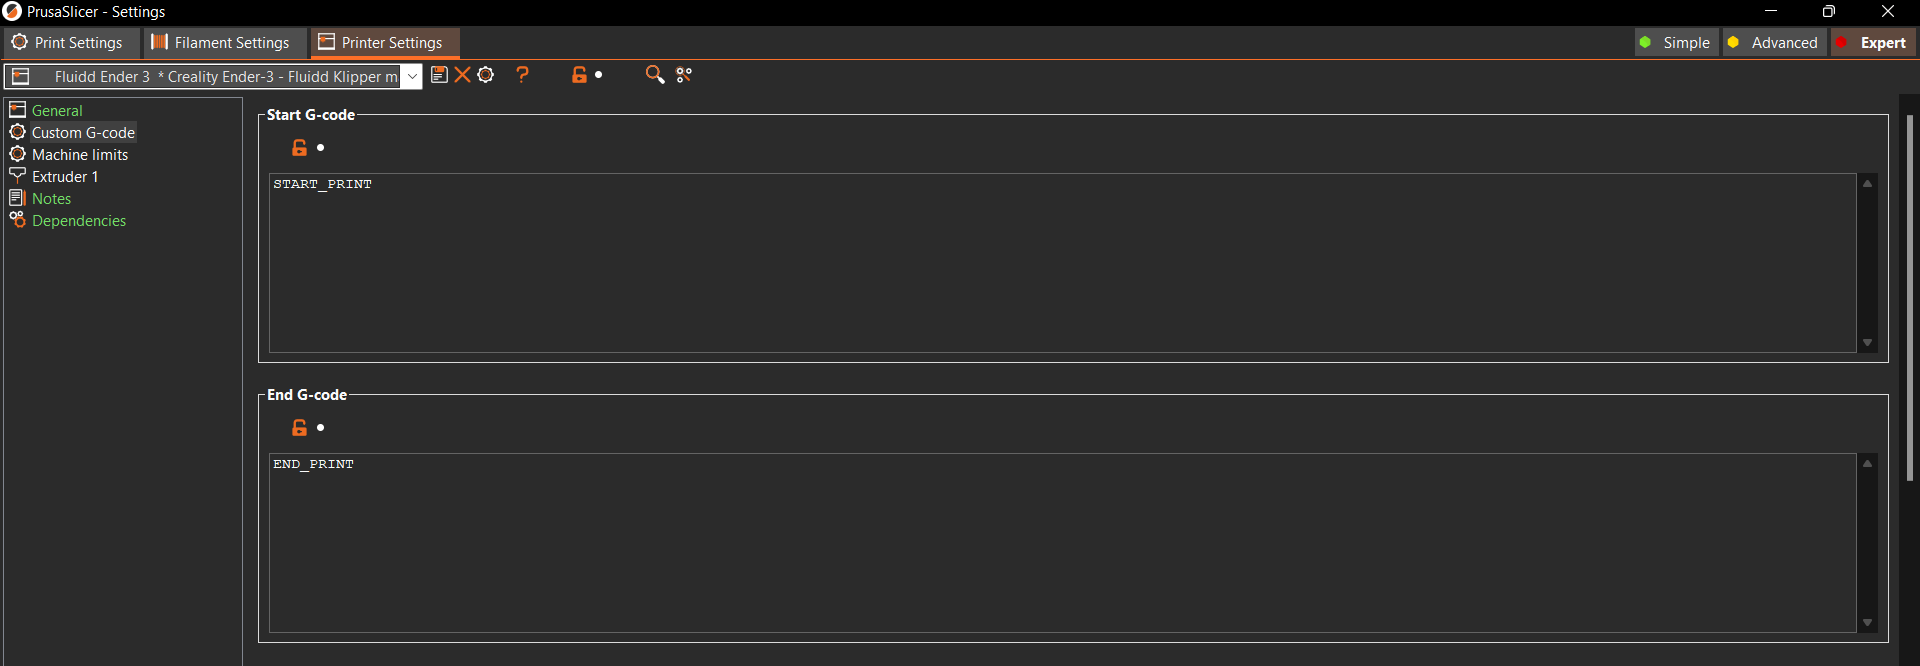
PrusaSlicer gives you the option to customize your start and end gcodes. Basically, you have the option to set up how your 3D printing process begins and ends.
In case you add a BLTouch sensor, or want to change the preheat temperatures, the only way is to edit them directly in your slicer. And while this isn't a big deal, it does mean that you'll have to reslice all your old models to match the new start sequence.
This is when Klipper's START_PRINT macro comes in handy.
Simply enter the START_PRINT command in the custom Gcode area of the PrusaSlicer. This command will be added to the gcode file the next time model slices are generated. When the Klipper firmware reads the START_PRINT line, it will run a list of commands that have already been set up in the firmware.
You may rapidly modify the START_PRINT macro in Klipper to fit your needs, and you're ready to start. You don't have to reslice your old models or change any of the parameters.
It saves you the trouble of manually altering the printing sequence. You can also change the beginning sequence at any time without affecting the slicer parameters.
PID Tuning
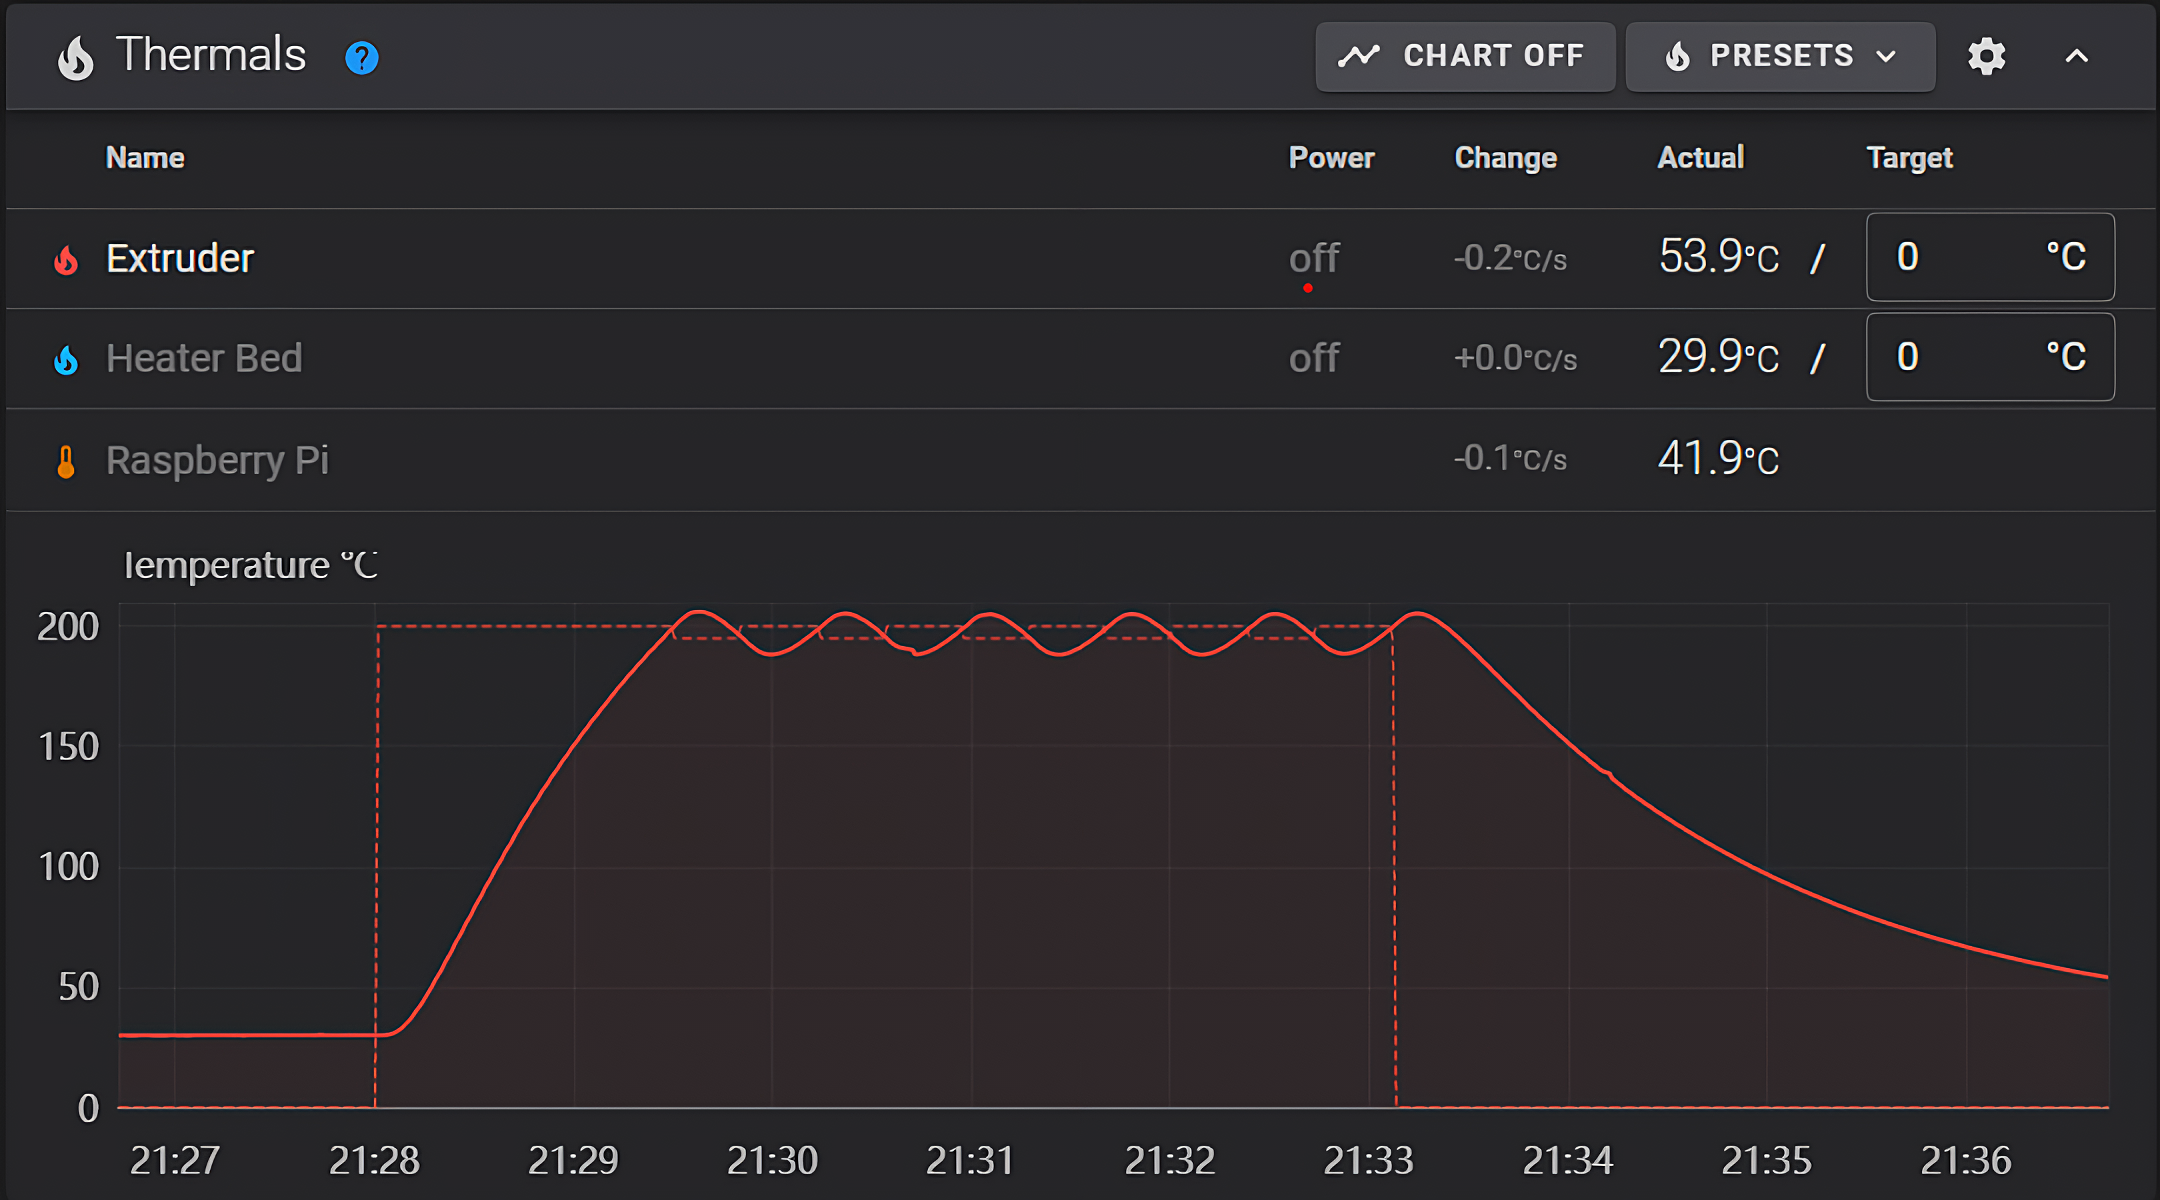
PID tuning helps you calibrate your heating settings and makes sure that the hot end and print bed are heated correctly. A while ago, we did an article on PID tuning in Klipper. You can refer to it for more information.
In that article, we discussed the steps you must take in order to PID-tune your hot end and printer bed. Those were a few manual commands you needed to enter into the Klipper's command terminal before being able to proceed.
Well, Klipper's macros get rid of the whole process and let you PID tune your heating elements with the click of a button.
Reddit user Wiikendz made an amazing set of Klipper macros that you can use to PID tune your hot end and do other things. This collection of macros is perfect for those just getting started with Klipper and is more than enough to get a taste of the power of macros. Look into it.
In a nutshell, Klipper's macros allow you to personalize your gcode files and execute intricate tasks in the Klipper firmware with a single command. The PID tuning macro is a great illustration of this.
Final Thoughts
There's more promise in Klipper macros than meets the eye at first glance. It's a feature of the firmware that doesn't get enough attention, and there's still a lot to learn about it. Each macro has its own features and uses that you can make the most of with a bit of skill and logic.
The Klipper's Discourse Group has a great collection of useful macros that you can use and modify to fit your needs. And if you know how to code, perhaps you, too, can make a useful contribution to the Klipper group.
Hopefully, after reading this, you have a better grasp of the concepts behind these macros. If you plan to use them in your 3D prints, let us know how these macros would also assist you. We'd like to know how different users use the macros for their 3D printing.
Please contact us if you have any further questions, examples, or resources to provide on this issue. Feel free to leave a comment below, and we'd be glad to talk to you.