More about Z-Hop in Orca Slicer
In the vibrant world of 3D printing, achieving a flawless print is the goal of every maker, designer, or hobbyist. It’s like a puzzle, where each setting plays a vital role, from nozzle temperature to layer height and print speed. Among these many factors, one often overlooked yet pivotal setting is Z-hop. Z-hop is the unsung hero for avoiding those frustrating surface flaws that can ruin an otherwise perfect 3D print. And if you’re using Orca Slicer, mastering Z-hop could be the secret you’ve been looking for to elevate your print quality.
But what exactly is Z-hop, and how can it unlock the door to printing perfection? Let’s dive deep into Z-hop in Orca Slicer, exploring its mechanics, impact, and how you can optimize this setting for smooth, flawless prints.
What is Z-Hop?
Z-hop stands for "Z-axis hop," a feature in many 3D printer slicers that slightly lifts the nozzle off the printed layer during travel moves. When enabled, the printer lifts the print head by a defined height (usually in the Z-axis) before the nozzle moves between sections of a print, then lowers it back to resume printing.
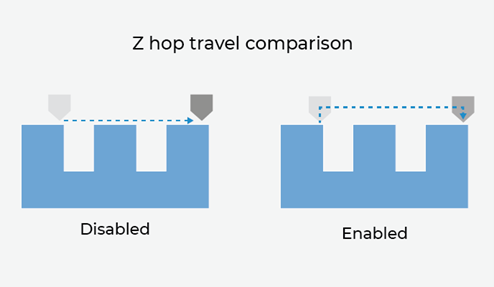
Source: bcn3d.com
Why is this necessary? Imagine you’re printing a delicate miniature or a model with sharp overhangs. As the nozzle moves between different parts of the model, it can unintentionally scrape against already printed layers, leaving ugly marks or dragging loose filament across the surface. Z-hop prevents this by lifting the nozzle off the surface, avoiding these collisions, and improving the final quality of the print.
In Orca Slicer, Z-hop is more than just a standard setting. It’s a finely tunable feature that can be customized to suit your specific print needs, whether it’s avoiding surface scratches on a detailed figure or ensuring clean overhangs in architectural models. With the right adjustments, Z-hop can be the difference between a smooth print and one marred by surface imperfections.
Why Z-Hop Matters in 3D Printing
3D printing is a highly dynamic process where every element needs to be meticulously managed to get the best results. The nozzle is constantly moving—depositing filament, reloading, retracting, and traveling. During these travel moves, particularly on more complex models, the nozzle may accidentally drag across the printed object, causing damage or unsightly scars. This is especially problematic in models with intricate details, overhangs, or delicate features.
Z-hop is designed to address this exact problem. It lifts the nozzle during travel moves, allowing the printer head to “hop” over the printed surface instead of dragging across it. This movement prevents:
- Scratches and Surface Marks: The nozzle won’t scrape the top layers of the print, which helps maintain a smooth finish, particularly important for aesthetic parts like figurines or detailed prototypes.
- Preventing Smudges: When the print head drags filament across a surface, it can leave behind a smudge of molten plastic. Z-hop minimizes this risk.
- Collision with Fragile Parts: Delicate parts of your print—such as thin arms or architectural details—are often vulnerable to being knocked or damaged by the nozzle. Z-hop provides clearance and avoids these unintentional collisions.
But not all models require Z-hop, and excessive Z-hop can sometimes lead to other issues, such as increased print time. This is why knowing how and when to use Z-hop effectively is key to maximizing its benefits.
Z-Hop in Orca Slicer: Fine-Tuning for Precision
Orca Slicer, a powerful slicer built on the foundation of Bambu Studio, offers an impressive array of settings that allow you to fine-tune every aspect of your print, including Z-hop. Unlike some other slicers, where Z-hop might be a simple toggle, Orca Slicer goes the extra mile, giving you precise control over how Z-hop behaves.
1. Z-Hop Height
The Z-hop height is arguably the most critical setting when it comes to Z-hop. This defines how much the nozzle lifts during travel moves. In Orca Slicer, you can manually set this height depending on the model’s needs. A default setting of 0.2 mm (matching the layer height) is a good starting point for many prints, but for models with particularly delicate features, you may want to increase this to 0.3 mm or higher.
A higher Z-hop height provides more clearance but can increase print times as the nozzle has to travel further up and down. It’s about finding that sweet spot—just enough to avoid contact with the print without drastically slowing down the process.
2. Z-Hop Type
Orca Slicer also offers different Z-hop types, such as normal, slope, and spiral. Each of these modes has its pros and cons, depending on the print and the model’s geometry.
- Normal Z-Hop: The nozzle moves straight up and down, creating a simple vertical lift. This is the most common type of Z-hop and works well for most models. However, it can sometimes cause stringing, particularly with hygroscopic materials.

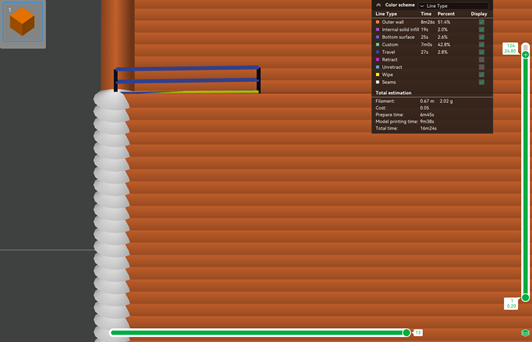
Source: wiki.bambulab.com
- Slope Z-Hop: In this mode, the nozzle moves in a diagonal path, which can reduce print time and minimize surface contact. This is ideal when printing larger models where small contact points may create issues.
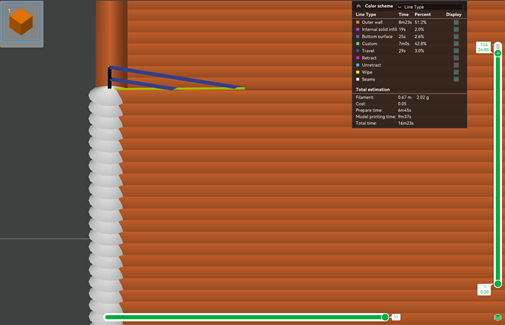
Source: wiki.bambulab.com
- Spiral Z-Hop: This mode lifts the nozzle in a small spiral motion, which reduces the risk of nozzle collisions with delicate features but takes more time than the other options. Spiral Z-hop is perfect for models with a lot of overhangs or delicate protrusions, where even a slight brush could cause damage.

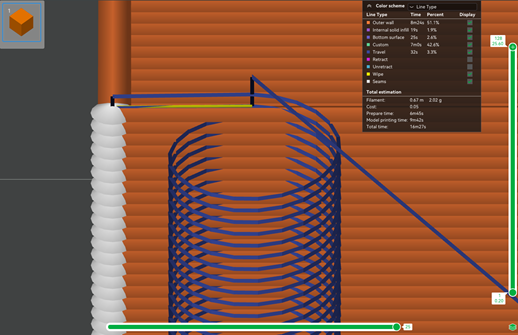
Source: wiki.bambulab.com
3. Combining Z-Hop with Retraction
Orca Slicer takes Z-hop a step further by allowing it to be paired with retraction, another essential setting for avoiding stringing and blobs on your print. Retraction works by pulling the filament back into the nozzle during travel moves, reducing the risk of filament oozing onto the printed surface.
When used together, retraction and Z-hop ensure the nozzle lifts cleanly off the print surface while also preventing excess filament from being deposited as the nozzle travels. This combination is particularly useful for PETG, PLA, and ABS, where retraction can help avoid stringing.
Here’s where fine-tuning comes into play. Retraction settings in Orca Slicer, like retraction length and speed, need to be carefully balanced with Z-hop. For example, too much retraction can cause under-extrusion, while too little Z-hop can still result in surface damage.
You can follow our guide about the retraction test in Orca Slicer: Retraction test in Orca Slicer
Ideal Scenarios for Using Z-Hop in Orca Slicer
Now that we understand the mechanics of Z-hop, the question becomes: when should you use it? Here are a few scenarios where Z-hop in Orca Slicer can drastically improve print quality:
Highly Detailed Models
Printing figurines, statues, or architectural models often requires preserving delicate details. Without Z-hop, the nozzle is more likely to bump into sharp edges or thin overhangs, damaging the print. A well-calibrated Z-hop (between 0.3mm and 0.5mm) is essential for keeping those fine details intact.
Large, Flat Surfaces
For models with expansive flat surfaces, even the slightest scrape from the nozzle can leave unsightly marks. This is especially true for parts where surface quality is paramount, such as tech enclosures or display models. A lower Z-hop (around 0.2mm) helps the nozzle lift just enough to avoid these marks while keeping print time reasonable.
Overhangs and Bridges
When printing overhangs or bridges, Z-hop prevents the nozzle from dragging across unsupported sections, which could deform these areas. In this case, combining Z-hop with retraction is particularly effective for preventing both nozzle bumps and filament ooze.
Multi-Part Prints
If you’re printing several parts at once or objects that consist of multiple sections, Z-hop can be crucial for keeping each part clean and free from stringing. This is especially true in functional prints where surface flaws might affect how well pieces fit together.
When to Avoid or Minimize Z-Hop
While Z-hop is useful in many situations, there are times when you might want to minimize or even disable it:
- Simple Models: For prints without many intricate features, overhangs, or delicate parts, Z-hop may not be necessary. Disabling Z-hop can save print time and reduce wear on your Z-axis.
- Fast Prototypes: If you’re printing functional prototypes where appearance isn’t a primary concern, you might opt to reduce or disable Z-hop to speed up the printing process.
- Flexible Filaments: For filaments like TPU, retraction settings often need to be minimal to avoid clogging or under-extrusion. In such cases, excessive Z-hop might introduce unnecessary complications. Instead, prioritize other settings like retraction distance and speed.
FAQs
What is Z-hop in 3D printing?
Z-hop is a feature that lifts the 3D printer nozzle off the print surface during travel moves. This slight lift, typically along the Z-axis, prevents the nozzle from dragging across already printed areas, avoiding surface marks and improving the print's final quality.
Why is Z-hop important in Orca Slicer?
In Orca Slicer, Z-hop is crucial for preventing surface flaws like scratches and smudges caused by nozzle collisions. By lifting the nozzle, Z-hop protects delicate parts, overhangs, and intricate details in complex models.
When should I use Z-hop in Orca Slicer?
Z-hop is ideal for printing models with fine details, overhangs, or fragile parts, where the nozzle might otherwise damage the surface. It is also useful for large, flat surfaces to prevent unsightly marks. However, it can be minimized or disabled for simple models or fast prototypes to save print time.
How do I adjust Z-hop height in Orca Slicer?
In Orca Slicer, you can manually set the Z-hop height to determine how much the nozzle lifts during travel. A good starting point is 0.2mm, but for delicate models, you may need to increase it to 0.3mm or higher. Adjusting the height balances between avoiding contact and maintaining reasonable print times.
What are the different types of Z-hop in Orca Slicer?
Orca Slicer offers several Z-hop modes:
- Normal Z-Hop: Moves the nozzle straight up and down.
- Slope Z-Hop: Moves the nozzle diagonally, reducing surface contact and print time.
- Spiral Z-Hop: Lifts the nozzle in a spiral motion, ideal for models with delicate features but may slow down printing.
Can Z-hop be used with retraction in Orca Slicer?
Yes, Z-hop can be combined with retraction to further improve print quality. Retraction pulls filament back during travel moves, preventing stringing and oozing, while Z-hop lifts the nozzle to avoid surface damage. Adjusting retraction length and speed along with Z-hop height helps balance quality and extrusion.
How do I troubleshoot excessive stringing with Z-hop enabled?
If stringing occurs with Z-hop enabled, try increasing the retraction distance or decreasing the travel speed. This will help prevent excess filament from being deposited during nozzle movements.
Does using Z-hop increase print time?
Yes, higher Z-hop settings can increase print time since the nozzle needs to move up and down. To reduce print time, consider lowering the Z-hop height or using modes like slope Z-hop that minimize travel time while avoiding collisions.
Why do I experience under-extrusion after travel moves with Z-hop?
Under-extrusion after Z-hop moves is often caused by excessive retraction. Reducing the retraction length slightly should ensure enough filament is reloaded after each travel move.
When should I avoid using Z-hop?
You may avoid or minimize Z-hop for simple models without intricate features, fast prototypes where print time is more important than surface quality, or when printing with flexible filaments like TPU, which may require minimal retraction to avoid clogs.
Troubleshooting Common Z-Hop Issues
While Z-hop can drastically improve print quality, it’s not without its challenges. Here are a few common issues you might encounter and how to resolve them:
- Excessive Stringing: If you’re noticing more stringing with Z-hop enabled, you might need to adjust your retraction settings. Try increasing the retraction distance slightly or decreasing the travel speed.
- Extended Print Times: Z-hop, particularly at higher heights, increases print time. If speed is a concern, try lowering the Z-hop height or using slope Z-hop to reduce the overall time. You can also experiment with spiral Z-hop, which offers a balance between collision prevention and speed.
- Under-Extrusion After Travel: If your print shows signs of under-extrusion right after a travel move with Z-hop enabled, it could be due to the retraction length being too high. Lower the retraction distance slightly to ensure that enough filament is reloaded after each travel move.
Conclusion: Mastering Z-Hop in Orca Slicer for Perfect 3D Prints
Z-hop may not be the first setting you think of when troubleshooting a 3D print, but it’s often the key to unlocking the smooth, high-quality results you’re after. By lifting the nozzle off the print surface during travel moves, Z-hop eliminates common problems like surface scars, smudges, and nozzle collisions.
In Orca Slicer, Z-hop goes beyond the basics. With advanced settings like Z-hop height, type, and the ability to combine it with retraction, Orca Slicer gives you complete control over how your nozzle interacts with the printed object. When used thoughtfully, Z-hop can help you achieve perfect prints even with the most intricate models.
As with any 3D printing setting, the key to mastering Z-hop is experimentation. Start with default settings, then fine-tune based on your specific model, filament type, and printer setup. Whether you’re printing delicate figurines or large flat objects, a well-calibrated Z-hop can make the difference between a good print and a perfect one.
