Orca Slicer Download
Try JusPrin, the first GenAI 3D printing tool built on OrcaSlicer.
If you are into 3D printing, you must have used Cura or PrusaSlicer to slice your models. These tools are necessary for converting any 3D model into G-code, which contains instructions your machine can execute to actually print your model. However, there is always room for new software that provides different features and options.
Orca Slicer is what you need. It’s free and built on Bambu Studio. It gives you more ways to customize, control, and get precise results for your prints. If you’re a beginner looking for ready-made profiles or an experienced user looking for advanced settings, Orca Slicer has you covered.
Orca Slicer started as a fork from Bambu Studio, which in turn is based on PrusaSlicer, one of the most widely used open-source slicing software. It was developed by SoftFever. It rapidly gained traction due to the increased number of printer profiles and more advanced print calibration options. It's particularly helpful if you want more control and detail over how your 3D models turn out.
Why should you consider using Orca Slicer, and how can you get started with it? This guide will walk you through downloading and installing Orca Slicer, reveal some of the coolest features it has to offer, and show you how to maximize this powerful tool.
With a main focus on how to download and install Orca Slicer, this simple guide will also provide useful links to other related guides about Orca Slicer, helping you expand your knowledge and upgrade your skills.
Let’s get started!
What is Orca Slicer, and what makes it different?
As we mentioned in the intro, Orca Slicer is an open-source 3D printer slicer developed by SoftFever. It’s based on Bambu Studio which is a fork of PrusaSlicer which is itself a fork of Slic3r.
Orca Slicer has more features and supports more printers, so it’s the one to use if you need a bit more control over your prints. It has more calibration tools, extra printer profiles, and more fine-tuned control of the slicing parameters than most other slicers out there. It’s the most popular slicer among open-source printers, and that’s because it’s so flexible and so well supported by the community.
Bambu Studio was designed to work best with Bambu Lab’s 3D printers, but Orca Slicer supports more printers and filaments.
To see how Orca Slicer compares to other slicers, check out our article: Orca Slicer vs. PrusaSlicer vs. Cura.
What Makes Orca Slicer Different?
Orca Slicer is built on top of Bambu Studio’s foundation but brings many useful upgrades, especially if you want more control over your prints. The first thing you’ll notice is the range of additional printer profiles. Orca Slicer supports a huge number of printers out of the box, from the Ender 3 series to more specialized machines. If your printer isn’t listed, you can easily create your own custom profile for your machine. It is perfect if you like to have control and customize everything.
Orca Slicer also has calibration tools to help you fine-tune your prints. For example, the Temperature Tower Test (to find the best print temperature for your filament) and the Flow Rate Calibration (to find the best speed that you can use in your prints) and the Pressure Advance Calibration (to reduce defects when the printer changes speed so you get sharp corners).
Learn more about calibration features here.
Orca Slicer also solves the problem of visible Z-seams (those lines that appear when your printer moves from one layer to the next). With Seam Gap and Wipe on Loops, Orca Slicer helps you reduce or eliminate these unwanted marks and get smoother prints. You have control over where the seam appears on the model and how much material is retracted at the end of each layer so you reduce the chance of blobbing or artifacts.
Find out more about seam settings.
Orca Slicer Download: How to Install
The Orca Slicer download is easy and fast. It supports Windows, macOS, and Linux.
Step 1: Download Orca Slicer
Go to the Orca Slicer GitHub Releases Page. This is where you’ll find the latest Orca Slicer and nightly builds if you want to try the latest features.
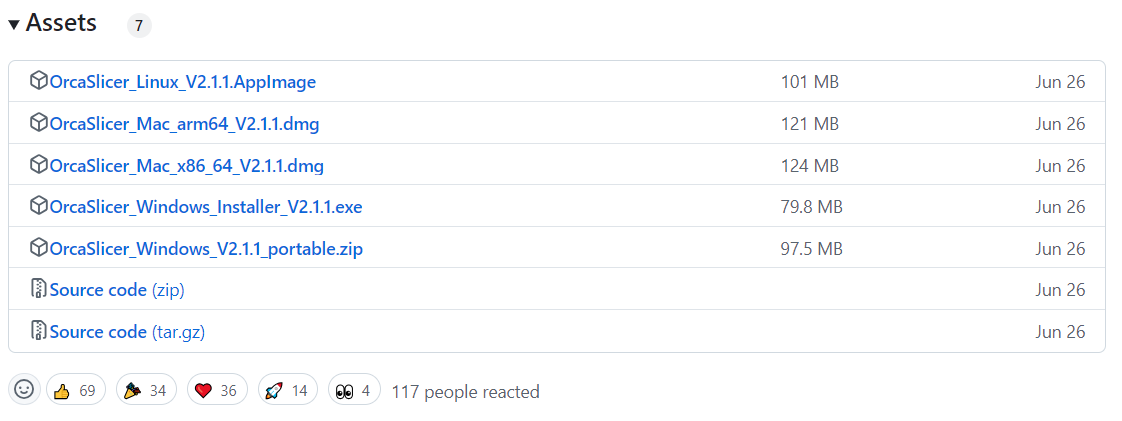
Under the latest release, go to the Assets section and download the one for your OS:
- For Windows, download the
.exefile. - For macOS, download the
.dmgfile. - For Linux, download the
.AppImagefile.
Step 2: Install Orca Slicer
Once downloaded, follow these steps:
- On Windows, run the
.exefile and follow the installation prompts. - On macOS, open the
.dmgfile and drag Orca Slicer into your Applications folder. - On Linux, run the
.AppImagefile directly, or set it to be executable using your terminal.
Step 3: Launch Orca Slicer
After installation, launch Orca Slicer. The first time you run the software, you’ll be asked to configure it for your 3D printer and your login region. Orca Slicer’s setup wizard will guide you through the process step by step, selecting and configuring your printer.
Setting Up Your Printer in Orca Slicer
Orca Slicer’s strength lies in its support for many printers and its large library of pre-configured profiles. If you use the Creality Ender 3, Elegoo Neptune series, or a custom machine, Orca Slicer probably has a profile for you.
Step 1: Select Your Printer
When you open Orca Slicer for the first time, it will ask you to choose your printer from the list after determining your login region. If your printer is not in the list, don’t worry, you can create a custom profile and configure its settings.
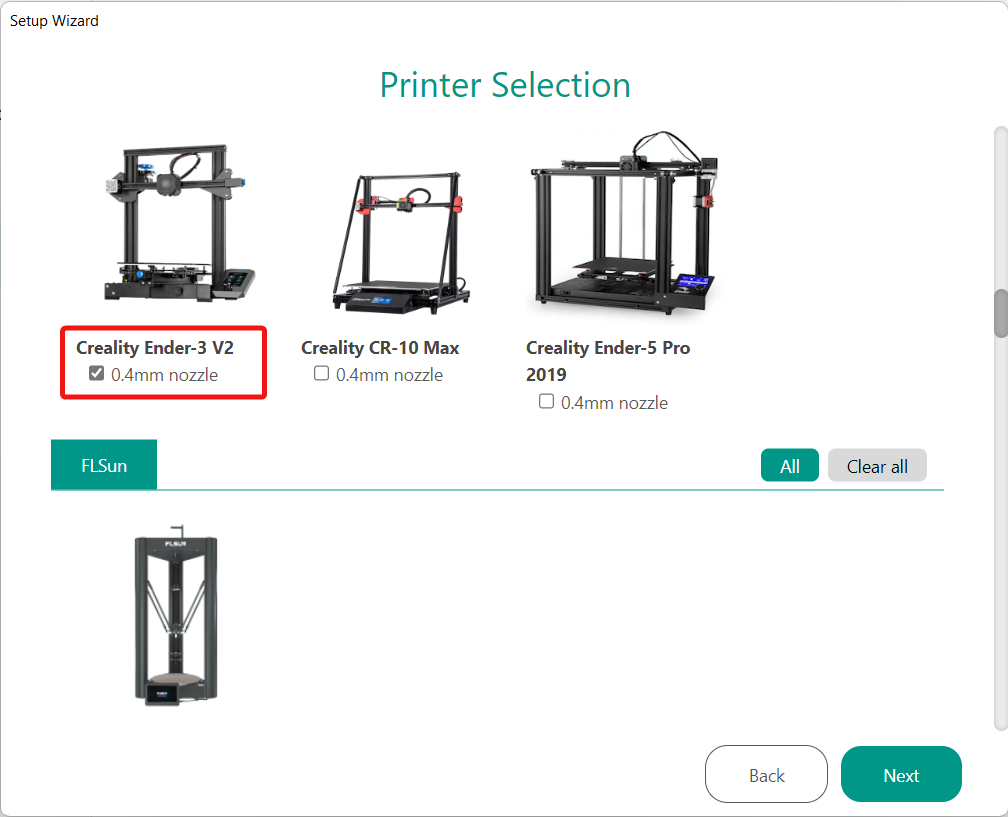
For a detailed guide on setting up a custom printer, see Setup a 3D Printer in OrcaSlicer.
Step 2: Configure Filament Settings
Orca Slicer has detailed filament profiles for common materials like PLA, ABS, PETG, and TPU. Once you’ve chosen your printer, the next step is to choose the kind of material that works with your 3D printer. Orca Slicer will adjust the nozzle temperature, bed temperature, retraction settings, print speed, and other settings based on the filament you’re using. You can also adjust these settings manually if needed.
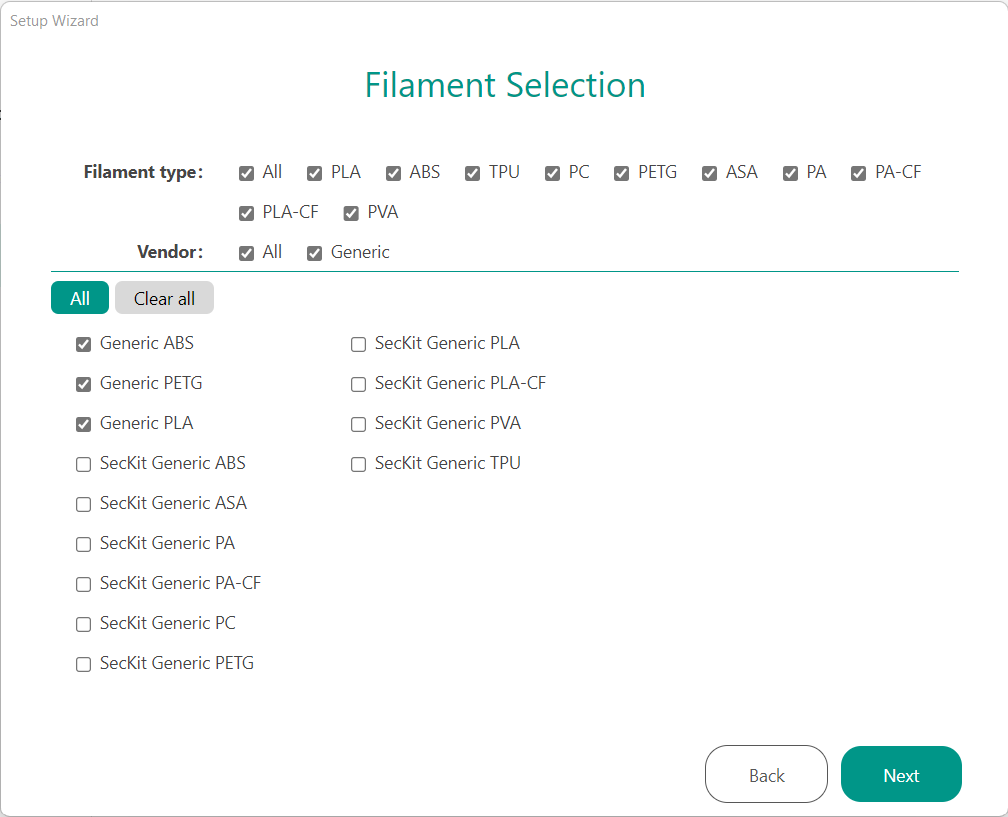
Orca Slicer comes with pre-configured profiles for many materials from different manufacturers and also generic filaments with options to add your custom materials.
Step 3: Enable Wireless Connectivity (Optional)
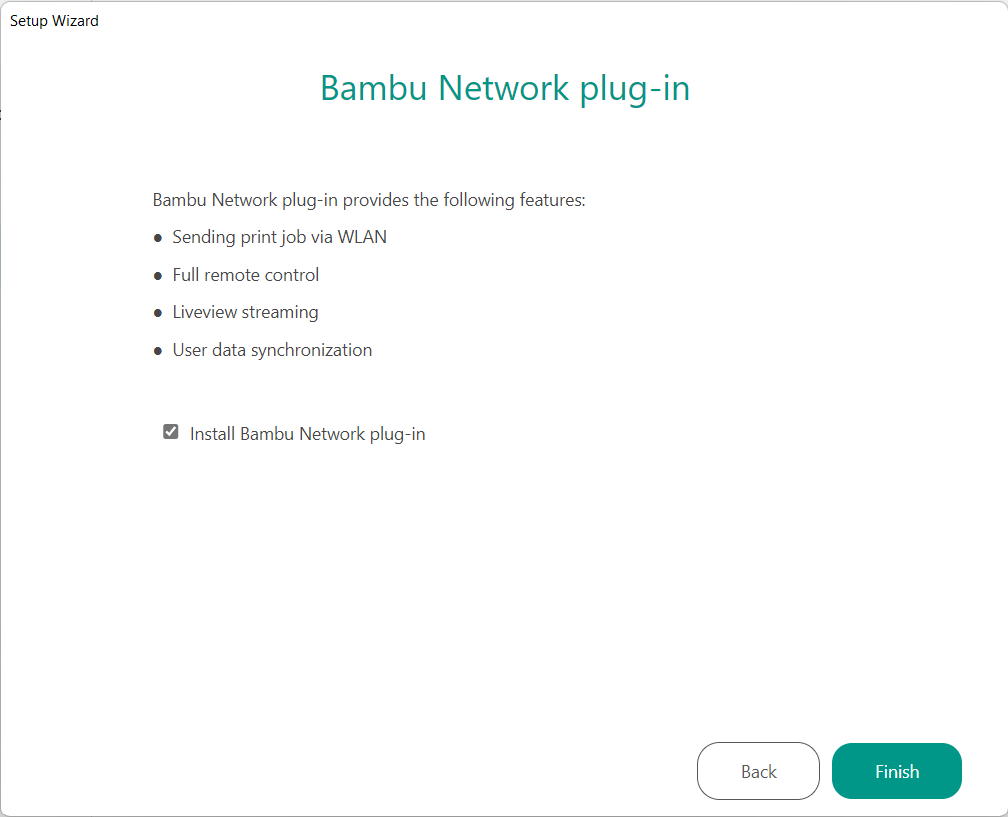
If you have a Bambu Lab printer or any other printer that supports wireless printing, Orca Slicer allows you to connect directly to your machine via the Bambu Network Plug-in. This feature lets you send G-code files to your printer over Wi-Fi; no SD cards or USB cables are needed.
Slicing and Printing with Orca Slicer
Now that you have your printer set up, you can slice your first model. Orca Slicer is very user-friendly and gives you a lot of control over the slicing process. To get started, select “New Project” and then drag and drop your file into the slicer window. Orca Slicer will automatically place your model on the build plate and give you options to scale, rotate, or position.
On the left-hand side, you’ll see a list of settings to control how your model is sliced. This is where you can get into the details of customizing your print. Orca Slicer has presets so if you’re just starting out you can leave the default settings as is. But if you want to fine-tune, you can adjust layer height, infill density, and print speed. There are also advanced options for seam visibility, support structures, and cooling fan settings depending on what you need for your print.
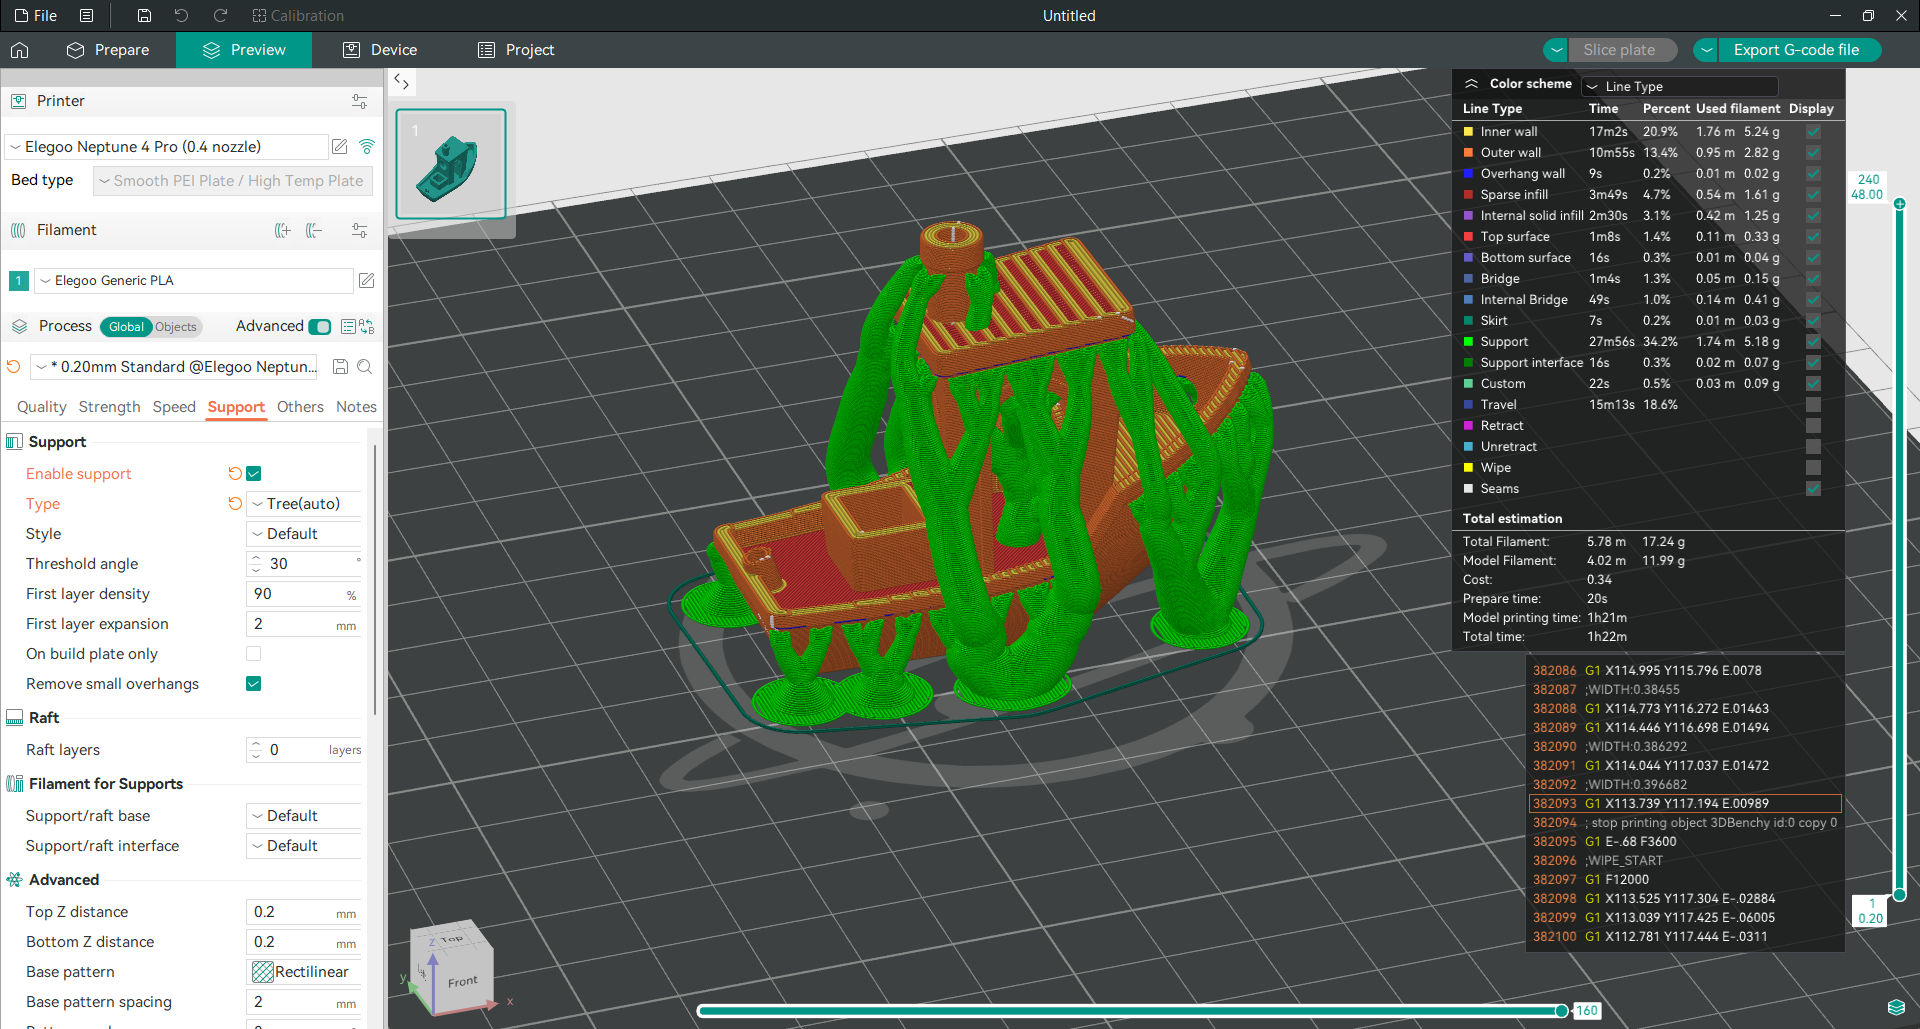
When you’re happy with the settings hit the “Slice Plate” button in the top right. Orca Slicer will process your model and once slicing is complete, you can preview the G-code. This preview shows how the printer will move layer by layer so you can double-check everything is good before sending it to the printer. If you need to make changes, you can adjust the settings and re-slice the model.
Once your model is sliced there are two ways to get it to your printer. If you have a standard FDM printer, you can export the G-code file to an SD card, pop it in your printer, and start the print. But if you have a printer connected to Octoprint, Klipper, or Bambu Lab, you can send the file directly from Orca Slicer via Wi-Fi. And if you have Orca Slicer connected to Obico, you can even monitor your printer and check print progress while you’re away (even if you’re not on the same local network).
Advanced Calibration Tools in Orca Slicer
Orca Slicer has a huge array of calibration tools to help you fine-tune your printer for the best results. These tools will help eliminate common printing problems like under extrusion, stringing, poor layer adhesion, and more so your prints look their best.
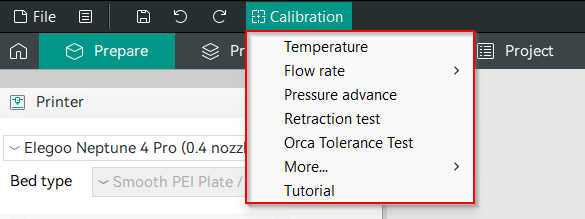
Here’s a breakdown of some of the most useful calibration features:
-
Temperature Tower Test The Temperature Tower Test lets you find the perfect print temperature for your filament by printing a model at different temperatures to see how temperature affects your prints. Use this calibration with different materials like PLA, ABS, and PETG to avoid warping and poor layer adhesion.
-
Flow Rate Calibration Ensuring your printer is extruding the correct amount of filament is key to achieving high-quality prints. Orca Slicer’s Flow Rate Calibration lets you fine-tune the extrusion flow so your prints have strong layer adhesion and smooth surfaces. Poor flow rate calibration can cause under extrusion, gaps between layers, and weak prints.
-
Pressure Advance Calibration The Pressure Advance Calibration tool helps optimize the extrusion when print speed changes, especially around corners. Proper calibration gives you sharper edges and eliminates under and over extrusion.
-
Tolerance Test The Tolerance Test lets you know how accurate your printer is and it is important to know what clearance you can use in your designs. This is especially important for projects that involve snap-fit or mechanical parts where tight tolerances are crucial for parts to fit together.
-
Maximum Volumetric Speed Test Orca Slicer also has a Maximum Volumetric Speed Test which lets you know the highest speed at which your printer can extrude filament without sacrificing print quality. This test is good for optimizing print speeds without under extrusion and poor layer adhesion.
-
Vertical Fine Artifacts (VFA) Test This test lets you find the sweet spot between speed and quality by printing the model at different speeds to find the fastest setting that maintains precision.
-
Retraction Test This test lets you avoid stringing and oozing by adjusting retraction. Orca Slicer makes it easy and helps you get clean prints between sections.
Remote Printing with Orca Slicer and Obico
One of the best things about Orca Slicer is the integration with Obico, a remote 3D printer management platform.
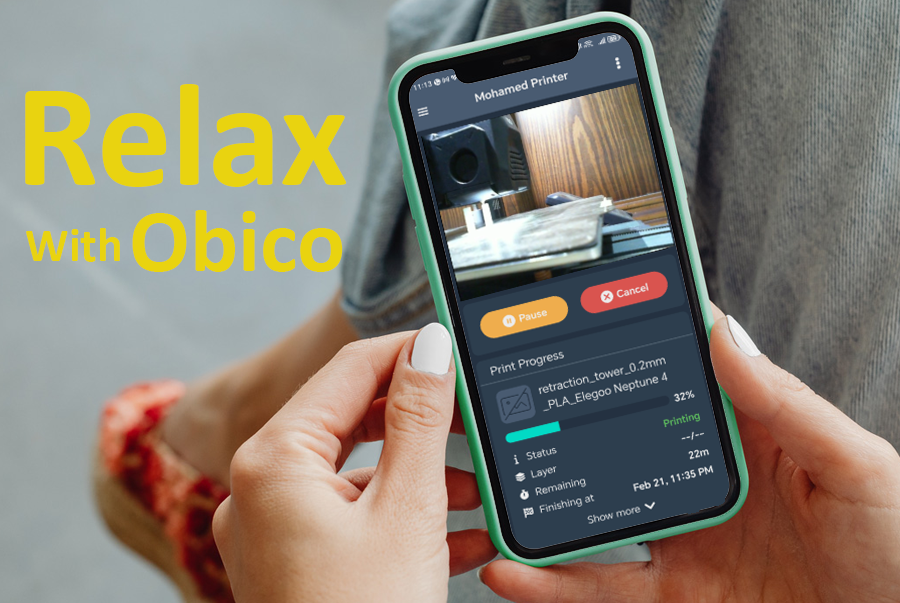
With Obico integration, you can:
- Access the Obico interface within the same window of Orca Slicer
- Start and stop prints remotely
- Monitor print progress in real-time
- See your printing progress through the webcam feed
- Get AI failure detection with two systems: General AI detection that monitors the entire print, and First Layer AI detection, which monitors the first layer and provides a detailed report with a grade and insights about the first layer
- Access a large library of 3D models that you can slice and send directly to your printer
- Receive alerts if a print fails
- Access to your printer’s interface (Mainsail and Fluidd interfaces)
Obico’s AI-driven failure detection can even pause or stop your print automatically if it detects issues like the common spaghetti failure.
To set up Orca Slicer with Obico, follow the instructions in this guide: Obico Integration Guide.
Orca Slicer also integrates with other interfaces like Klipper interfaces (Mainsail and Fluidd) and OctoPrint through the Device Tab feature. Where you can slice your model and send it over the Wi-Fi and control your printer remotely.
Read more in this guide: A Guide to the OrcaSlicer Device Tab.
FAQs
Q: What is Orca Slicer?
Answer: Orca Slicer is an open-source 3D printer slicer developed by SoftFever, based on Bambu Studio which is a fork of PrusaSlicer. It has advanced features like extensive printer profiles, fine-tuning options, and powerful calibration tools, so you have more control over your 3D prints.
Q: How is Orca Slicer different from other slicers like Cura and PrusaSlicer?
Answer: Orca Slicer has broader printer compatibility and more slicing parameters to control. It has advanced calibration tools like Pressure Advance Calibration and unique features to manage Z-seams and flow rates, so it’s more customizable for users who want to have more control over their prints.
Q: Where can I download Orca Slicer?
Answer: You can download Orca Slicer from its GitHub Releases page. Choose the version for your OS (Windows, macOS, or Linux).
Q: How do I install Orca Slicer on Windows/macOS/Linux?
- For Windows: Download the .exe file and follow the installation prompts.
- For macOS: Download the .dmg file, open it, and drag the application to your Applications folder.
- For Linux: Download the .AppImage file, set it to be executable, and run it directly.
Q: What printers are compatible with Orca Slicer?
Answer: Orca Slicer supports many printers, including Creality Ender 3, Elegoo Neptune series, and Bambu Lab printers. You can also create your own profile if your printer is not listed.
Q: How do I set up my printer in Orca Slicer?
Answer: When you first open Orca Slicer it will ask you to select your printer from a list. If your printer isn’t in the list, you can easily create a custom profile by entering your machine��’s settings.
Q: Does Orca Slicer support wireless printing?
Answer: Yes, Orca Slicer allows you to connect to compatible 3D printers over Wi-Fi, such as BambuLab machines, via the Bambu Network Plug-in. This eliminates the need for SD cards or USB cables, making remote printing easier. You can do the same with Klipper printers if you connect your Orca Slicer with Obico or Klipper interface.
Q: What are the key calibration tools in Orca Slicer?
Answer: Orca Slicer has several calibration tools: Temperature Tower Test, Flow Rate Calibration, Pressure Advance Calibration, Retraction Test, and others to fine-tune your printer.
Q: Can I monitor and control my printer remotely with Orca Slicer?
Answer: Yes, Orca Slicer integrates with Obico and supports Klipper interfaces (Mainsail, Fluidd) and OctoPrint for remote printer management, including monitoring print progress, starting/stopping prints, and receiving failure detection alerts (with Obico).
Q: Is Orca Slicer free to use?
Answer: Yes, Orca Slicer is free and open-source, with updates and community support.
Related Links
Explore more resources to help you get the most out of Orca Slicer with these comprehensive guides:
-
OrcaSlicer 3D Printer Calibration Features
Optimize your 3D prints with Orca Slicer’s calibration tools.
-
Temperature Tower Test in Orca Slicer
Find the perfect temperature for your filament.
-
Flow Rate Calibration in OrcaSlicer
Fine-tune extrusion settings with Orca Slicer's Flow Rate Calibration tool.
-
Pressure Advance Calibration in Orca Slicer
Adjust material flow for cleaner, sharper corners.
-
Understand your printer’s accuracy and clearance for precision parts.
-
Maximum Volumetric Speed Test in Orca Slicer
Print faster without compromising quality.
-
Speed Test in OrcaSlicer (VFA)
See how different speeds affect quality.
-
Retraction Test in Orca Slicer
Eliminate stringing and oozing.
-
Orca Slicer vs PrusaSlicer vs Cura
Compare the features and performance of Orca Slicer with other leading slicers.
-
See how Orca Slicer stacks up against Bambu Studio in a detailed comparison.
-
How to Setup a 3D Printer in OrcaSlicer
A step-by-step guide to configuring your 3D printer in Orca Slicer.
-
Guide to the Orca Slicer Device Tab
Learn how to manage your printer remotely using Orca Slicer’s Device Tab.
-
OrcaSlicer Seam Settings - How to Use It
Master seam settings to minimize visible layer transitions in your prints.
-
How to Connect OrcaSlicer to Obico
Find out how to connect Orca Slicer to Obico for remote 3D printer management.
Final Thoughts
Orca Slicer is a total game changer in the 3D printing software world. It has a user-friendly interface and advanced features that suit all beginners and experienced users. With its wide printer compatibility and calibration tools, you can fine-tune your prints like never before.
Downloading and setting up Orca Slicer is easy and once you’re up and running you’ll find you can do things you never thought possible with your prints. And with Obico integration, you can monitor and control your printer remotely even if you are not connected to the same local network.
So why not give it a try? It’s free and powerful and could be the tool that takes your 3D printing to the next level.
Also available in: Deutsch | Español | Français | Italiano | Nederlands | Polski | Português | Русский
