Orca Slicer Filament Profiles and How to Make Your Own
3D printing is more than a hobby; it’s a tool for innovation, design, and creativity. As technology gets better, the tools we use to optimize the print process get better. Orca Slicer is one of the best slicing software options out there for users who want precision, efficiency, and customization. One of its many features is the ability to create and manage your own filament profiles, and that’s a game changer for getting great results every time.
In this article we’ll go deep into filament profiles in Orca Slicer, what they are, why they matter, and how you can create, fine-tune, and optimize your own custom profiles for your material.
Let’s get started!
Understanding Orca Slicer
Before we get into filament profiles, let’s have a quick look at Orca Slicer. Orca Slicer is a very versatile 3D printing slicing software built on the solid foundations of PrusaSlicer and Bambu Studio. It combines the best of these two software programs with its own features to give you powerful tools for slicing, calibration, and customization. Whether you’re new to 3D printing or a seasoned pro, Orca Slicer gives you the flexibility to customize settings to your exact needs.
One of the slicer’s best features is the customization. From printer profiles to filament settings, you can change almost everything to suit your material, design, and print conditions. This is especially true with filament profiles where you can optimize for many different materials.
If you’re new to Orca Slicer, we recommend you start with the start guide for step-by-step instructions on how to download, install, set up the software, and get started. It also has links to many other related guides you can follow to become an Orca Slicer master.
Once you’re comfortable with the basics, you’ll be ready to delve into advanced topics like custom filament profiles, so let’s continue...
What are filament profiles?
Filament profiles are part of the slicer software; they define how your 3D printer interacts with specific filament types. These profiles include material-related settings such as extrusion temperature, bed temperature, cooling, retraction, and others. These settings affect the quality, strength, and appearance of your prints. Slicers group these settings into profiles to make using different materials easier and to get the best results.
Most slicers, including Orca Slicer, come with pre-configured profiles for common materials like PLA, ABS, PETG, and TPU. These are a good starting point. Some of these profiles are general, and others are for well-known brands like eSUN. In Orca Slicer, filament profiles are linked to printer profiles. When you choose a specific printer, you can choose between the compatible filament presets for this printer.
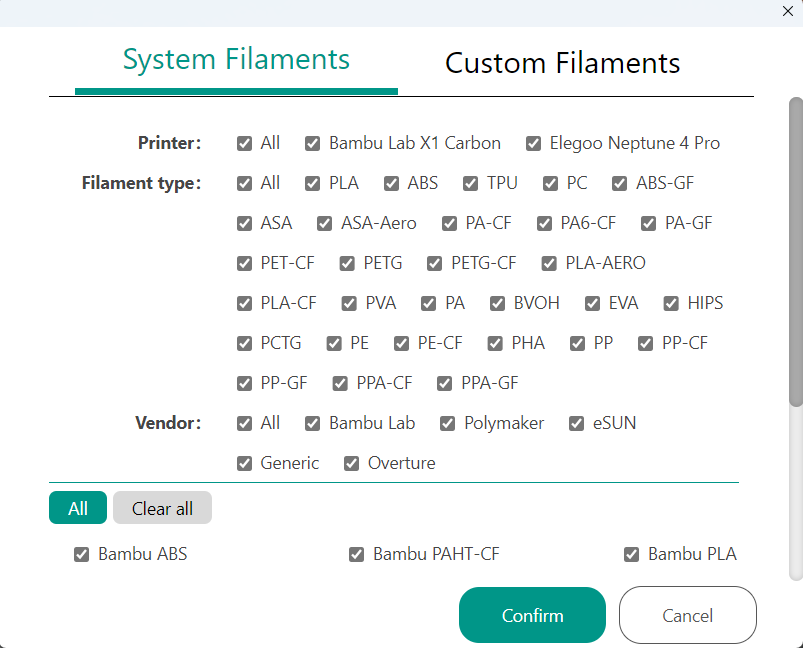
But sometimes you will need to add a custom filament profile. Whether you are using a new filament brand not supported by Orca Slicer or experimenting with specialty materials like silk PLA, custom profiles allow you to tweak settings and control them if you want to update any setting in an easy, organized, and direct way to get the best results.
Why Do Custom Filament Profiles Matter?
Preconfigured profiles are convenient but often too generic to fit every filament and printer setup. Custom filament profiles allow you to adjust parameters to fit your specific materials and conditions, especially if you want to use a material brand that is not supported by Orca Slicer.
We talk here about the general material profiles in Orca Slicer. But if you are using a well-known brand supported by Orca Slicer, you can simply select it and only tweak it to get the best results for your needs. You can also save the updated material profile as a copy in this case.
Custom profiles also improve reliability by reducing failed prints and optimize performance for specialty filaments like carbon fiber PLA or special flexible TPU, which often require nonstandard settings. Once configured, custom profiles will be consistent across multiple prints and save time by not having to adjust frequently.
In essence, custom filament profiles give you control, ensuring your prints meet your exact requirements and perform at their best.
How to Create a Custom Filament Profile in Orca Slicer
Creating a custom filament profile in Orca Slicer is easy but requires some attention to detail.
Follow these steps to create a profile for your specific filament and printer:
Step 1: Open Orca Slicer
First, open Orca Slicer on your computer. Make sure you have already set up your printer profile, as this will affect the options for your filament profile.
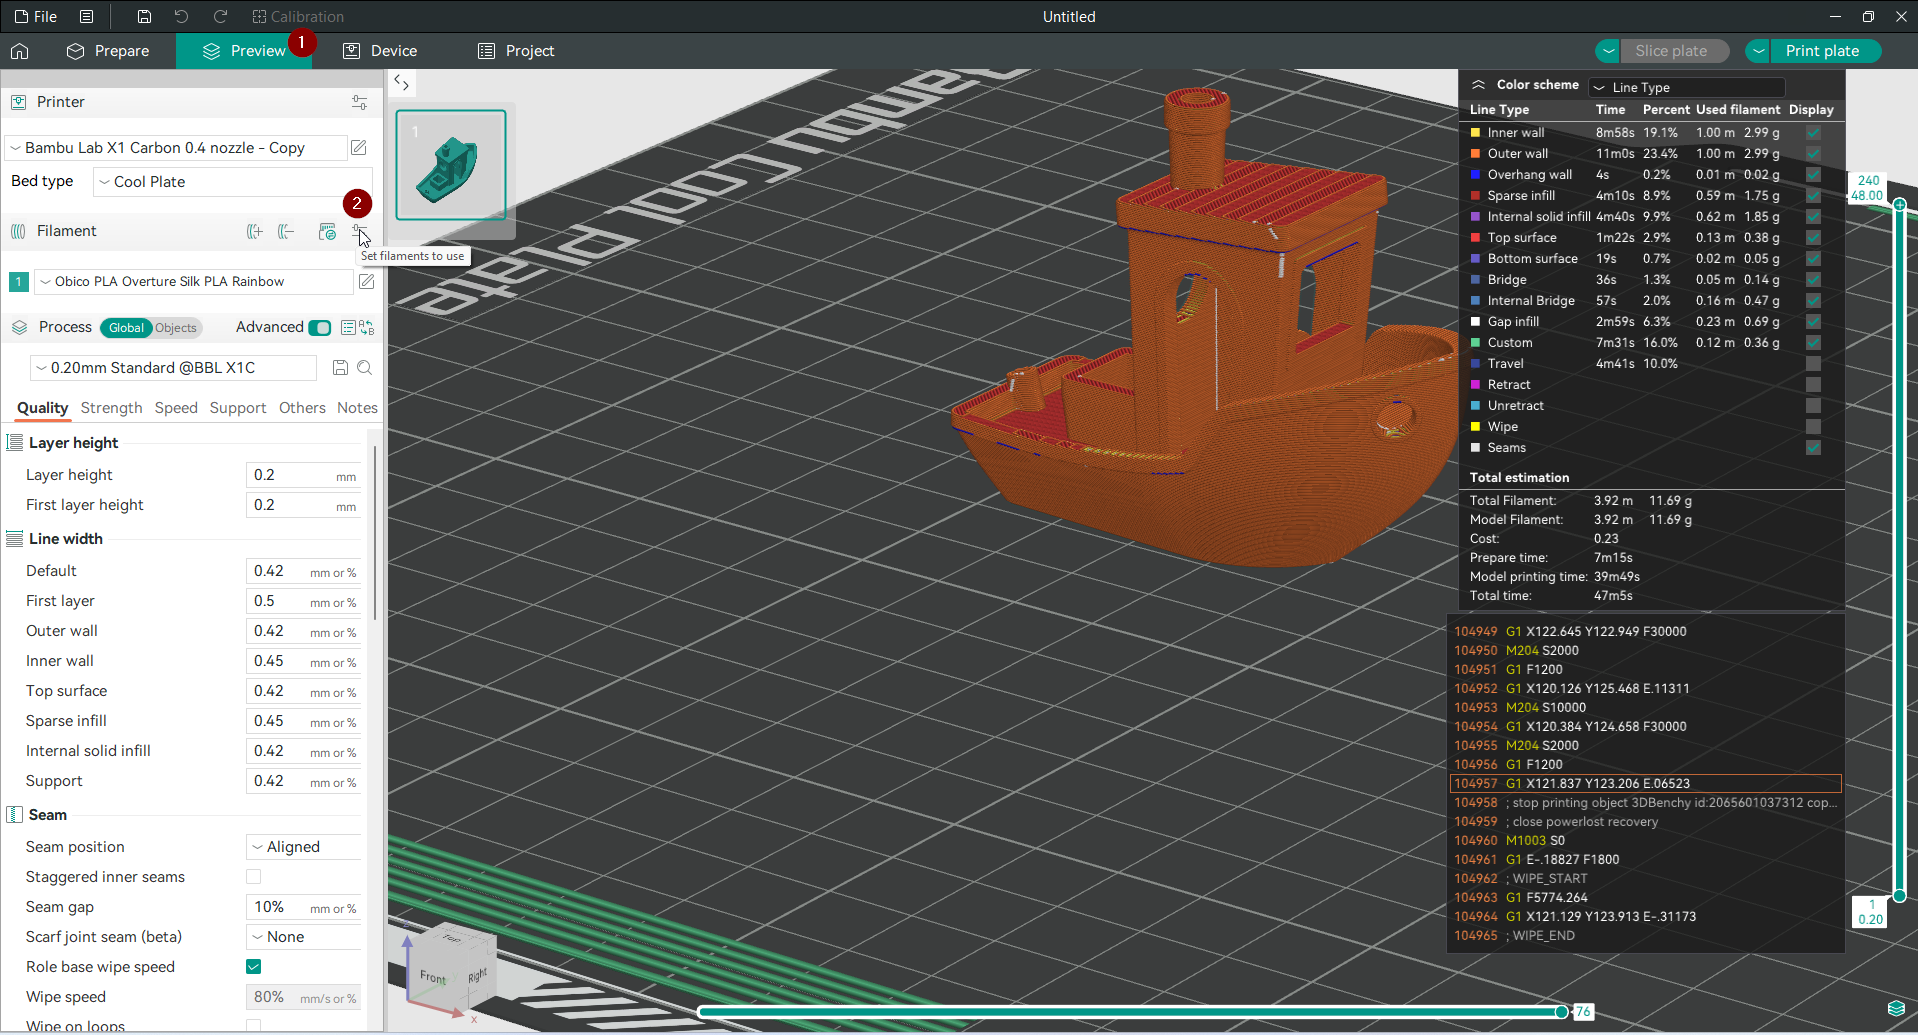
Step 2: Navigate to the Filament Settings
- From the main screen, click the Prepare tab in the top left.
- On the right-hand side of the screen, find the Filament section.
- Click the settings icon next to the Filament section, or scroll to the bottom of the Filament drop-down menu and select Add/Remove Filament.
Step 3: Access the Custom Filaments Menu
This will open a window showing all the pre-configured filament profiles in Orca Slicer. These include common materials like PLA, ABS, and PETG, as well as profiles for specific brands or printers you have added to Orca Slicer.
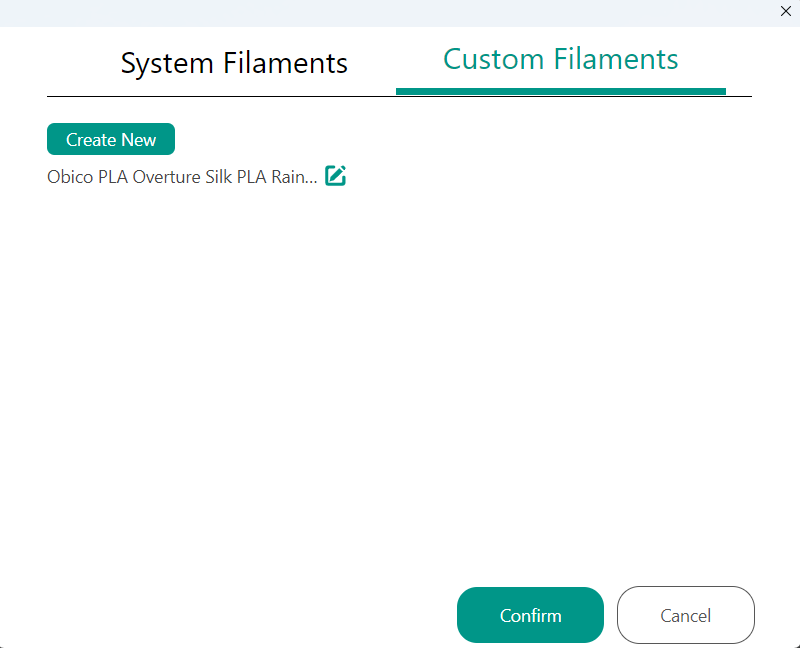
- Click on the Custom Filaments tab.
- Select Create New to begin the process of creating a custom profile.
Step 4: Input Filament Details
You will be asked to fill in several fields to define your filament:
- Vendor: Select the manufacturer of the filament (e.g., Overture, Hatchbox). If your brand isn’t listed, you can create a custom entry by checking the box "Can’t find vendor I want."
- Filament Type: Select the material type, e.g., PLA, ABS, PETG, TPU, or a specialty filament like carbon fiber PLA.
- Serial: Give the filament profile a descriptive name, e.g., “Overture Silk PLA Rainbow.”
- Base Profile: Select an existing profile that is close to your filament. For example, use “Generic PLA” as a starting point for PLA filaments. This will save you time, as you will only need to update a few settings without having to start from scratch.
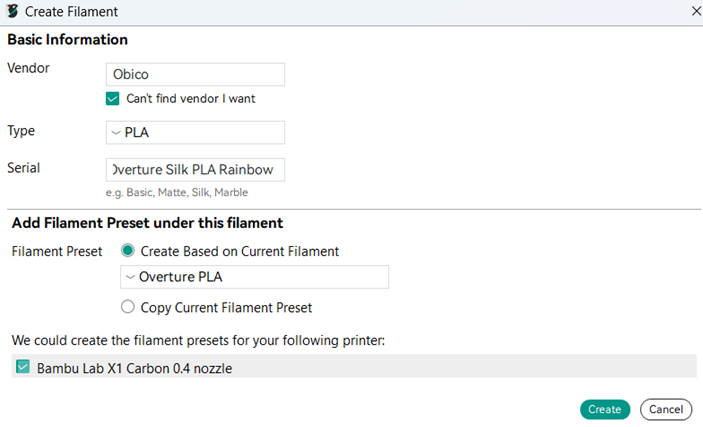
Step 5: Assign Printer Compatibility
Select the printers this profile will be compatible with. This will ensure the profile only shows up in the filament menu when using the selected printers.
Step 6: Save and Edit
Click Create to save your new profile. Now you can select this profile from the Custom Filaments list and start tweaking the settings for your filament.
Fine-Tuning Your Custom Filament Profile in Orca Slicer
Once you have created a custom filament profile, you need to fine-tune it to match your filament and your printer. Orca Slicer makes this easy by having a Filament Settings window with multiple tabs for extrusion, cooling, retraction, advanced, and multi-material.
How to Open the Filament Settings Window
To access the Filament Settings window for fine-tuning your profile, follow these steps:
-
Select the New Added Filament:
Go to the Filament dropdown menu in the right-hand panel of the slicer under the Prepare tab and select the new filament you want to edit.
-
Edit the Profile:
Click the small edit icon (usually a pencil icon) next to the name.
-
Filament Settings Window:
After clicking the edit icon, a new window will open—the Filament Settings window. This is where you will find the various tabs to fine-tune your new filament profile.
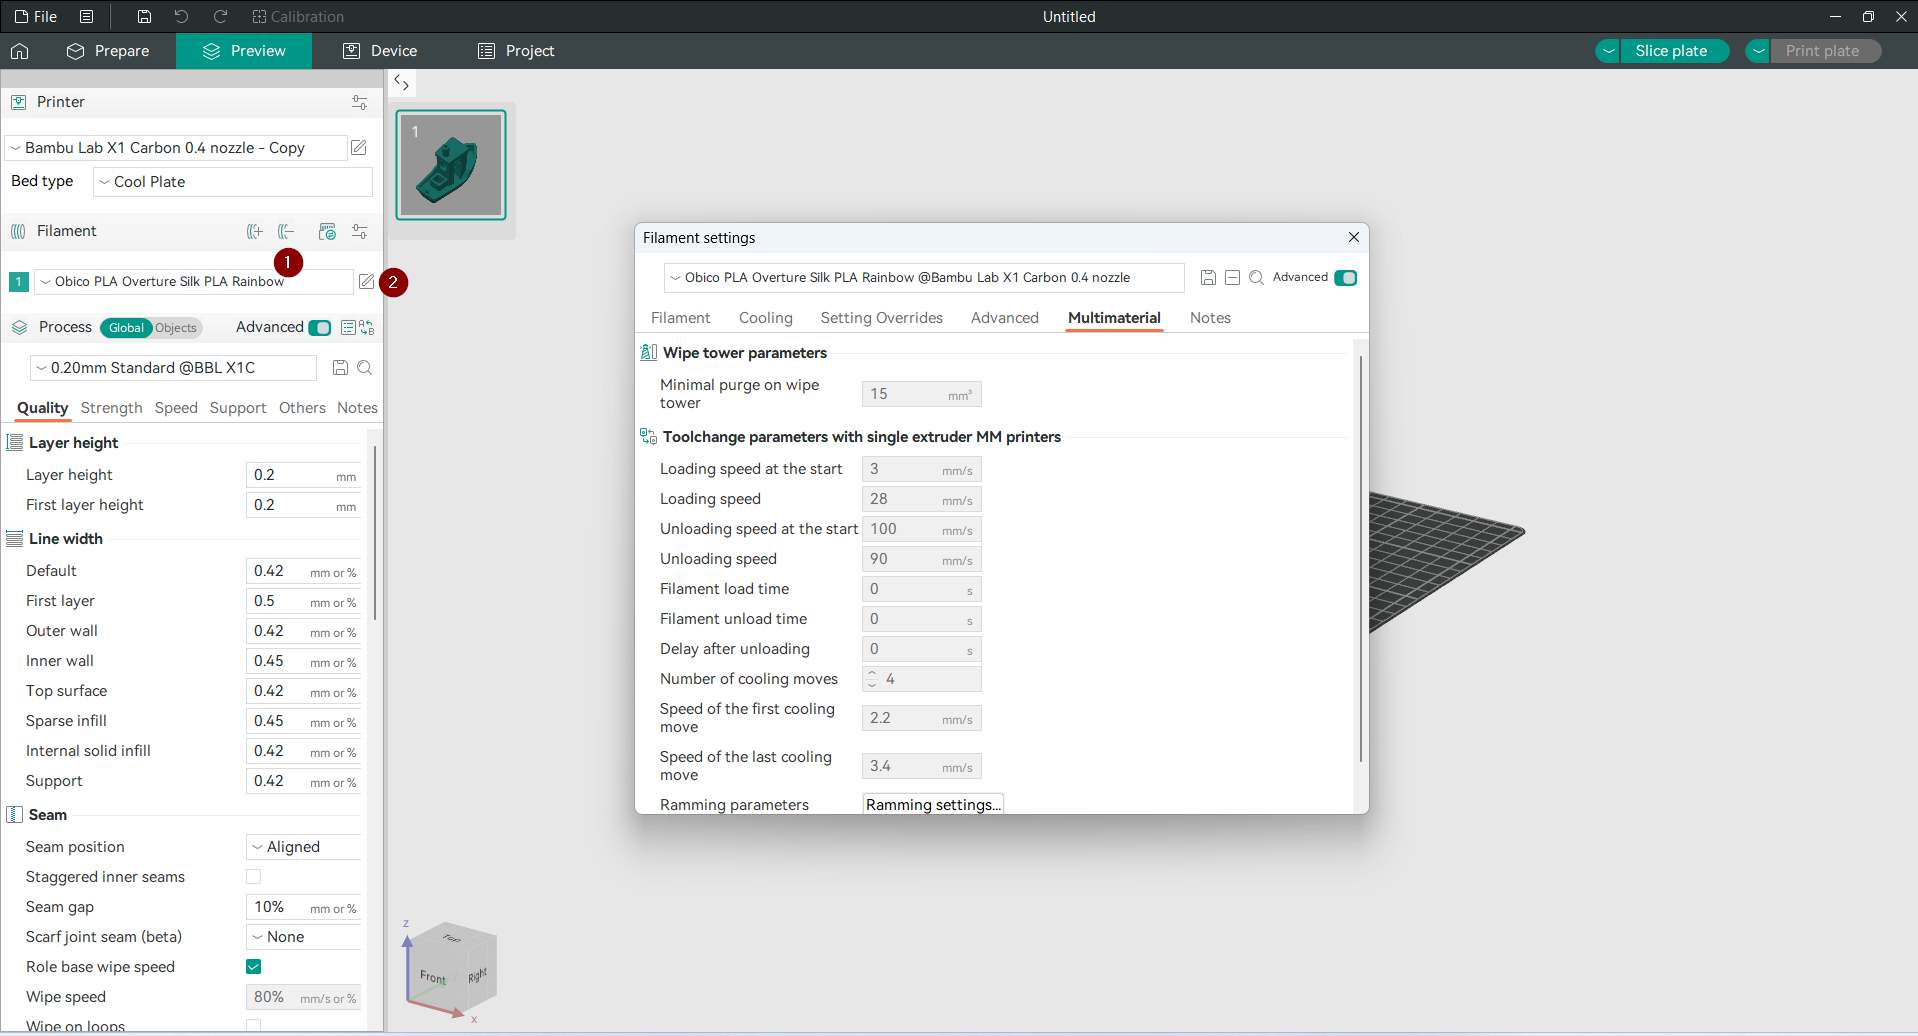
Once you are in the window, you can start to fine-tune. Below is an overview of the tabs in the Filament Settings window, what they do, and what to focus on.
Filament Tab
The Filament tab has the basic settings that define the physical properties of the filament and how it interacts with the printer. These are material type, diameter, flow ratio, and print temperatures. The most important settings in this tab are the nozzle temperature and bed temperature, which are crucial for adhesion and layer bonding.
For example, PLA needs a nozzle temperature of 190°C–220°C and a bed temperature of 50°C–60°C. These can be adjusted incrementally based on the manufacturer’s recommendations and test prints. Other important fields are the filament diameter (usually 1.75 mm) and flow ratio, which control how much material is extruded. Most users stick to the default flow ratio of 1.00, but you may need to adjust if you see over or under extrusion. The tab also has fields for cost tracking like filament density and price per kilogram, which can be useful for estimating project cost.
This tab also offers more advanced settings like pressure advance for better extrusion control and maximum volumetric speed. These advanced options are ideal for users seeking maximum precision, but they can usually be left at their default values for general use.
Cooling Tab
The Cooling tab controls how the slicer handles cooling fans during print. Cooling is super important for clean prints, especially for materials like PLA, which need rapid cooling to solidify layers quickly. This tab has settings for adjusting fan speeds at different stages of the print, like the first layer or overhangs and bridges.
Key options in this tab include the part cooling fan speeds, which determine how much airflow is applied to the printed object. For PLA, it’s common to set the fan to 100% after the first layer, while for materials like ABS, minimal or no fan use is recommended to prevent cracking. Another essential feature is the force cooling for overhangs and bridges, which ensures that airflow increases for these challenging geometries to prevent sagging.
For printers with auxiliary or exhaust fans, this tab allows you to configure extra airflow options. These aren’t necessary for every printer but can improve cooling and heat management for larger or more complex models. The cooling tab also has extra parameters to fine-tune airflow thresholds and behaviors so you have full control over layer solidification.
Setting Overrides Tab
The Setting Overrides tab is where you can adjust retraction settings and other printer-specific behaviors. Retraction is important to minimize stringing and oozing during non-printing movements, and this tab has the tools to fine-tune these settings.
The most important options here include retraction distance and retraction speed. Retraction distance defines how far the filament is pulled back during movement, with shorter distances (e.g., 0.5–1 mm) used for direct drive extruders and longer distances (e.g., 3–6 mm) for Bowden setups. Retraction speed determines how quickly the filament is retracted. this may vary depending on the material.
Beyond these basics, this tab has more advanced options, like wipe settings and extra length on restart, which help to fine tune the extrusion process for higher precision. These options are not often adjusted but are super useful for users who have stringing or inconsistent starts and stops in extrusion.
Advanced Tab
The Advanced tab allows you to add custom G-code scripts for extra control over your prints. G-code commands can automate actions at the start or end of a print; this tab is useful for advanced users who want to streamline their workflow or optimize specific behaviors.
For example, you can use Start G-code to preheat the nozzle and bed or to prime the extruder before the print starts. Similarly, you can use End G-code to retract the filament, disable the heater, and turn off the fans after the print is done. These scripts can save you time and reduce manual interventions between prints.
This tab also includes other advanced configurations that allow users to customize their printer’s behavior further. While these features are primarily for experienced users, they offer unparalleled flexibility for tailoring the printing process to specific needs.
Multimaterial Tab
The Multi Material tab is for printers that can do multimaterial or multicolor printing. This tab has settings for managing filament transitions and improving print quality during tool changes.
Important features include wipe tower parameters, which control the amount of material purged during transitions to prevent mixing, and tool change speeds, which dictate how quickly filaments are loaded and unloaded. These settings are critical for reducing waste and maintaining smooth transitions between filaments. For users printing with different materials or colors, this tab offers the necessary tools to handle filament changes efficiently and ensure consistent print quality.
The Multi Material tab also has more advanced options for cooling and delay management during transitions, so you can fine-tune how the printer handles material swaps. These settings are not relevant for single material prints but are important for multi extruders or single extruders with material swap capability.
Notes Tab
The Notes tab is for you to put specific information about the filament profile. You can use this section to document any changes made, test results, or manufacturer recommendations for the filament. This is especially useful for users with multiple profiles or testing new materials, so you can keep track of important info and avoid duplication of work.
Testing and Iterating
Once you have your custom filament profile fine-tuned, the next step is to test and validate through iterative printing. Testing is important to find areas to improve and make sure your changes give you the print quality you want. The key to successful testing is to start with small calibration models that help you isolate specific settings to test. Popular choices are temperature towers, retraction tests, and overhang benchmarks.
A temperature tower is a great tool to find the optimal nozzle temperature for your filament. These models have multiple sections printed at different temperatures, so you can see how different settings affect adhesion, surface finish, and detail. Look for smooth layer transitions, minimal stringing, and good overhang performance to find the sweet spot.
For retraction settings, use a stringing test model. This will help you see if your changes to retraction distance and speed are enough to eliminate oozing during nonprint moves. If stringing persists, increase retraction distance or speed and test again. If gaps or under extrusion appear, decrease these values to improve flow consistency.
An overhang and bridging test is also good when fine-tuning cooling settings. These models have steep overhangs and bridges that test your printer’s cooling to the max. Use this test to make sure fan speeds and cooling thresholds are set correctly to prevent sagging and get clean edges.
Make one change at a time during testing. This isolates the effect of each adjustment, preventing new issues while solving old ones.
For full test guides using Orca Slicer to improve your print quality and find the best filament settings, check out our full guide: OrcaSlicer Calibration Deep Dive.
Saving Your Profile
Once you’re happy with your custom filament profile, it’s time to save your settings for future use. Orca Slicer lets you save as a new file or overwrite the existing one. This way your optimized settings are saved and easily accessible for future prints with the same filament.
To save your profile, click the Save icon in the Filament Settings window. When saving, give the profile a descriptive name that reflects the filament’s brand, type, or unique characteristics—for example, “Overture Silk PLA Rainbow” or “Flexible TPU 95A.” This way you can easily find the correct profile when working with multiple filaments.
If you’ve created a profile for a filament you want to share with others or use across multiple printers, Orca Slicer also lets you export the profile as a file. This is useful for team collaboration, when managing filament settings across different slicer installations, or if you want to share the new profile with the 3D printing community.
FAQs
Q1. Do I need to create a custom profile for every filament?
Answer: No. Orca Slicer includes a library of pre-configured profiles for common materials and brands. However, custom profiles are recommended for new or experimental filaments or to optimize performance.
Q2. Can I edit pre-configured profiles?
Answer: Yes. Orca Slicer allows modifications to existing profiles. You can save changes as a new copy.
Q3. How do I know my settings are correct?
Answer: Testing is key. Use calibration models like temperature towers or retraction tests to verify your settings. Make incremental changes and test until you achieve desired results.
Q4. Can I share my custom profiles?
Answer: Yes. Orca Slicer allows profile export for sharing or use across multiple slicer installations.
Q5. What happens if I use the wrong settings for my filament?
Answer: Incorrect settings can lead to failed prints, stringing, or printer damage. Start with recommended settings and fine-tune from there.
Final Thoughts
Orca Slicer simplifies managing filament profiles, allowing you to fine-tune settings for any material. Custom profiles improve print quality, prevent issues like stringing and warping, and deliver results that meet your expectations.
Investing time in creating and testing profiles ensures reliable, high-quality prints. Once optimized, profiles can be reused for consistent performance, saving time and effort. Orca Slicer supports a wide range of materials, making it suitable for both beginners and experienced users.
Take your time to experiment, test, and refine your profiles for excellent results every time. 😉
Happy printing!
