Orca Slicer vs. Bambu Studio: Detailed Review and Features
Introduction
In the world of 3D printing, the slicer software you choose can significantly impact the quality, speed, and efficiency of your prints. Two popular slicers making waves in the community are Orca Slicer and Bambu Studio. Both of these slicers offer a robust set of features tailored to different users, but which one is right for you?
In this guide, we’ll compare both slicers, covering installation, user interface, standout features, community support, and more.
Whether you're new to 3D printing or experienced, this will help you choose the right slicer for your needs.
Overview of Slicer Software
What is Slicer Software?
Before we delve into Orca Slicer and Bambu Studio, it’s important to understand what slicer software does. In 3D printing, slicer software acts as the bridge between your digital 3D model and the physical printer. It takes the 3D model, which is typically in a format like STL or OBJ, and converts it into a series of instructions that your 3D printer can follow.
The term "slicing" comes from the software's process of dividing the 3D model into thin horizontal layers. Each of these layers represents a cross-section of the model at a specific height, and the slicer software determines the exact path the printer's nozzle will follow to build each layer. This path includes not just the outer shell of the model but also the internal structure, known as infill, which can vary depending on the desired strength and material efficiency.
Beyond simply slicing the model, the software also generates a G-code file, which is a text-based file containing detailed instructions for the printer. These instructions tell the printer how to move its components (like the print head and build plate), at what speed, and at what temperature to extrude the filament. The G-code also controls other aspects, such as fan speeds, and retraction settings, which help prevent issues like stringing or oozing.
Why Choosing the Right Slicer Matters?
Selecting the right slicer software is crucial in the 3D printing process because it directly impacts the quality, efficiency, and success of your prints, as well as the user experience, ease of use, and printer compatibility.
Here's why it matters:
Print Quality
The slicer software determines how your 3D model is translated into layers that the printer can build. A good slicer optimizes layer height, infill patterns, and support structures to ensure that the final print closely matches the original design with high precision. Poor slicing can result in visible layer lines that make the surface of the print look rough, poor adhesion, or inaccurate dimensions that cause parts not to fit together correctly. Additionally, it can cause bad support placement which can make it difficult to remove supports cleanly, potentially damaging the print. The slicer’s algorithms might add too few or too many supports, leading to sagging in unsupported areas or wasting material. Slicing errors can also cause over-extrusion, which results in blobs and stringing, or under-extrusion, which creates gaps and weak layers that weaken the overall strength and quality of the print.
Print Speed
Efficiency in slicing not only saves time during the preparation phase but also optimizes the actual printing process. A well-chosen slicer can reduce print time by optimizing paths and minimizing unnecessary movements. This is especially important for large or complex prints, where time savings can be substantial. Faster prints also mean higher productivity, which is crucial for professionals and hobbyists working on multiple projects.
Material Management
Different materials need specific settings for temperature, cooling, retraction, and extrusion. A good slicer offers a variety of pre-made material profiles. It includes general and brand-specific material profiles, with these settings already optimized. This ensures optimal print results by automatically applying the correct settings for each material, helping to prevent issues like warping, stringing, or print failures. It also allows you to start printing and switch between materials easily without the need to manually adjust or select many settings yourself.
Support Structure Optimization
Support structures are often essential for printing overhangs and complex geometries, but poorly designed supports can be hard to remove and may damage the print. A good slicer offers intelligent support algorithms that minimize material usage while ensuring supports are easy to remove and don’t harm the print’s surface. This is especially important for delicate models or those requiring high surface quality.
User Experience and Learning Curve
For beginners, choosing the right slicer can be the key to a smooth and successful 3D printing experience. Easy-to-use slicers with simple interfaces and ready-made settings help new users get good results without needing to know all the technical details. On the other hand, experienced users might prefer slicers that give them more control to adjust every part of the print. This difference in ease of use and customization is an important factor that can vary from one slicer to another.
Compatibility and Integration
Not all slicers are compatible with every 3D printer or material. Choosing a slicer that is well-supported and regularly updated ensures compatibility with the latest printers and filaments. Additionally, some slicers offer integration with other tools, like remote monitoring, which can enhance the overall printing experience by allowing users to control and monitor prints from remotely.
Community support and updates:
Community support and regular updates are important when picking a slicer. A good user community offers helpful advice, tips, and solutions to common problems, making it easier for you to get the most out of your slicer. Regular updates from the developers keep the slicer compatible with new printers and materials and fix any bugs or issues. Choosing a slicer with active community support and frequent updates can make your 3D printing experience much smoother and more enjoyable.
Now that we know what a slicer is and why picking the right one matters, let’s dive into OrcaSlicer. We’ll walk through how to install it and get started, take a look at its user interface and layout, and point out its key features.
Orca Slicer
OrcaSlicer is an advanced slicing software developed as a fork of Bambu Studio, which itself is based on PrusaSlicer, which in turn is a fork of the original SliC3r program. It was created by a GitHub user named Softfever and was designed to enhance the features and capabilities of its predecessor by adding more printer presets, detailed print settings, and a range of other advanced tools that improve the overall 3D printing experience.
OrcaSlicer offers additional customization options, such as including a wide range of pre-configured printer profiles with the ability to add custom printers. It also includes unique features like Sandwich (inner-outer-inner) mode - an improved version of the External perimeters first mode - support for Klipper firmware, and a comprehensive calibration menu that helps users fine-tune their print settings with ease.
OrcaSlicer isn’t limited to just one brand of 3D printers - it works with a wide range of different models. In fact, it might be one of the slicers that supports the most printers out there. Thanks to its active open-source community, OrcaSlicer is constantly being updated and improved, making it a flexible and powerful tool for anyone into 3D printing.
While it might seem unusual to compare two slicers where one is derived from the other, OrcaSlicer and Bambu Studio are designed for different purposes and cater to unique user needs. Even though they have a lot in common, they each have their own unique features, which you'll understand by the end of this article.
How to Download and Install OrcaSlicer
OrcaSlicer is user-friendly and easy to install, even if you're new to 3D printing. Follow these steps to get OrcaSlicer up and running on your computer:
-
Download OrcaSlicer:
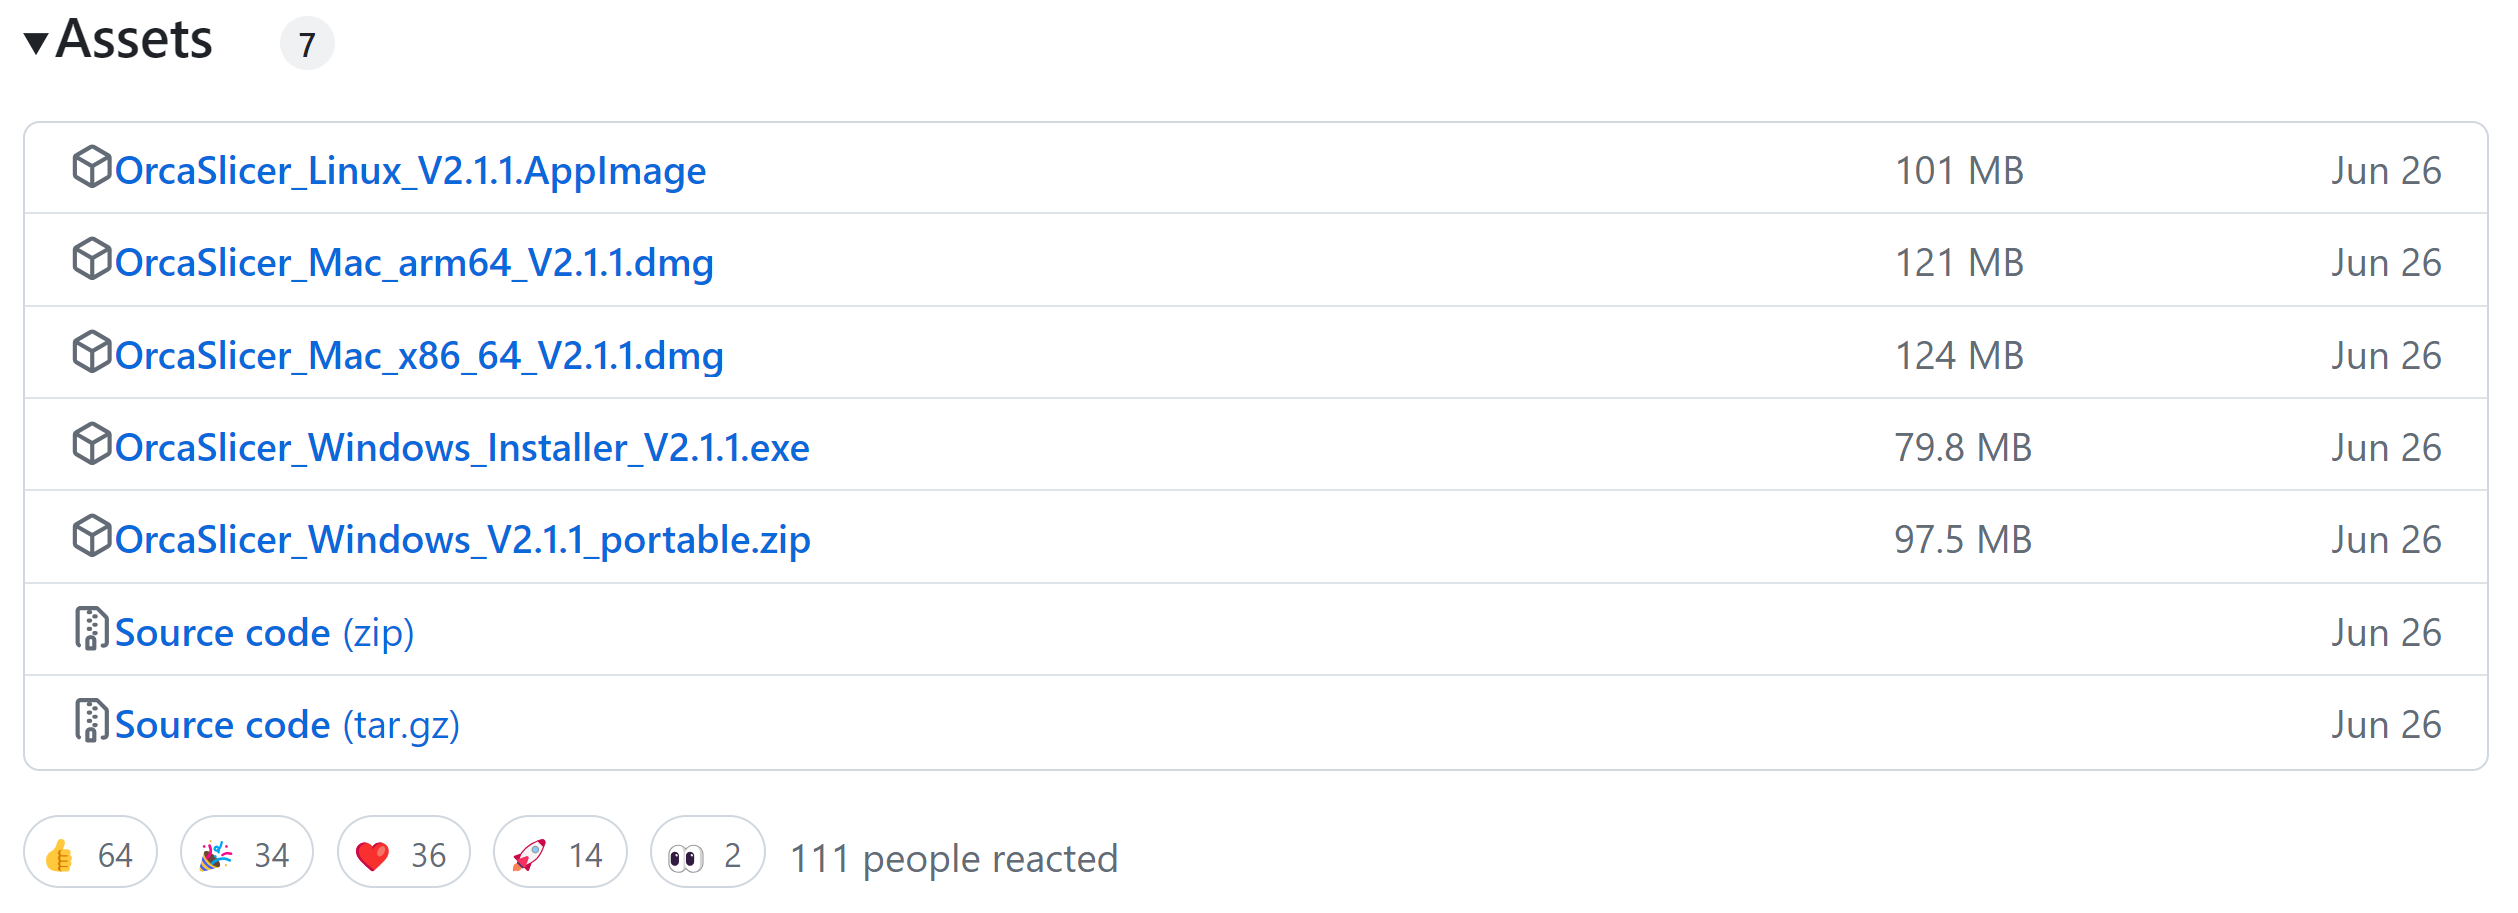
Head over to the OrcaSlicer official release page on GitHub. You can easily download the latest version from the assets section for Windows, Mac, or Linux. Simply choose the version that matches your operating system.
-
Install OrcaSlicer:
Double-click on the orca-slicer.exe file (for Windows) or the appropriate installer for your OS. This will launch the installation process. Follow the prompts, and OrcaSlicer will be installed on your computer. Once the installation is finished, OrcaSlicer will open, ready for you to set up.
Setting Up OrcaSlicer
After installing OrcaSlicer, you’ll need to set it up for your specific 3D printer. The setup process is quick and easy:
-
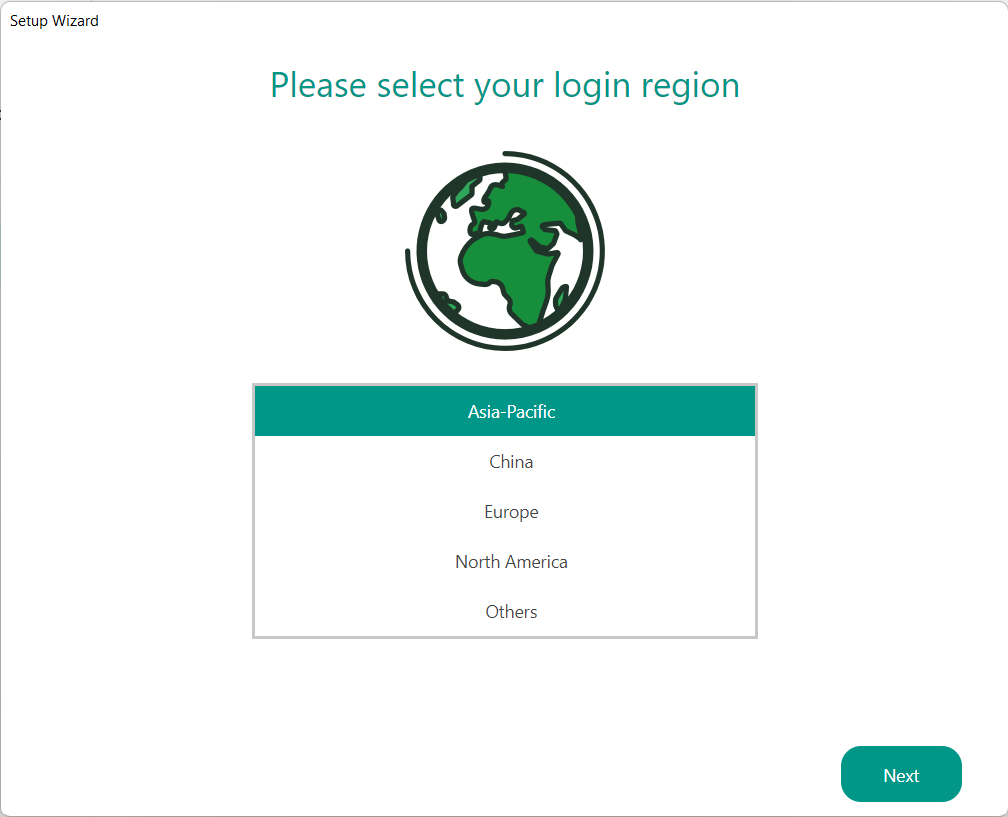
Choose Your Region:
When you first open OrcaSlicer, you'll need to select the location where you'll be using your 3D printer.
-
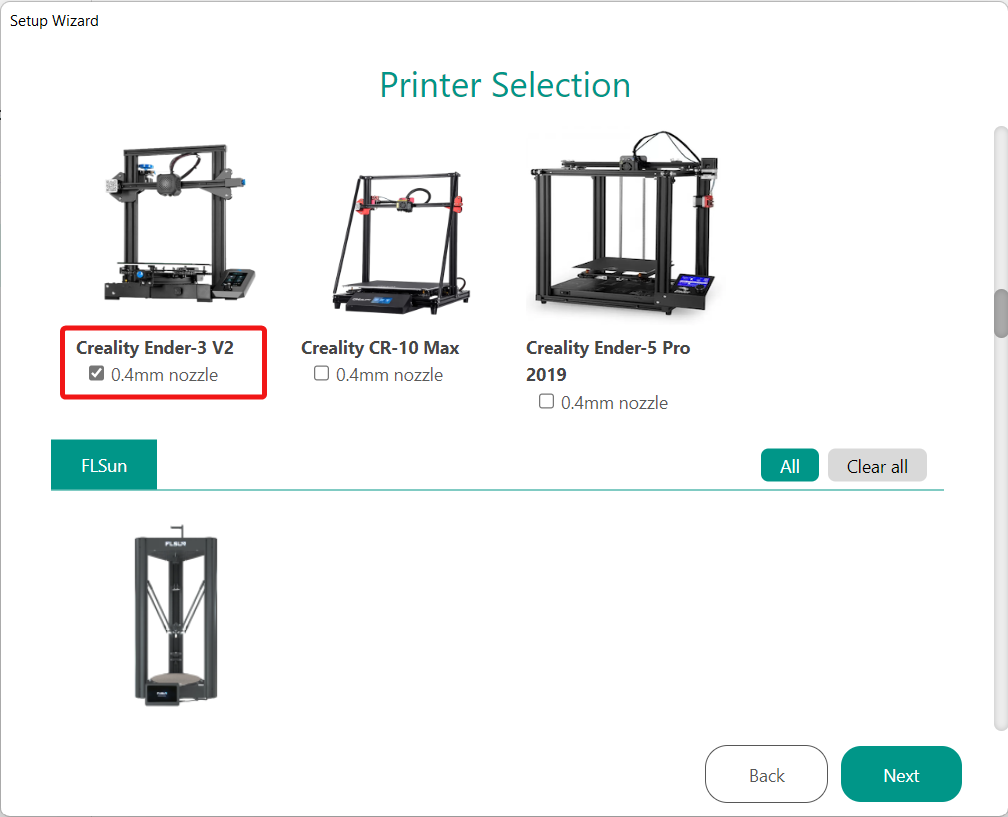
Select Your 3D Printer:
OrcaSlicer comes with many pre-configured printer profiles. Scroll through the list and select your printer. If your printer isn’t listed or if you’re using a custom setup based on Klipper or Marlin, you can add your printer manually. OrcaSlicer supports a wide range of printers, making it a versatile choice.
-
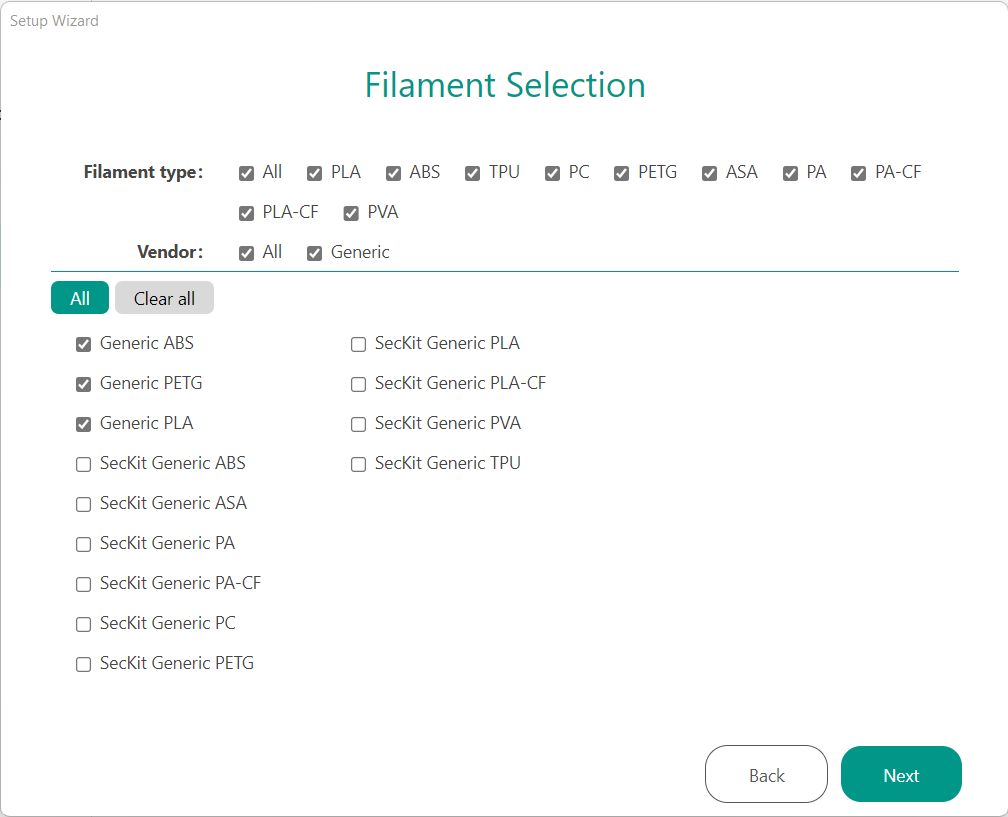
Pick Your Filament:
Next, select the type of filament you plan to use. OrcaSlicer offers pre-set options for a variety of filaments, including both brand-specific and general materials, so you won’t need to adjust the settings manually. This makes starting your prints much easier.
-
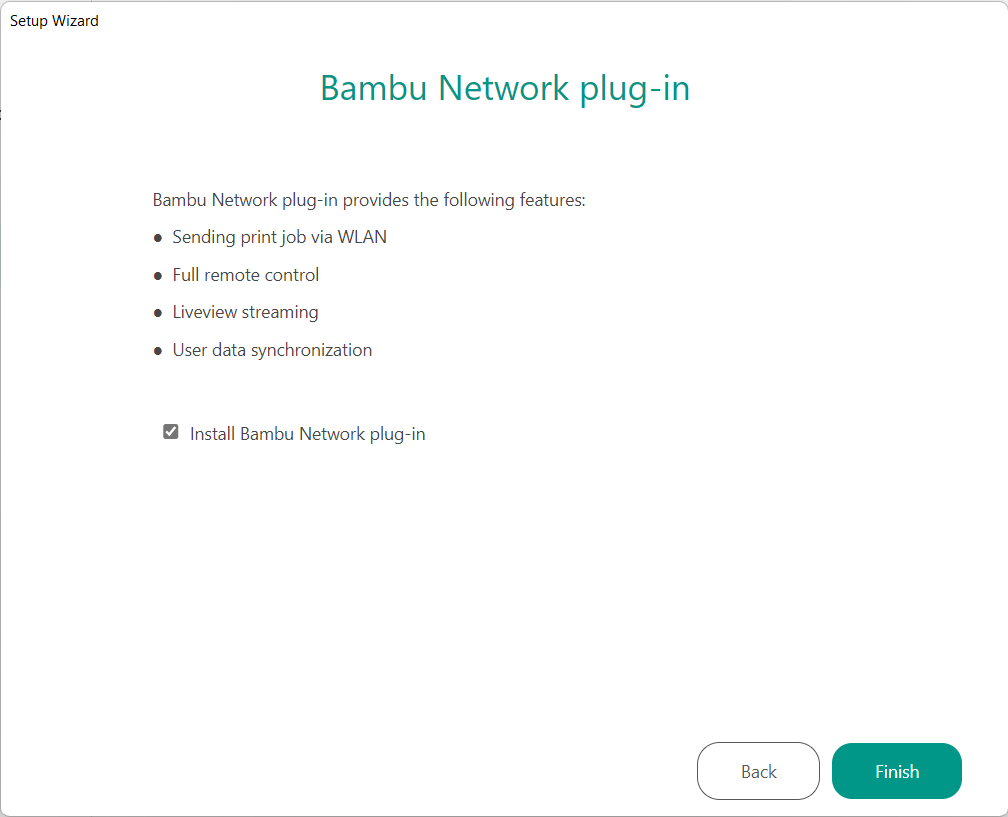
Set Up Wireless Connection (Optional):
If you want to connect your 3D printer wirelessly, OrcaSlicer offers a Bambu Network Plug-in that works with both Bambu and Klipper printers. This allows you to manage your printer from anywhere within your network.
-
Log In to BambuLab (Optional):
If you have a BambuLab 3D printer, you can log in to your BambuLab account to control your printer remotely using the Bambu Handy app. This step is optional and can be skipped if you’re not using a Bambu printer.
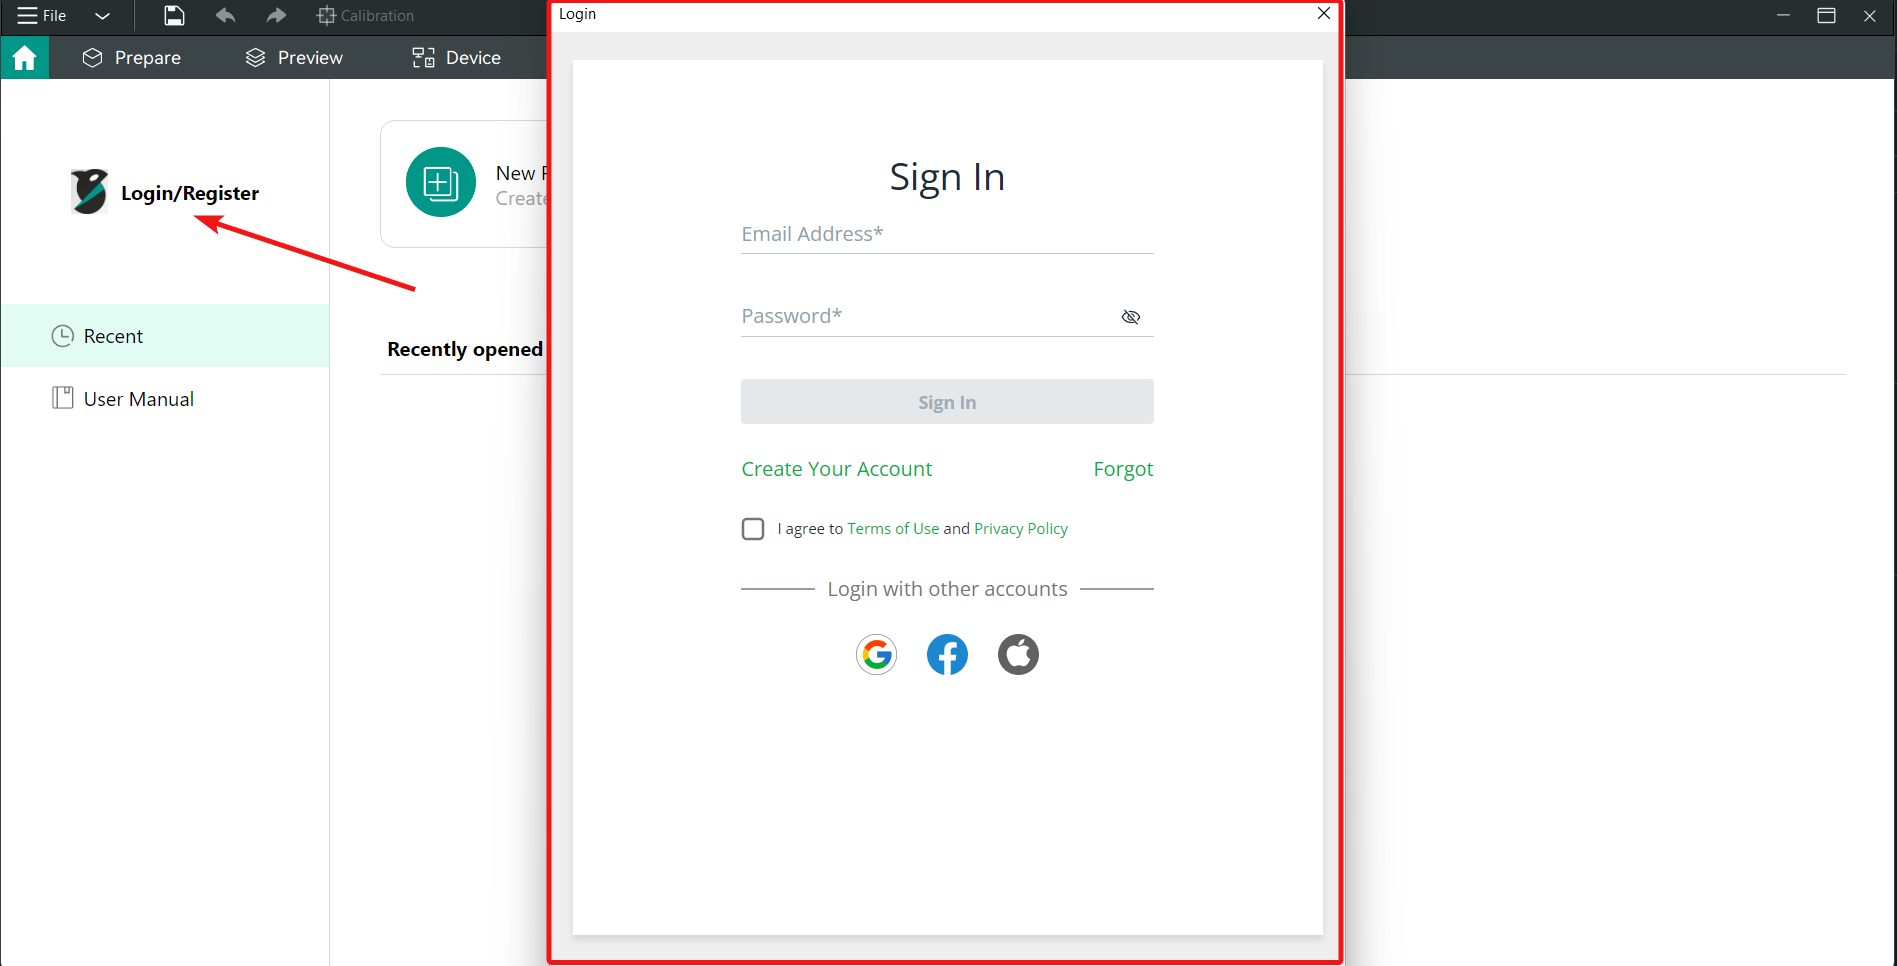
If you don't have a Bambu 3D printer, you can skip this step, as the account won’t be necessary.
With OrcaSlicer now set up, it’s time to take a closer look at its user interface and layout. Let’s explore what it has to offer.
OrcaSlicer is designed to be user-friendly, so it’s easy to get around no matter how experienced you are.
User Interface Overview
When you open OrcaSlicer for the first time, you’ll see that the interface is simple and well-organized. The main area is where you’ll work with your 3D models - loading, arranging, and adjusting them as needed. On the left side of the screen, there’s a panel that gives you quick access to all the settings you’ll need with both options: basic and advanced (there is a toggle switch to switch between two modes).
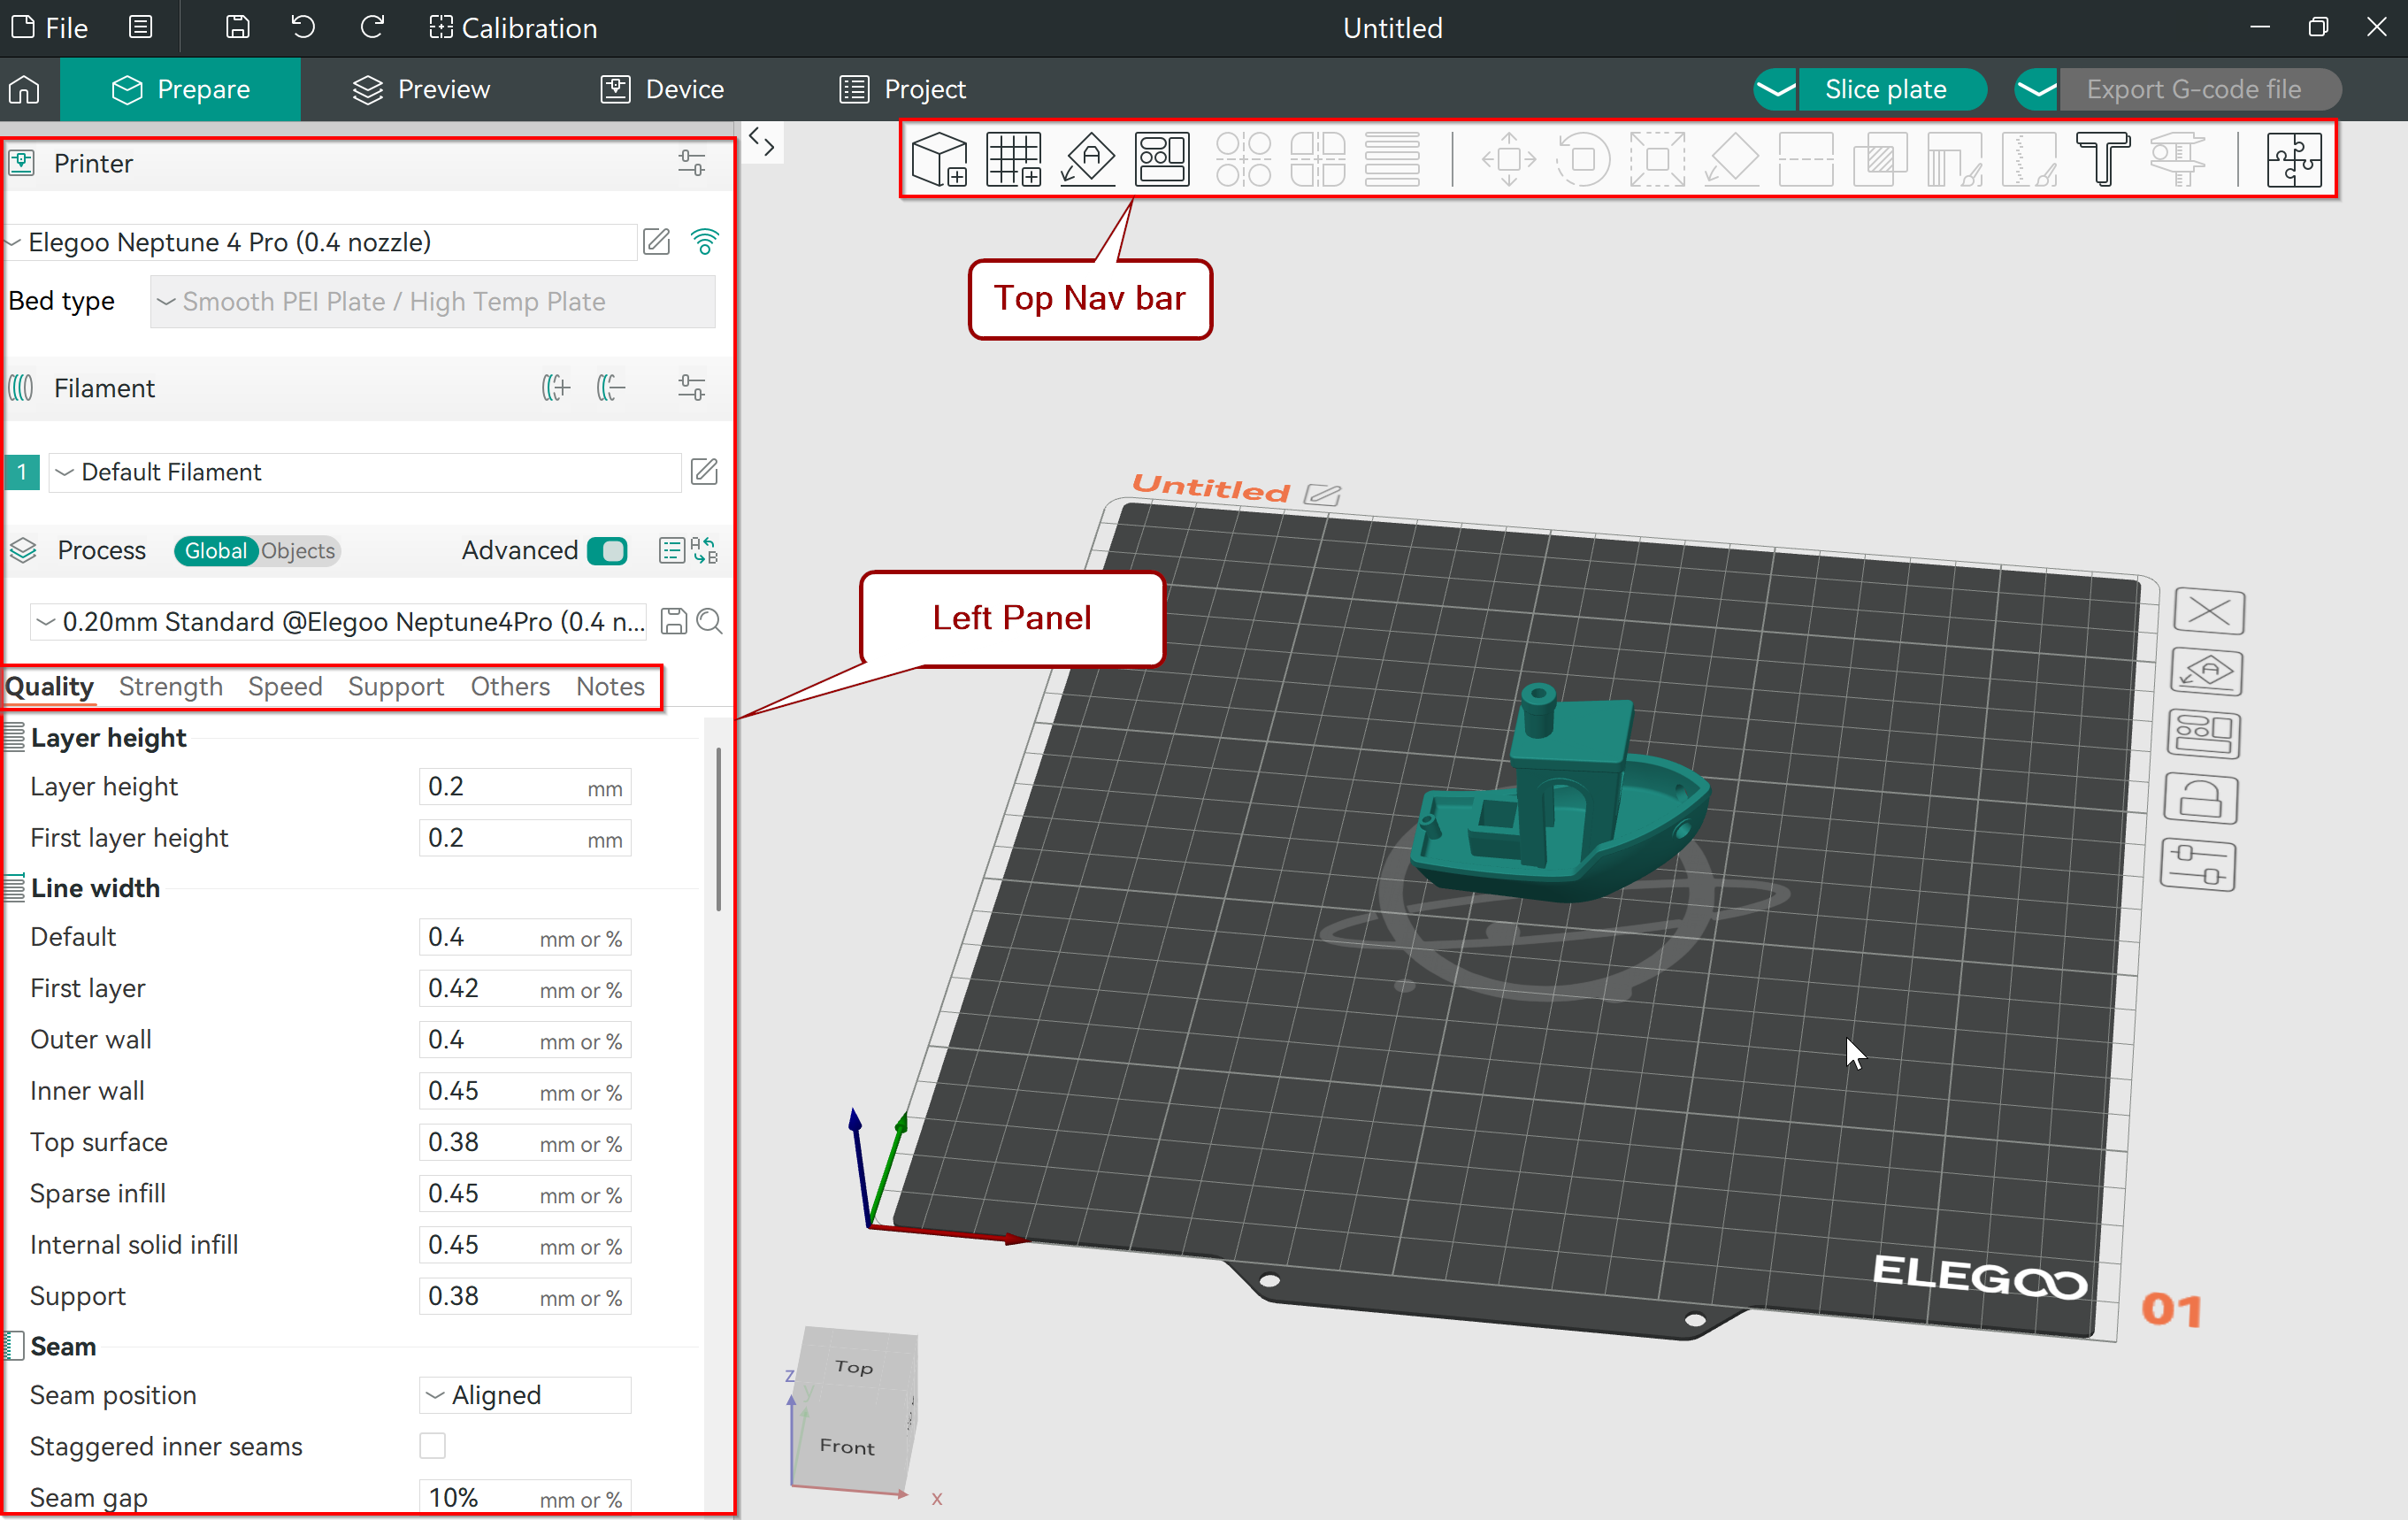
At the top of the screen, there's a toolbar with tools that help you adjust your models on the print bed. You can move, rotate, and resize your models easily. There's also a tool to paint supports exactly where you need them, giving you more control over the print. You can also paint seams to make sure your edges are neat, and there's a nice measuring tool that lets you check angles and distances between different parts of your model.
Settings Panel
The settings panel on the left side is split into different sections, each focusing on a specific part of the slicing process. Here’s a quick look at what you’ll find:
Quality
This section is focused on how your print will look. You can adjust settings like layer height, line width, seam placement, and precision. Additionally, you can fine-tune ironing for smoother surfaces, optimize the wall generator, and control walls and surfaces, bridging, and overhangs for better overall print quality.
Strength
This section is all about ensuring your print is strong and durable. You can adjust the wall loops, control the top/bottom shells, infill patterns and density, and other advanced options to enhance the structural integrity of your print.
Speed
This section lets you control how fast your printer operates during different stages of the print. You can adjust the speed for the first layer, other layers, overhangs, and travel moves. Additionally, it allows you to fine-tune acceleration and jerk settings (X/Y).
Support
This section allows you to customize how supports are generated for your model. You can select the type of support and adjust various settings like threshold angle, top and bottom Z-distances, and many other options to ensure the supports fit your specific needs.
Others
This is where you’ll find extra options, like adding a skirt or brim, using spiral vase mode, or turning on special print modes that might be useful for certain projects.
You can recognize that each section is organized by what it does to the final print, rather than by technical jargon. This makes it easier to understand how each setting will affect your print and helps you quickly find the settings you need based on the results you’re aiming for.
After slicing your model, OrcaSlicer automatically transitions to the Preview tab, offering a detailed overview of your sliced model with a color-coded scheme. This preview feature is crucial for inspecting various aspects of the print before sending it to the printer, allowing you to ensure everything is set up correctly.
In the Preview tab, you can delve into different data views, which you can select form a drop-down menu. Each provide detailed insights into the printing process of your model. The line type view, for instance, helps you easily identify various line types - like inner and outer walls, skirts, bridges, and supports - by displaying them in distinct colors, allowing you to visualize the print's overall structure. The filament view breaks down the filament usage, clearly separating the amount needed for the model itself and the supports, giving you a better estimate of material consumption.
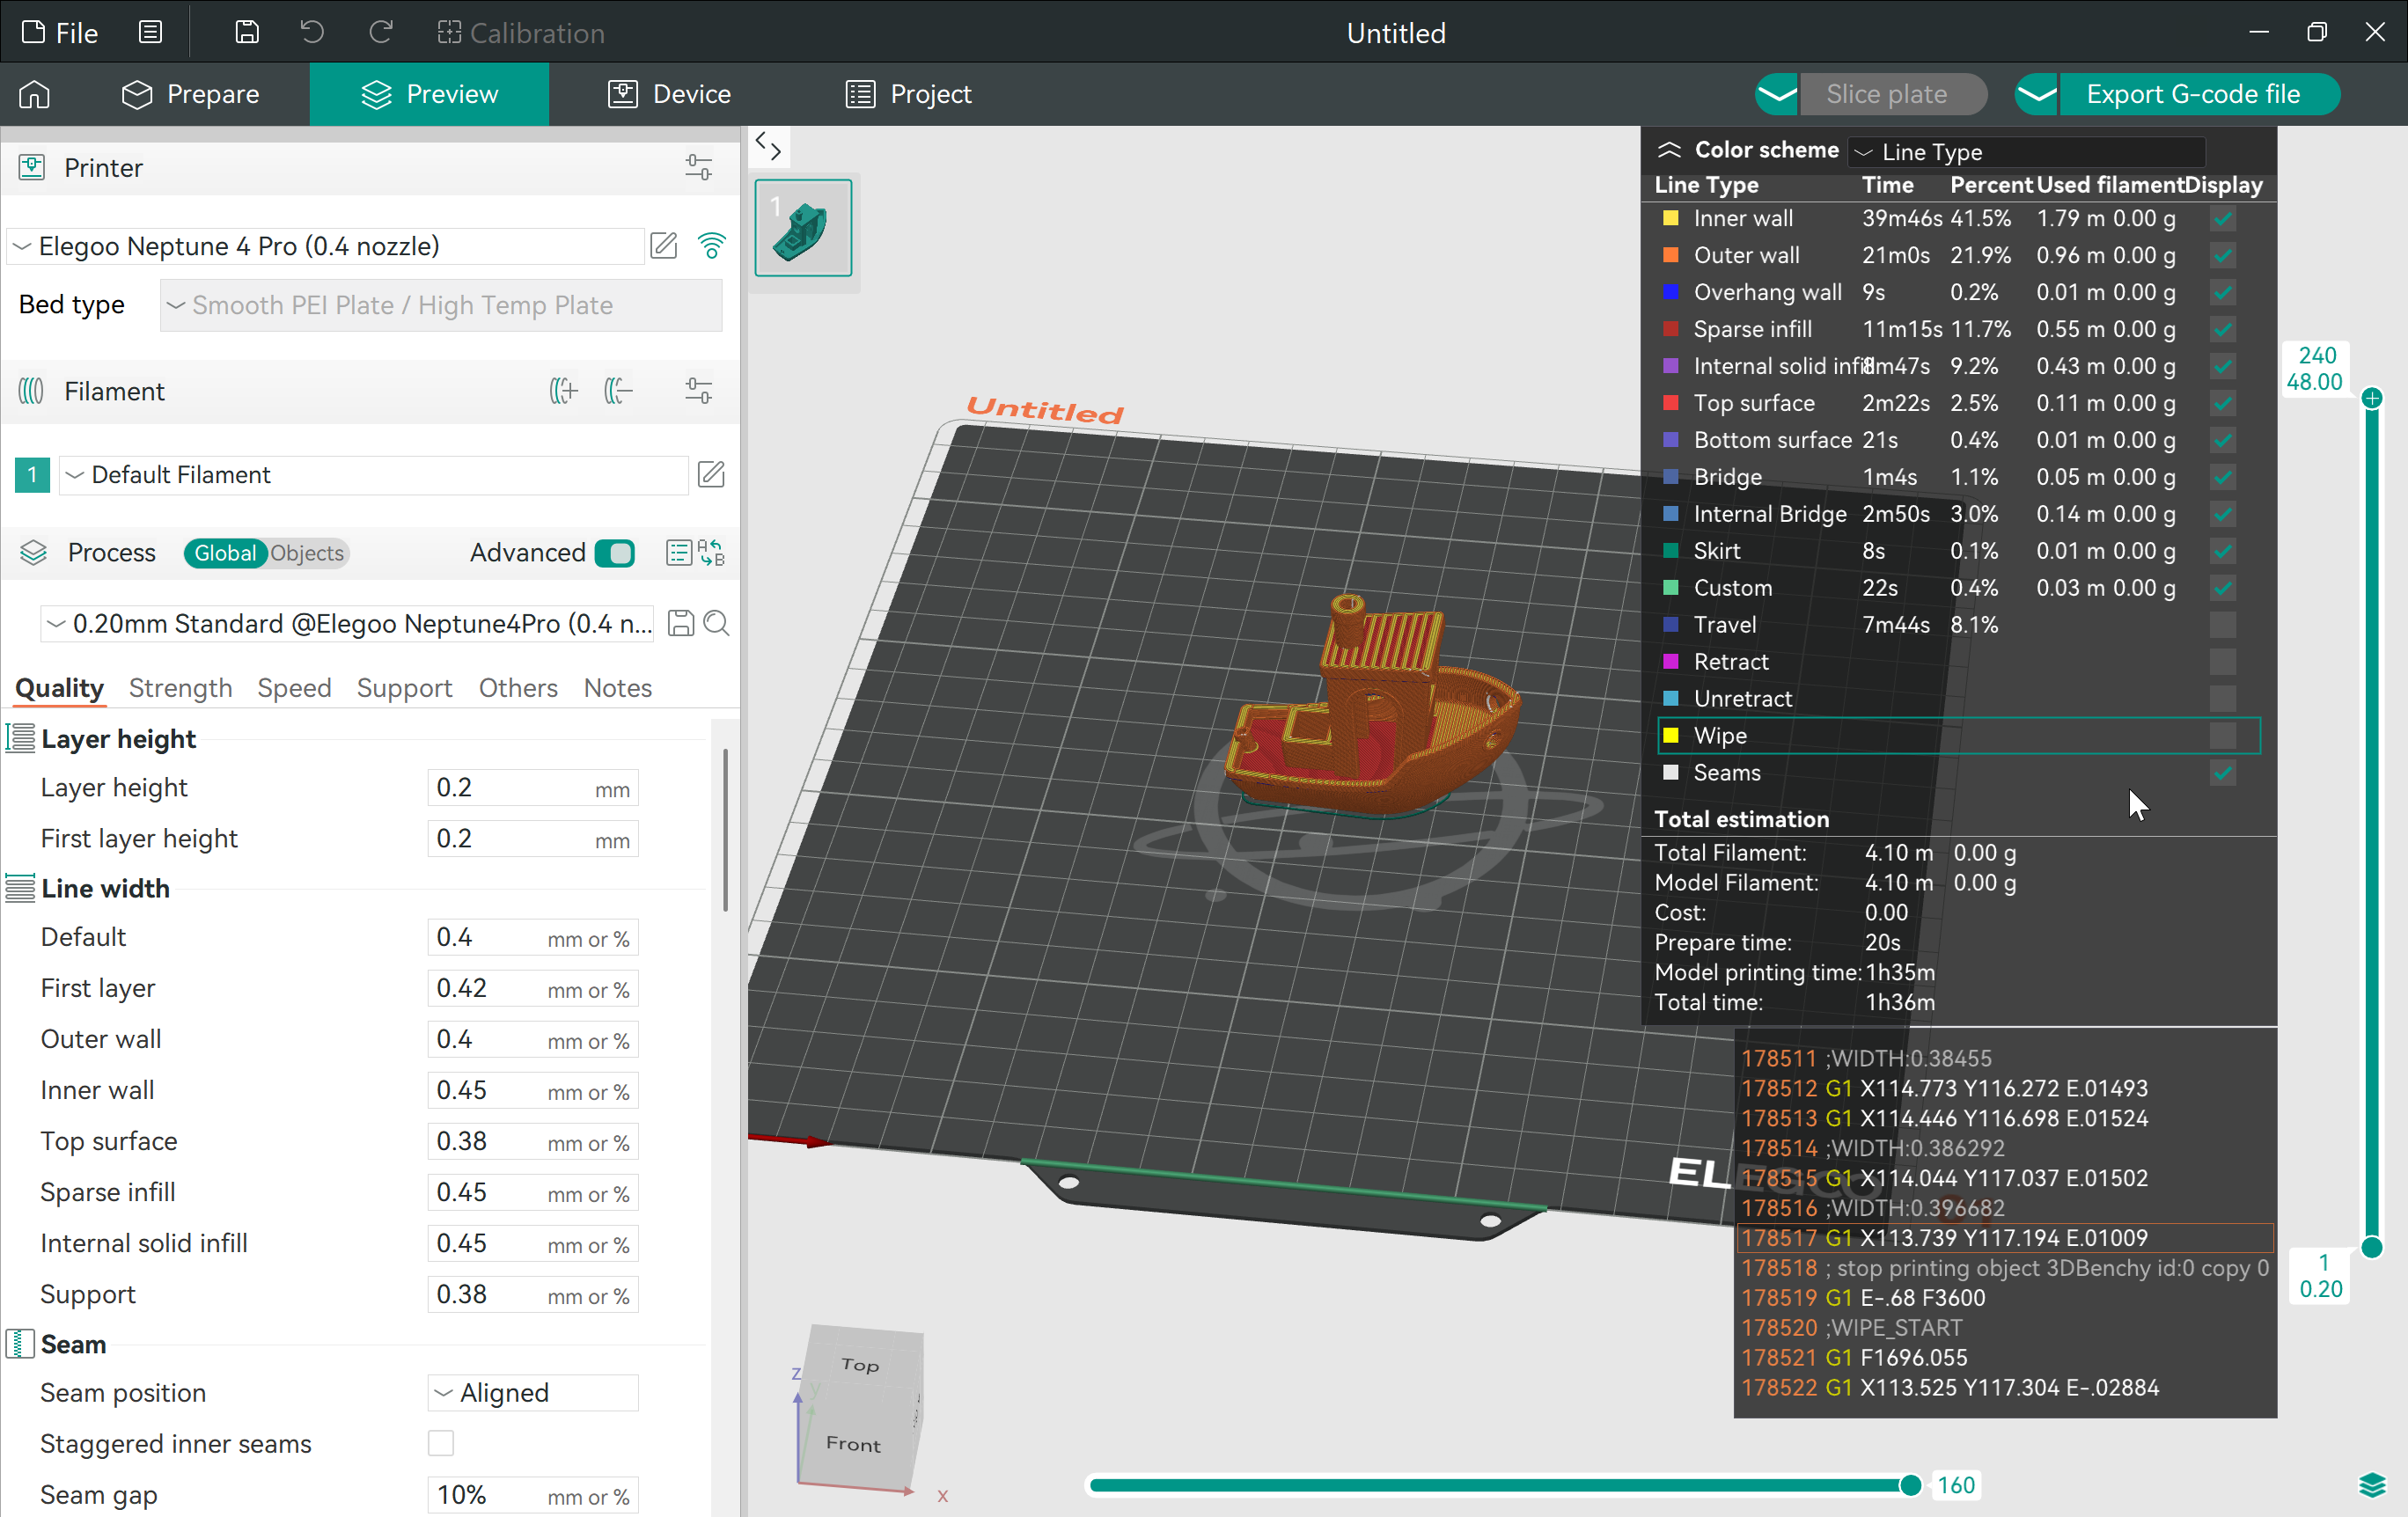
Additionally, the speed view shows the printing speed for different parts of the model, highlighting layers with different colors representing the corresponding speeds.
Another useful view is the layer height display, which highlights the thickness of each layer across the model, allowing you to see any variations. The line width view indicates the width of the lines being printed, which directly affects the strength and precision of the print, while the flow view shows the filament flow rate. The layer time view provides an estimate of how long each layer will take to print, helping you pinpoint any layers that could slow down the overall print time. Additionally, the fan speed and temperature views allow you to monitor cooling and heating parameters throughout the print.
Each view uses a color gradient applied to the sliced model, with data on the side displaying the corresponding value for each color, making it easy to interpret the information.
To further assist in analyzing your sliced model, the Preview tab includes two sliders:
The vertical slider simulates the printing process layer by layer, allowing you to move through the print stack and observe how each layer will be built. This feature is particularly useful for understanding the sequential construction of your model.
The horizontal slider lets you zoom in on a specific layer to examine it in detail. By moving the slider, you can simulate the path of the nozzle as it moves across that layer, providing a clear view of how the material will be laid down.
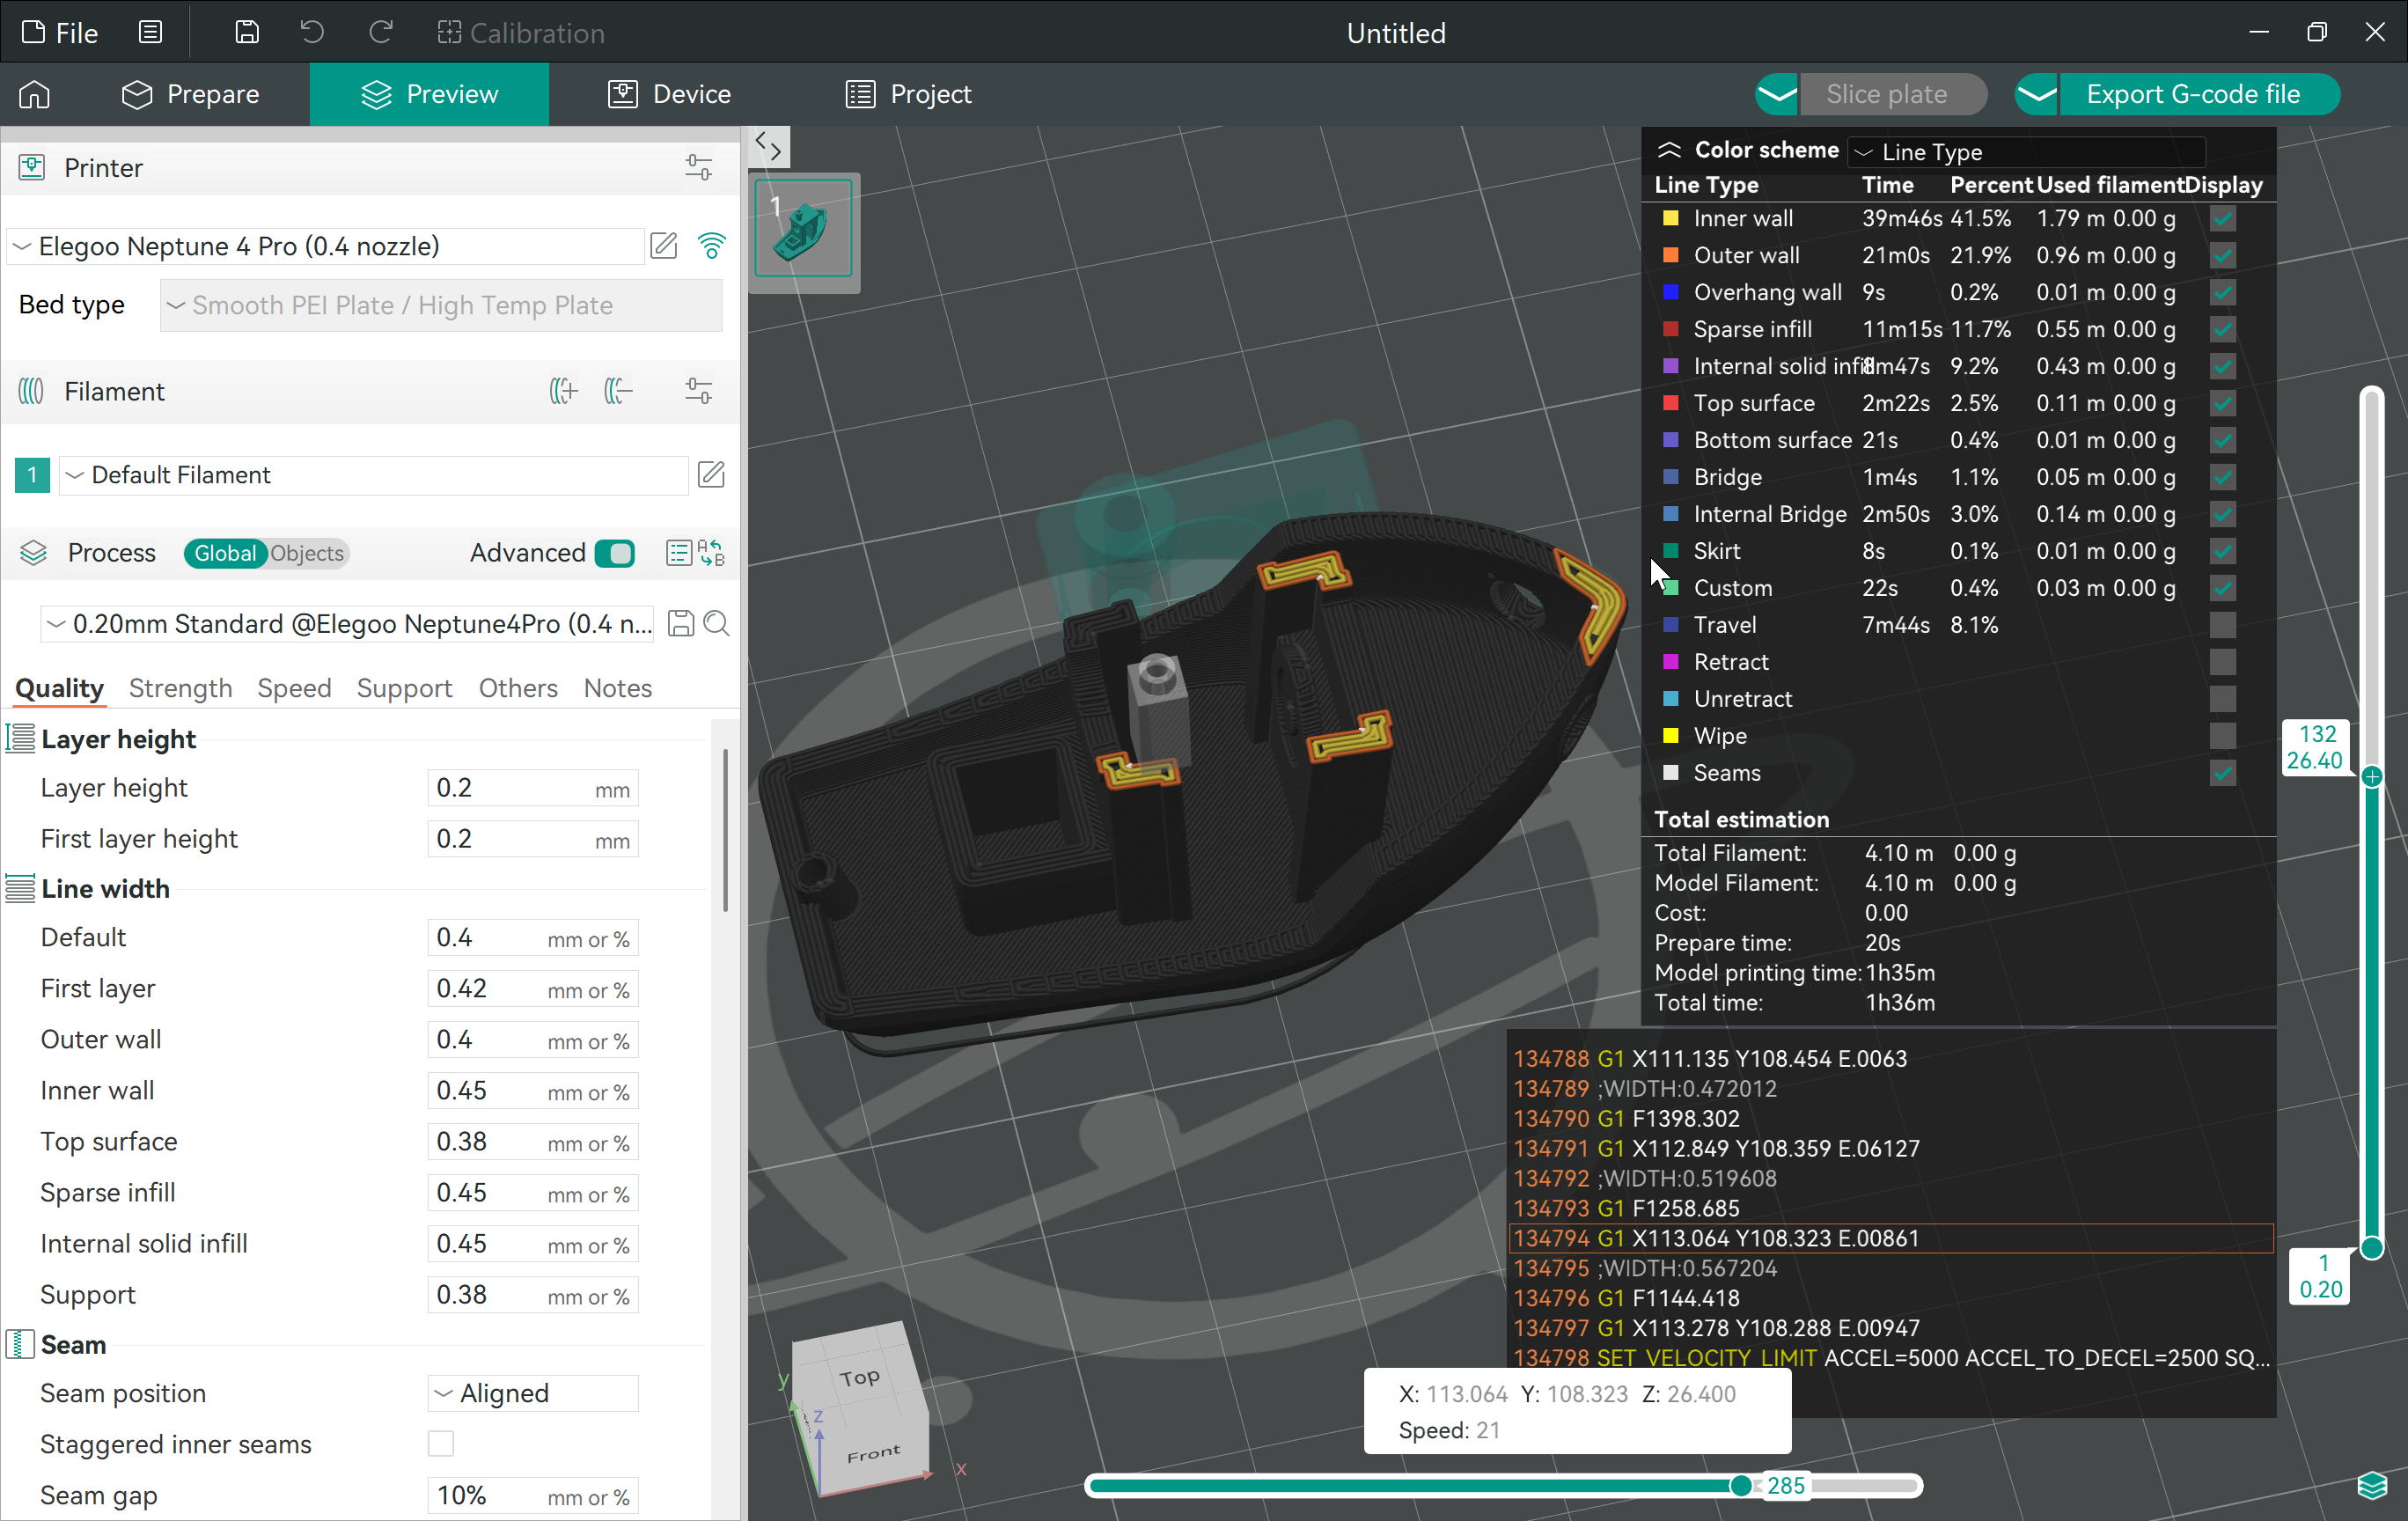
These features in the Preview tab collectively offer a comprehensive look at your sliced model, enabling you to catch potential issues, refine settings, and ensure a smooth and successful print.
Now that we’ve covered what OrcaSlicer is, how to install it, and its user interface and layout features, let’s move on to explore some of its unique standout features.
OrcaSlicer Standout Features
1. OrcaSlicer Calibration Menu
One of the most impressive features of OrcaSlicer is its extensive Calibration Menu. Proper calibration is crucial for achieving high-quality 3D prints, and OrcaSlicer makes this process straightforward and efficient. By using these tools, you can ensure your printer is set up correctly, leading to more accurate, smoother, and better-looking prints with less hassle.
We offer detailed guides for each calibration method in the calibration menu, which you can find in the following sections. And for a comprehensive overview of all these calibration features in a single article, don't miss the Orca Slicer Calibration Features guide.
The calibration menu in OrcaSlicer includes:
Temperature Tower Test
This test helps you identify the best printing temperature for your filament. By printing a model at different temperature settings, you can see which one works best. OrcaSlicer automatically adjusts the temperature during the test print to make this process simpler.
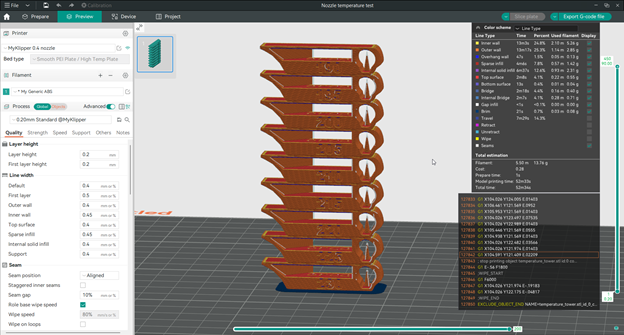
For a step-by-step guide, visit our detailed guide: Temperature Tower Test in Orca Slicer.
Flow Rate Calibration
Proper flow rate ensures that the right amount of filament is extruded during printing. This test helps you fine-tune the flow rate, leading to stronger prints and better surface quality. By adjusting this setting, you can prevent issues like gaps between layers or over-extrusion.
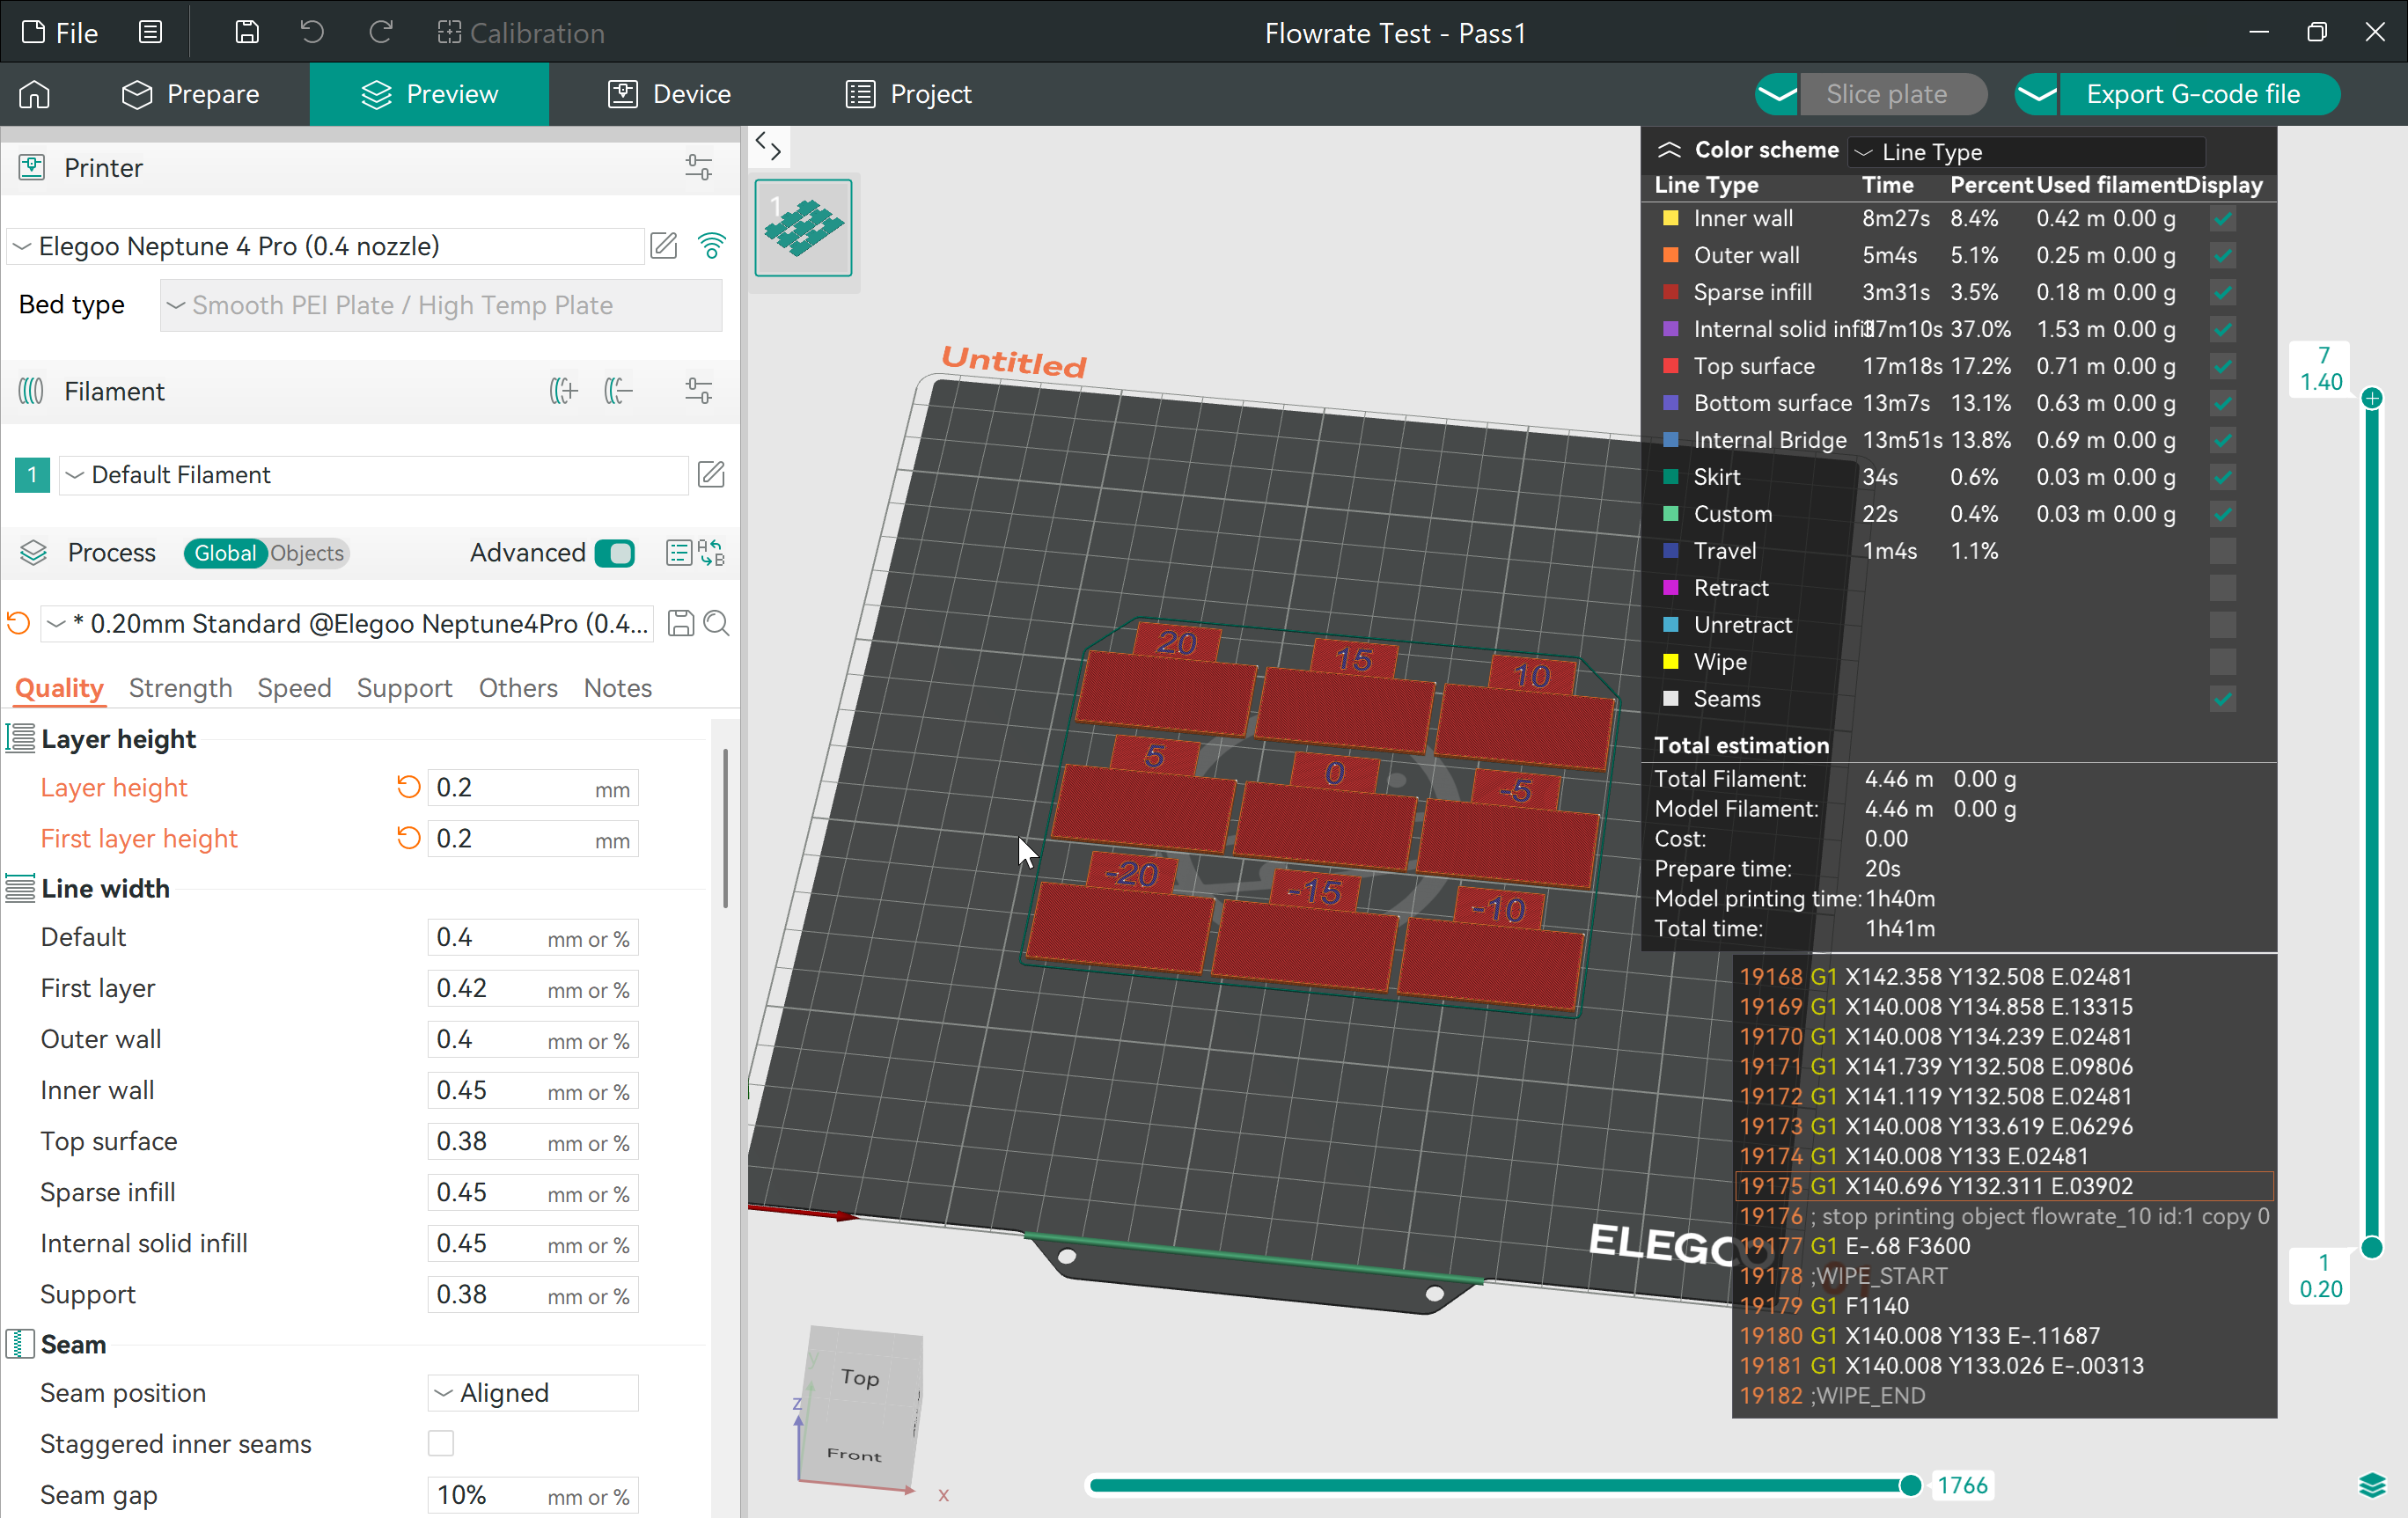
Learn more in our guide: Flow Rate Calibration in Orca Slicer.
Pressure Advance Calibration
This test helps you adjust how your printer handles extrusion rate during sudden changes in printing speed, particularly around corners and edges. Proper pressure advance settings can lead to sharper corners and reduce issues like over-extrusion or under-extrusion.
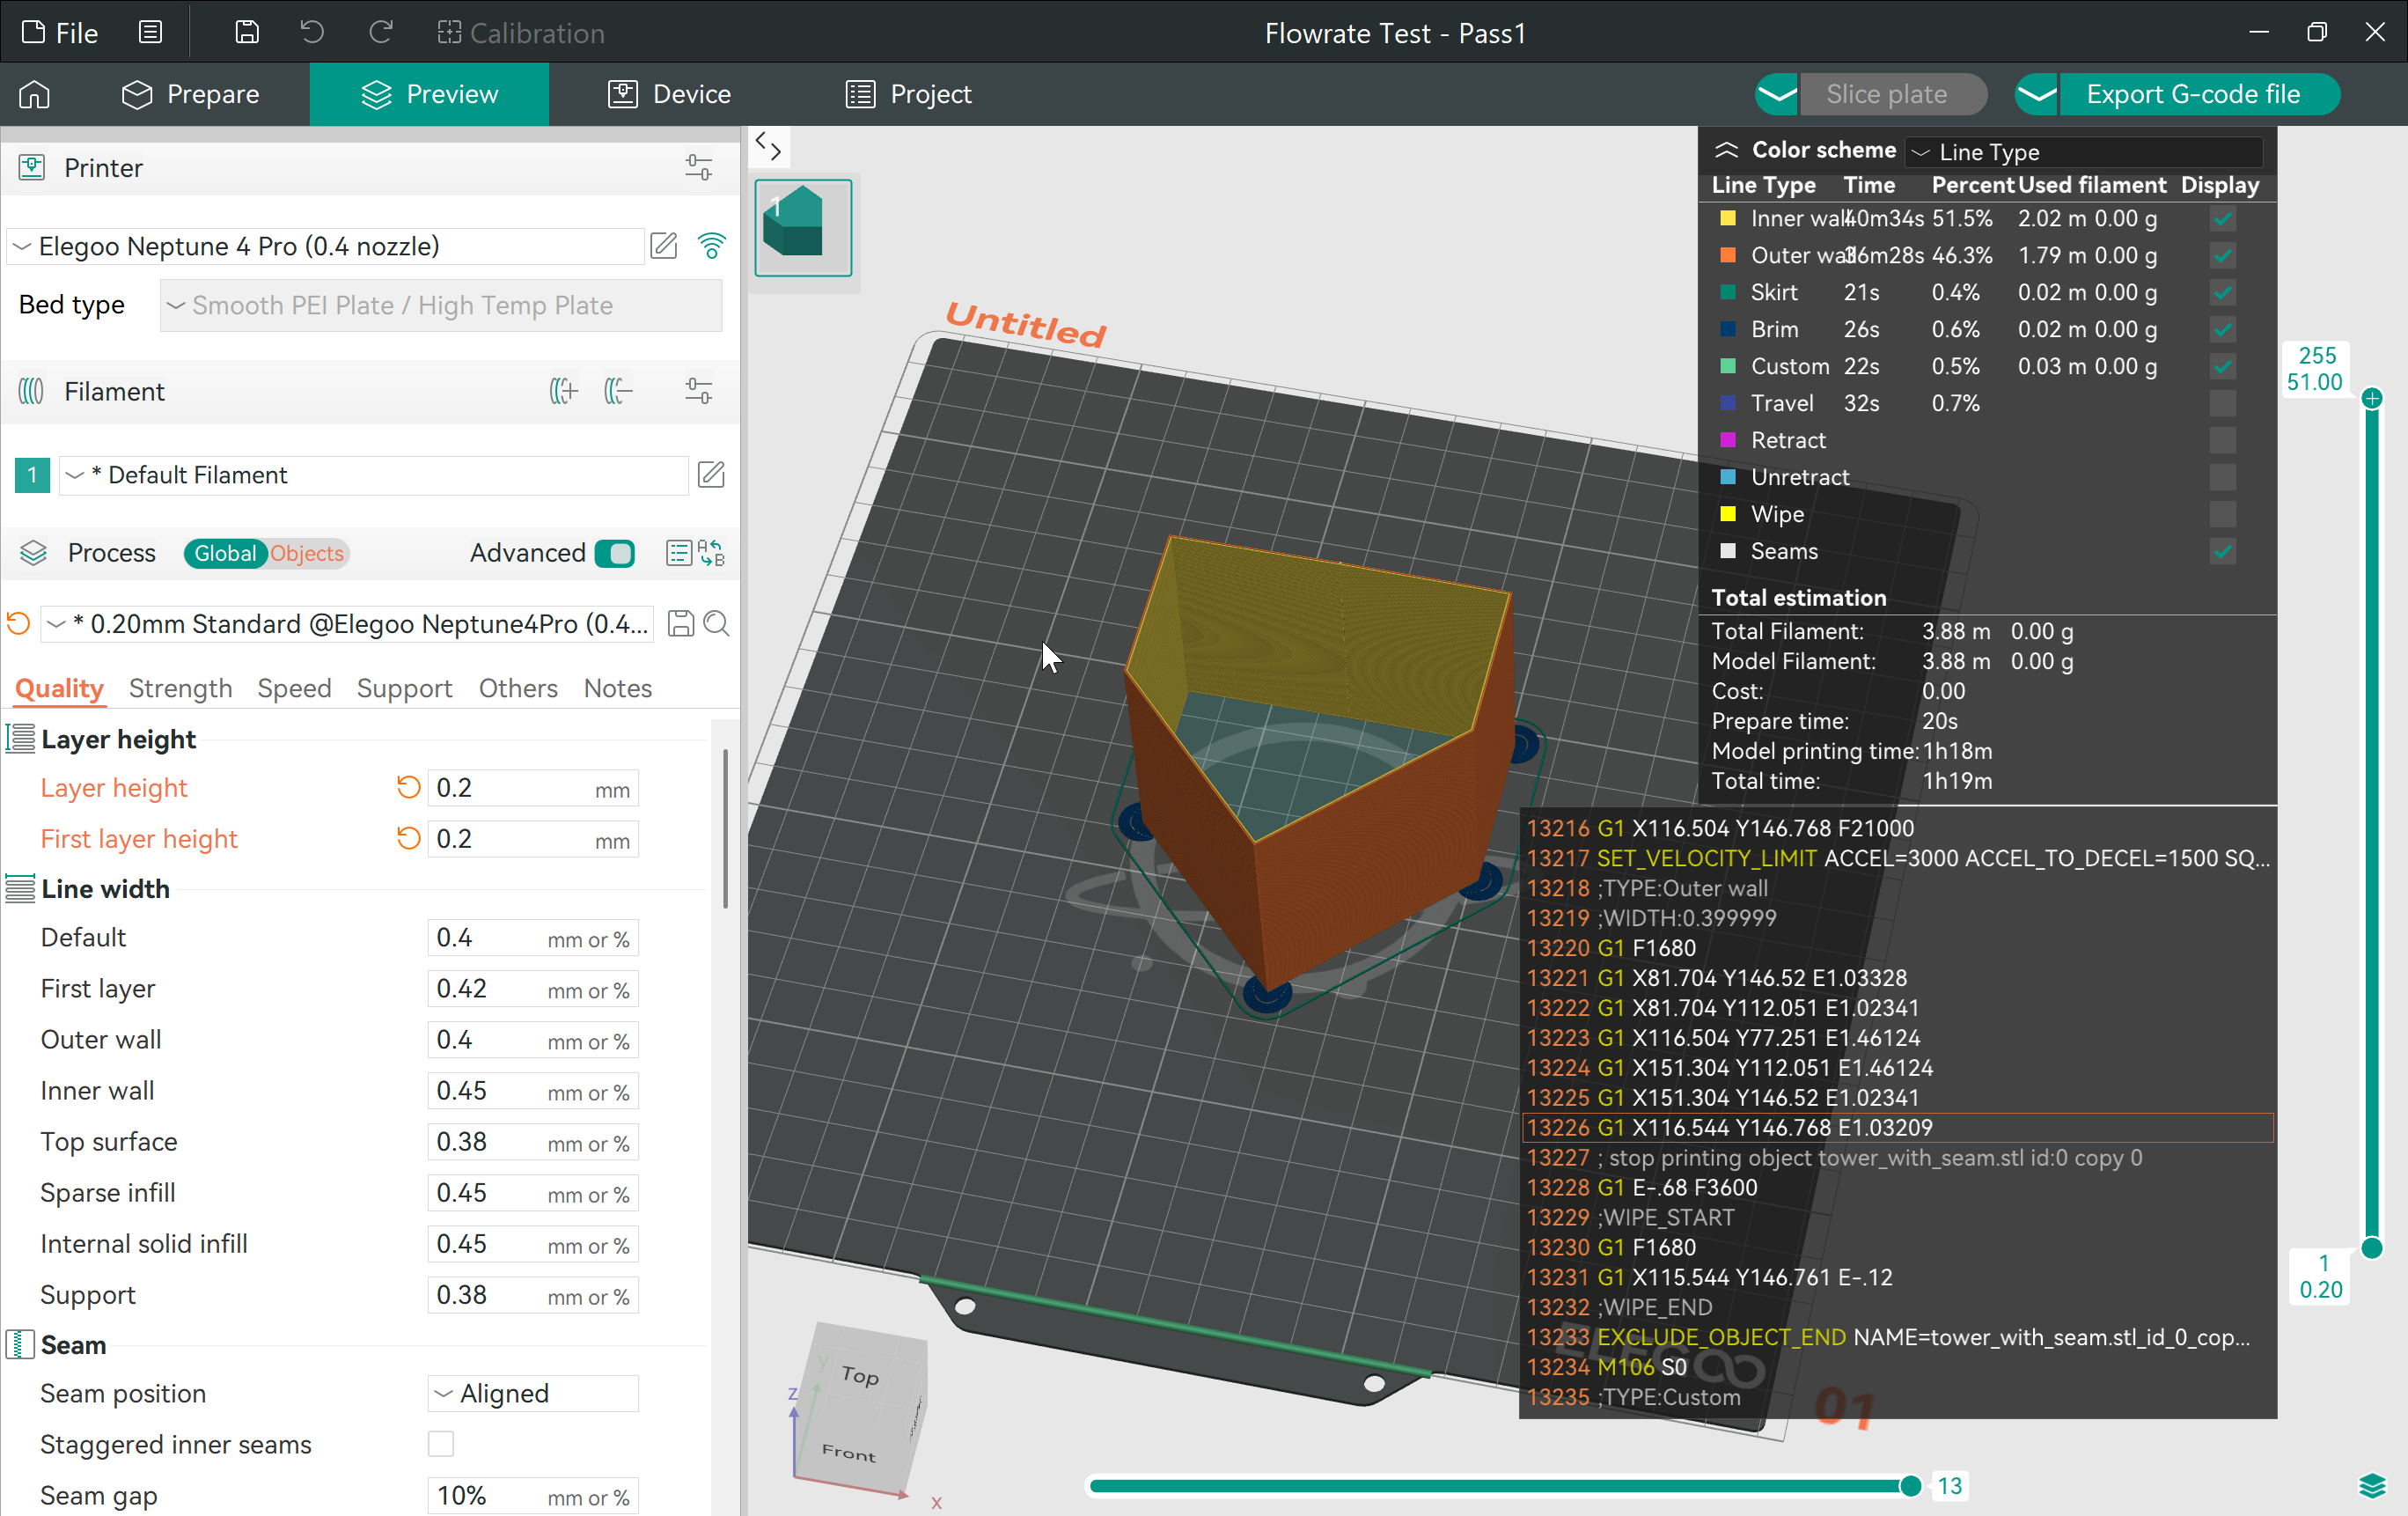
To understand how to use this feature effectively, read our guide: Pressure Advance Calibration in Orca Slicer.
Tolerance Testing
Tolerance Testing checks how well your printer maintains accurate dimensions, which is important if you need parts that fit together precisely. This test helps you determine the right clearances for your designs.
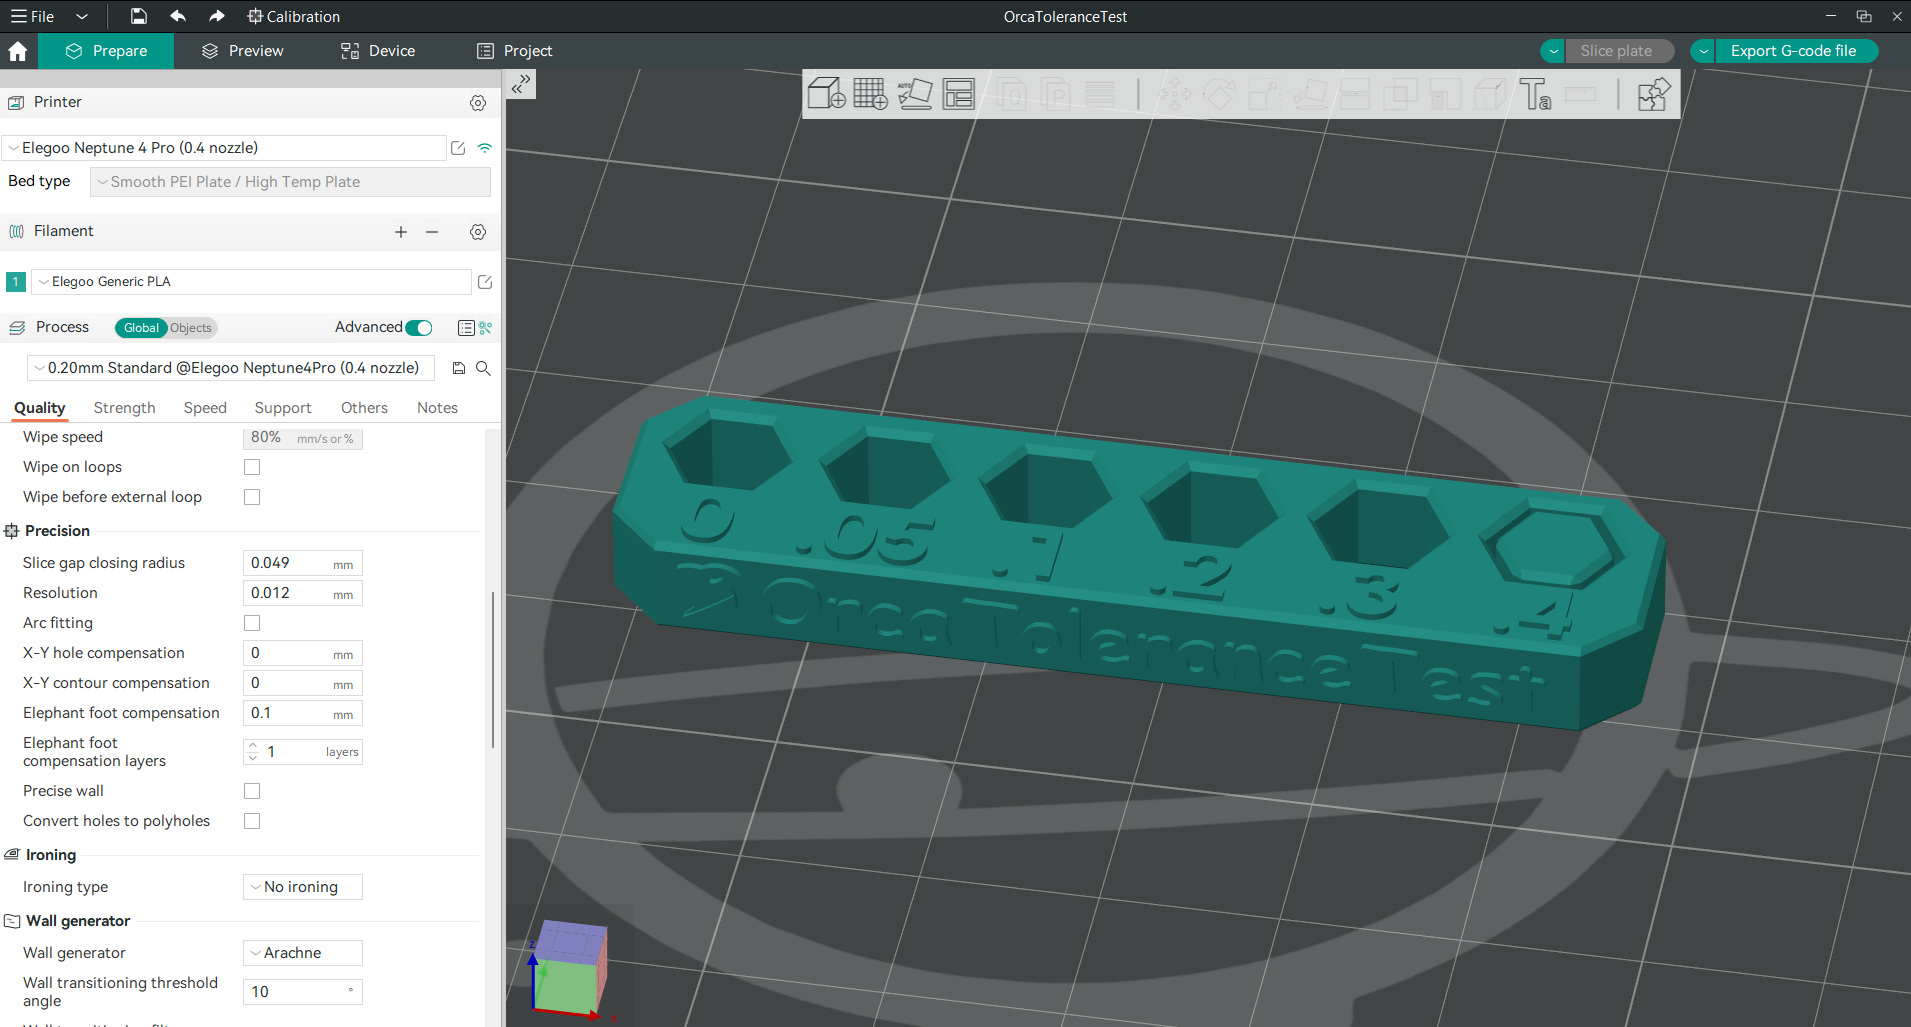
Detailed instructions can be found in Tolerance Test in Orca Slicer.
Maximum Volumetric Speed Testing
This test identifies the highest extrusion rate your printer can handle without compromising quality. It’s useful for those looking to increase print speeds while maintaining good results.
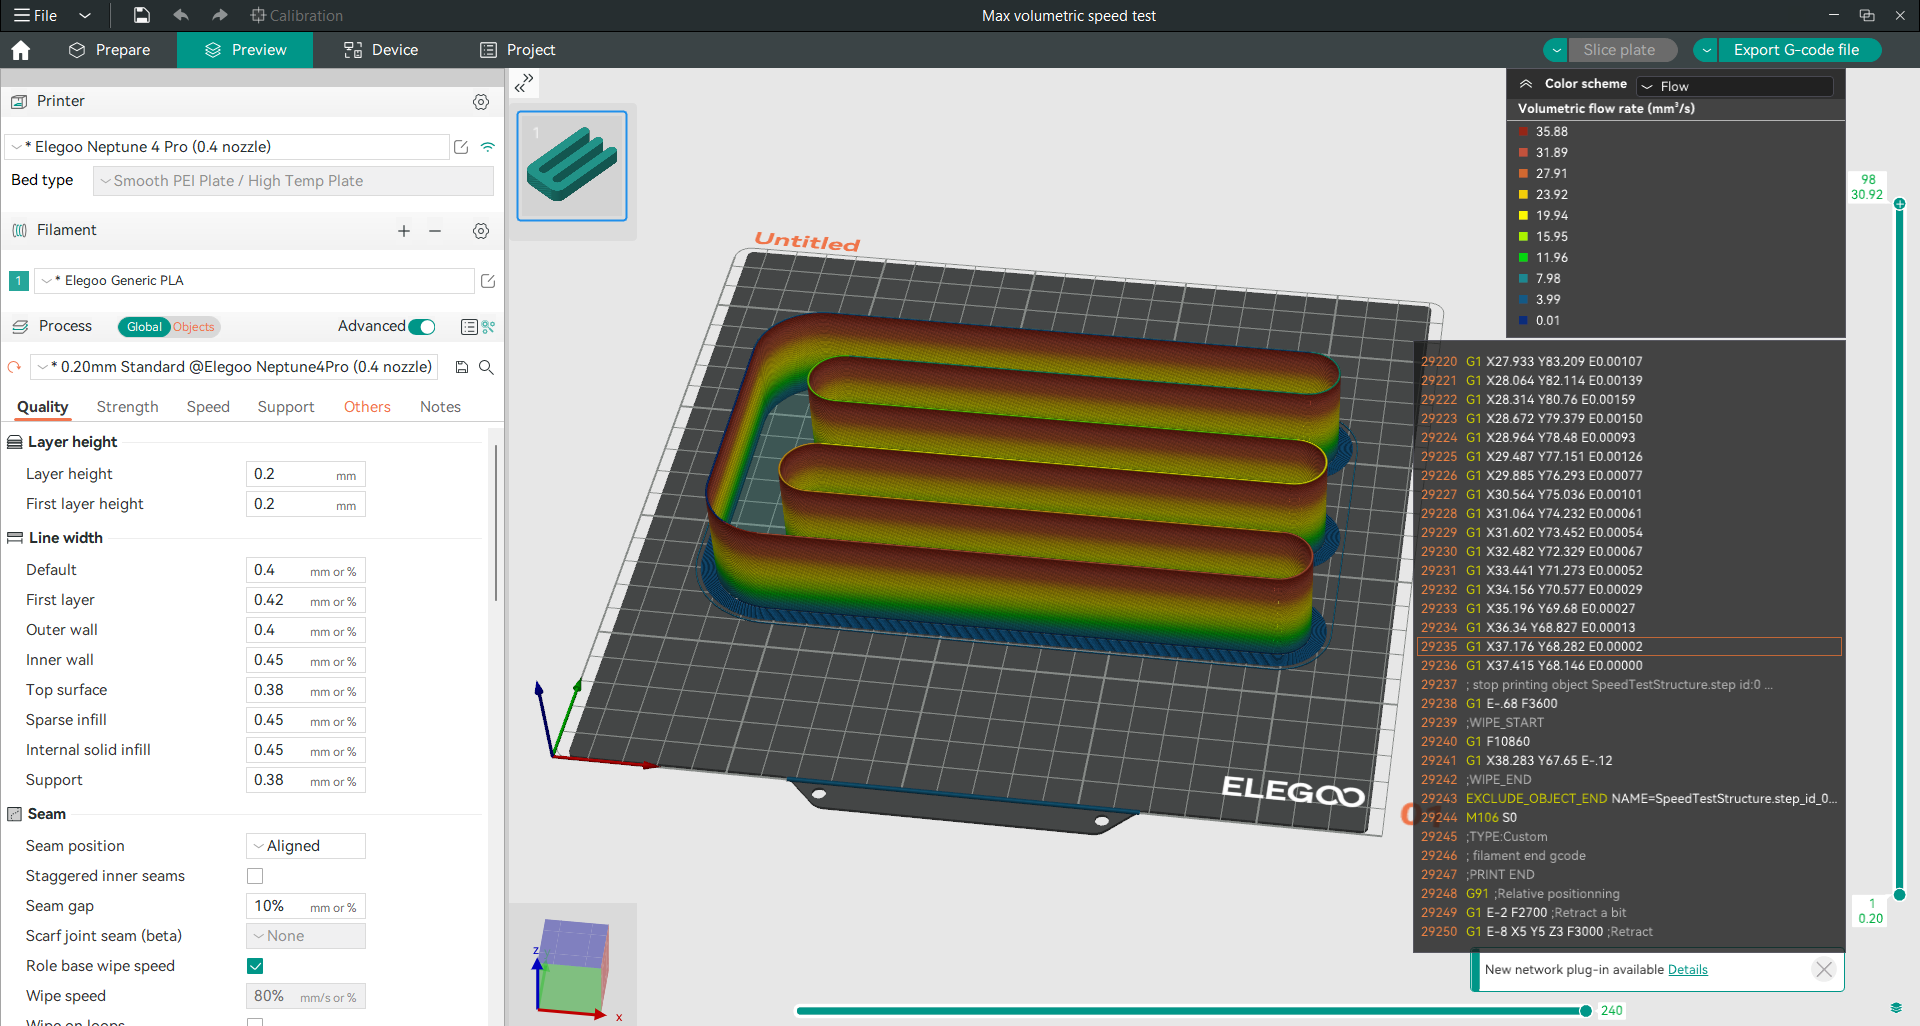
For detailed instructions, see Maximum Volumetric Speed Test in Orca Slicer.
Vertical Fine Artifacts (VFA) Test (speed test)
Also known as the Speed Test, it helps you find the optimal balance between speed and print quality. By testing different speeds, you can determine the best speed settings for your projects.
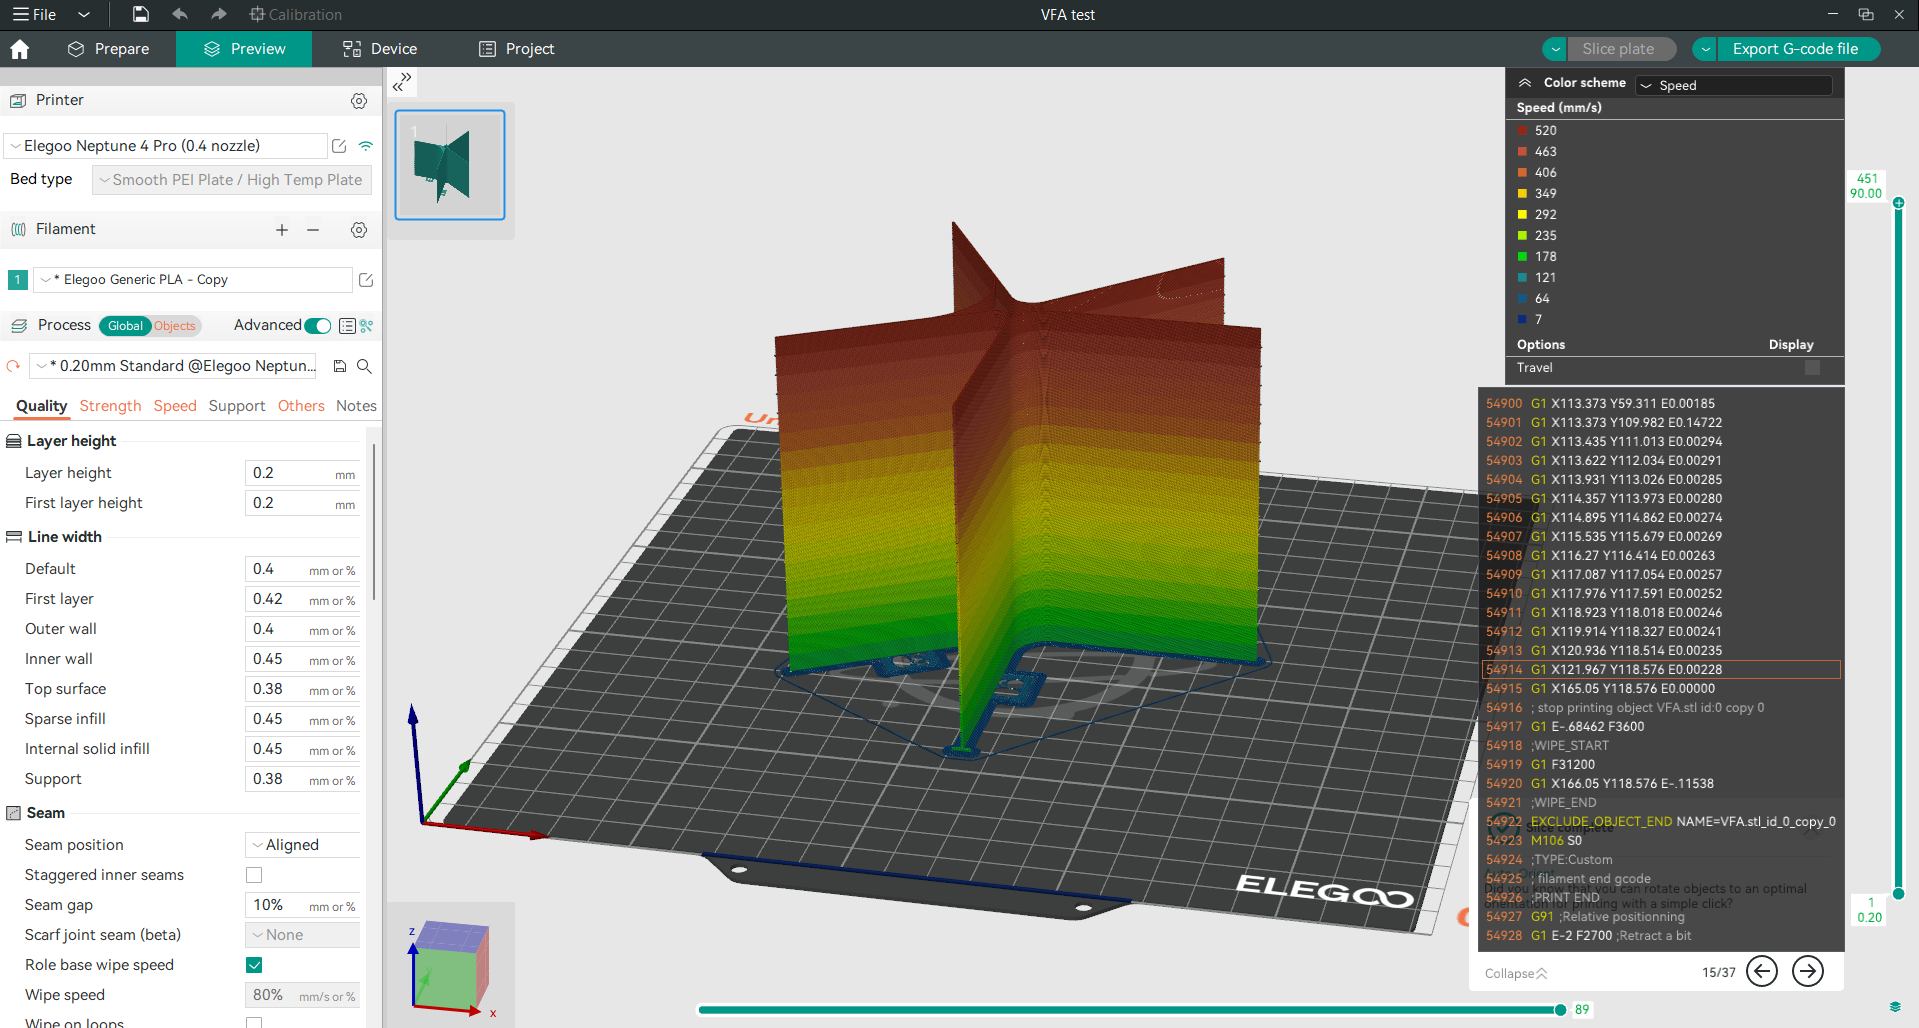
You can explore more in Speed Test in Orca Slicer (VFA).
Retraction Test
This test addresses issues like stringing and oozing by helping you adjust retraction settings. Proper retraction calibration can lead to cleaner, more precise prints.
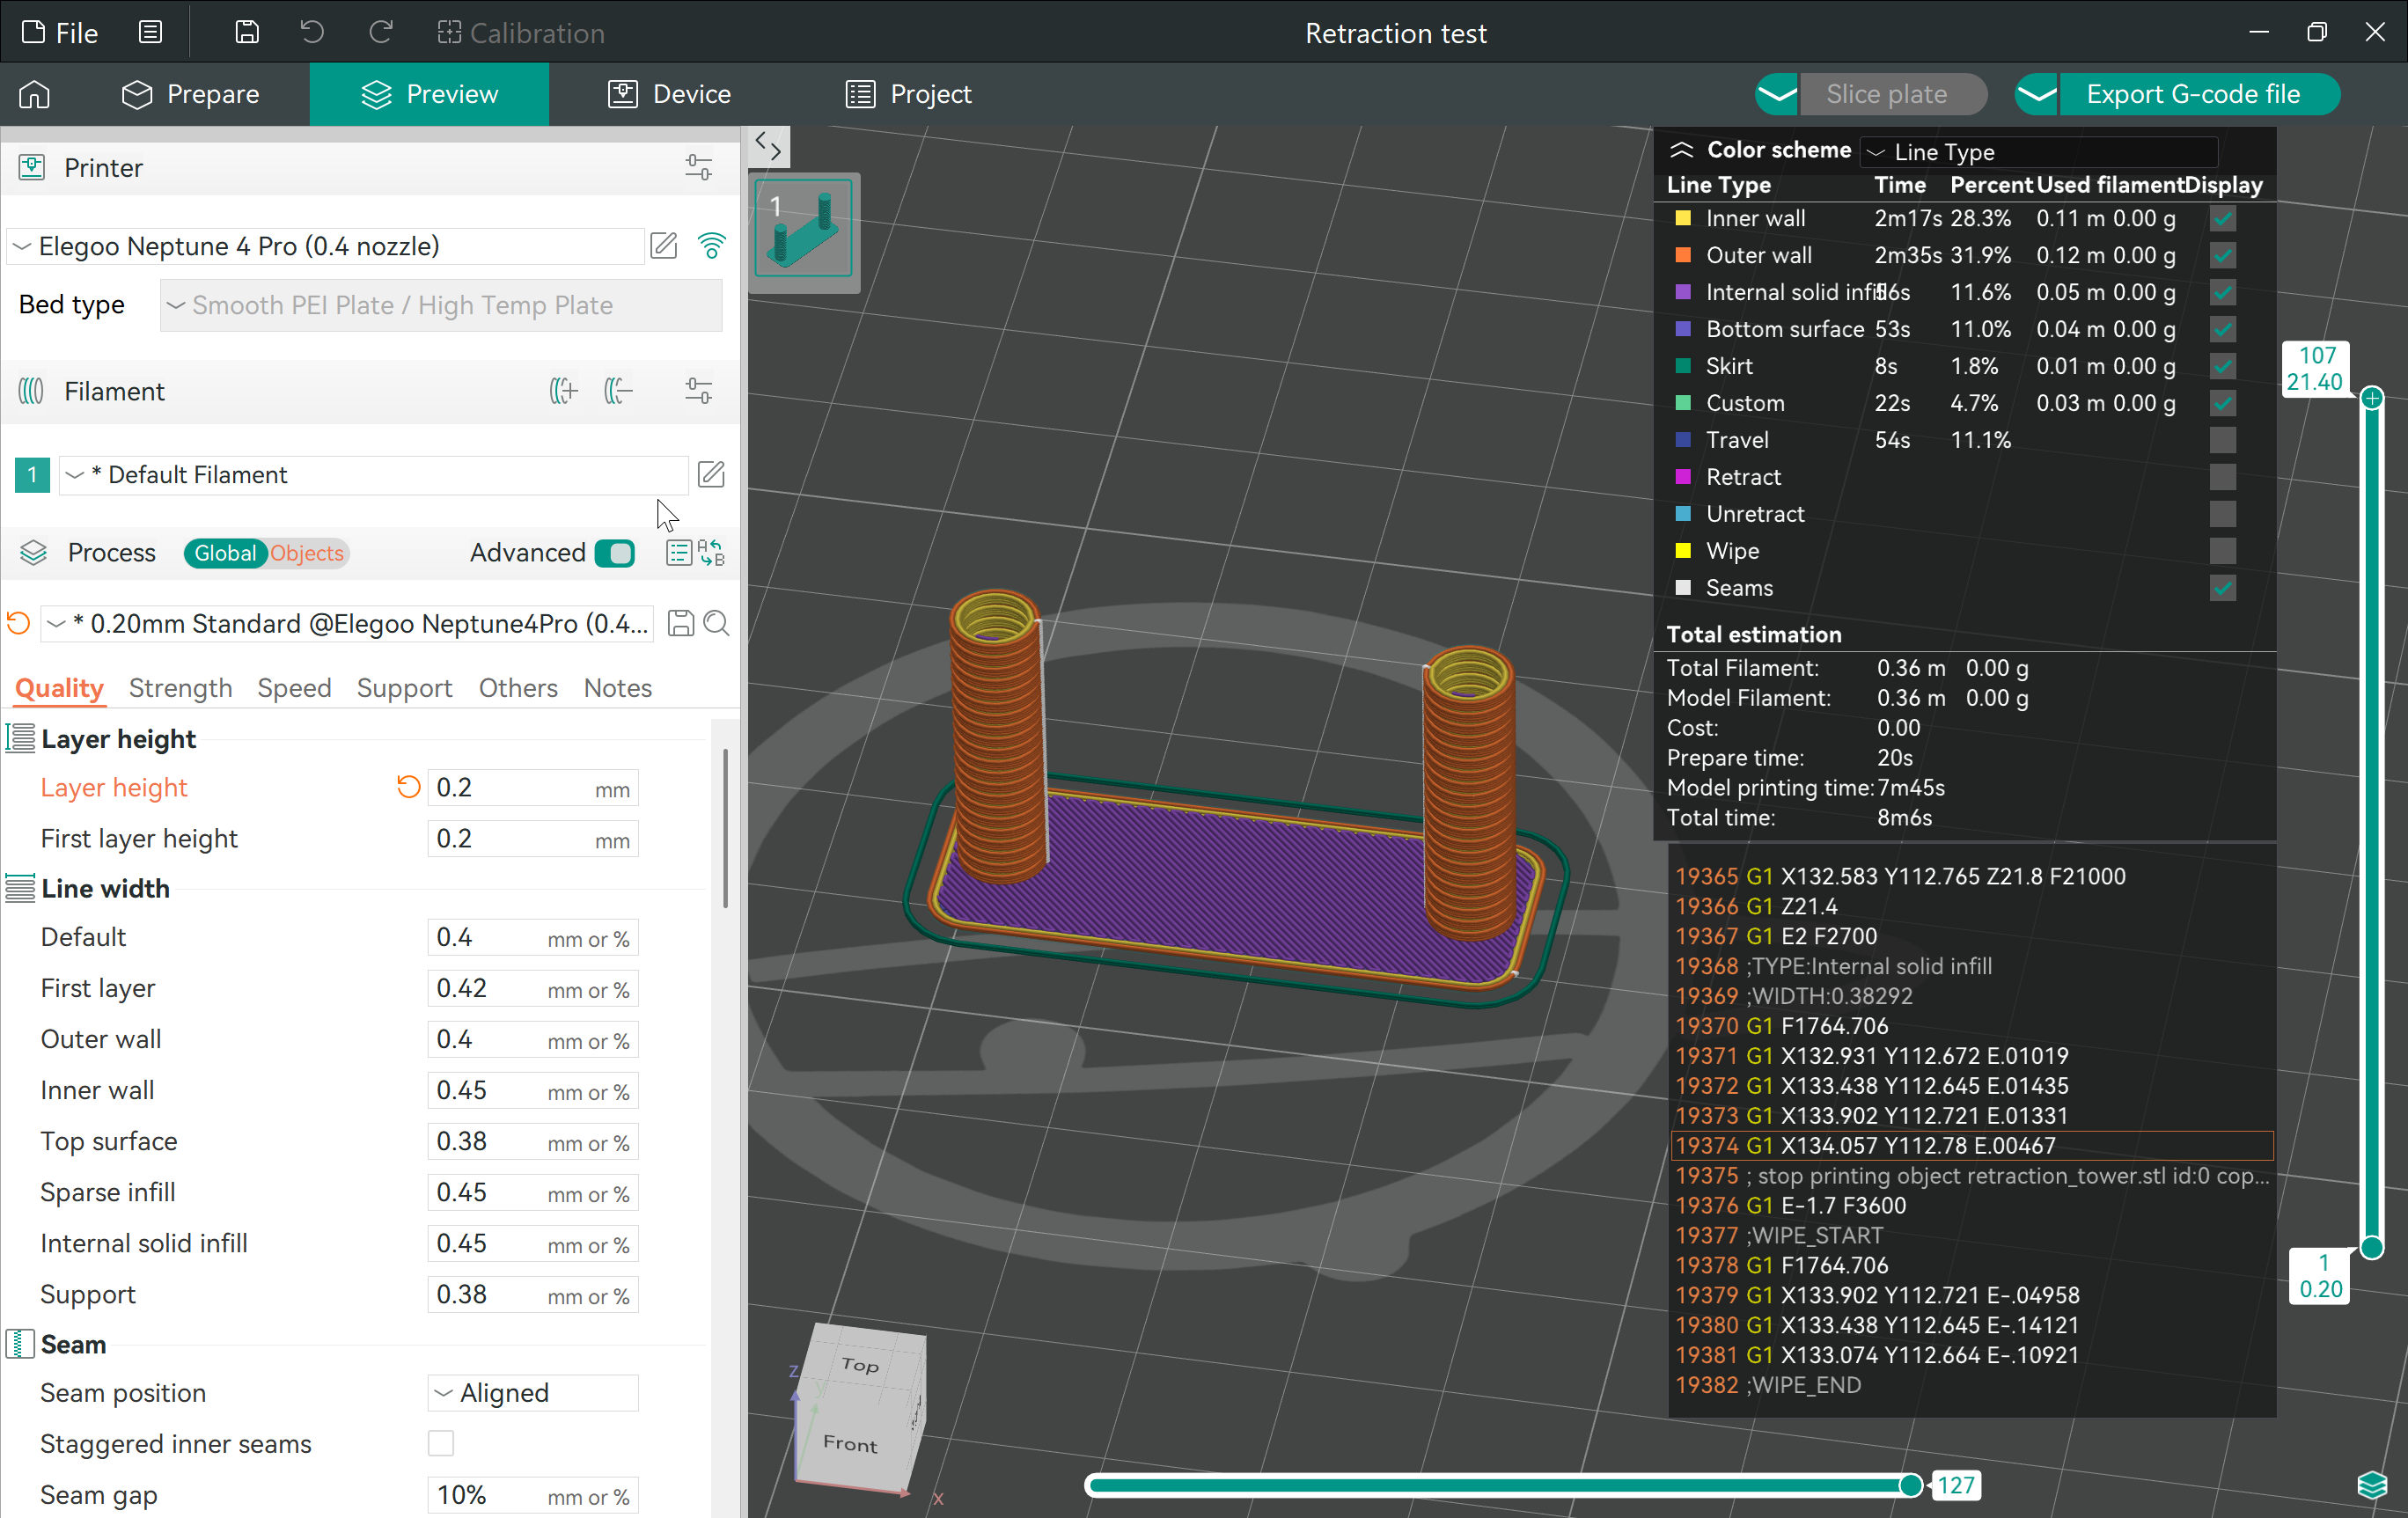
For step-by-step guidance, visit Retraction Test in Orca Slicer.
2. Wide Printer Compatibility
OrcaSlicer is compatible with an impressive number of printers, more than most other slicers, including Bambu Studio. It comes with about 136 pre-configured printer profiles from a variety of brands, making it easy to get started with different models.
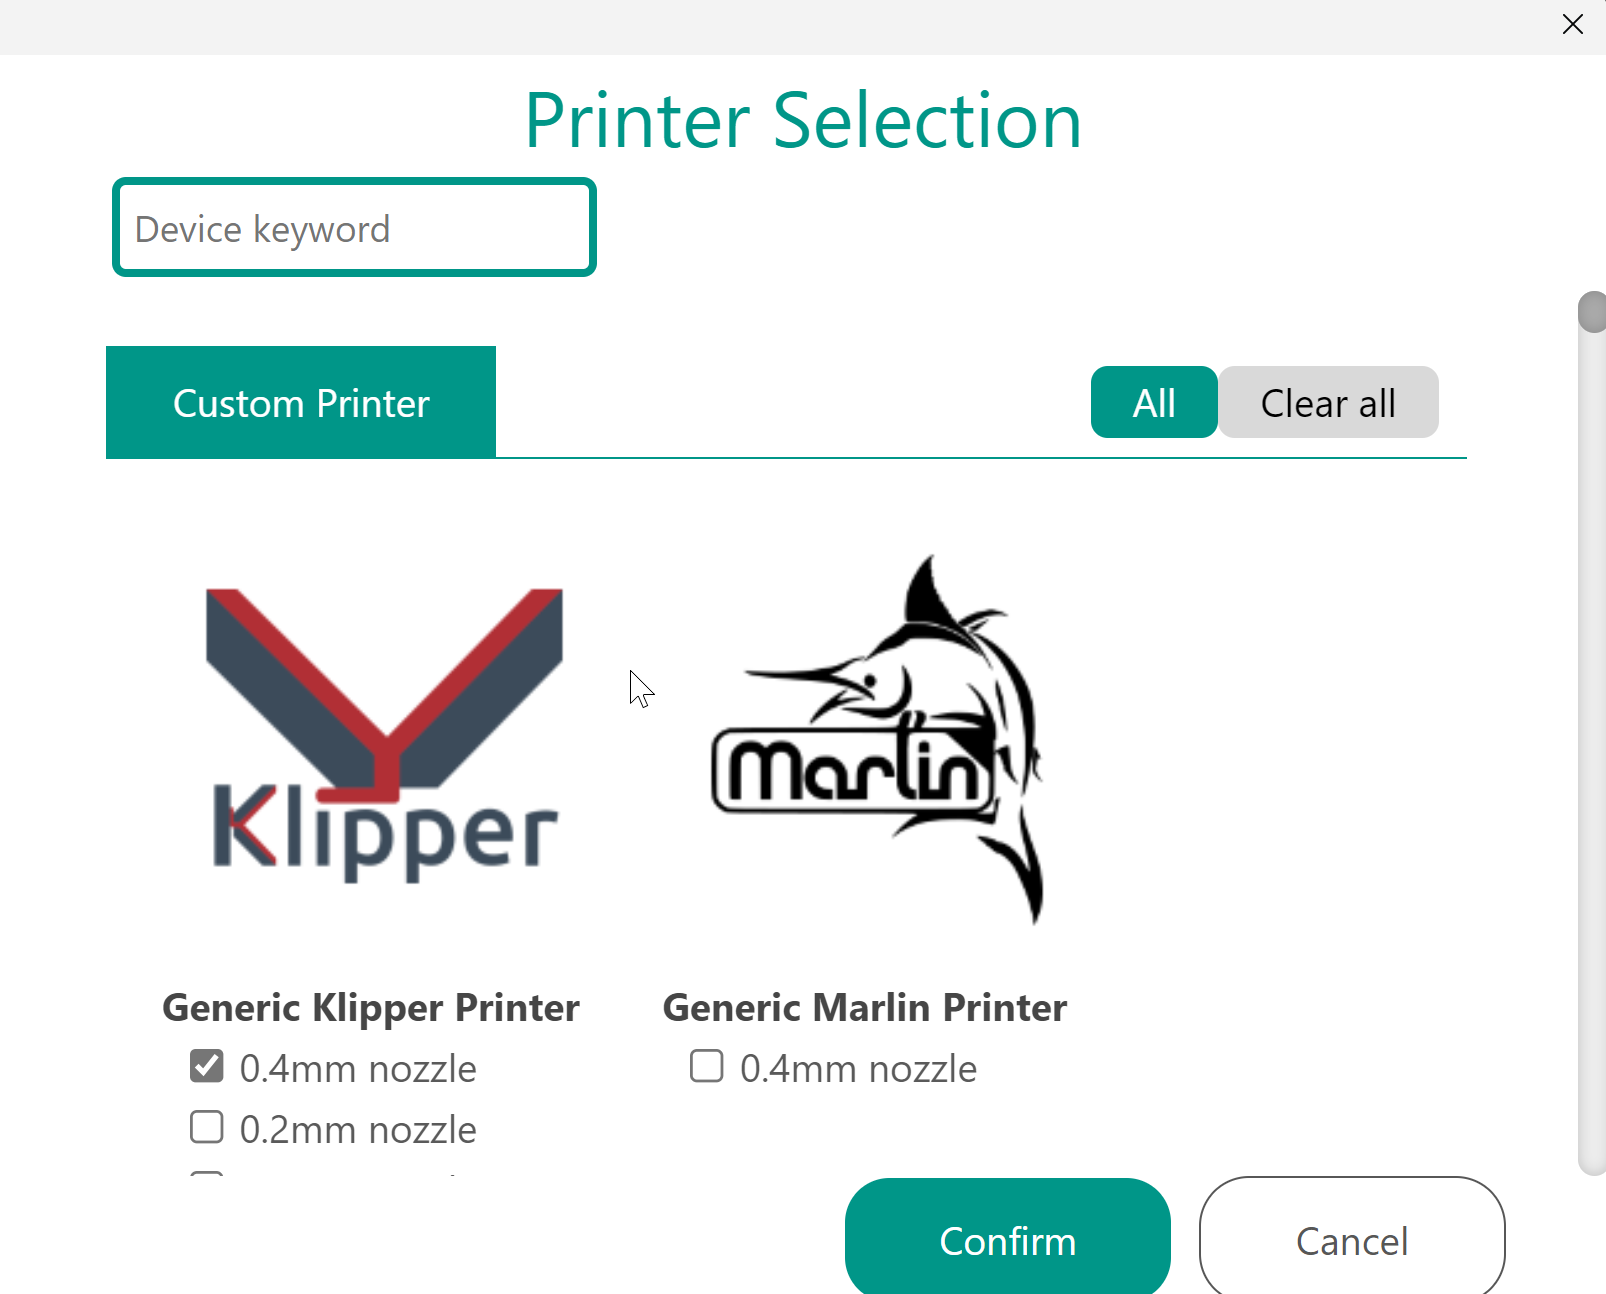
And if your printer isn’t included, you can simply add a custom Marlin or Klipper printer, and configure its settings easily to match your needs.
It also includes a wide range of pre-configured material profiles from well-known vendors, along with options for generic materials. Plus, you have the ability to add your own custom filament profiles, allowing you to tailor the settings to your specific materials.
2. Remote Printer Control
OrcaSlicer has a feature called the Device Tab that lets you control your 3D printer directly from the slicer. With this feature, you can monitor your printer’s progress, start or stop prints, and send G-code files without needing to switch between different apps or web browsers. It integrates seamlessly with tools like OctoPrint, Klipper (using Mainsail and Fluidd interfaces), PrusaLink, PrusaConnect, Duet, FlashAir, AstroBox, Repetier, MKS, FlashForge, SimplyPrint, and Obico.
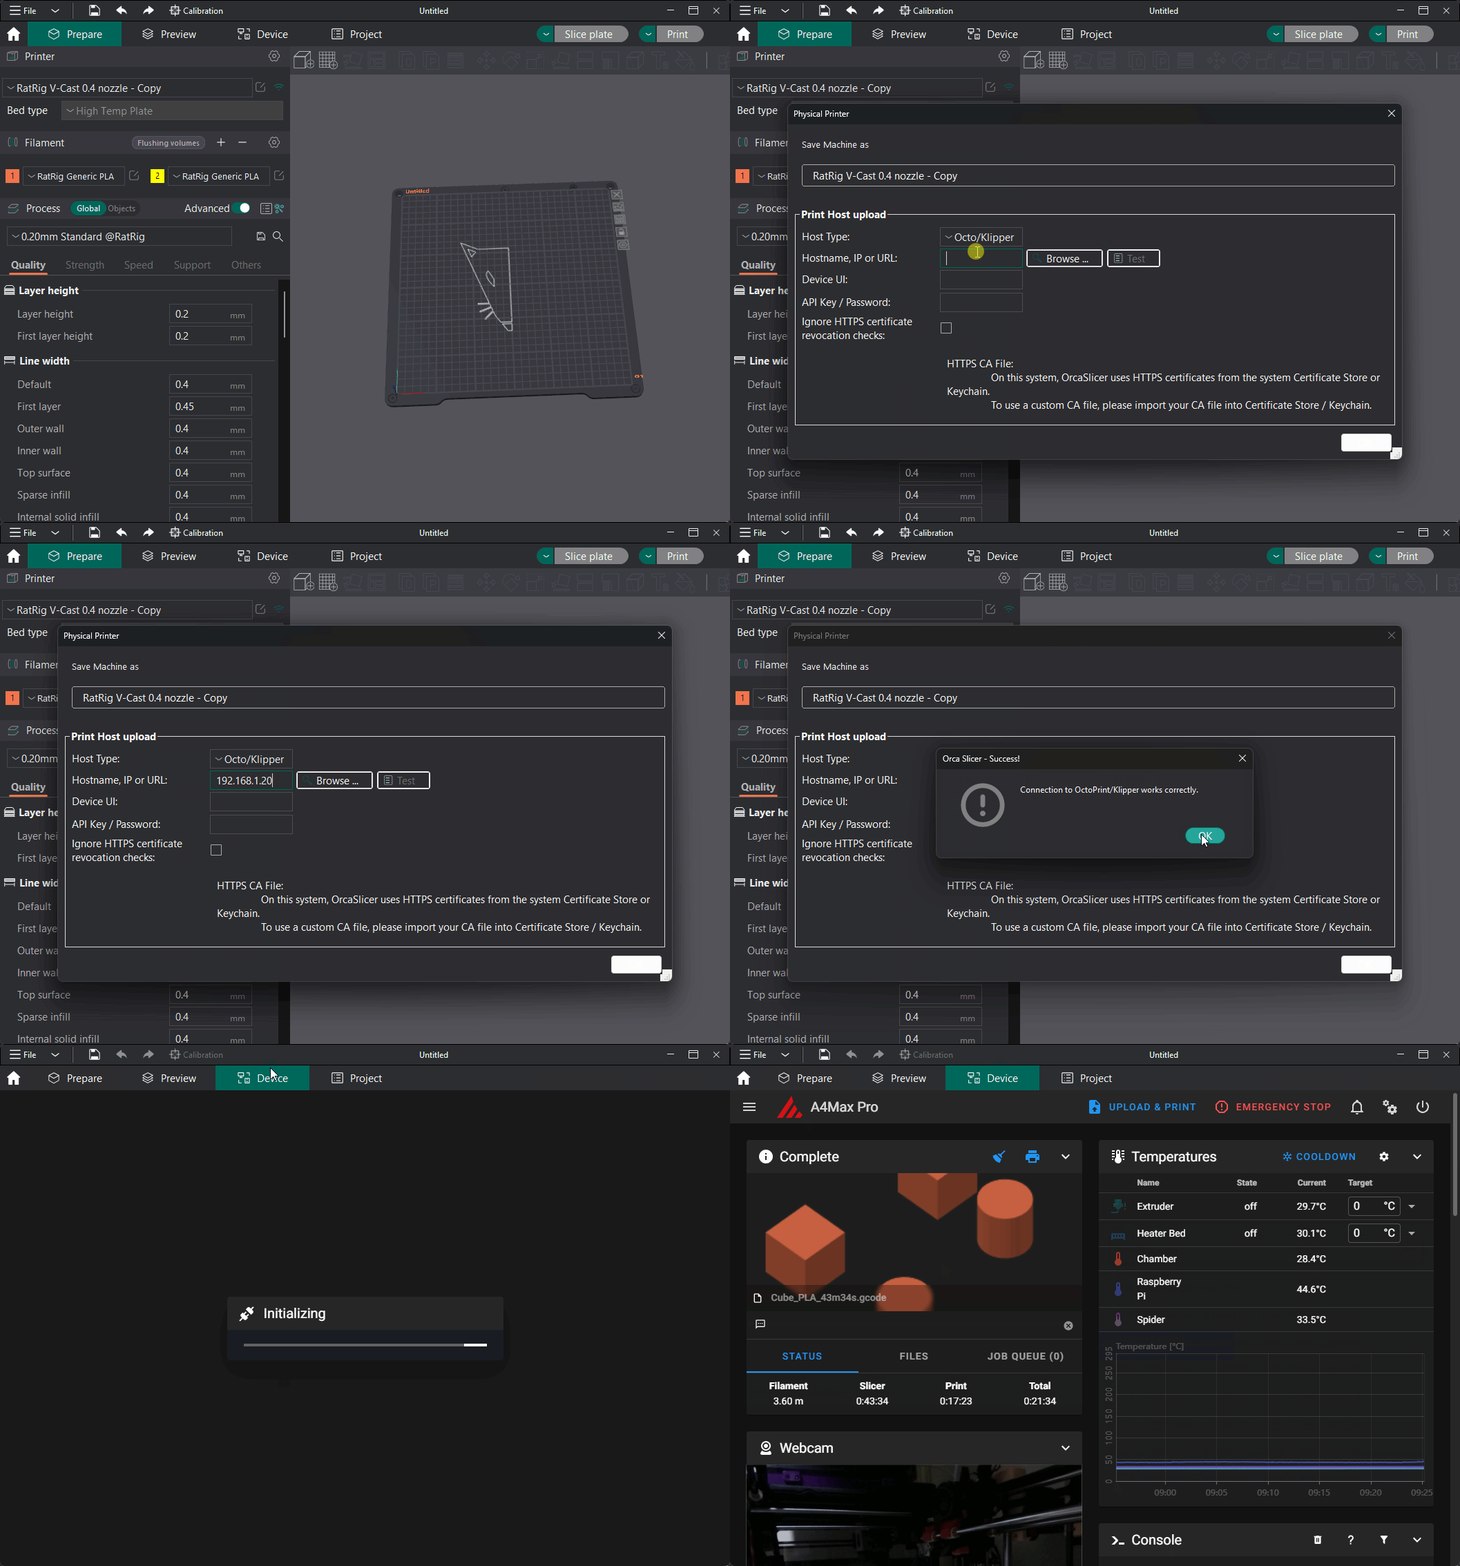
Source: GitHub
If you link your Klipper printer to OrcaSlicer through the Device Tab using Mainsail or Fluidd, you will have access to all these interface options directly from OrcaSlicer. This includes the ability to access and edit your printer’s configuration files without needing to open additional software.
And if you link your printer to Obico through the Device Tab in OrcaSlicer, you can control your printer from anywhere, not just when you are connected to the same local network.
For a detailed guide on how to set up and use the Device Tab, you can check out our comprehensive guide: OrcaSlicer Device Tab.
4. Orca Slicer Seam Settings and Seam Gap
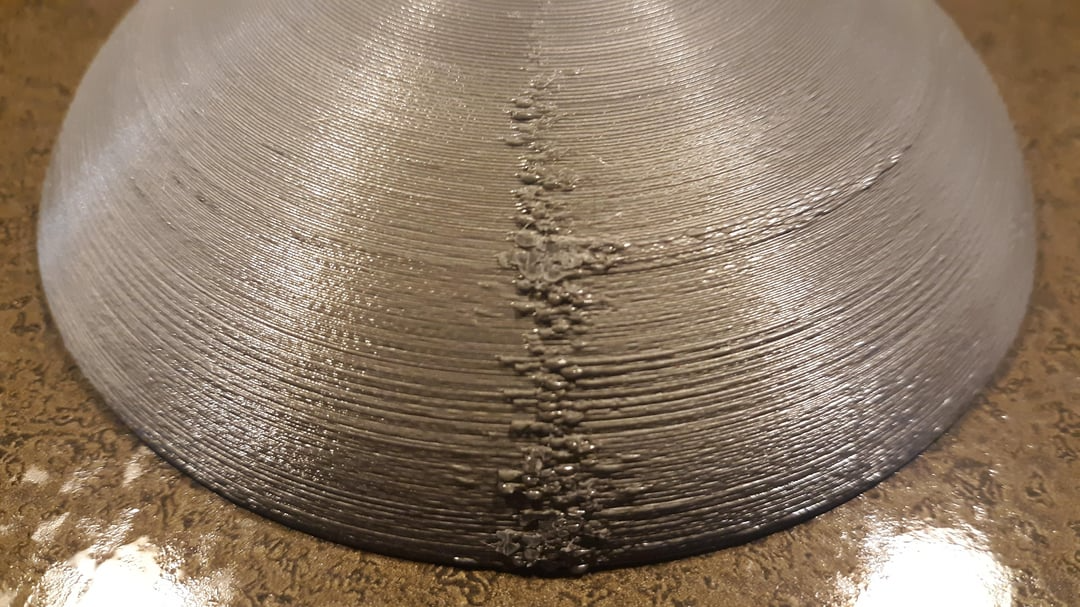
In 3D printing, the Z-seam refers to the point where each layer of the print begins and ends. It's the vertical line or seam that forms on the surface of the print due to the slight overlap when the printer transitions from one layer to the next.
Why Does the Z-Seam Occur?
Layer Transitions: During printing, the nozzle completes a circular path for each layer. When it starts the next layer, the point where the previous layer ends and the new one begins can create a small bump or visible line.
Extrusion Changes: Slight variations in extrusion as the printer starts and stops can make the Z-seam more pronounced.
Seam Gap Feature in OrcaSlicer
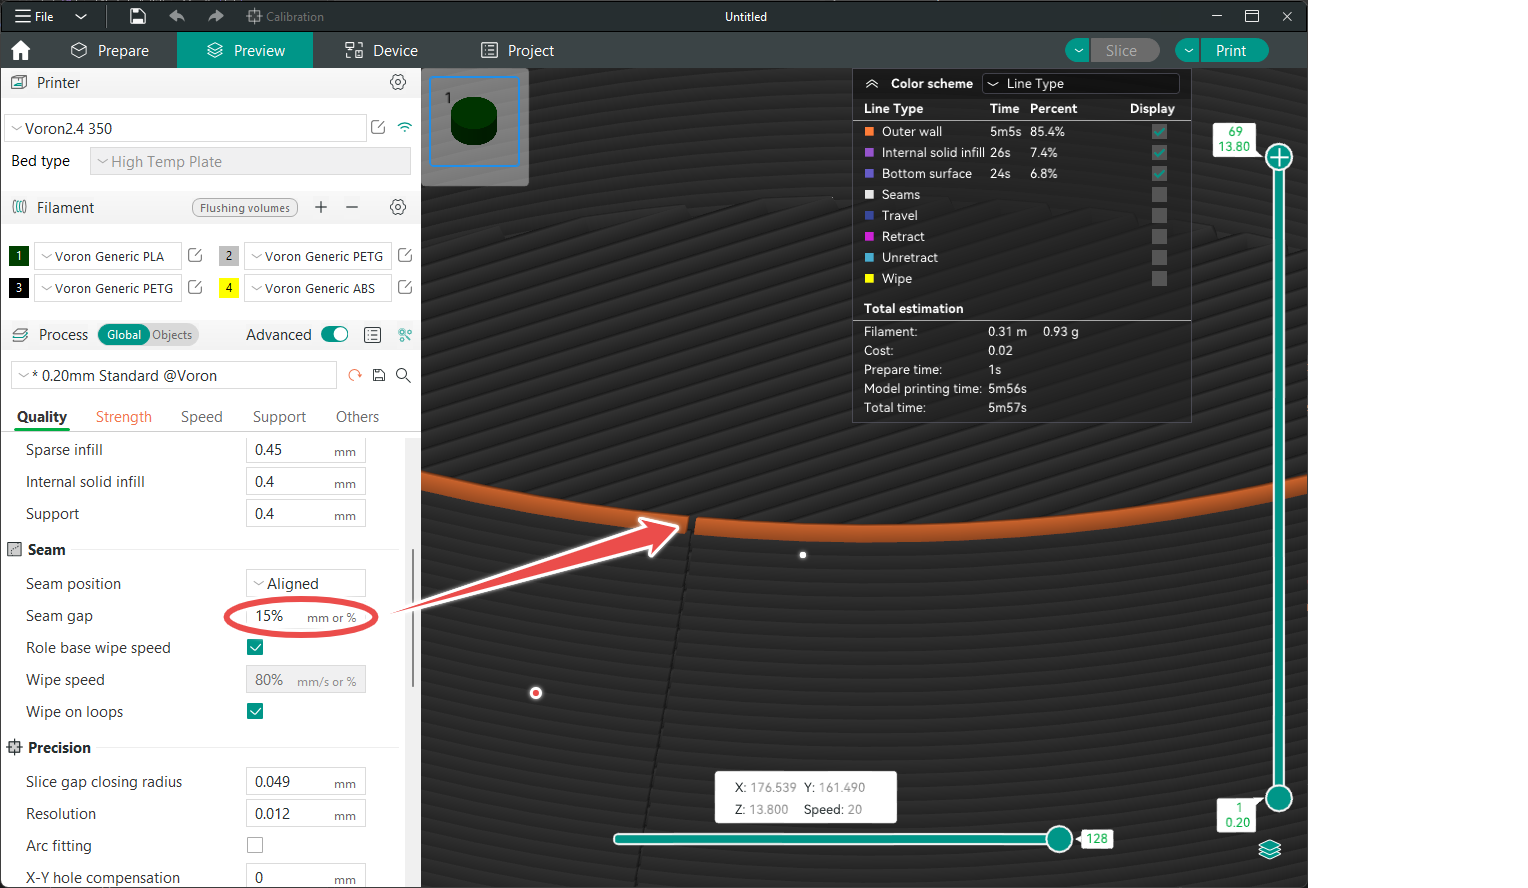
OrcaSlicer has a feature called Seam Gap that helps reduce the likelihood of these imperfections. The Seam Gap setting works by stopping the release of material just before the end of a layer. This approach minimizes the chance of blobs or pimples forming at the layer change point, which can make the Z-seam less noticeable.
Source: GitHub
Default and Adjustment Guidelines:
The default setting for Seam Gap in OrcaSlicer is typically 10%. This means the gap is 10% of the nozzle diameter. For example, with a standard 0.4 mm nozzle, the gap would be 0.04 mm (10% of 0.4 mm).
- If you notice large blobs on your prints, try increasing the Seam Gap by 5–10%. This adjustment tells the printer to stop extruding even earlier, reducing the excess material buildup.
- If you see gaps between layers near the seam, lower the Seam Gap value to ensure enough material is extruded to properly connect the layers.
Exploring Additional Seam Settings
Besides Seam Gap, OrcaSlicer provides other settings to control seam placement like the Seam Position option which determines where on the model the seam will appear. It has options like 'Nearest', 'Random', or 'Aligned' let you choose whether to hide the seam along a corner or distribute it randomly to make it less noticeable.
For detailed guidance on how to adjust these seam settings effectively, you can check out the OrcaSlicer Seam Settings Guide. This guide provides step-by-step instructions and tips to help you fine-tune your seam settings for the best possible outcomes.
5. Verbose Gcode
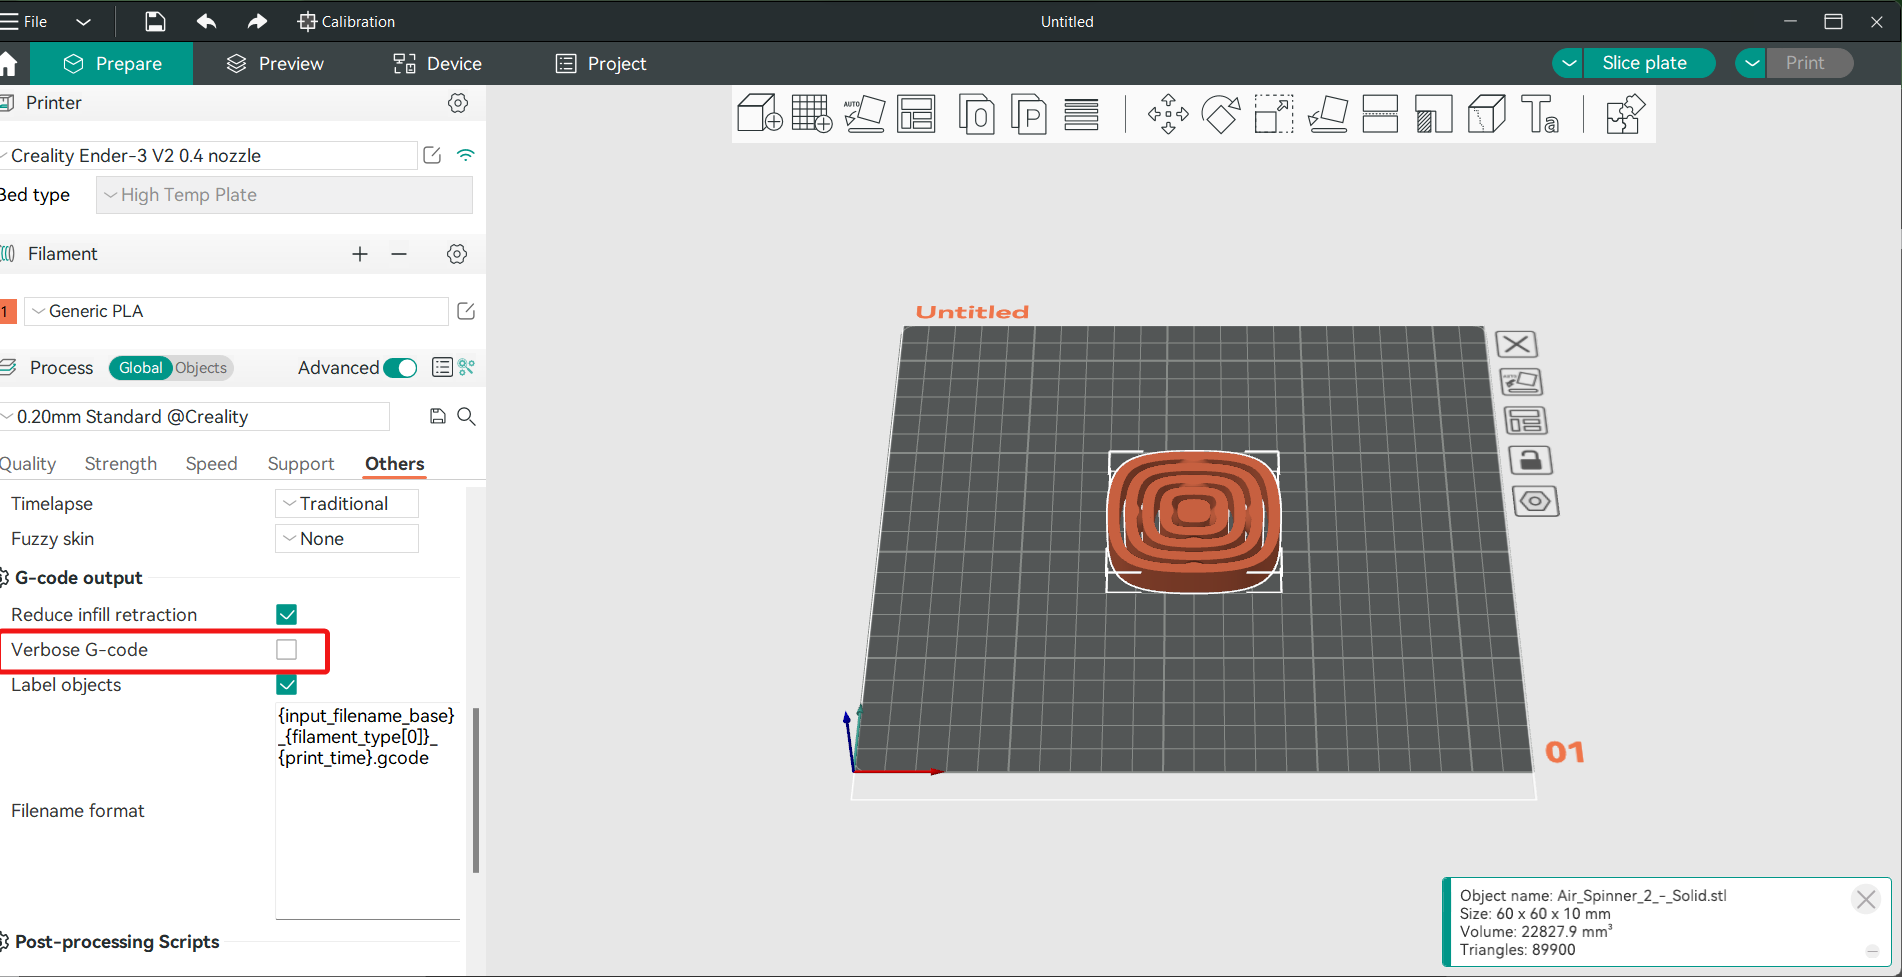
Verbose Gcode is a feature in OrcaSlicer, which you can find under the "Others" tab. When you turn it on, it adds comments to every line of your Gcode, explaining what each command does. This makes it easier to understand, especially if you’re trying to figure out why a print didn’t turn out as expected.
6. Wipe on Loops
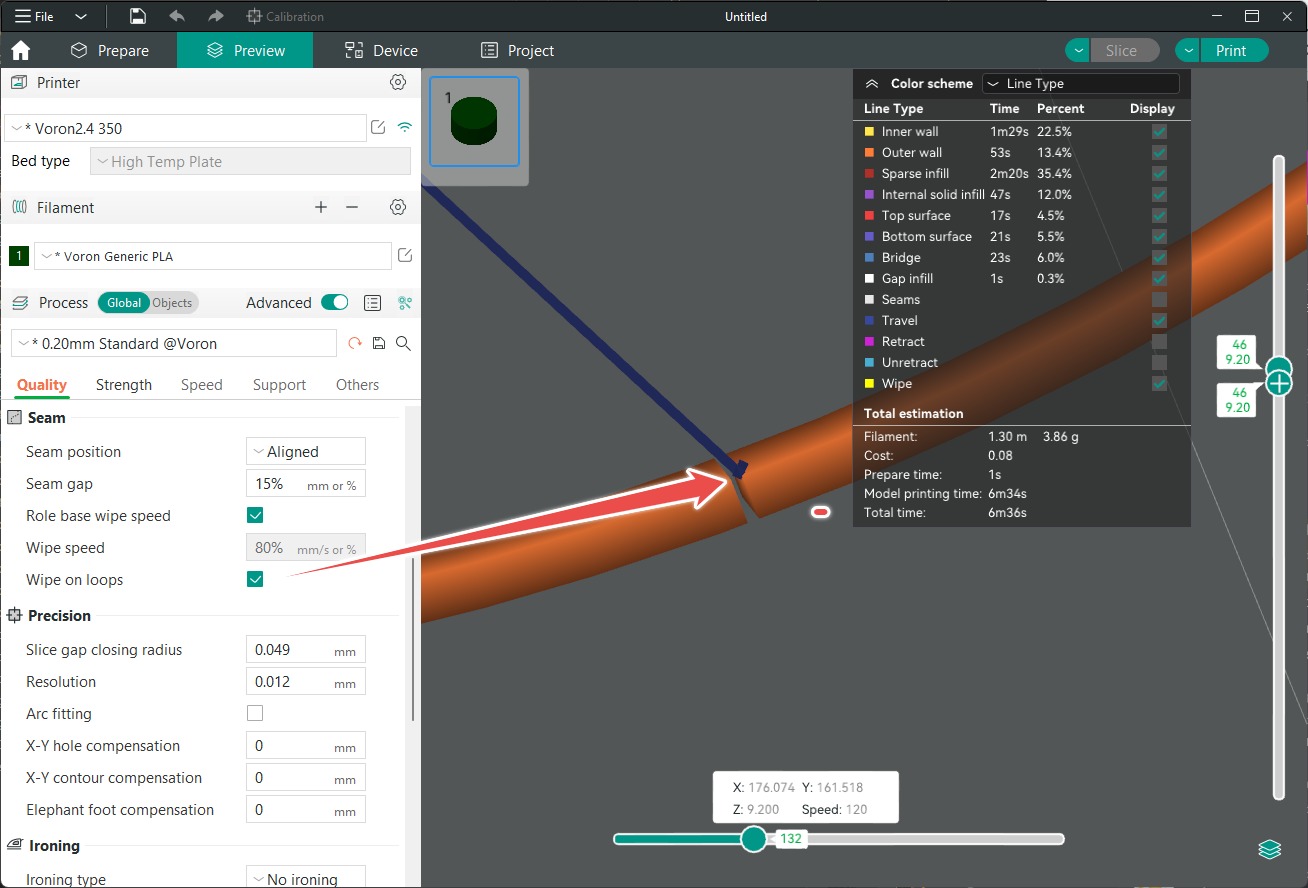
The Wipe on Loops feature in OrcaSlicer is designed to help hide seam lines on your prints. When this setting is enabled, the nozzle moves slightly inward as it finishes a layer loop, making the seam less noticeable. This feature is turned on by default in OrcaSlicer.
Source: GitHub
It's generally a good idea to leave Wipe on Loops enabled unless you notice that your print quality is suffering. In most cases, this setting improves the appearance of your prints by minimizing visible seams.
7. Precise Wall
The Precise Wall feature in OrcaSlicer is designed to improve the accuracy of your prints by adjusting the spacing between the outer and inner walls of your model. Normally, when walls overlap, it can lead to slight size inaccuracies and inconsistencies between layers. Precise Wall helps to eliminate this overlap, making sure your prints are more accurate and consistent.

Source: GitHub
This feature is especially useful for keeping your prints true to size without sacrificing strength. By enabling Precise Wall, you can achieve better dimensional accuracy while still maintaining the overall quality of your printed parts.
8. Projects and Plates
OrcaSlicer introduces a convenient way to manage complex printing tasks through its Projects and Plates feature. A "Project" in OrcaSlicer is essentially a 3MF file that stores all your print objects, settings, and configurations in one place. This makes it easy to save and revisit your work without needing to set everything up again from scratch. You can save your project by going to the File menu and selecting "Save Project."
Plates allow you to organize different parts of your print job efficiently. For example, if you have multiple parts that need to be printed in different colors or with different settings, you can assign each part to a separate plate. This feature streamlines the printing process, particularly when working on large or multi-part projects.
You can add a plate by clicking on the "Add Plate" icon in the top bar of your OrcaSlicer interface.
9. Paint-on Supports
The Paint-on Supports feature in OrcaSlicer gives you precise control over where support structures are placed on your model. Instead of relying solely on automatic support generation, you can manually paint areas where you want supports, ensuring they are only applied where necessary.
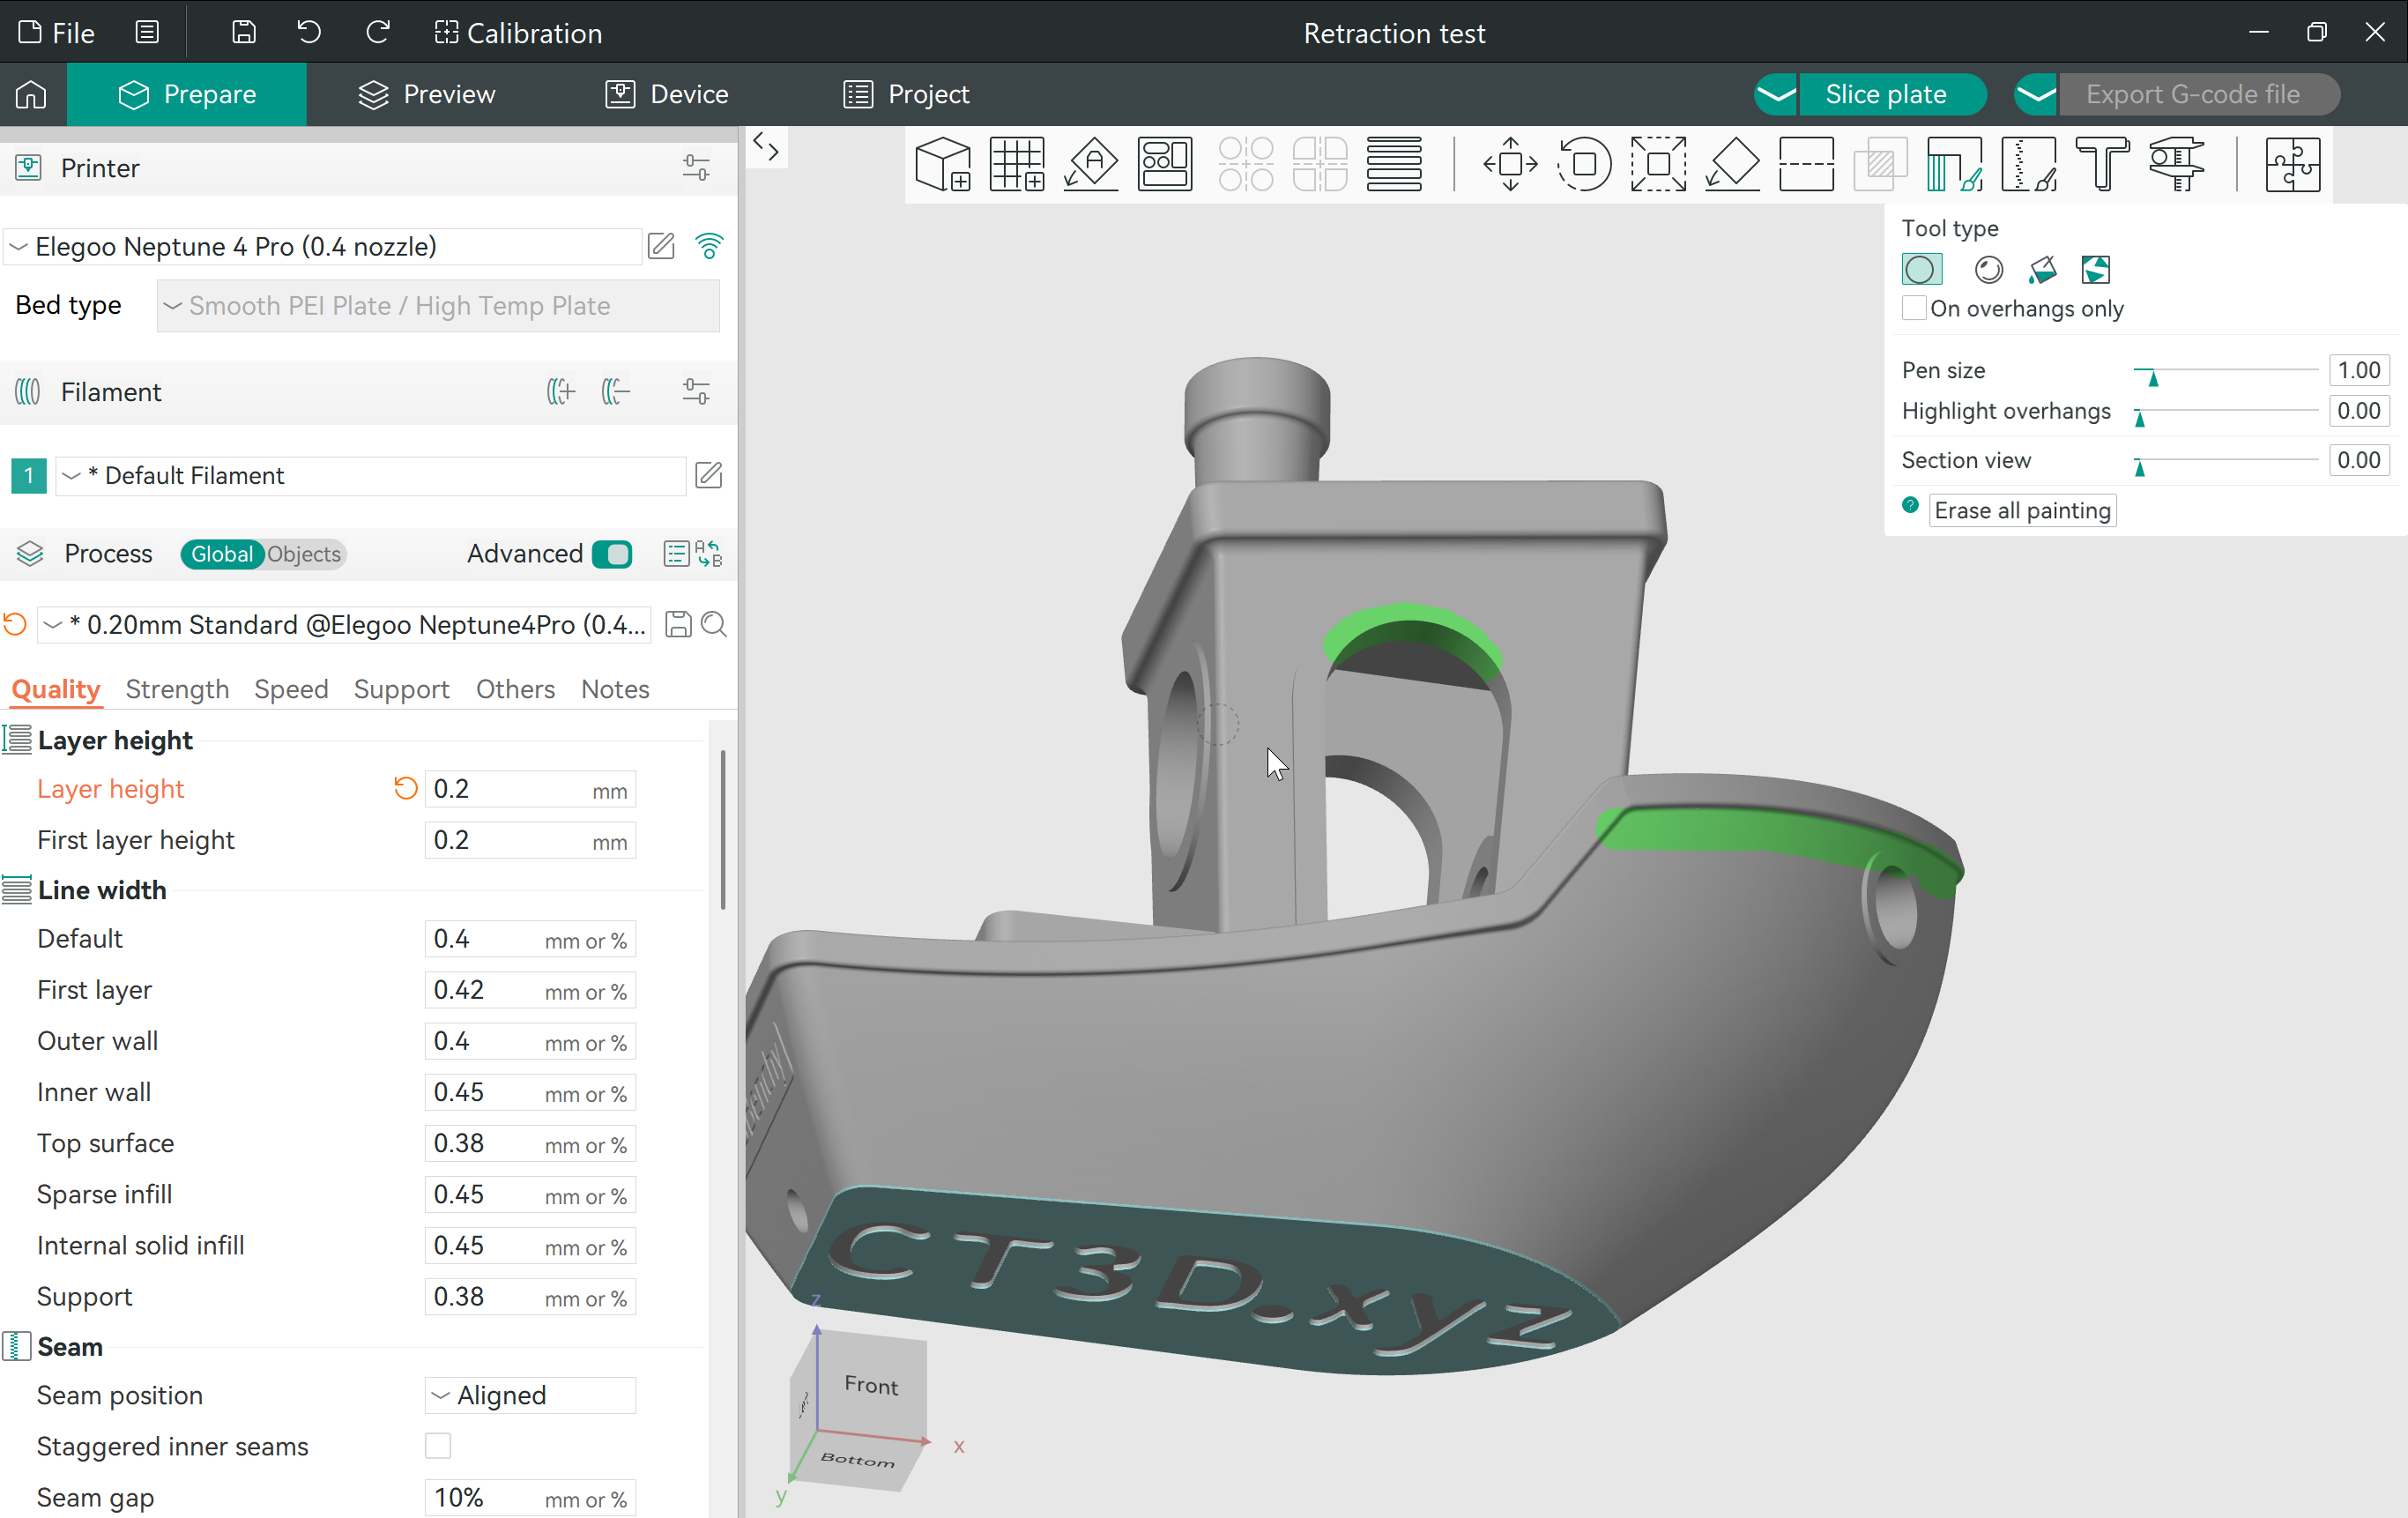
This is especially useful for complex models with intricate details, as it allows you to avoid unwanted supports in areas where they might be difficult to remove. By using Paint-on Supports, you can achieve cleaner prints with less post-processing required.
You can find the support painting tool in the top bar of your OrcaSlicer interface.
10. Stealth Mode
OrcaSlicer includes a feature called Stealth Mode . When enabled, it disables all connections to the Bambu Lab’s hardware management system and cloud services. This is particularly beneficial for users who want to ensure that their printer and data remain entirely local, without any external communication.
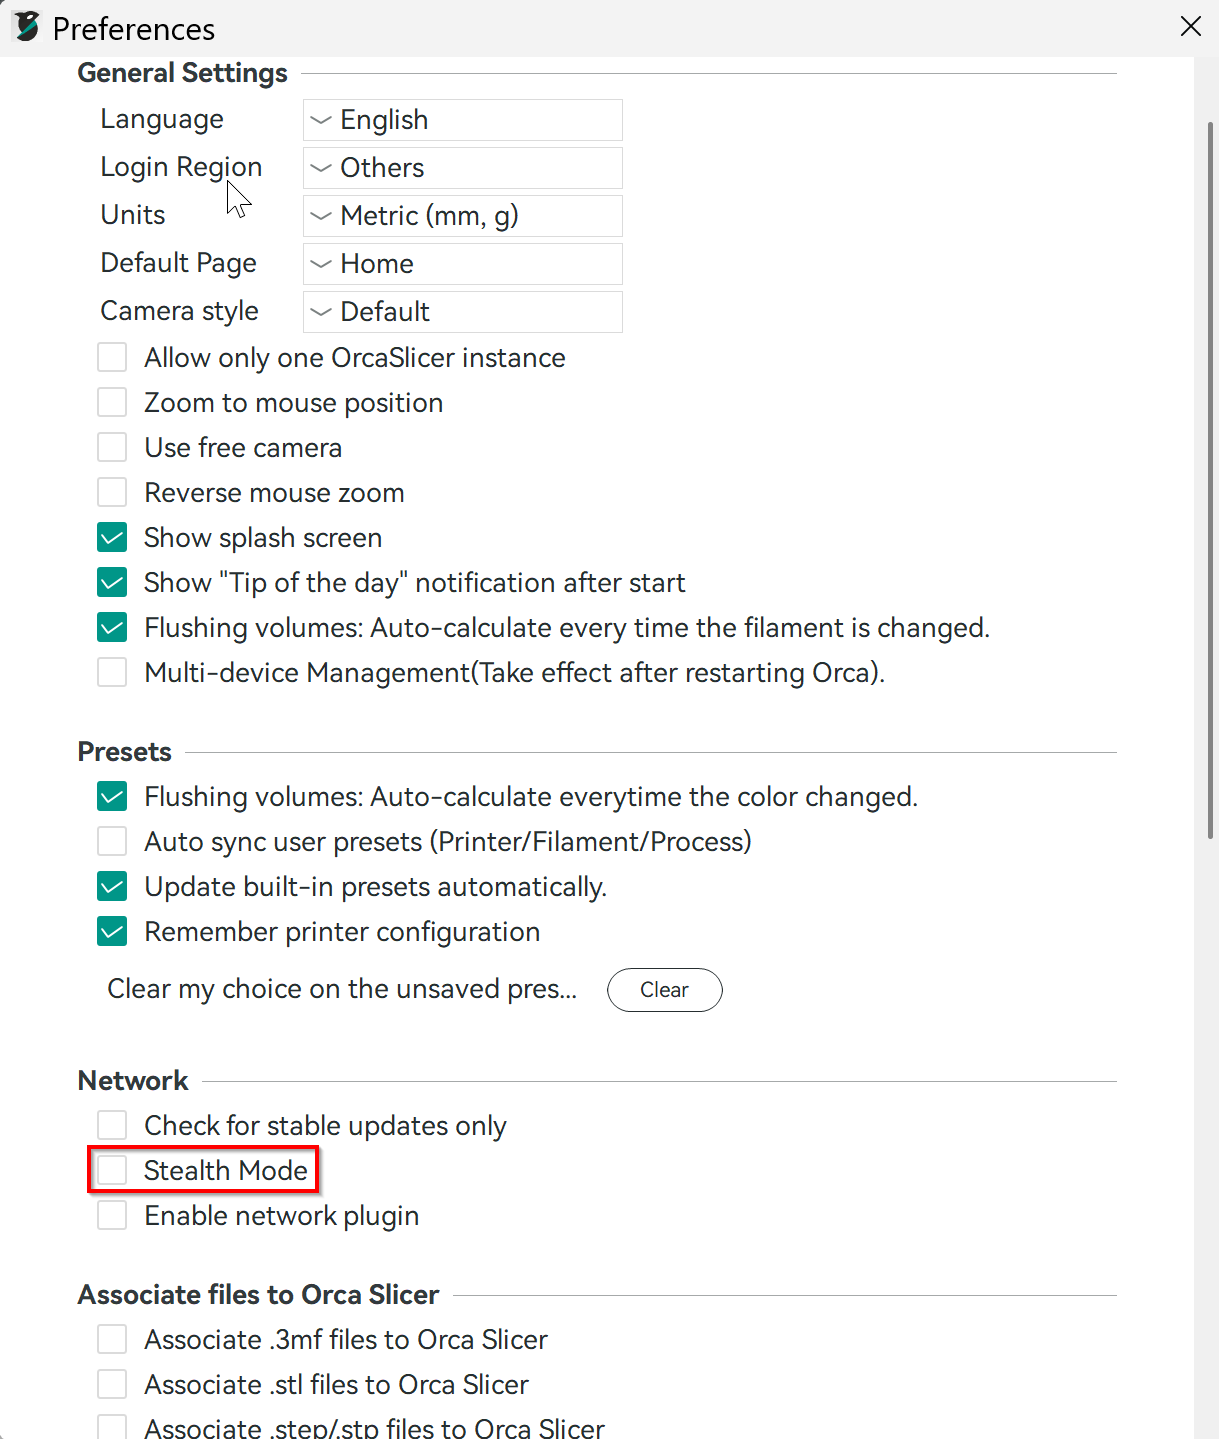
Stealth Mode is a valuable feature for those who are privacy-conscious, providing peace of mind while still allowing full functionality of OrcaSlicer’s powerful tools. You can turn it on from the preference window in OrcaSlicer.
Now that we’ve explored OrcaSlicer, let’s turn our attention to Bambu Studio.
Bambu Studio
Bambu Studio, created by Bambu Lab, is a straightforward and easy-to-use software for 3D printing. It's built on PrusaSlicer and takes ideas from UltiMaker’s Cura, offering powerful features for both new and experienced users. The interface is simple to navigate, and it gives you solid control over your printing projects.
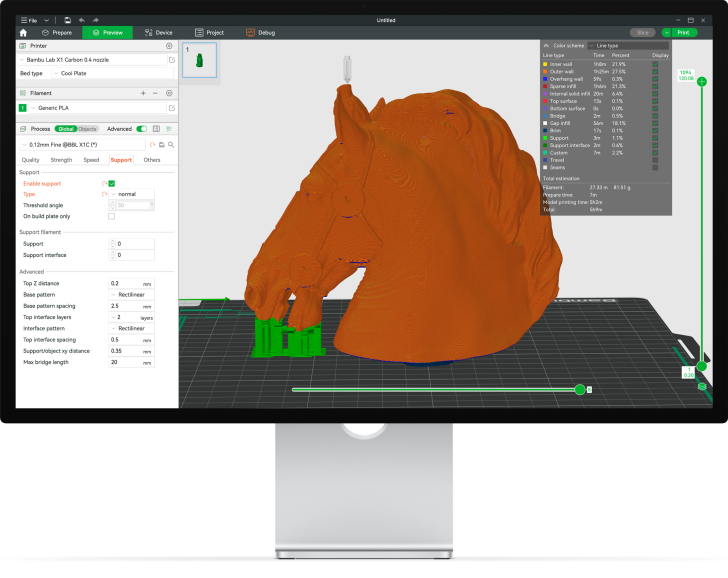
Source: Bambu Lab
This slicer was originally developed by Bambu Lab to support their printers and related hardware, such as the Bambu Lab AMS (Automatic Material System) for multi-color 3D printing. However, it also supports many other 3D printers from different manufacturers, with the option to add custom printers to meet your specific needs. That said, it doesn't offer as many printer options as OrcaSlicer.
In the upcoming sections, we'll cover how to install the slicer, navigate the user interface, and explore its standout features.
Accessibility and Setup
Supported Platforms
Bambu Studio is available for Windows and macOS, and Linux. This broad platform support ensures that users can work with Bambu Studio regardless of their operating system preference, making it accessible to a wide range of users.
Downloading and Installing Bambu Studio
Setting up Bambu Studio is a straightforward process that involves the following steps:
-
Visit the Bambu Lab Website:
Navigate to the official Bambu Lab download page to access the latest version of the software.
-
Download the Installer:
Choose the appropriate installer for your operating system (Windows, macOS, or Linux) and download it.
-
Run the Installer:
Once the download is complete, open the installer and follow the on-screen instructions to install Bambu Studio on your computer.
-
Set Up Your Printer Profiles:
After installation, you will be prompted to select your region and add the printers you intend to use. It is crucial to select the correct printer models to ensure compatibility with your print jobs.
Initial Setup
Printer and Filament Selection
The initial setup of Bambu Studio is critical for ensuring that your 3D prints are successful. Here’s how to get started:
-
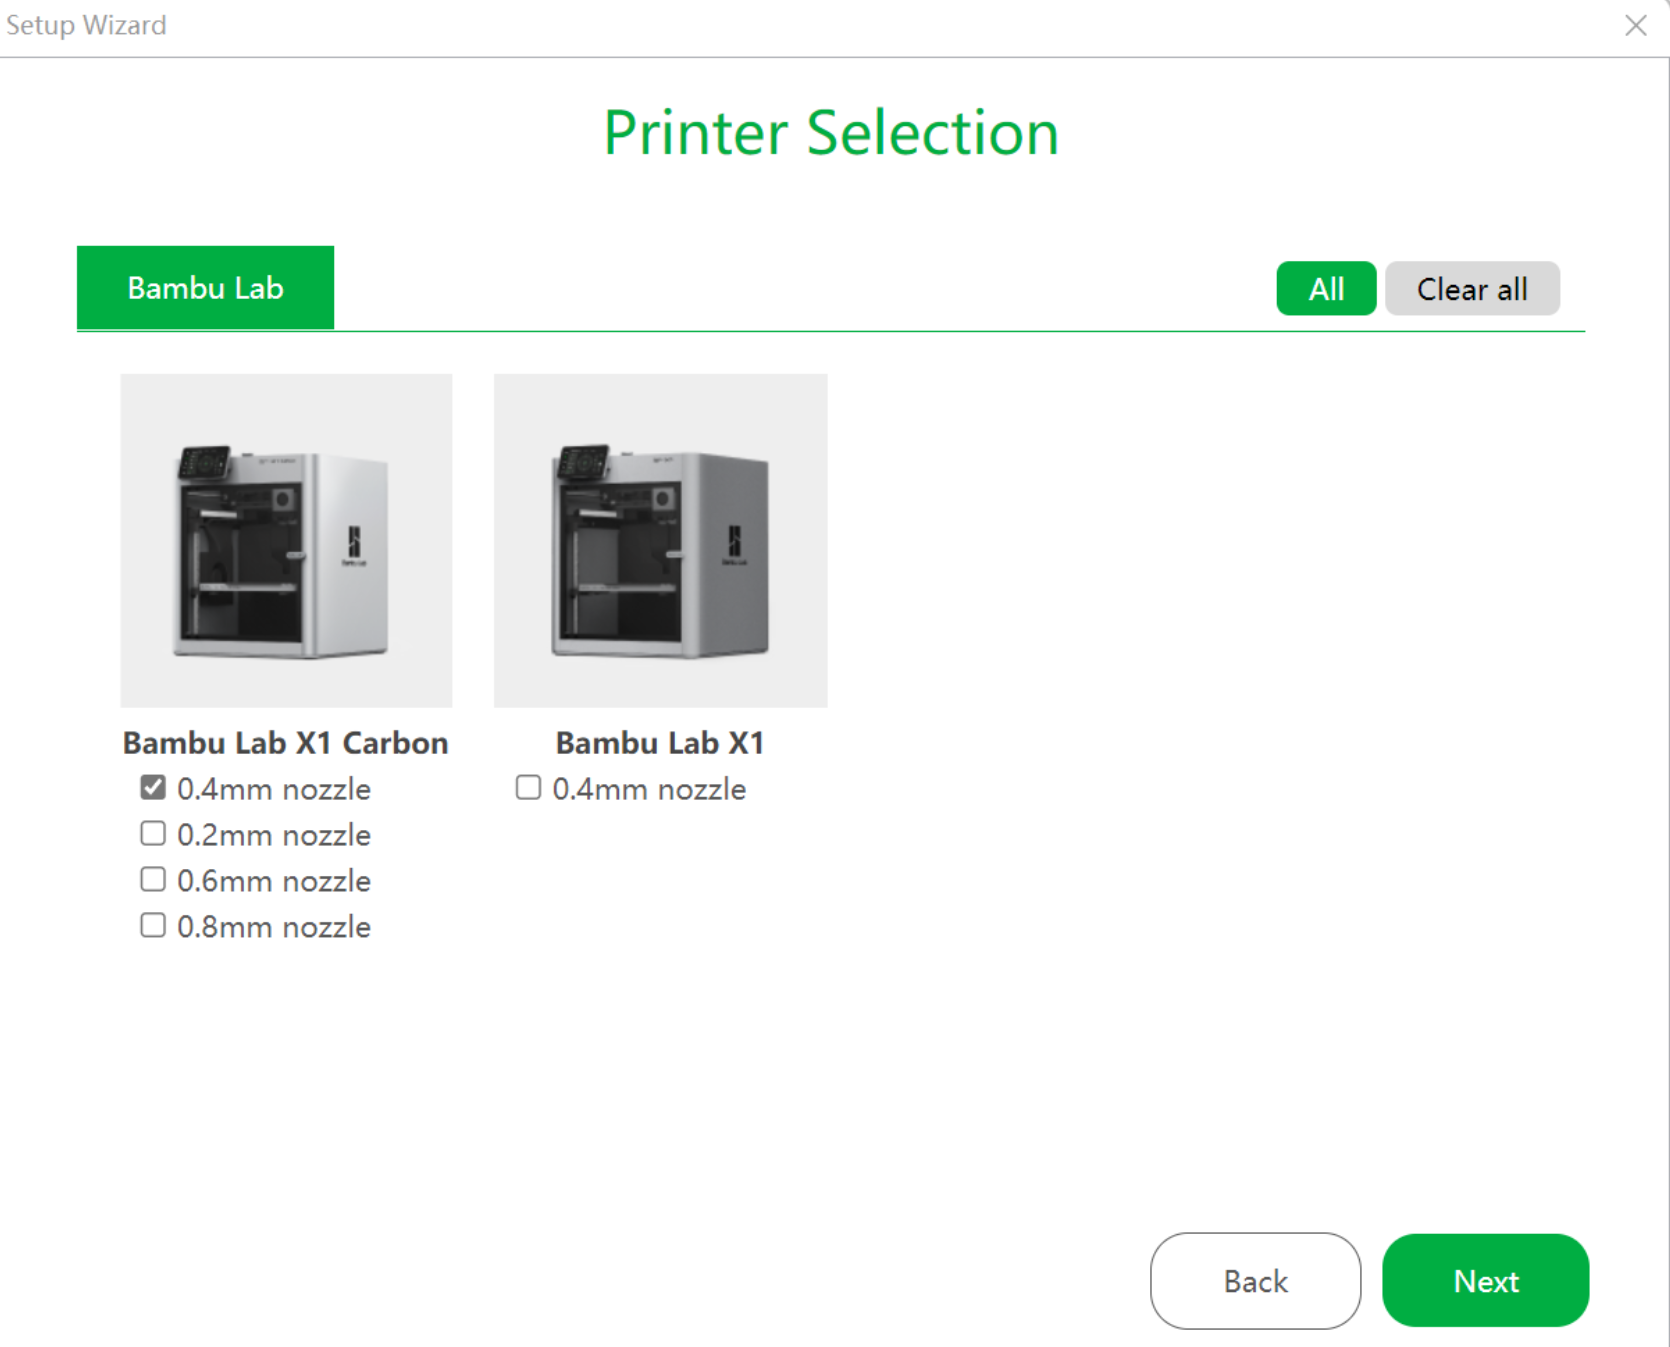
Printer Selection:
During the setup process, you will be asked to choose which printers to add to your library. Using the wrong printer settings can lead to failed prints or even damage to the printer.
-
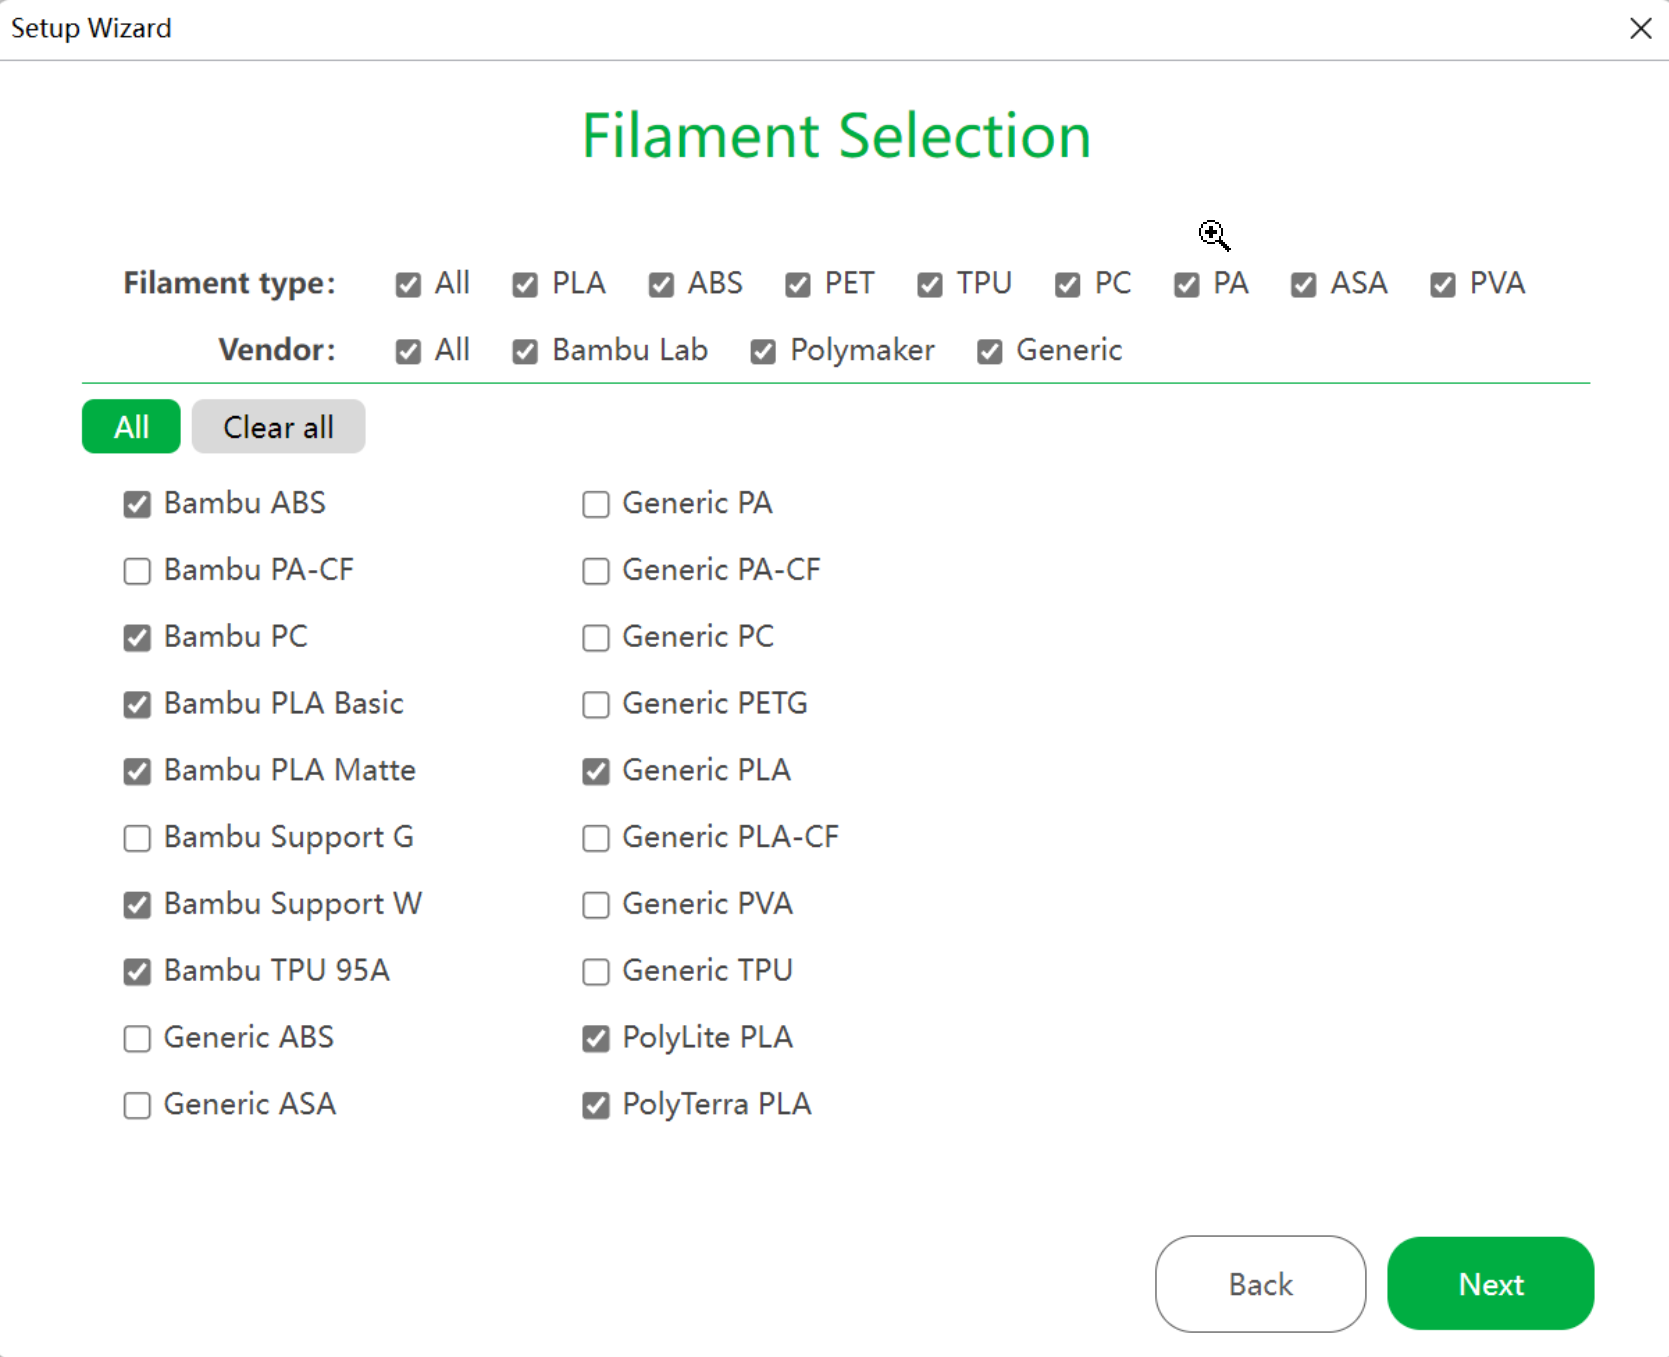
Filament Selection:
After selecting your printer, Bambu Studio will prompt you to choose the filament types you plan to use. The software comes with preset profiles for various filament types.
-
Account Creation: While Bambu Studio may prompt you to create an account, it is not required to use the software. You can skip this step if you prefer not to create an account.
User Interface and Layout
Bambu Studio features a modern and intuitive user interface, designed to streamline the 3D printing process from start to finish. The software is organized into several key sections, each dedicated to a specific aspect of the printing process.
Main Sections:
-
Home:
The Home section is your starting point for opening, importing, or creating new projects. It provides quick access to recently used files and commonly used functions.
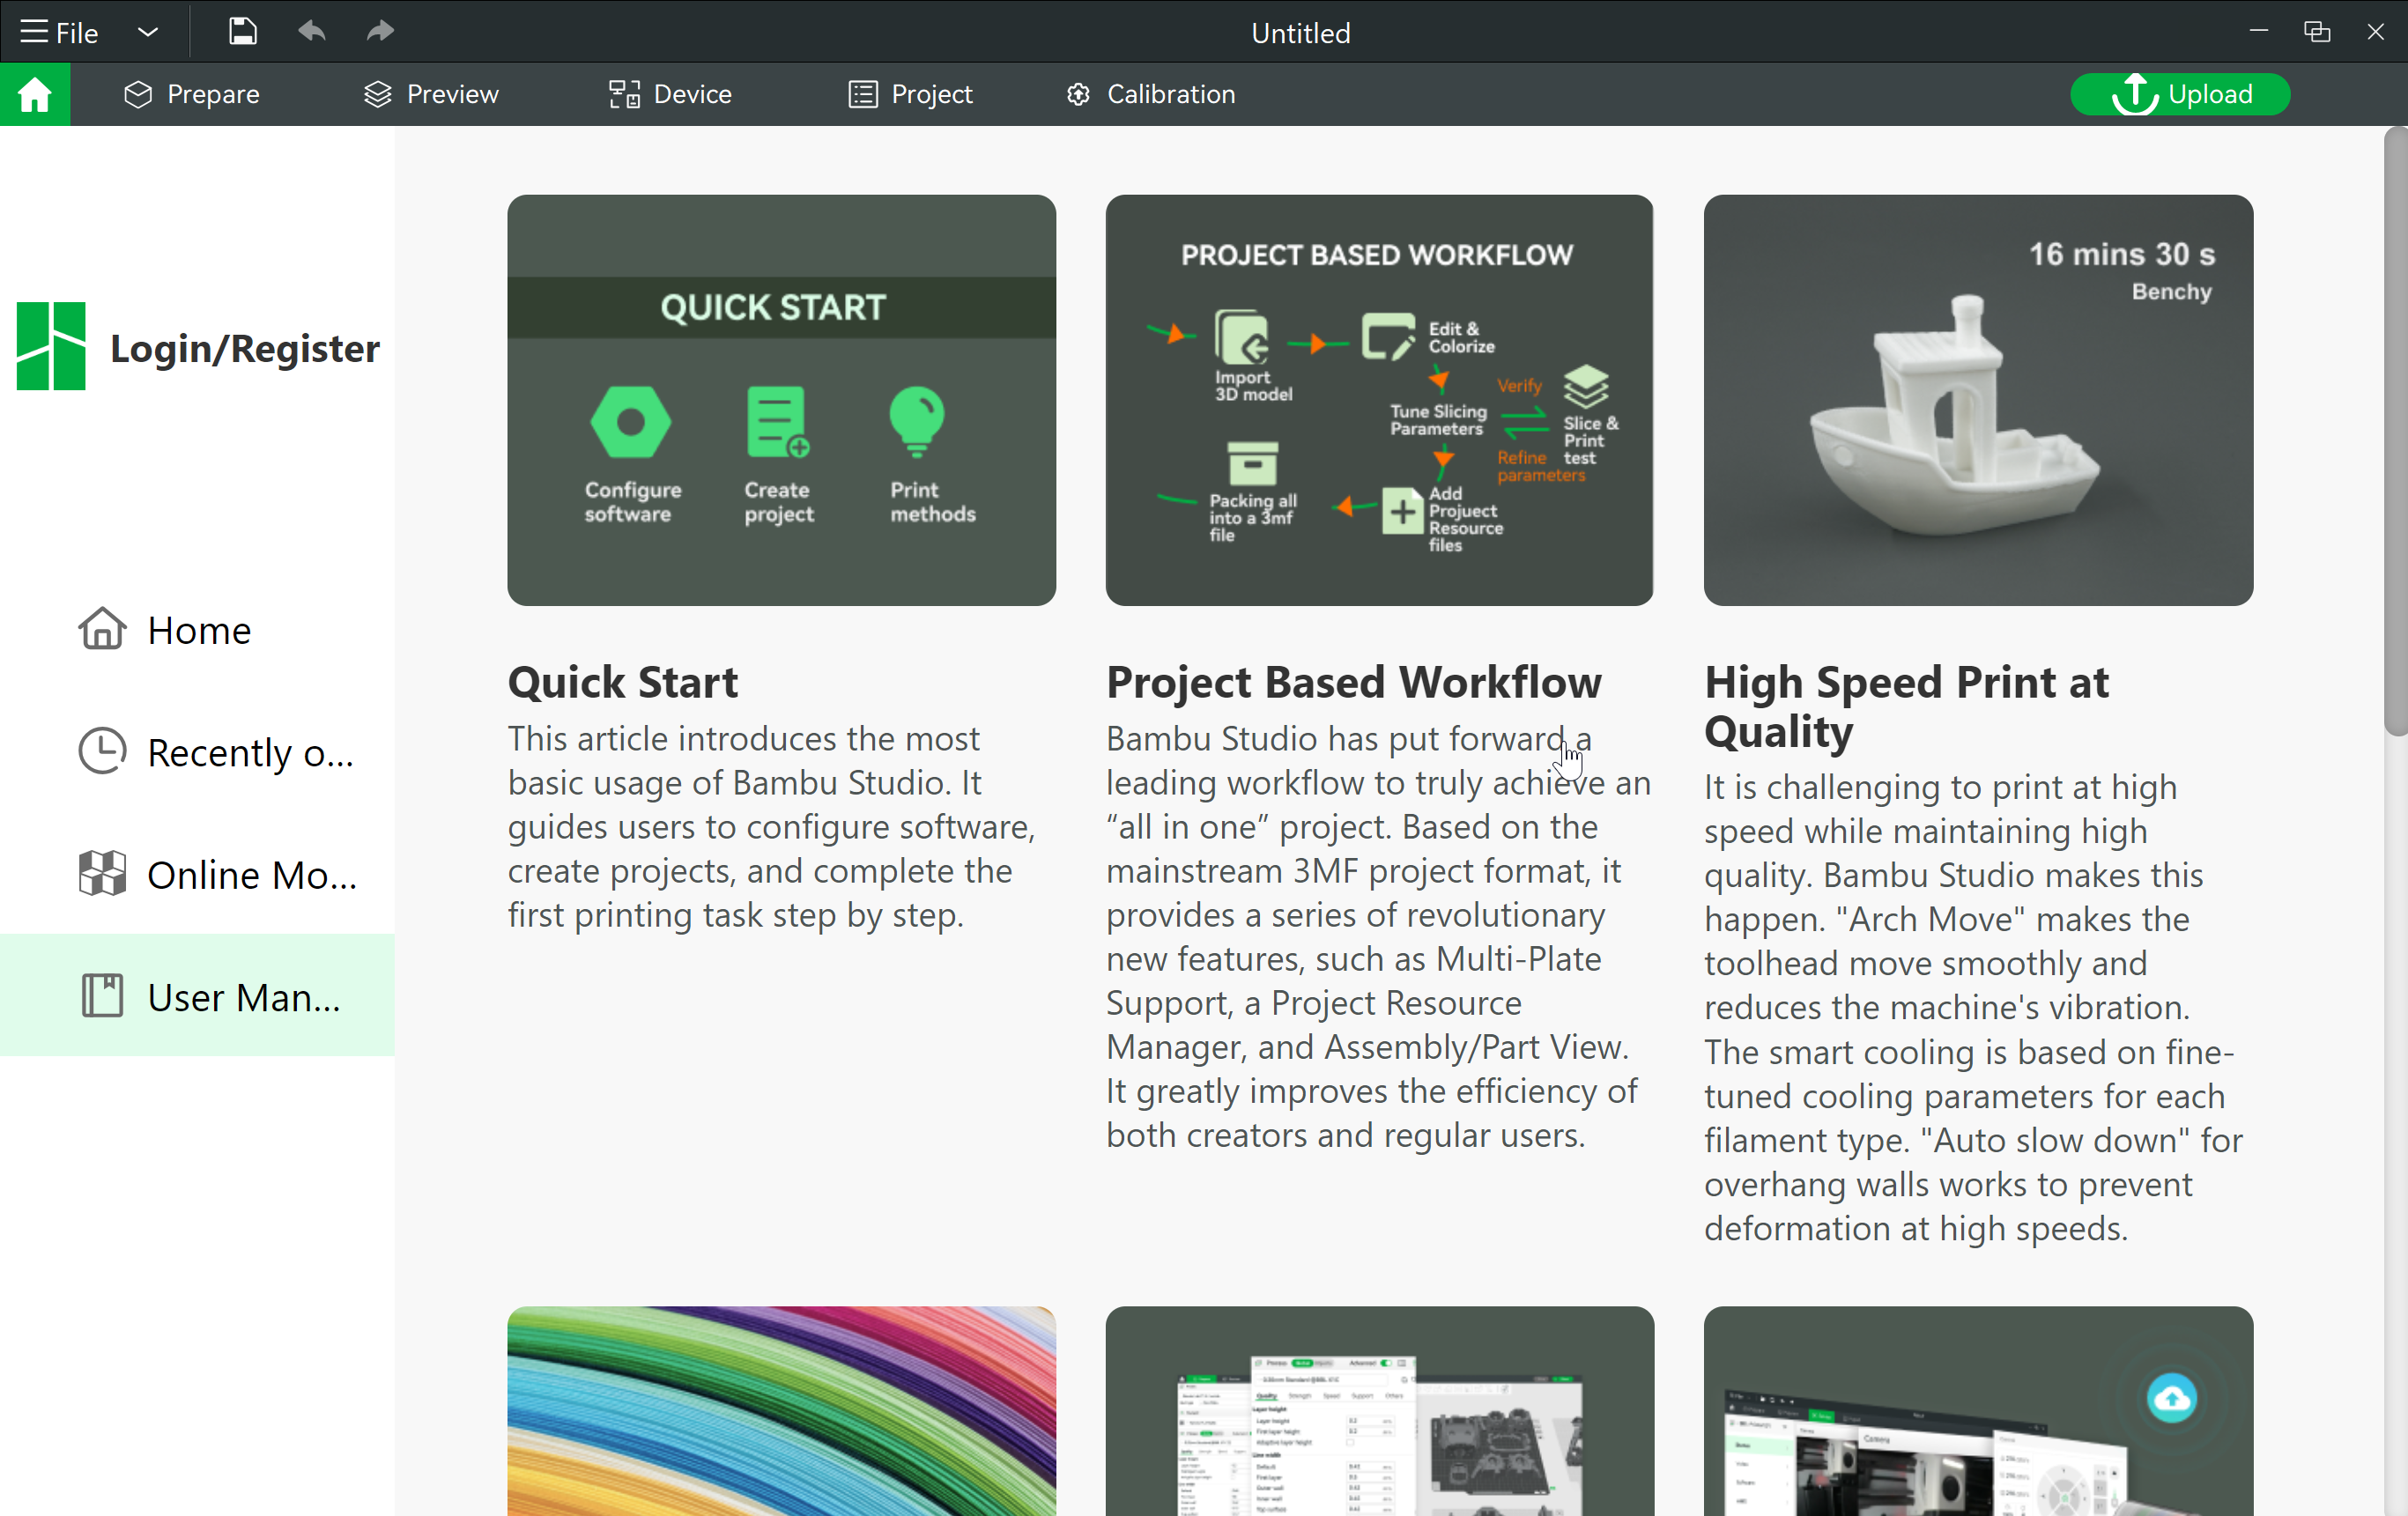
Additionally, it includes a user manual with helpful articles linked to the Bambu Lab website, covering topics like a quick start guide, multi-color printing, and a guide for creating 3D text, among others. Plus, it offers access to 3D models through MakerWorld, where you can find and download models from their website.
-
Prepare:
The Prepare section is where the bulk of your work will take place. Here, you can adjust settings, arrange models on the build plate, and prepare your files for slicing. This section offers a range of tools for model manipulation, including moving, rotating, scaling, and more.
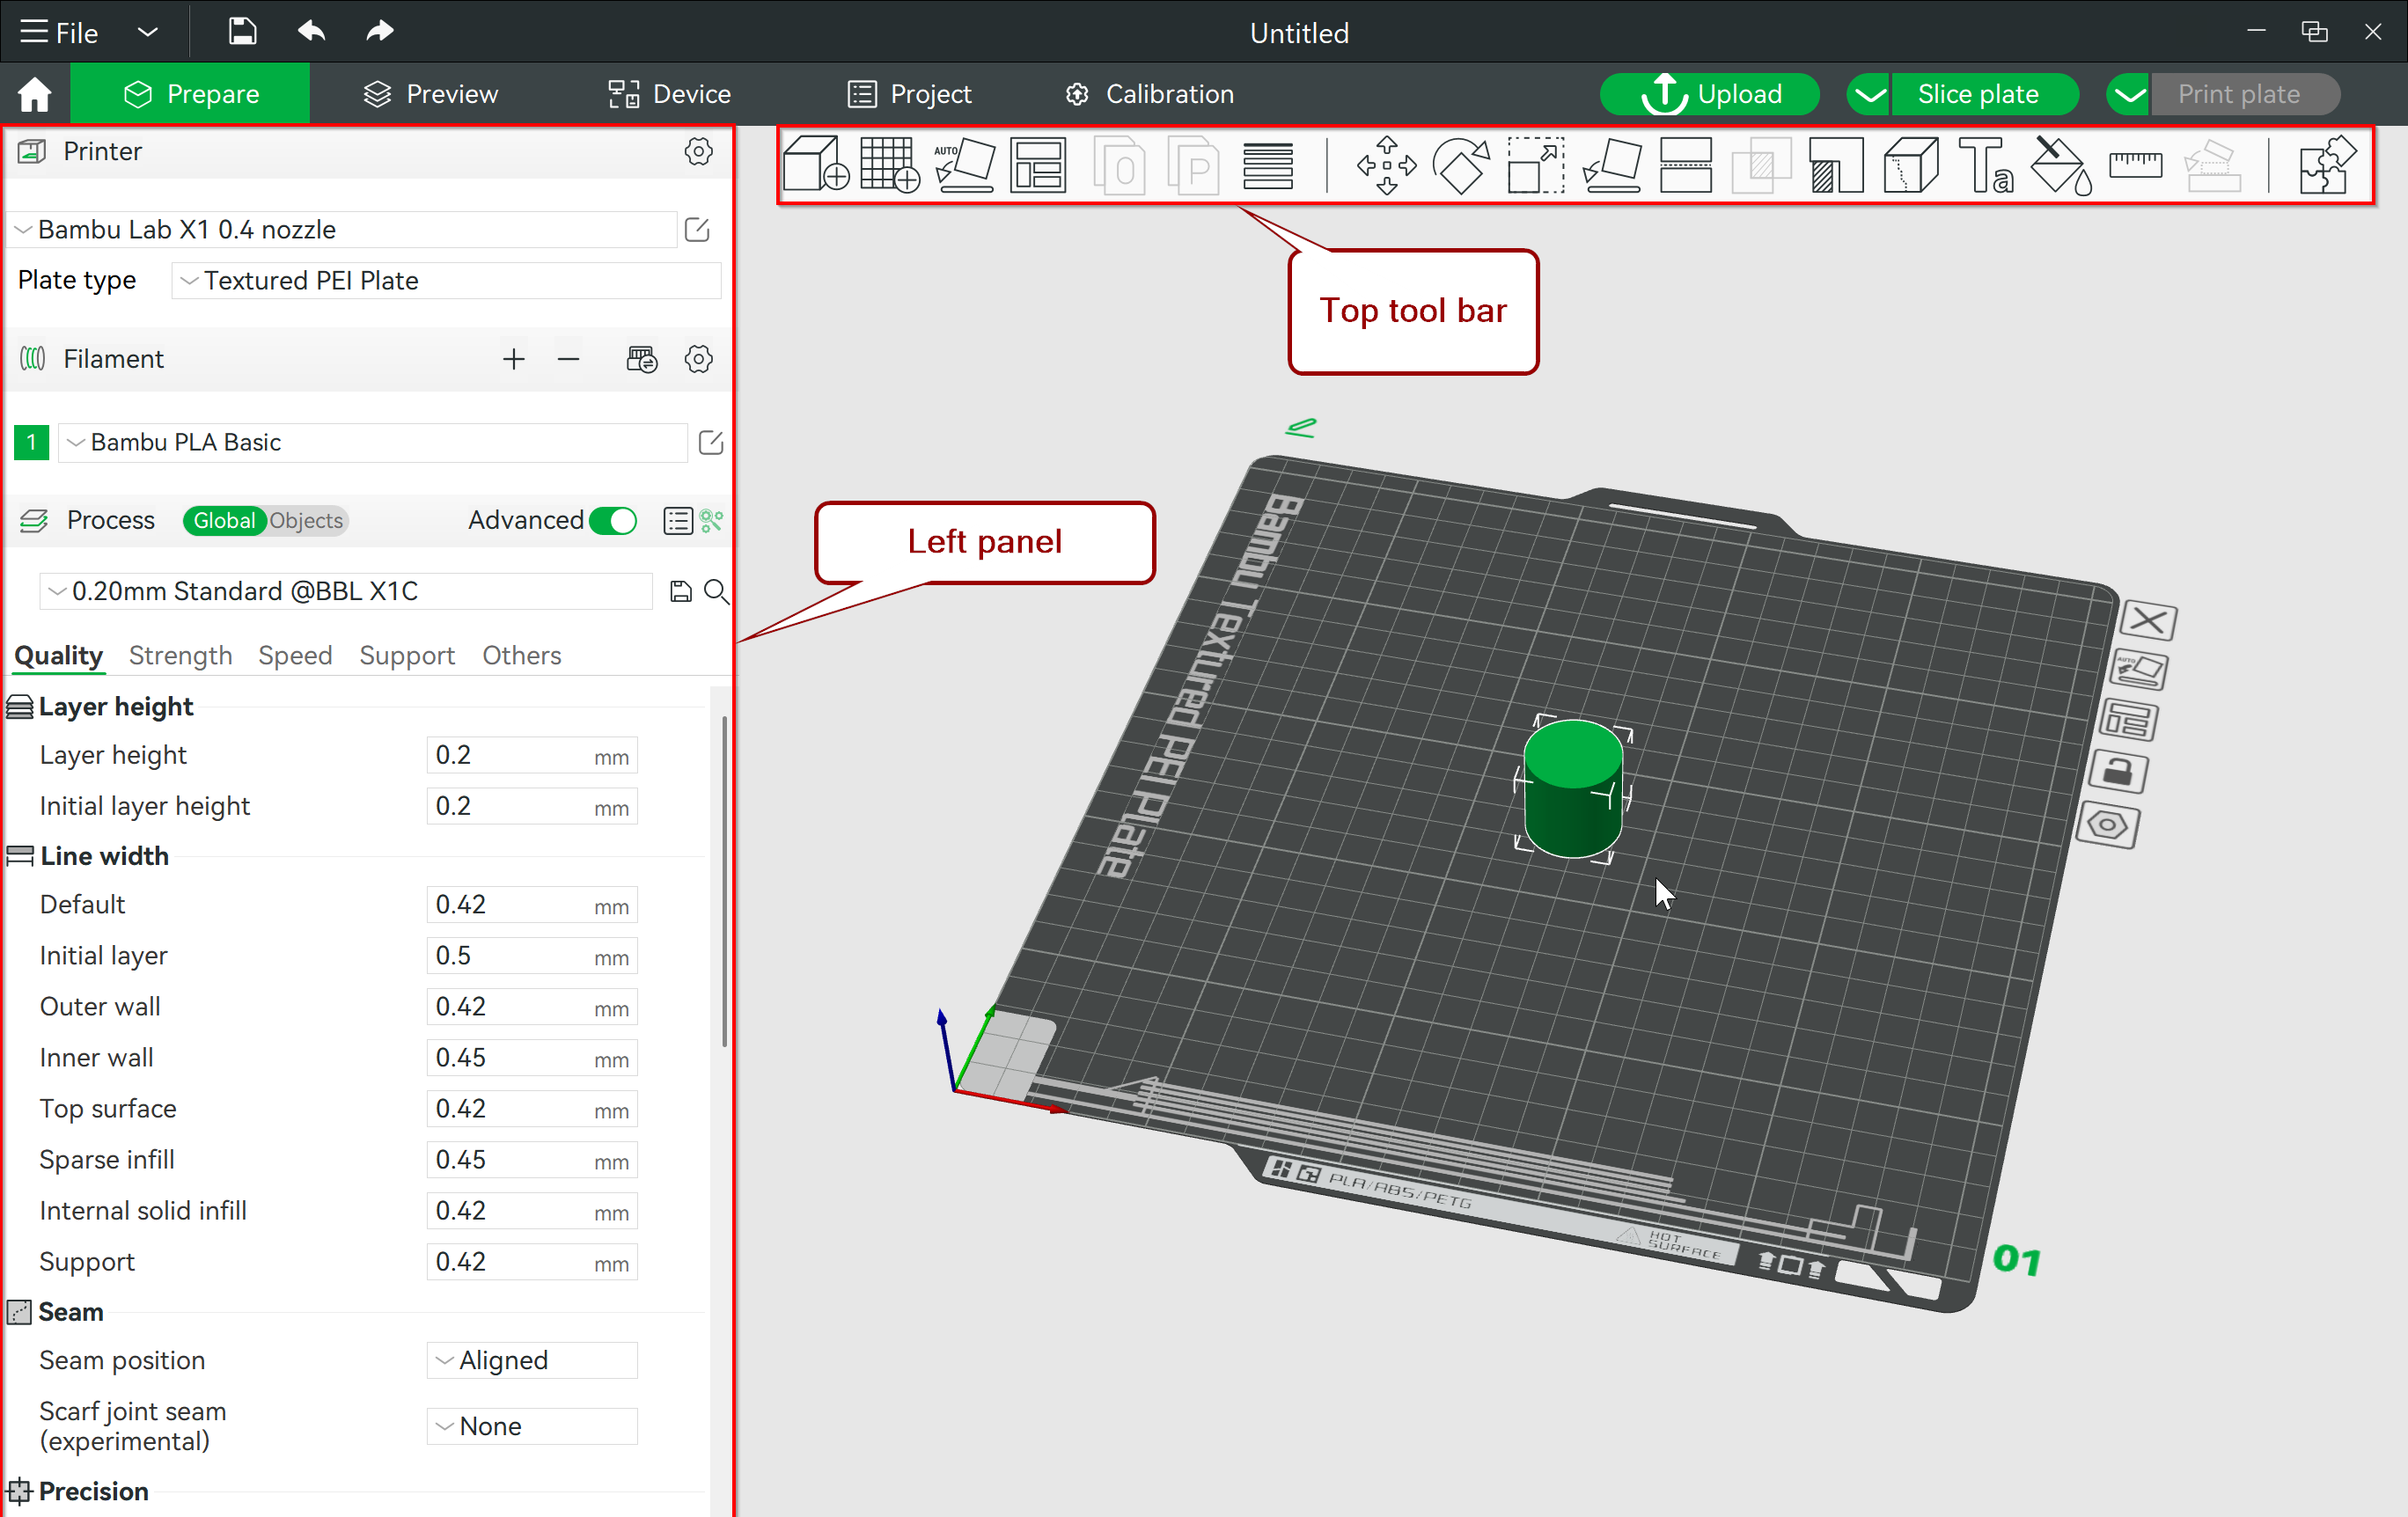
Additionally, the left panel in this section allows you to fine-tune your slicing settings, choose your material, and switch between printers, ensuring your model is perfectly optimized for printing.
-
Preview:
After slicing your model, the Preview section allows you to inspect the sliced model in detail. You can see a layer-by-layer breakdown, estimate print time, and check for potential issues such as overhangs or unsupported areas.
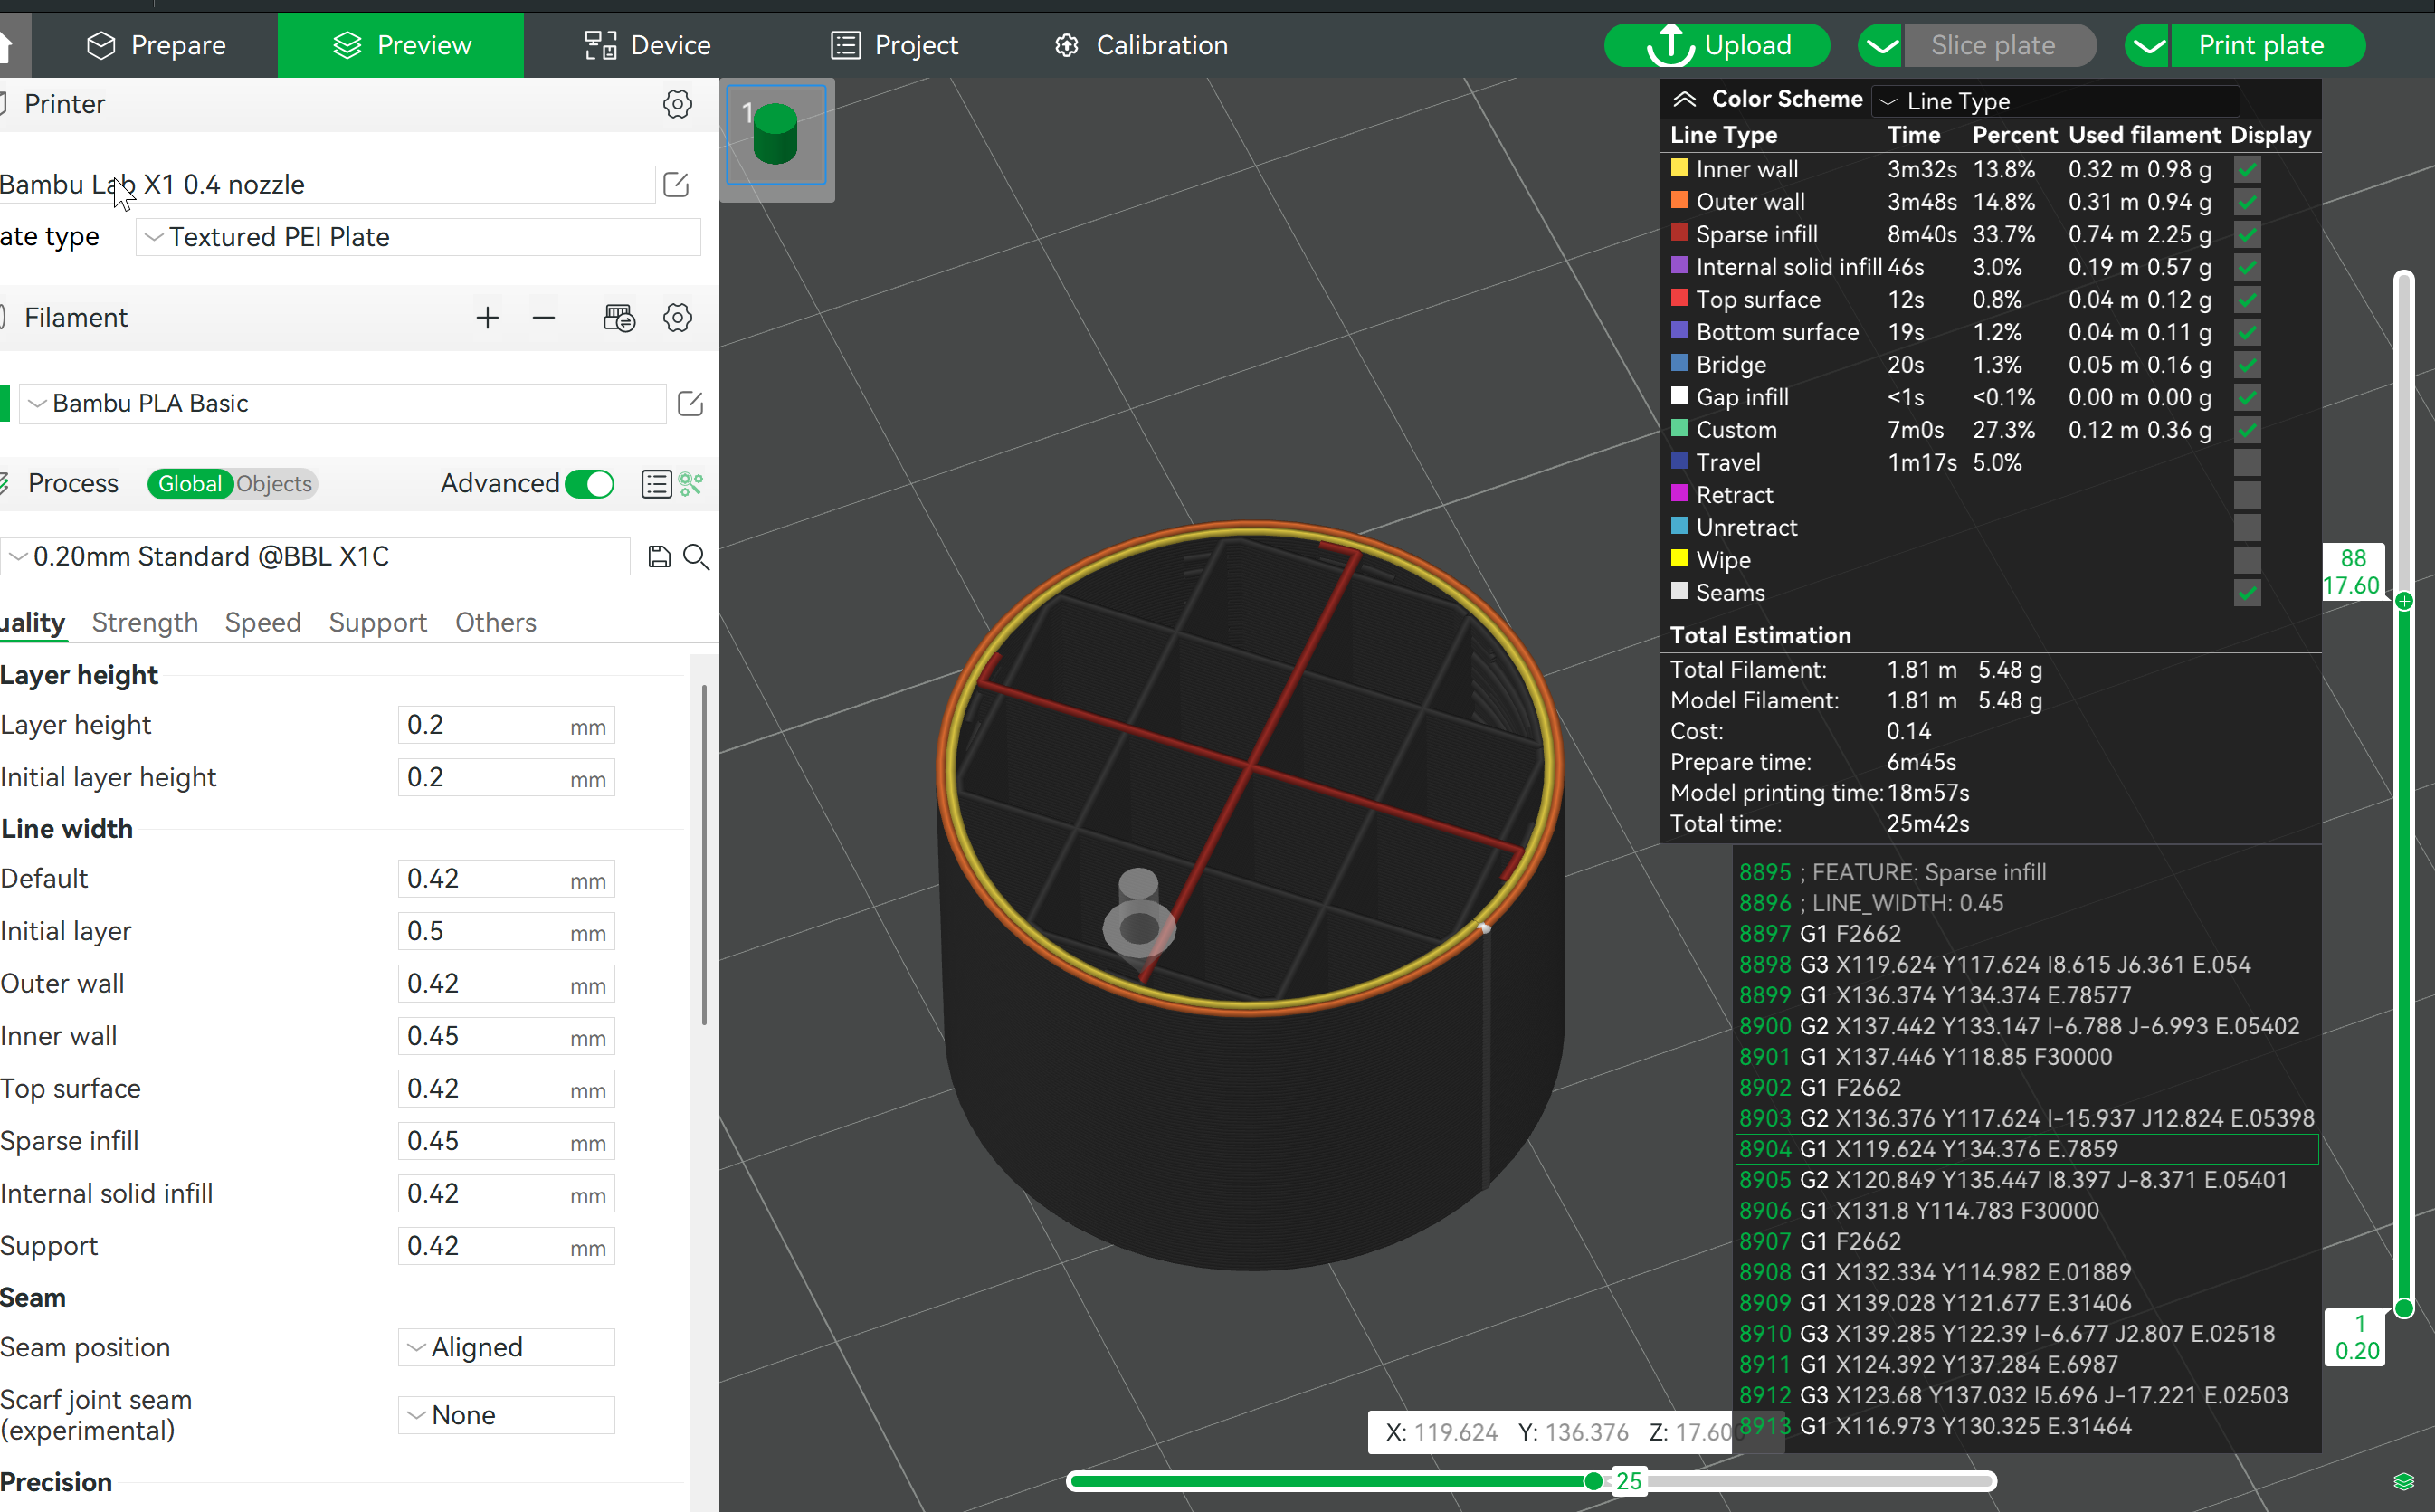
This section is very similar to OrcaSlicer (which we have previously covered in detail), as both slicers share these features, originally derived from PrusaSlicer. However, it’s important to note that OrcaSlicer is actually a fork of Bambu Studio, meaning Bambu Studio introduced these capabilities first.
-
Device:
The Device section offers live monitoring and control of your 3D printer. It lets you check the current status of your printer, including temperature settings, filament usage, and printing progress. This section is quite similar to the device tab in OrcaSlicer and supports integration with Klipper (Mainsail and Fluidd interfaces), OctoPrint, Duet, and more.
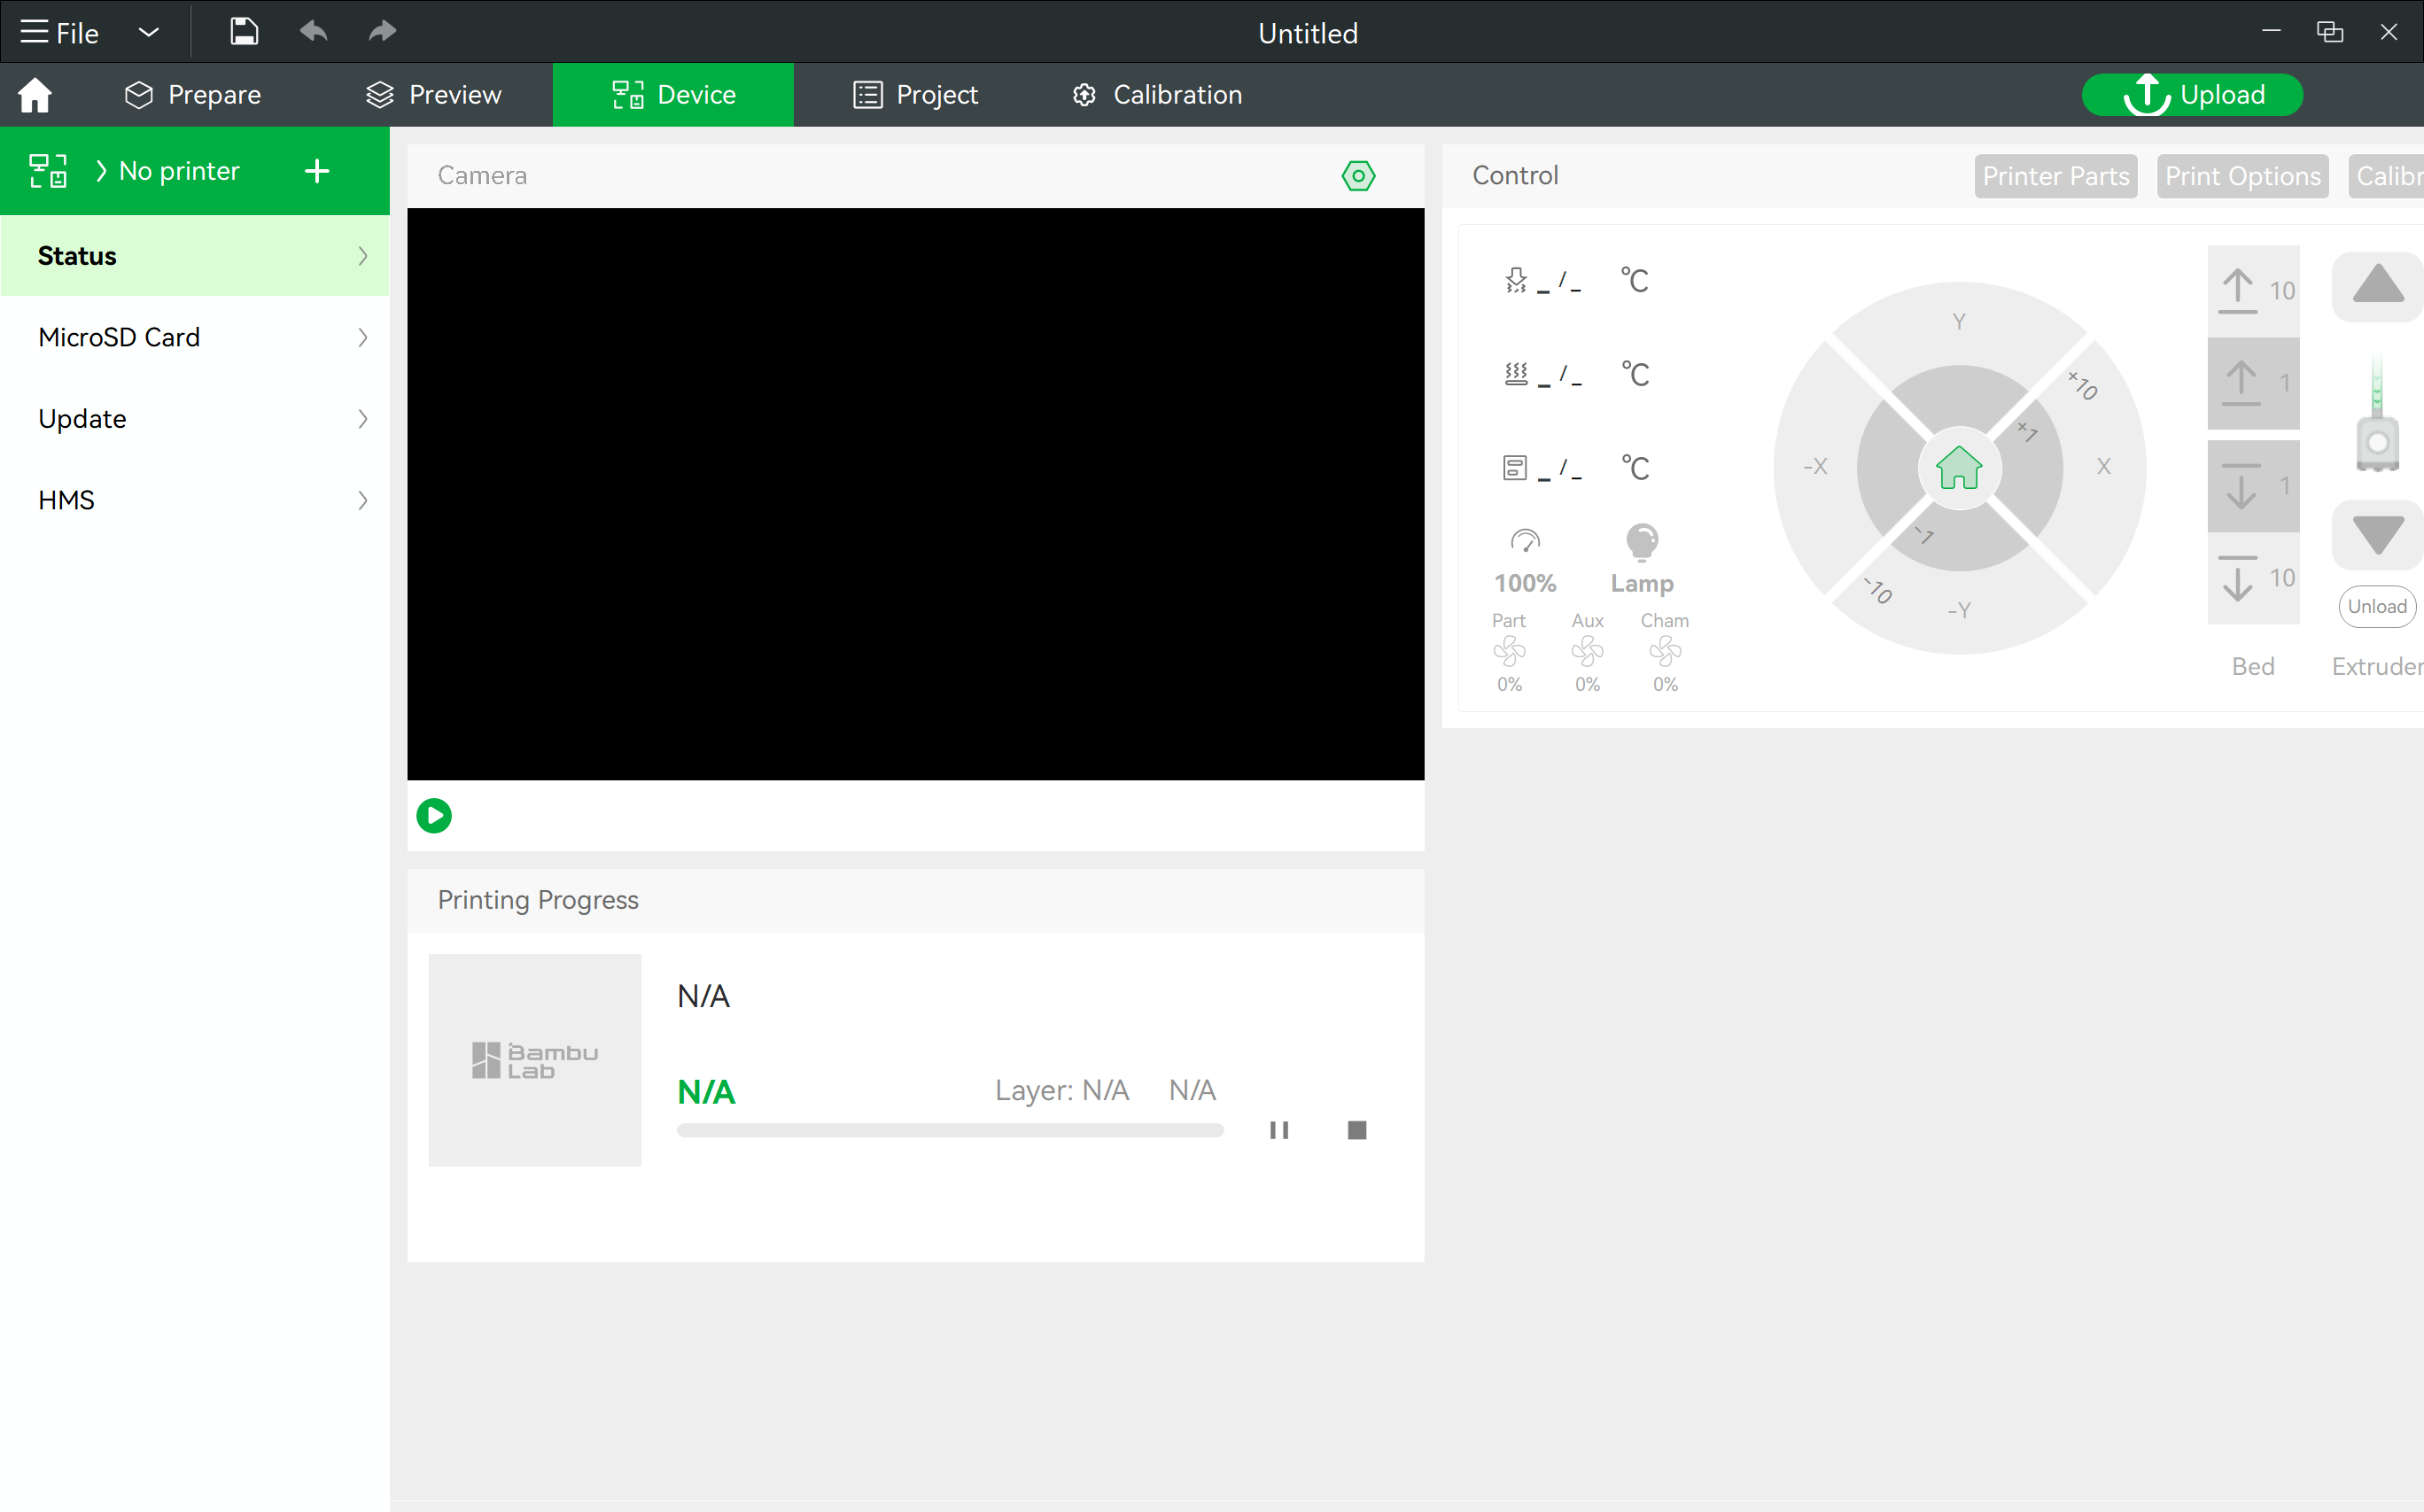
if you're using a Bambu Lab printer, such as the Carbon X1, this section provides a nice control panel with easy user interface built by Bumbu lab. It allows you to remotely control your printer, view the live feed through the embedded camera, update the printer's firmware, access the Micro SD card for models, record timelapses, and perform other essential tasks.
-
Project:
The Project section is for managing more complex 3D printing projects, especially those with multiple parts or build plates. While you might not need to use it for everyday printing, it becomes really handy when working on bigger projects.
For example, if you're designing something like an RC car with lots of parts, the Project section helps you keep everything organized. You can add details like who created the model, a description, a list of materials needed, and even assembly instructions. You can also save your slicing settings and note who created them if they weren’t your own.
The Project section bundles all this information and the STL files into one package. This makes it easy to manage and share as a complete project. When you or someone else opens the file, everything is organized and ready to go, making the whole process smoother.
-
Calibration:
The Calibration section in Bambu Studio offers two specific tools: Flow Dynamics Calibration and Flow Rate Calibration. These options are designed to fine-tune your printer's settings, but they only work with Bambu Lab printers and are not compatible with printers from other manufacturers.
Unlike OrcaSlicer, which provides a comprehensive range of calibration options that work with a wide variety of printers, Bambu Studio's calibration tools are more specialized and limited to Bambu Lab machines. For more detailed guides on how to use these calibration features, you can refer to the Bambu Lab Wiki:
These resources provide step-by-step instructions to help you get the most accurate and high-quality prints from your Bambu Lab printer.
Toolbar Functions:
The toolbar at the top of Bambu Studio provides quick access to essential tools, enabling you to perform a variety of functions with ease:
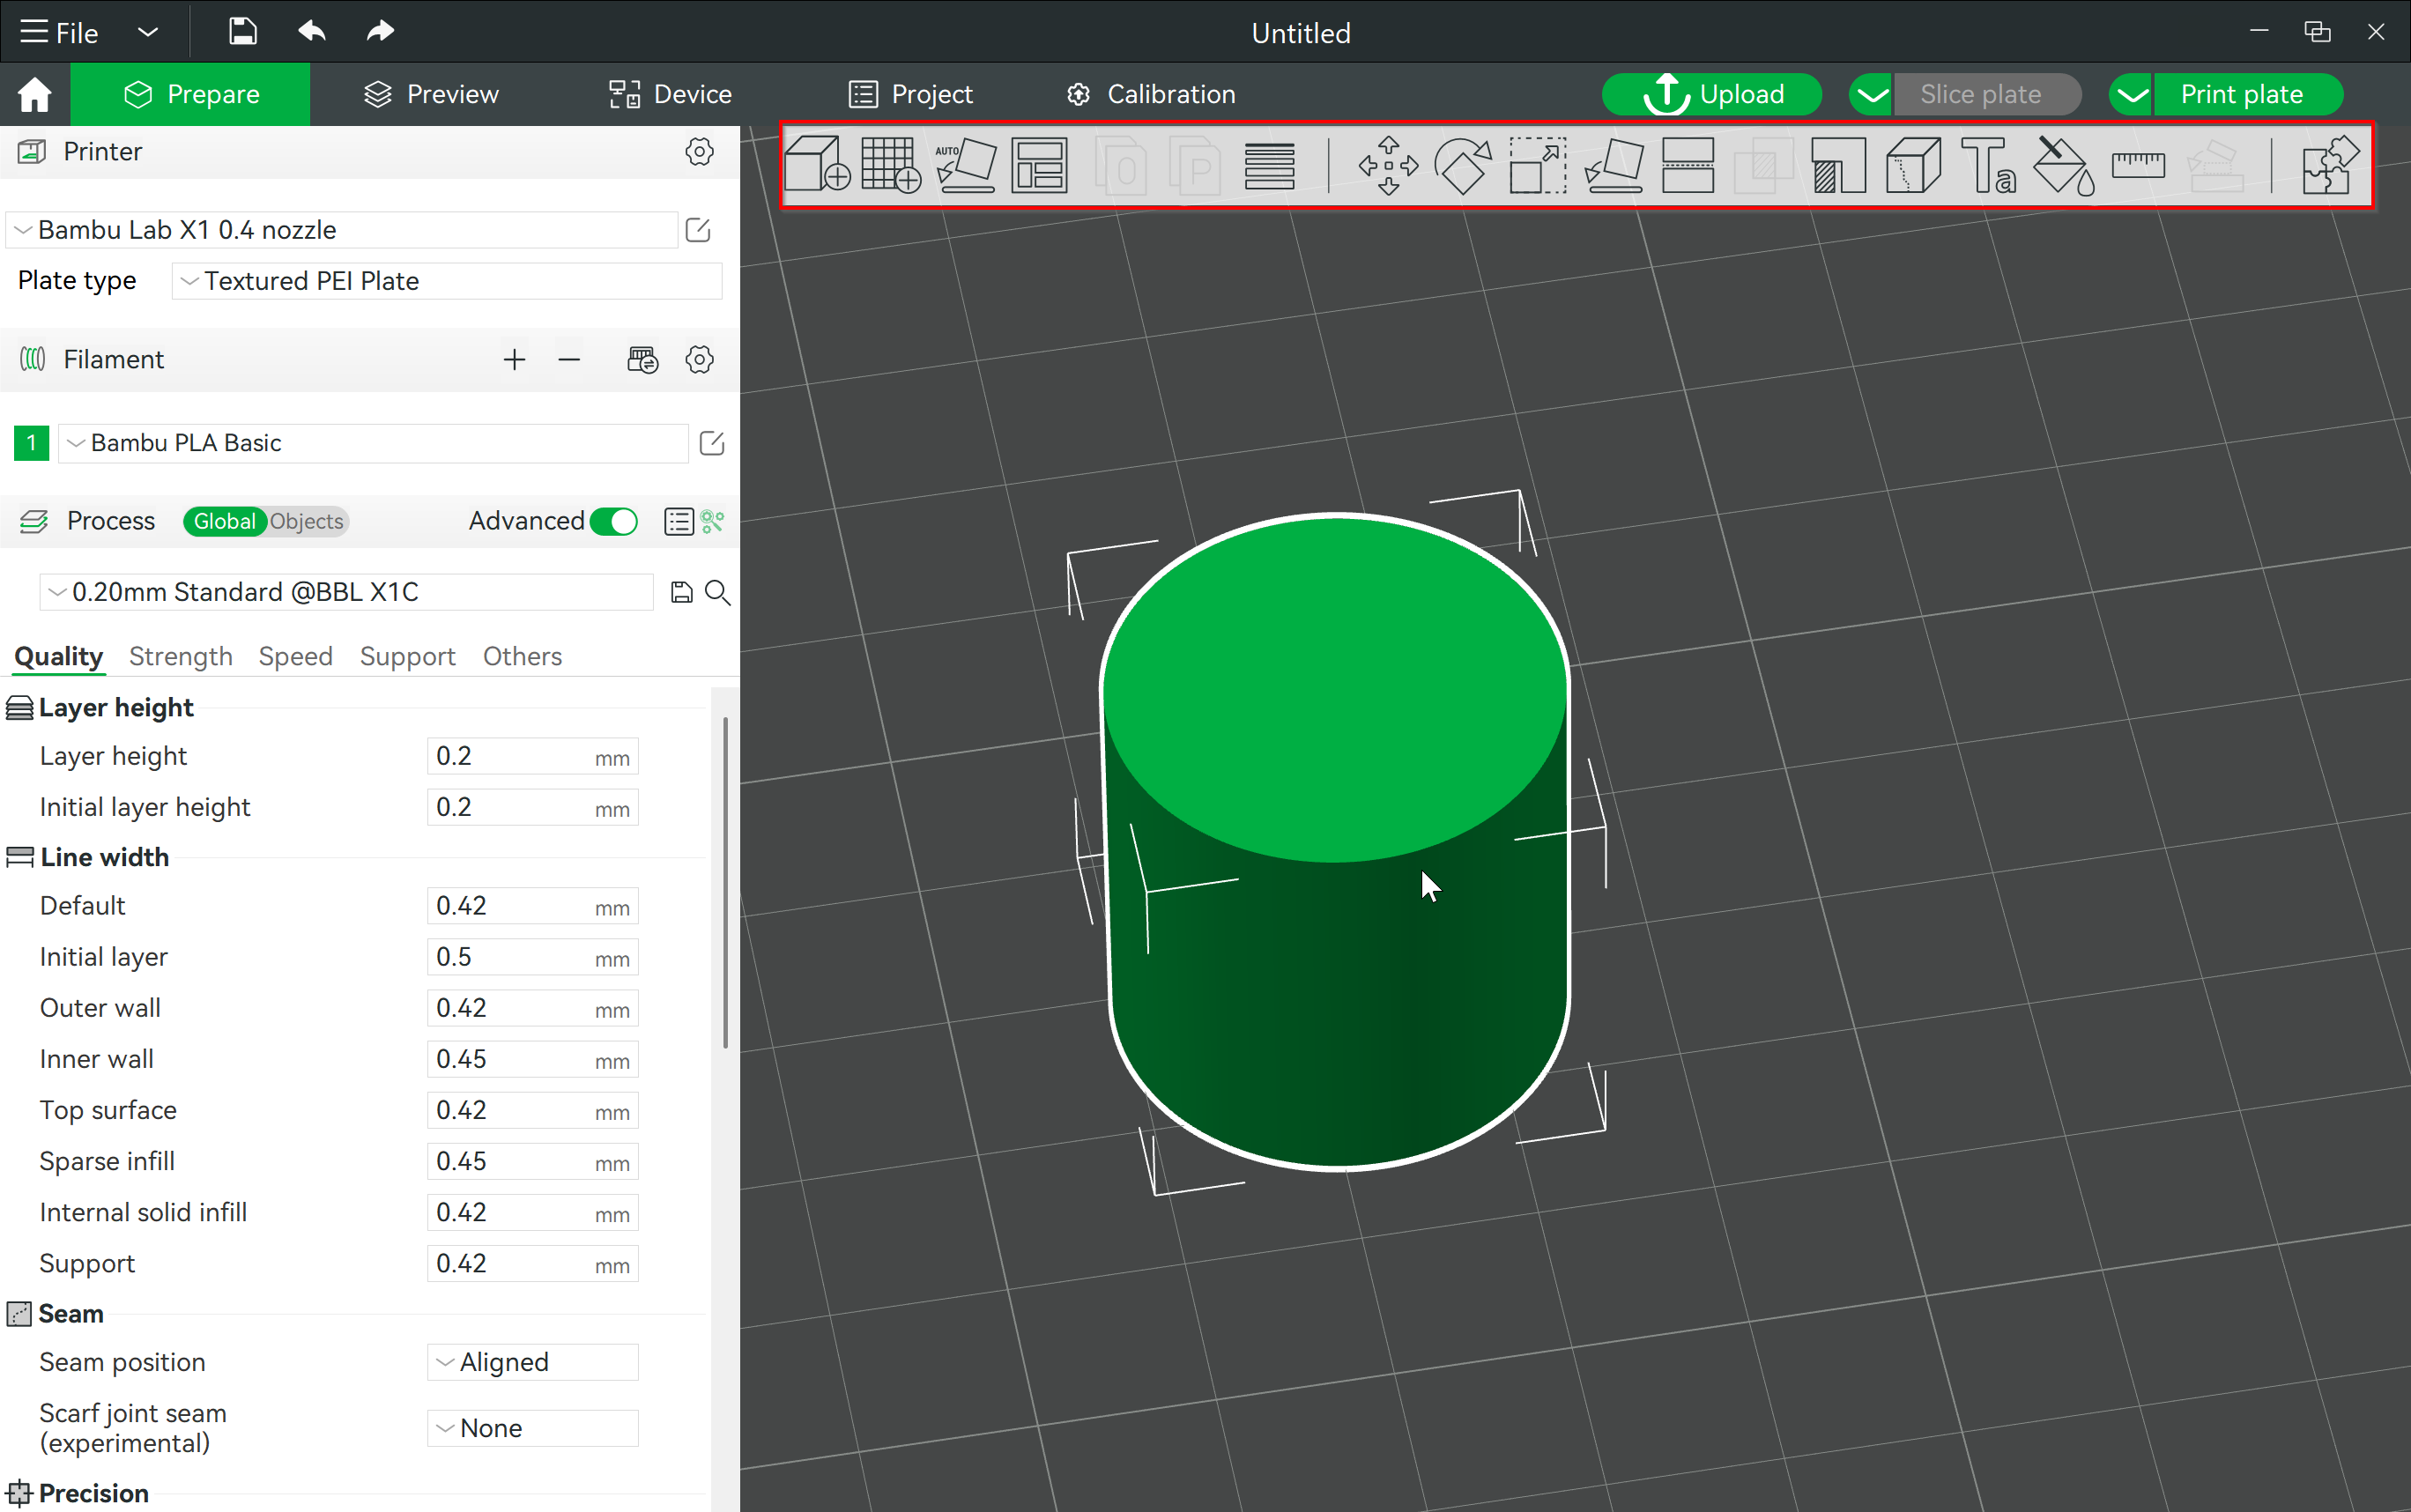
- Add Object: Import additional objects onto the build plate for printing.
- Add Build Plate: Manage multiple build plates within a single project, which is especially useful for large or multi-color prints.
- Auto Orientation: Automatically position the object in the optimal orientation for printing, minimizing the need for manual adjustments.
- Arrange Objects: Automatically arrange multiple objects on the build plate for efficient use of space.
- Split to Objects/Parts: It lets you break a model into separate pieces, making it easier to print, color, or adjust settings for each part, especially for complex or multi-color prints.
- Variable Layer Height: This tool helps you adjust the layer height in different parts of the model to optimize print quality and speed, especially on curved surfaces, by lowering the height where more detail is needed while keeping it higher elsewhere to save time.
- Move: Shift the model to a different position on the build plate.
- Rotate: Turn the model around to change its orientation.
- Scale: Resize the model to make it bigger or smaller.
- Lay on Face: Automatically lay the model flat on the build plate with the face you choose for better stability during printing.
- Cut: Use the Cut tool to slice your model into parts by adjusting the cut plane's angle and position, which is helpful for printing large models, creating flat surfaces, or isolating specific sections of a model.
- Mesh Boolean: Perform complex operations like union, difference, and intersection on models to create new shapes.
- Support and Seam Painting: Control where supports and seams are placed, which is essential for achieving high-quality prints.
- Text Shape: Add custom text directly onto models with adjustable options for font, size, thickness, and more.
- Color Painting Tool: Apply different colors to parts of your model, useful for multi-color printing.
- Assembly View Guide: Offers a detailed view and instructions for assembling complex multi-part models.
Now that we've looked at Bambu Studio's user interface and basic functions, let's explore some of its standout features.
Standout Features of Bambu Studio
Bambu Studio offers several standout features that make it a powerful tool for 3D printing:
-
Multi-color 3D printing
Bambu Studio excels at multi-color printing, allowing you to easily add and manage multiple filaments. It offers a powerful "Color Painting" tool that allows you to easily prepare a multicolor print by painting your model exactly as you envision it. This tool becomes available once you've added multiple filaments to your settings. You can choose from various brush types and sizes to paint specific areas of your model, and use the section view to access hidden parts.
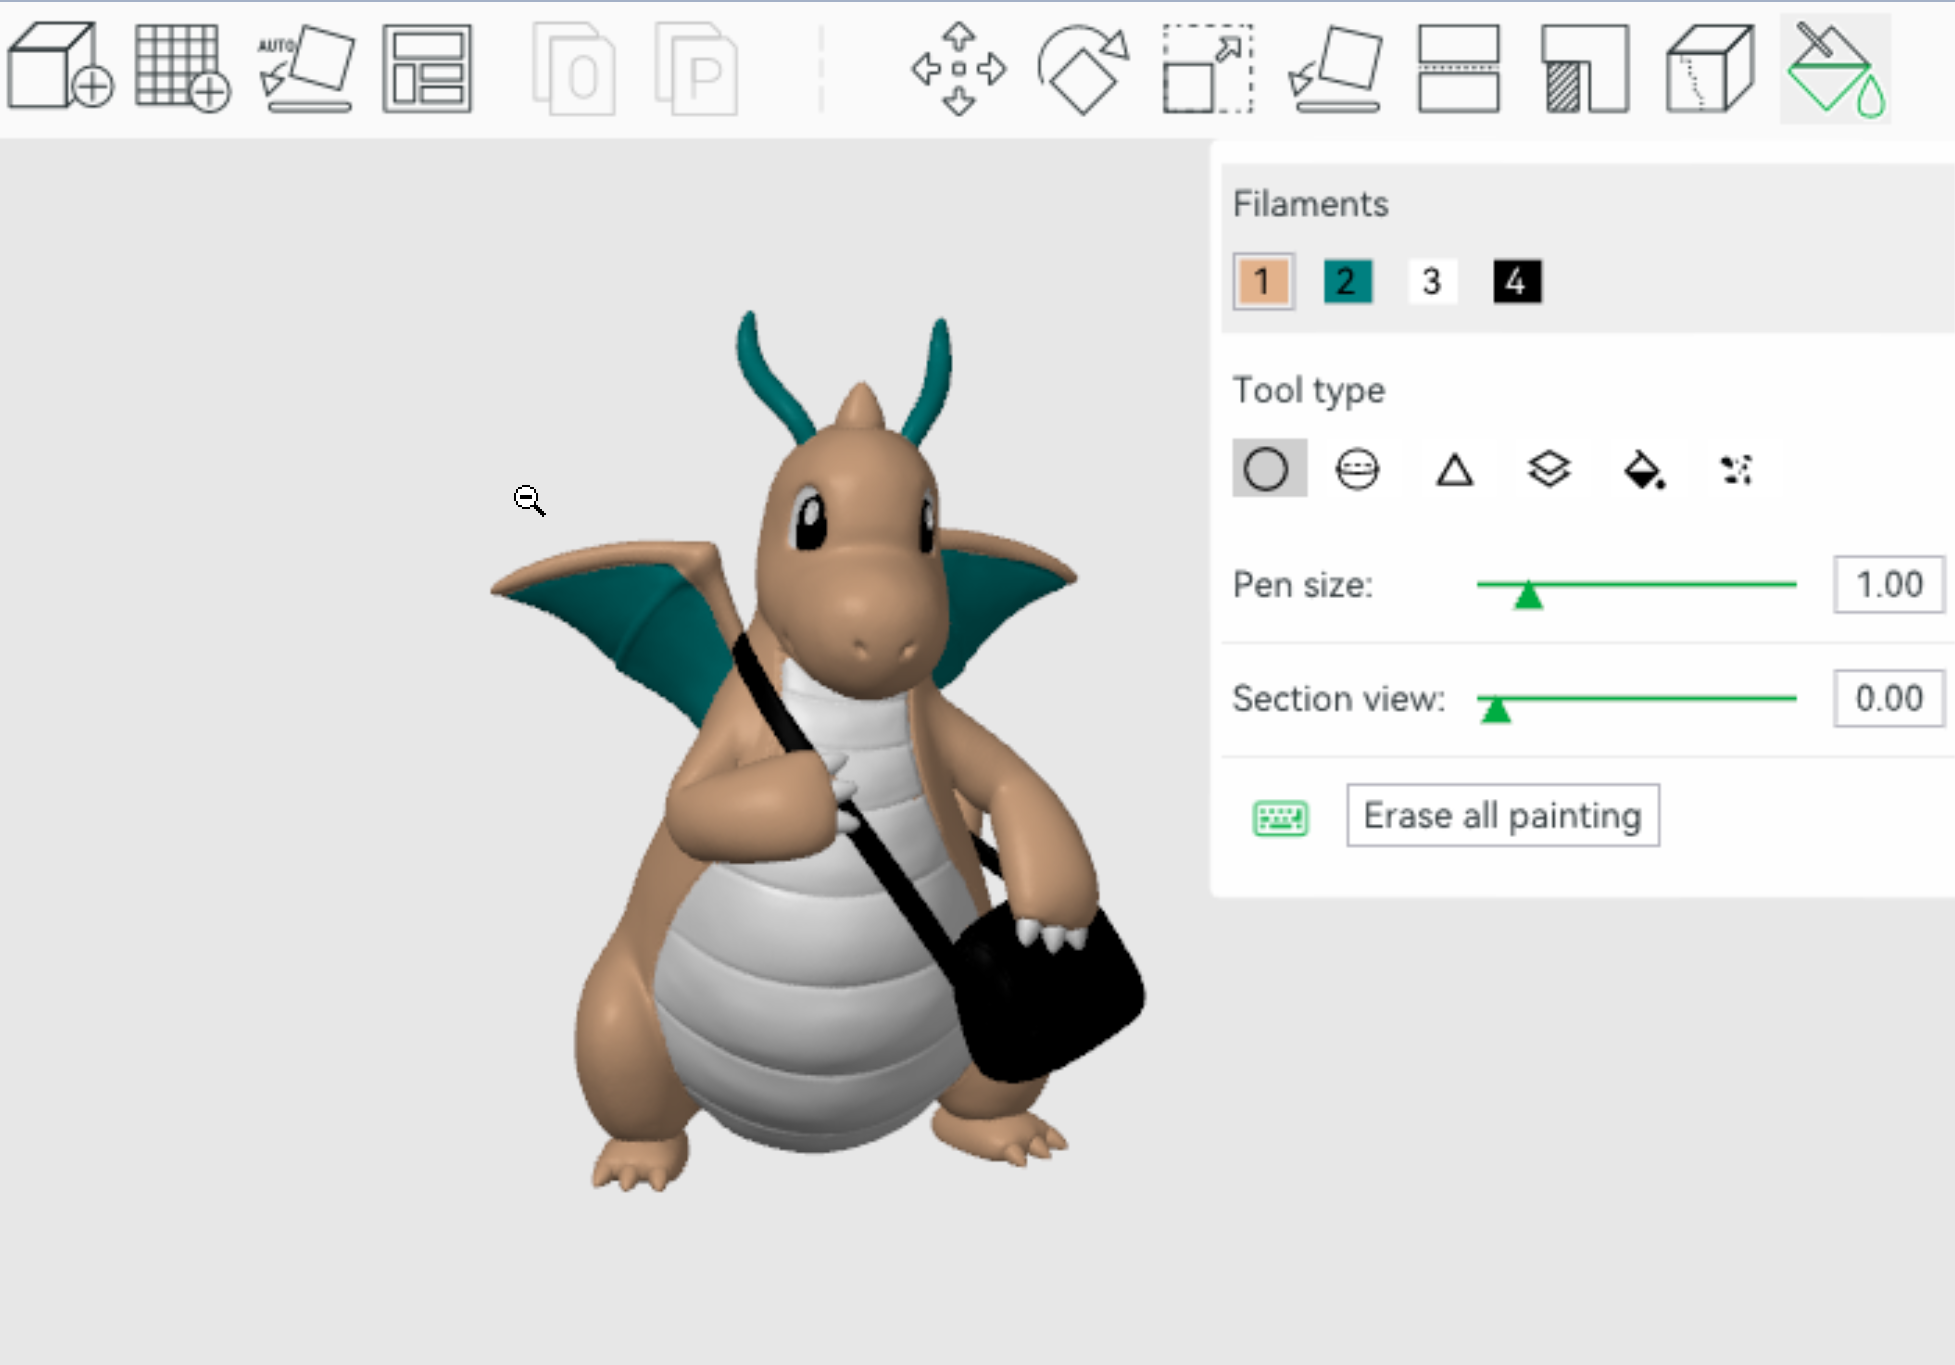
Source: Bambu Lab Wiki
Additionally, Bambu Studio lets you optimize filament usage by adjusting the flushing volumes for the purge tower. You can do this by clicking on the “Flushing volumes” setting in the “Filament” section, where you can enter custom values for color changes.
If you own an AMS, you can synchronize the filament list with the slicer by clicking on “Synchronize filament list from AMS.” The software will automatically recognize the AMS connected to your printer and download the filament data. To use this feature, ensure your Bambu Lab machine is connected to the slicer.
If you need a more detailed guide on multi-color 3D printing, you can visit their guide on the Bambu Lab Wiki.
-
Project-Based Workflow:
One of the most useful features of Bambu Studio is its project-based workflow, which simplifies managing complex 3D printing projects. This feature is particularly helpful when you're working with models that have many parts, like 3D printed RC cars or planes. Instead of juggling multiple files and trying to keep everything organized, Bambu Studio lets you manage everything within a single project.
You can organize your models across different build plates in one project, which is great if your model is too large to fit on one plate. You can easily move parts between plates, and the software helps keep everything in order. You can also switch between viewing individual parts and the entire assembled model, making it easier to see how everything fits together.
Bambu Studio uses the 3MF file format, which stores all the important details - like the 3D model, color settings, and assembly instructions - in one file. This ensures that nothing gets lost and all the information you need is in one place. This project-based workflow makes it easier to manage detailed and complex projects, helping you turn your ideas into finished prints.
-
Advanced Support Structures:
Bambu Studio provides advanced support options that help you handle challenging prints with complex overhangs. The software offers two main types of support structures: Normal and Tree supports, each with its own benefits.
Normal Supports are great for providing stable support by projecting the overhangs directly down to the build plate. They are reliable and offer strong support, especially for larger, flat overhangs where a solid base is needed. Normal supports can be set to different styles like Grid or Snug, depending on the level of detail and ease of removal you need.
Tree Supports, on the other hand, are designed to save filament and make support removal easier. Instead of directly projecting the support structure down, Tree supports use a branching system that only touches the model where needed. This not only reduces material usage but also minimizes contact with the model, making removal much simpler. Tree supports are particularly useful for prints with intricate or curved overhangs, where traditional supports might be difficult to remove without damaging the print.
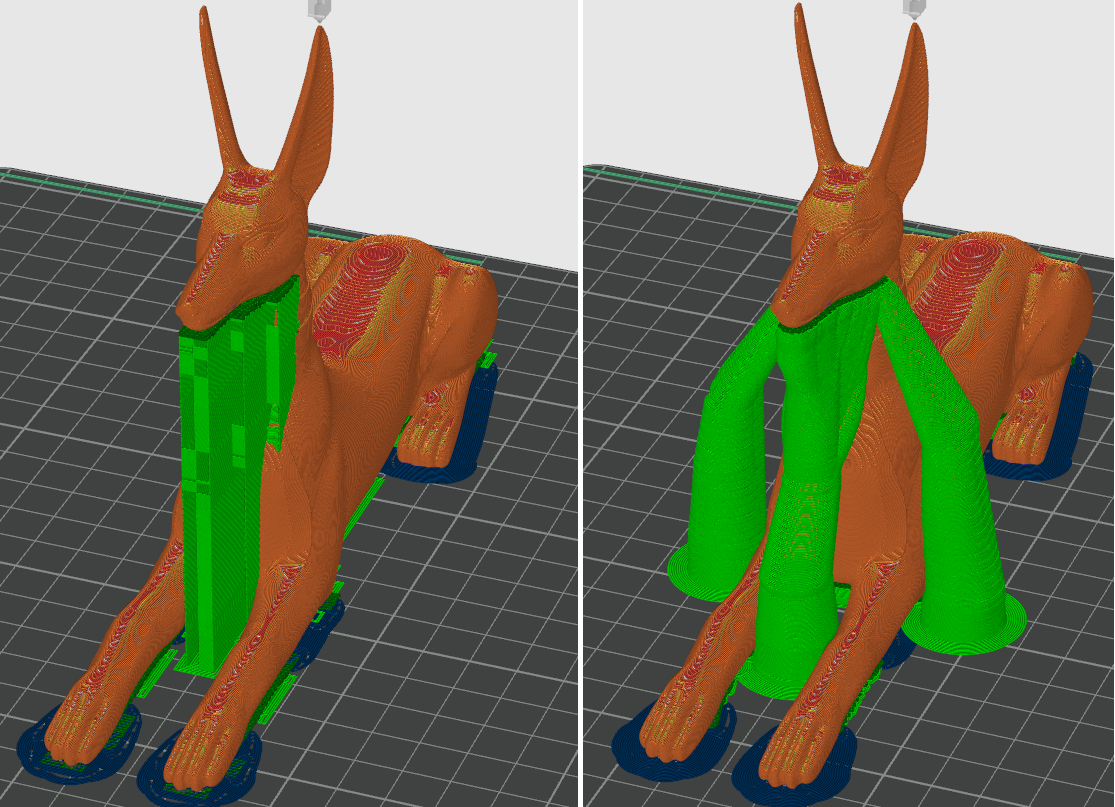
Bambu Studio also offers various support styles and customization options, allowing you to fine-tune the support structures according to the specific needs of your print. You can even control parameters like branch distance, diameter, and angle in Tree supports, giving you full control over the strength and ease of removal.
If you need detailed information about supports in Bambu Studio, you can read their guide on the Bambu Lab Wiki.
-
Filament Profiles and Customization:
Bambu Studio comes equipped with over 30 pre-configured filament profiles, covering a wide range of materials from standard options like PLA to more advanced materials such as PC and PETG-CF. These profiles include both generic options and specific brand materials, giving you flexibility in choosing the right filament for your projects.
Additionally, Bambu Studio allows you to create and customize your own filament profiles. This means you can easily switch between different materials without the need for manual adjustments each time.
-
Bambu Printer Live Streams:
The “Go Live” feature in Bambu Studio allows users of Bambu Lab printers to stream their 3D printing activities directly to platforms like TikTok or YouTube using Open Broadcaster Software (OBS). This feature is ideal for content creators who want to share their printing process with a wider audience.
To start streaming, Bambu Studio provides a virtual camera tool that can be easily set up. Once activated, you can stream live video from your printer’s camera. Even if you close Bambu Studio, the stream continues to run in the background. The software supports only one virtual camera stream at a time, so if you switch printers, the first stream will stop.
For OBS setup, you’ll need to configure the media source by linking to the virtual camera stream file (ffmpeg.sdp). This allows you to broadcast your live 3D printing sessions with ease. Detailed instructions for setting this up are available on the Bambu Lab Wiki. This feature makes it simple for creators to engage with their audience and showcase their work in real-time.
-
MakerWorld Integration:
MakerWorld is a new collaborative 3D model platform developed by Bambu Lab that integrates seamlessly with Bambu Studio.
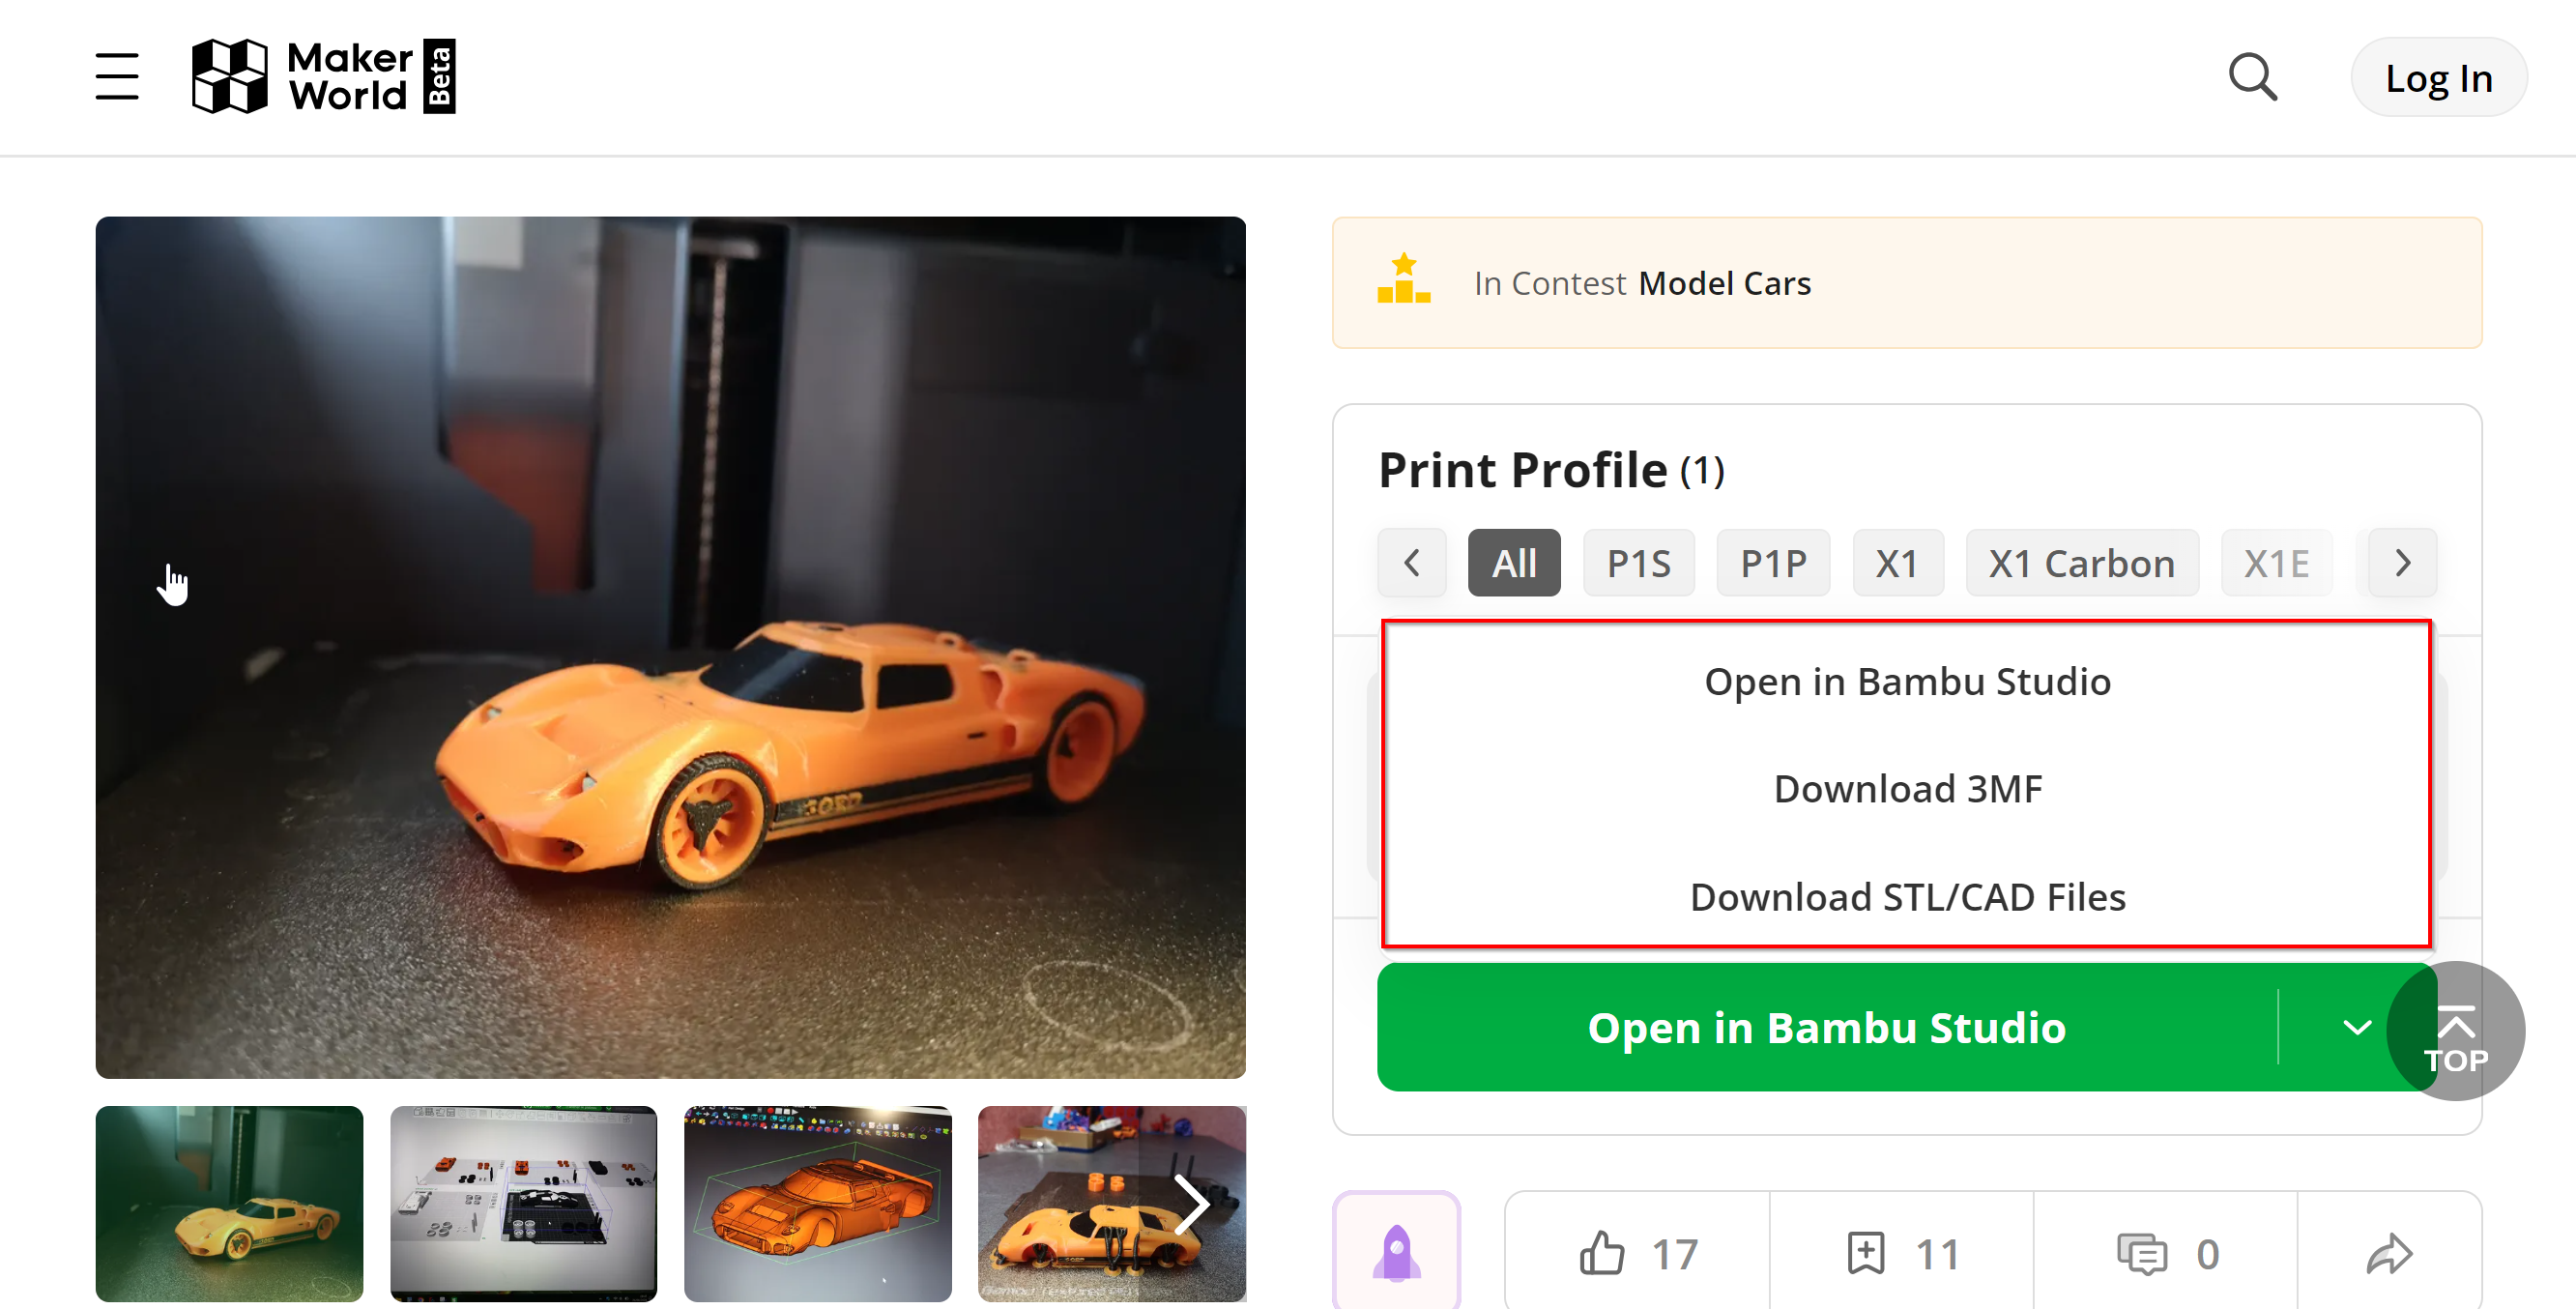
With MakerWorld’s integration, users can directly open models in Bambu Studio and access pre-configured slicing profiles, filament parameters, and print settings. This makes it easier to prepare and print models with tailored settings, all with just a single click.
-
3D Text Tool:
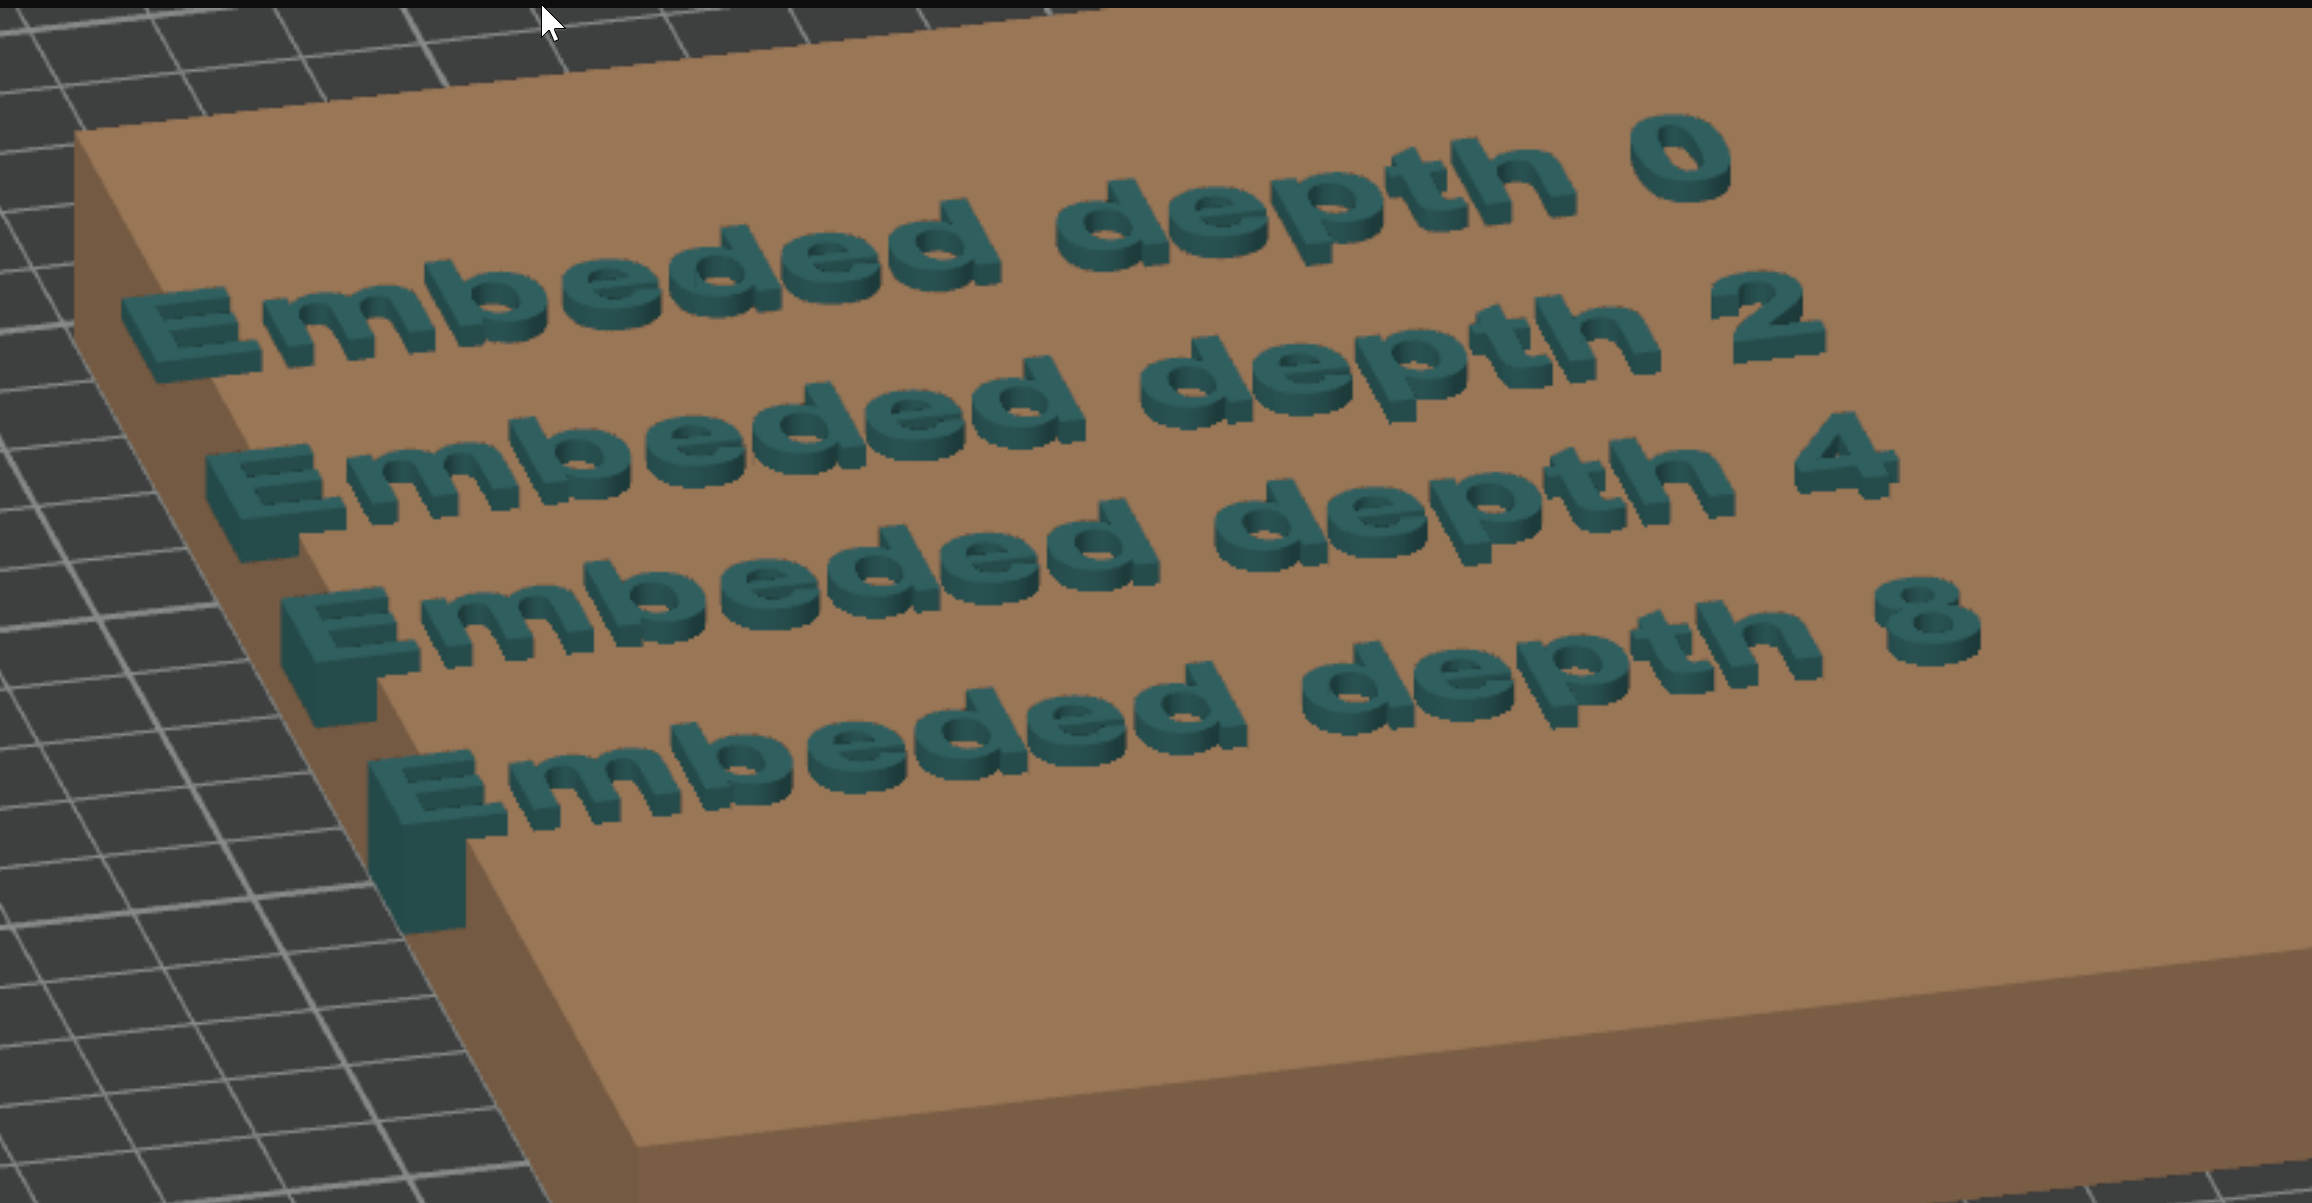
The 3D Text Tool in Bambu Studio makes it simple to add custom text to your 3D models. Whether you want the text to stick out (emboss), be carved in (engrave), or just sit on the surface of your model, this tool has you covered. You can place text on any surface, even curved or angled ones.
Source: Bambu Lab Wiki
What You Can Do with the 3D Text Tool:
Choose Your Font and Style:
The tool lets you pick from many popular fonts and customize them by adjusting the size, thickness, and spacing between letters. You can also make the text bold or italic, depending on the look you're going for.
Attach Text to Any Surface:
You can attach your text to any part of your model, whether it’s flat, curved, or angled. The text can be aligned to stay horizontal or follow the shape of the surface it's attached to.
Embed or Raise Text:
You can choose whether the text is engraved into the model (like a carving) or sticks out from it. You can also adjust how deep the text is embedded or how much it sticks out.
Create Custom Effects:
The 3D text can be turned into a negative part, which means it will create an indentation in the model. You can also make the text a different color or material from the rest of the model by using it as a modifier part.
Easy Placement and Alignment:
The tool allows you to move, rotate, and mirror the text easily, so it fits perfectly on your model. Mirroring the text is especially useful for making stamps or molds.
The 3D Text Tool is user-friendly and integrates smoothly into Bambu Studio, making it easy to add text to your designs without needing any other software.
If you want more detailed instructions on how to use the 3D Text Tool, you can check out the Bambu Lab Wiki for helpful guides and examples.
Bambu Studio and OrcaSlicer Community Support
When it comes to community support, both Bambu Studio and OrcaSlicer have active and engaged user bases, but they differ in how this support is structured and accessed.
Bambu Studio benefits from official support provided by Bambu Lab. This includes resources like a detailed FAQ page, an extensive wiki, and a community forum. Users can also access technical support directly through a ticketing system, which is particularly useful for resolving specific issues related to Bambu Lab products. The official resources and structured support make it easier for users to find reliable information and get help directly from the developers.
OrcaSlicer, being a community-driven project, relies heavily on community-based support. The primary platforms for support include GitHub discussions, Discord channel, and Reddit group. These platforms allow users to share experiences, troubleshoot issues, and contribute to the ongoing development of the software. While OrcaSlicer doesn’t have the same level of official support as Bambu Studio, its active community ensures that users can usually find the help they need. The collaborative nature of the community also means that new features and updates often emerge quickly based on user feedback and contributions.
Now that we've taken a close look at both OrcaSlicer and Bambu Studio, let's explore when it's best to use each one.
OrcaSlicer is ideal for users who want maximum control over their printing process. It offers advanced customization options, making it perfect for those who like to fine-tune every aspect of their prints. The slicer’s calibration tools, like temperature towers and pressure advance tests, allow for precise adjustments that can significantly improve print quality. Additionally, OrcaSlicer is compatible with a wide range of printers, including those running Marlin or Klipper firmware, and supports various custom setups. Its strong community support through GitHub, Discord, and Reddit ensures that users can find help and resources easily.
Bambu Studio, on the other hand, excels in ease of use and integration with Bambu Lab printers. It’s particularly suited for users who prefer a more streamlined experience with robust default settings that work well right out of the box. Bambu Studio’s project-based workflow simplifies the management of complex, multi-part projects, and its integration with the Bambu Lab AMS makes multi-color and multi-material printing straightforward. The slicer also includes unique features like the “Go Live” streaming option and MakerWorld integration, making it a great choice for content creators and those using Bambu Lab hardware.
If you’re someone who enjoys deep customization and needs advanced calibration options, OrcaSlicer is the better choice. However, if you’re using Bambu Lab printers and prefer a user-friendly interface with seamless integration and advanced project management tools, Bambu Studio is the way to go.
FAQs
Q: Can I use OrcaSlicer with any 3D printer?
Answer: Yes, OrcaSlicer is compatible with a wide range of 3D printers, including those running Marlin or Klipper firmware. It also allows you to add custom printer profiles, making it flexible for various setups.
Q: Is Bambu Studio limited to Bambu Lab printers only?
Answer: No, Bambu Studio supports other 3D printers as well, including popular models like Creality and Prusa. However, it’s optimized for Bambu Lab printers, where it provides the best performance and seamless integration.
Q: Which slicer is better for beginners?
Answer: Bambu Studio is generally more beginner-friendly due to its straightforward interface and robust default settings that work well without needing much adjustment. OrcaSlicer, while powerful, may require more tweaking and is better suited for users who want to fine-tune their prints.
Q: How does community support differ between the two slicers?
Answer: Bambu Studio benefits from official support provided by Bambu Lab, including a detailed FAQ page, wiki, and a ticketing system for technical help. OrcaSlicer relies on community-based support through GitHub, Discord, and Reddit, where users share experiences and contribute to the software’s development.
Q: Can I do multi-color printing with both slicers?
Answer: Yes, both OrcaSlicer and Bambu Studio support multi-color printing. However, Bambu Studio excels in this area, especially when paired with the Bambu Lab AMS, which simplifies the process of managing multiple filaments.
Q: What makes OrcaSlicer stand out from Bambu Studio?
Answer: OrcaSlicer offers advanced customization options, including extensive calibration tools and support for a wide range of printers. It’s particularly appealing to users who want detailed control over their prints and who use non-Bambu printers.
Q: Does Bambu Studio offer unique features that OrcaSlicer does not?
Answer: Yes, Bambu Studio includes unique features like the “Go Live” streaming option, MakerWorld integration for easy access to pre-configured models, and a project-based workflow that simplifies managing complex print jobs, especially for multi-part projects.
Q: How often are updates released for each slicer?
Answer: Bambu Studio receives regular updates from Bambu Lab, ensuring ongoing support and compatibility with their printers. OrcaSlicer, being community-driven, also sees frequent updates, with new features and improvements often based on user feedback and contributions.
Q: Can I use Bambu Studio if I don’t have a Bambu Lab printer?
Answer: Yes, Bambu Studio supports a variety of third-party printers, including models from Creality and Prusa. However, the software is optimized for Bambu Lab printers, so you’ll get the best performance with those.
Q: How does OrcaSlicer handle printer calibration compared to Bambu Studio?
Answer: OrcaSlicer excels in printer calibration with its extensive menu of tools, such as temperature towers, flow rate adjustments, and pressure advance tests. Bambu Studio offers calibration tools but focuses mainly on Bambu Lab printers, providing fewer options for fine-tuning.
Q: Can I control my 3D printer remotely with these slicers?
Answer: Yes, both OrcaSlicer and Bambu Studio offer remote printer control capabilities. OrcaSlicer integrates with platforms like OctoPrint and Klipper, while Bambu Studio provides robust remote control, especially for Bambu Lab printers, through its embedded interface and the Bambu Handy app.
Q: Are there any privacy concerns when using these slicers?
Answer: OrcaSlicer includes a Stealth Mode option that disables all connections to Bambu Lab’s hardware management system and cloud services, offering enhanced privacy. Bambu Studio, while more integrated with cloud services, allows users to manage their settings to balance convenience and privacy.
Q: What file formats do OrcaSlicer and Bambu Studio support?
Answer: Both slicers support common file formats like STL, OBJ, and STEP for 3D models. They also support the 3MF format, which stores additional project details. Bambu Studio’s project-based workflow leverages the 3MF format to include slicing profiles and assembly instructions.
Final Thoughts
Choosing between OrcaSlicer and Bambu Studio depends on your specific needs and preferences. OrcaSlicer is ideal for users who want extensive control over their 3D printing process, offering advanced customization and calibration tools that cater to precision and flexibility. On the other hand, Bambu Studio shines with its ease of use, particularly for Bambu Lab hardware users, and its streamlined features for multi-color printing and project management. Both slicers have strong community support, but Bambu Studio offers more structured, official assistance. Ultimately, the right choice depends on whether you prioritize customization and control or simplicity and integration.
Also available in: Deutsch | Español | Français | Italiano | Nederlands | Polski | Português | Русский
