Orca Slicer’s Spiral Vase (Vase Mode): A Deep Dive
Introduction
If you’ve ever wondered how people create those gorgeously smooth, hollow prints that look like ceramic vases straight from an artisan’s studio, you’re about to discover their secret. It’s called Spiral Vase Mode, and it can turn your 3D printer into a wizard of single-wall printing. Picture your extruder gliding in one continuous loop around a shape, steadily building a spiral from the bottom up. Gone are the days of multiple perimeters, infill grids, and cluttered top layers. In their place, you’ll find a single, graceful helix of filament that forms a delicate but surprisingly impressive object.

For many 3D printing enthusiasts, vase-mode prints represent a sweet spot between practicality and artistry. They can be quick to produce, visually striking, and mesmerizingly smooth on the surface. In short, they’re different from your average print. And thanks to Orca Slicer—a slicer admired for its user-friendly design and flexible feature set—accessing Spiral Vase Mode has never been simpler.
This guide will walk you through everything you need to know about Spiral Vase Mode in Orca Slicer. We’ll talk about what it is, why it’s so popular, and how to set it up. We’ll also cover vital details about nozzles, layer heights, water-tightness, tricky designs, and the all-important calibration steps. By the end, you’ll be ready to bring your own vase-mode dreams to life. Whether that’s a lamp, a prototype shell, a decorative piece, or an actual vase you can put flowers in, is entirely up to you.
Let’s get started!
Why Go Spiral?
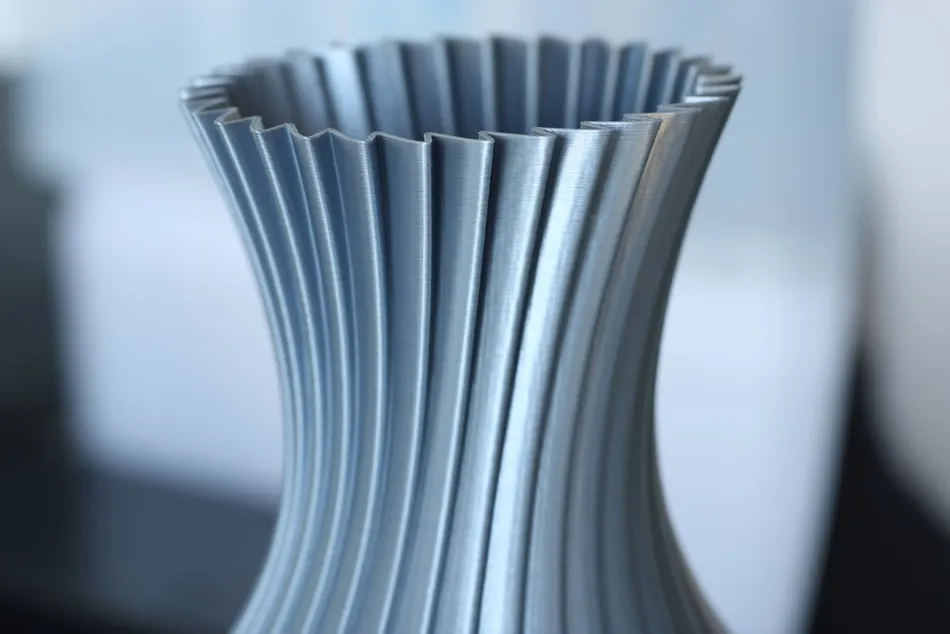
The concept behind Spiral Vase Mode is beautifully straightforward: instead of printing multiple layers and perimeters in the usual stacked fashion, the slicer generates a single continuous path that spirals upward. This means there’s no start-and-stop perimeter for each layer. Instead, the nozzle moves in a constant circular or oval pattern around the model, gliding ever higher with each rotation. It’s like watching a potter’s wheel in action, only driven by software instructions.

source: wevolver.com
One of the first things you’ll notice is how quickly these prints can come together. Typical 3D prints rely on multiple walls, infill, and top surfaces. Those extra layers all consume time and material. Vase mode eliminates them, which translates to fast turnaround and less filament usage. Imagine finishing a tall decorative piece in a fraction of the time it would normally take.
But the real show-stopper is the surface finish. Because the print is produced in a single, continuous outward loop, you won’t see a “seam” line that’s common where a typical perimeter starts and ends. The layers blend smoothly, often giving your object an almost ceramic-like look. This is perfect for decorative vases, planters, lampshades, and even wearable art. Many makers also love using vase mode for quick prototypes: if they only need the outer dimensions or shape, a hollow, single-walled print can give them that information fast.
Getting to Know Orca Slicer
Before jumping into the Orca Slicer. Built on the shoulders of other well-known open-source slicers, Orca Slicer offers a friendly interface that doesn’t skimp on advanced features. You’ll find powerful options for adaptive layer height, supports, and calibration. Yet if you’re new to 3D printing, you won’t feel overwhelmed, because the software is laid out in a way that makes sense: you pick a filament profile, choose your settings, and slice.
Orca Slicer also lets you preview your print layer by layer. This is especially handy in vase mode, since you can actually watch the spiral take shape in the 3D visualization. If something looks off—perhaps a strange gap in your model or a portion that’s bridging too far—you’ll catch it before hitting “Print.”
The slicer makes activating Spiral Vase Mode a breeze. You’ll see an option labeled “Special Mode” >> “Spiral Vase” in the "others" settings tap. Checking that box is your key to single-wall printing glory. Of course, once you do that, Orca Slicer automatically disables other features you no longer need. If you had top layers selected, it zeroes them out. If your infill was set to 15%, it now becomes zero. It also ensures you’re only using a single perimeter. This approach saves you from forgetting a crucial setting and accidentally destroying the spiral’s continuity.
Enabling Spiral Vase Mode
Let’s say you’ve got your Orca Slicer up and running. You’ve loaded a 3D model—a basic vase shape, a small bust, or perhaps a geometric container. Now you’re wondering how to tell the slicer you want the single-walled approach. Here’s how:
-
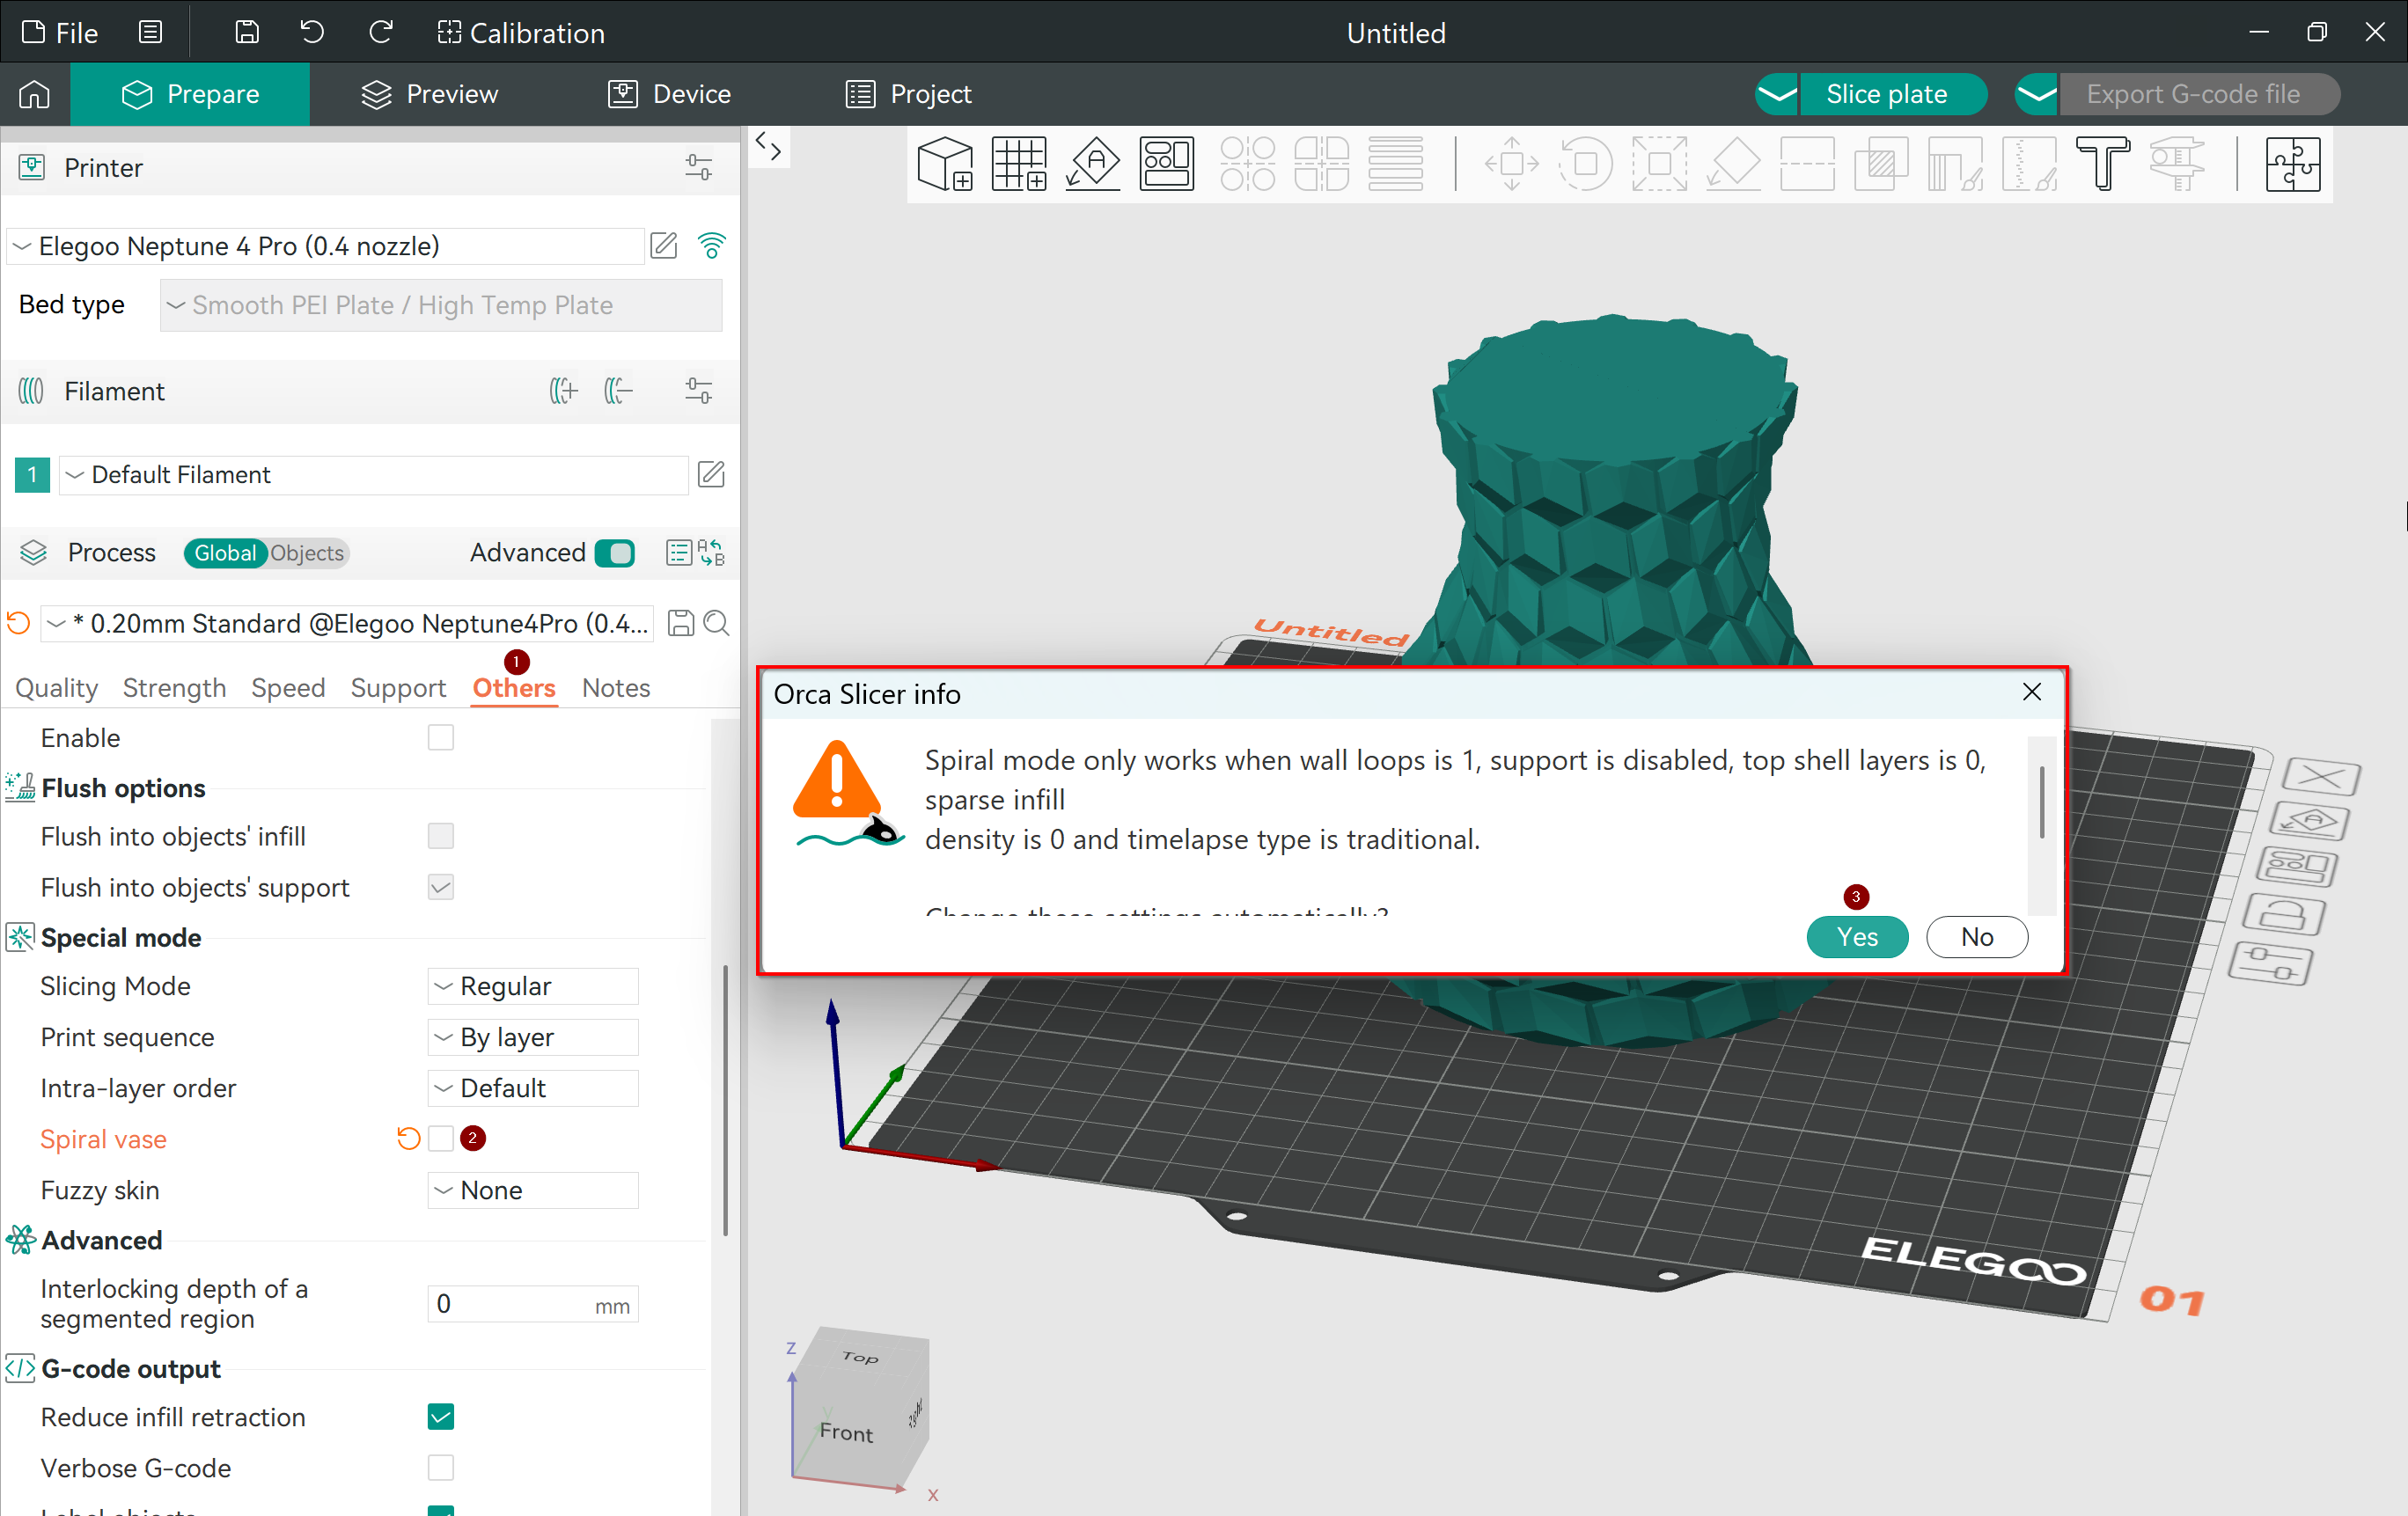
Go to the “Others” Tab
Look for a section that says “Special Mode.”
-
Check the Spiral Vase Box

Once you check that box, Orca will prompt you if other settings conflict with vase mode. Typically, it must set the number of walls to exactly one, turn off supports, set top layers to zero, remove any infill, and set the timelapse type to traditional. Confirm those changes.
-
Slice and Preview
When you hit the slice button, take a moment to watch the toolpath preview. You should see a single continuous outline swirling up from the bottom to the top of your model.
-
Save a Profile
If you intend to print in vase mode frequently, it’s smart to save these settings as a dedicated profile. Label it something like “Ender 3 Vase Mode” or “Orca Vase Profile,” so you won’t forget which parameters are in play.
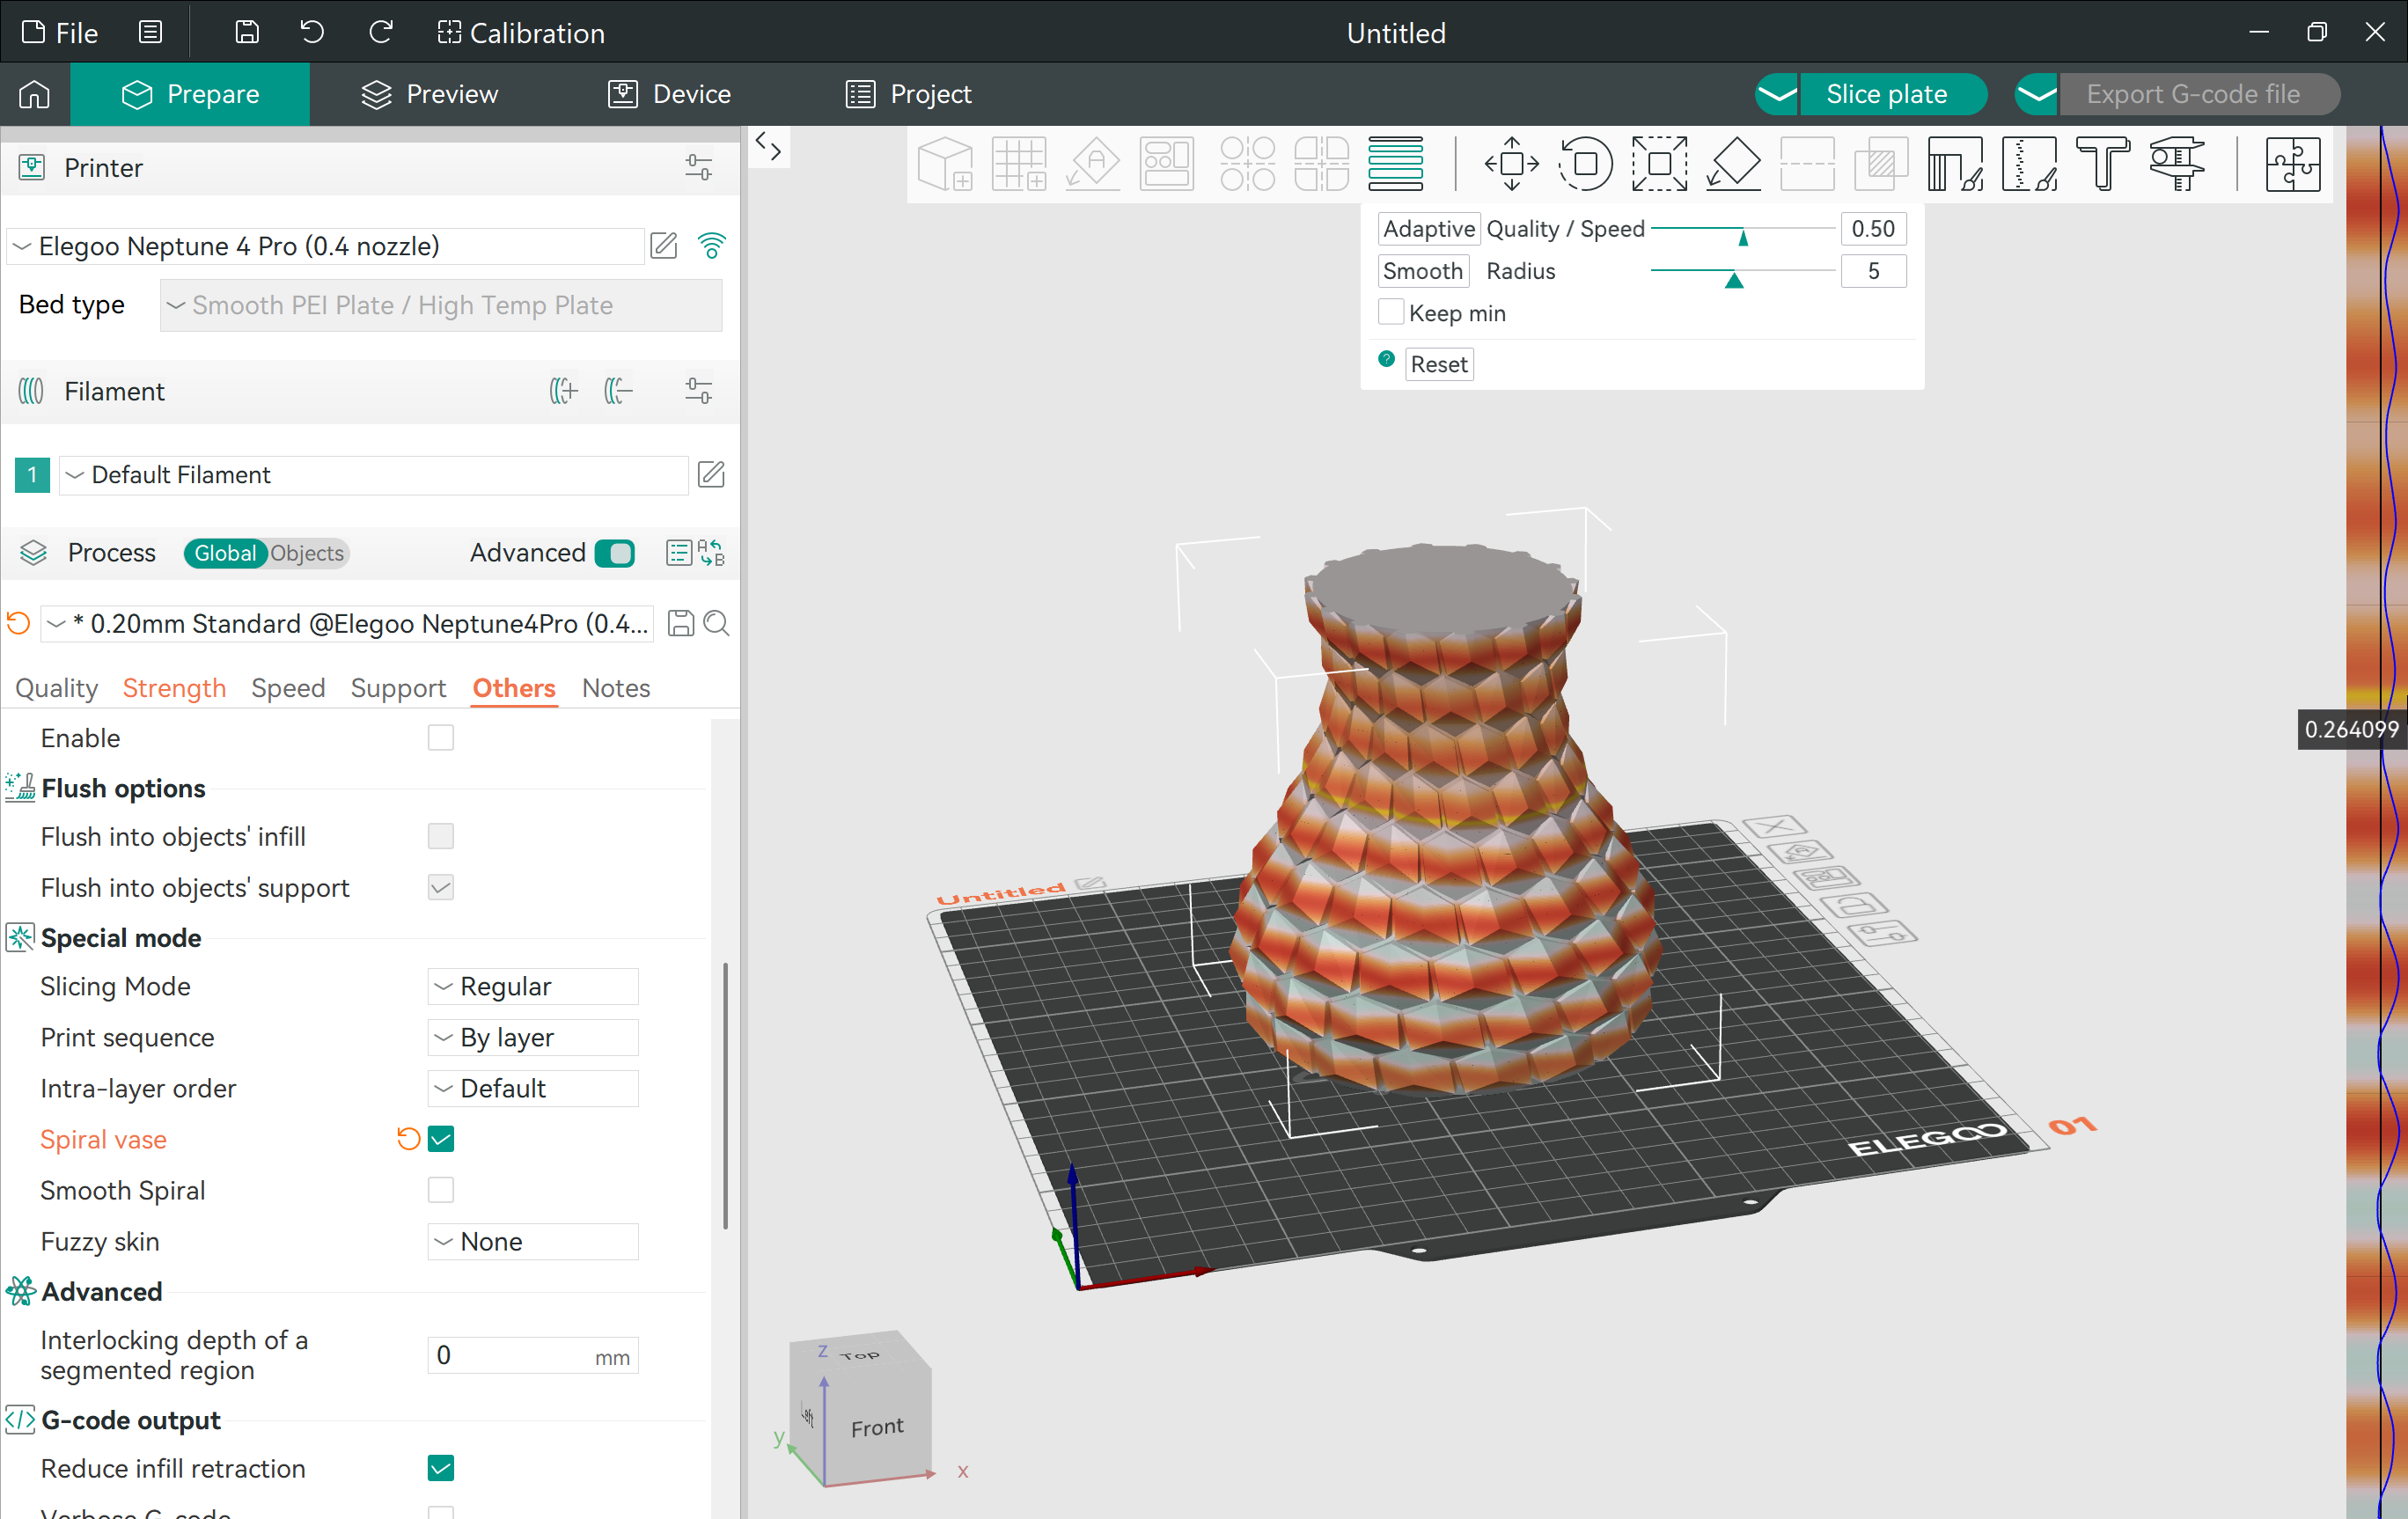
Within the same “Others” tab, you may find something called Smooth Spiral (parameter name: spiral_mode_smooth), which smooths out X and Y moves and can eliminate visible seams in the XY directions—even on walls that aren’t vertical. By enabling this option, a new option called Max X/Y smoothing will appear. The Max XY Smoothing parameter adjusts the maximum distance to move points in the XY plane to create a smoother spiral. You can set this in millimeters or as a percentage of the nozzle diameter. For example, setting this to 200% ensures smooth and precise transitions for curved designs.
And that’s it. You’ve initiated the simplest form of Spiral Vase Mode. However, to get truly great results, you’ll likely want to examine a few more considerations, like nozzle size, layer heights, and overall print speeds.
Choosing the Right Nozzle
Nozzle size can feel like a deep topic in 3D printing, especially if you’re just getting started. Most printers ship with a 0.4 mm nozzle, which is a fine all-around choice. However, if you plan to print in vase mode regularly—especially for functional containers that might hold water—you might benefit from a larger diameter like 0.6 mm or 0.8 mm.
Why does size matter? Because a single perimeter with a 0.4 mm line can be more fragile. Think of it as a thin wall that might flex or leak if you put it to serious use. A thicker nozzle deposits more plastic on each spiral pass, leading to a more robust wall that’s less likely to sprout tiny holes. That said, going bigger also makes your layer lines more visible and your corners slightly less crisp. It’s a trade-off between aesthetics and strength.
If you do stick with a 0.4 mm nozzle, there’s nothing wrong with that, especially for decorative prints. Just keep your expectations realistic. You may end up with prints that look gorgeous on a shelf but aren’t quite watertight. And if you do need them to hold water, you might consider a sealant or an epoxy coat after printing to plug any micro-gaps. We’ll talk more about water-tightness in a bit.
Understanding Layer Height
Layer height influences both the appearance and speed of your prints. For typical everyday prints, many people use a layer height around 0.2 mm, balancing detail with efficiency. In vase mode, the same rules generally apply, but here’s a twist: you can combine vase mode with adaptive or variable layer heights.
Let’s say your model features detailed curves near the top but a relatively straight cylinder near the bottom. You could use thicker layers (say 0.3 mm) for the simple cylindrical regions to shorten printing time. Meanwhile, the slicer can automatically apply thinner layers—like 0.12 mm—to the curved or intricate sections to preserve fine details. Orca Slicer will color-code these changes in the preview, typically showing thicker zones in one color and thinner layers in another.
This approach makes for faster prints that still look premium where it counts. You don’t waste hours printing a simple, flat area with super-fine layers. Instead, the slicer adjusts on the fly, giving your model a smooth finish on complex curves and a speedy process on simpler geometry.
Printing Tips for Water-Tight Containers
One question that always arises with vase mode is: “Will my print actually hold water?” The short answer is: possibly, but it depends. A single wall can leak if the filament isn’t laid down perfectly or if the layers don’t fuse well. If that’s your main goal—say, you’re making a functional flower vase—here are a few tips:
-
Use a Larger Nozzle
As mentioned before, a 0.6 mm or 0.8 mm nozzle helps lay down more plastic and reduces the risk of micro-gaps between layers.
-
Slow Down
Printing too fast in vase mode can lead to less consistent extrusion. Slowing your print speed ensures each new layer has time to bond to the previous one.
-
Increase Extrusion Temperature
Hotter filament tends to fuse better. If your usual print temperature is 200 °C for PLA, try 205 or 210 °C. Be cautious not to go so high that you get excess stringing or degrade the plastic, but a small increase can improve adhesion.
-
Slight Over-Extrusion
While over-extrusion can cause surface bumps, a slight increase in flow (2–5%) might help seal tiny gaps. Tweak carefully and monitor your print for lumps.
-
Post-Processing
If your container still leaks, sealing it with epoxy resin or a specialized 3D print sealant can make it waterproof. You can brush it on the inside, preserving the outer appearance.
It’s important to remember that the success rate can vary from one machine to another, and from one filament brand to the next. If you’re dead set on making a watertight vase, be prepared to experiment. Print small test samples—a short spiral tube, for instance—and fill them with water to see if they hold. Once you nail the right combination of speed, temperature, and flow, you’ll have a recipe for success.
Complex Shapes and Spiral Vase Mode
Vase mode doesn’t have to be limited to symmetrical cylinders. You can print decorative busts, curved sculptures, and a variety of geometric forms. The main condition is that the shape should allow the slicer to draw a single continuous perimeter from bottom to top. If there are features that “close” the top or overhang too far, you might need to alter the model.
Orca Slicer comes with a handy cutting tool. Suppose you have a 3D bust of a historical figure, but you want to hollow it out for use as a pencil holder. You can slice off the top portion in the slicer, leaving the interior open. You can also remove or tweak parts of the model that might require bridging or supports. Because vase mode doesn’t use support structures at all, any severe overhang might cause drooping plastic. With a bit of strategic cutting, you can convert a standard figurine into a shape that prints flawlessly in a spiral.
Another interesting angle is to leverage adaptive layer height for models with facial details or small decorative features. By applying finer layers in areas of high detail, you can preserve the sculpted look. Meanwhile, you can use thicker layers on large, flat surfaces to speed up the print. This hybrid approach can produce truly stunning vase-mode sculptures that show off your printer’s capabilities.
Common Pitfalls and How to Avoid Them
Under-Extrusion
You’ll notice it right away if your single wall has tiny holes or transparent gaps. Try increasing your flow slightly or lowering print speed. Double-check that your nozzle isn’t partially clogged.
Over-Extrusion
If lumps or blobs form on the outer surface, you might be pushing too much filament. Dial back your flow, or ensure your nozzle temperature isn’t making the plastic too runny.
Layer Shifts
Because vase-mode prints often become tall, layer shifts can occur if the printer’s belts or rods are loose. Make sure your hardware is stable and your bed is level. A slight brim can help keep the base anchored.
Inconsistent Layer Lines
If you see banding or odd stripes, the Z-axis of your printer might be wobbling, or your filament diameter might vary. Printing in vase mode exposes such issues because there’s only one perimeter. Keep your filament consistent and ensure the printer’s mechanics are aligned.
Poor Cooling
Tall, thin vase-mode objects may not have enough time to cool between layers. If the top begins to droop or get mushy, increase your part-cooling fan speed, or consider reducing print speed to let each layer cool before the next arrives.
Exploring Adaptive Layer Height in More Detail
One of Orca Slicer’s standout features is the adaptive layer height option, and it becomes particularly handy when printing in vase mode. Imagine you’re making a curved lampshade or a statue with a flowing robe. Certain spots require exquisite detail so that folds and curves look natural, while other areas are flat or plain and don’t need as many layers.
When you activate adaptive layer height, Orca Slicer analyzes the geometry of your model, automatically assigning thinner layers where details are complex and thicker layers where everything is straightforward. The result is not only a better-looking surface but often a reduced print time compared to just using the smallest layer height on the entire piece.

The slicer also includes a smoothing feature. If you’ve manually adjusted thickness on certain areas, you might create sharp transitions between thick and thin layers. The smoothing tool helps blend them so the nozzle gradually shifts from one thickness to another, preventing visible lines on the final print. For many people, adaptive layer height is the gateway to professional-quality prints without the tedium of uniform high resolution.
For a detailed guide, follow: Orca Slicer Adaptive and Variable Layer Height.
Speeding Up Prototypes
Vase mode isn’t just for pretty objects. Sometimes, you need a quick prototype of an enclosure or a container, and you only care about the exterior dimensions and feel. Instead of waiting hours for an infill-laden print, switch to vase mode for a fast, hollow shell. You can test ergonomics, ensure components fit, or check overall proportions in a fraction of the time.
While the single wall won’t withstand heavy force, it’s enough for a test fit or basic visual check. If changes are needed, you can revise your design in CAD and reprint another spiral shell. This rapid iteration cycle is particularly useful for engineers, product designers, or anyone who wants to hone a shape before committing to a final, sturdier piece.
Frequently Asked Questions
Q1: Do I always need to use a larger nozzle for vase mode?
Answer: Not necessarily. A standard 0.4 mm nozzle works just fine for decorative prints. A bigger nozzle is more about strength and potential water-tightness. If you’re aiming for sturdy or leak-proof containers, a larger diameter may help.
Q2: Can I print overhangs in vase mode?
Answer: Small overhangs might be okay, but major ones will droop or fail because there’s no internal support. You can sometimes reorient the model or slice off the problematic areas, but truly horizontal overhangs are usually a no-go.
Q3: How do I pause to change filament for a color stripe?
Answer: Most printers have a “pause at layer” feature in the slicer or firmware. Decide which layer you want the color change at, insert a pause command, then manually swap filament. Just note that the pause could leave a small mark when the nozzle restarts.
Q4: Are adaptive layer heights worthwhile for vase mode?
Answer: Yes. Adaptive layer height can save time while preserving detail, especially on curved or complex sections. It’s a powerful combo, giving you the best of both speed and resolution.
Q5: Does filament choice matter?
Answer: Yes. PLA is easy to print and comes in many colors, making it popular for decorative objects. PETG adheres better between layers, useful for water resistance. ABS can warp if you lack an enclosure, but if you’re set up for high temperatures, it offers durability. Each filament brings its own quirks.
Q6: How tall can I print in vase mode?
Answer: You can print as tall as your machine allows, but be aware that tall, thin prints are prone to wobbling. A stable printer frame, slower speeds, and possibly a brim for bed adhesion will help keep things steady.
Q7: Why is my print forming lumps or zits on the surface?
Answer: These lumps are often a sign of slight over-extrusion or temperature that’s a bit high. Lowering flow rate or adjusting retraction settings might clear it up. Keep an eye on whether your nozzle is building up excess plastic at specific points.
Q8: Can I calibrate specifically for vase mode?
Answer: Absolutely. Running a few small test spirals is a great way to dial in flow, temperature, and speed. Because you only have one perimeter, even minor mistakes are more visible, so taking time to fine-tune is worthwhile.
Conclusion
Spiral Vase Mode in Orca Slicer offers a thrilling blend of simplicity and elegance. It strips away complex printing elements—like infill and multiple perimeters—and focuses purely on a single, unbroken wall that climbs in a spiral. The result can be visually captivating, surprisingly quick to produce, and efficient in material usage. Whether you’re aiming to create a stylish flower vase, a custom lamp, a decorative art piece, or a hollow prototype, vase mode invites you to explore 3D printing from a refreshingly minimalist angle.
Above all, vase mode reminds us that 3D printing is as much art as it is science. Once you watch that spiral appear layer by layer, you might catch yourself marveling at how a single thread of melted filament can turn into something both delicate and functional. It’s a little slice of magic in your workshop, and Orca Slicer’s user-friendly interface makes it accessible to hobbyists and professionals alike.
Now that you know the ins and outs of Spiral Vase Mode, why not give it a try? Begin with a small, simple shape to dial in your settings. Then let your imagination run wild. Print a geometric lamp to cast intriguing shadows on your wall. Turn a figurine into an avant-garde pencil holder. Or push the limits with a tall showpiece that showcases your printer’s height capacity. The possibilities are vast, and as you hone your vase-mode techniques, you’ll find this seemingly simple approach can yield some of the most eye-catching, fastest, and most efficient prints you’ve ever made.
Happy spiraling!
