OrcaSlicer Seam Settings - How to Use It
A seam is an integral part of 3D printing. Its result of the layered manufacturing process works and gives a distinctive identity to the 3D printed part. However, a seam line detracts from the visual appeal of the model and, in extreme cases, can ruin the appearance of the part as well.
Orca Slicer has an entire section dedicated to seam settings in 3D printing. Using these settings, you can fine-tune the appearance of the seam line in your 3D prints and even make it completely invisible. Mastering these settings will significantly improve the quality of your 3D prints and make your work stand out from the rest.
In this guide, we'll dive into the essential seam settings in OrcaSlicer and show you how to access and adjust them for flawless 3D prints. Let’s seam it up!
What is a Seam in 3D printing?
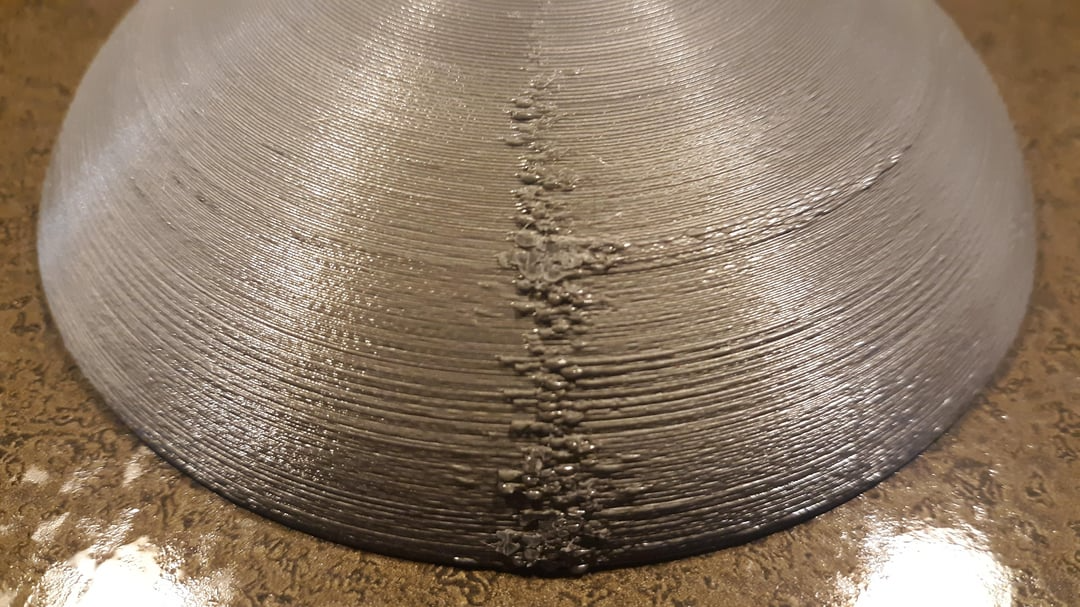
Source: HeyMarkedOne via Reddit
In 3D printing, a seam, also known as a Z-seam, is the small bump that appears where each layer starts and ends. When the nozzle moves up to start a new layer, it leaves behind a small amount of melted filament, creating a visible line along the Z-axis.
These seams affect the print’s visual quality and functionality especially in parts requiring tight tolerances. In the case of mating components, the parts may not fit together well because of a prominent seam line. Conversely, if the start and end points are distributed randomly over the print, they might look like blemishes and artifacts spread all over the print surface.
The visibility of seams depends on the model's geometry and print settings. Models with sharp corners can often hide seams better, as the seams can be aligned with the corners. In contrast, smooth and cylindrical shapes tend to make seams more noticeable.
By adjusting seam settings in OrcaSlicer, such as seam position, seam gap, scarf joint, and extrusion control, you can manage and minimize these artifacts for smoother, more aesthetically pleasing 3D prints.
If you're just starting with OrcaSlicer and want to learn more about it, check out our Getting Started with OrcaSlicer guide. It's a great place to begin and will help you understand the basics. From there, you can find more articles on different topics that will help you improve your 3D printing skills and make the most of OrcaSlicer.
Seam Settings in OrcaSlicer
Understanding the various seam settings and options in OrcaSlicer is crucial for achieving flawless 3D prints. In this section, we’ll delve into the Seam settings in OrcaSlicer that will leverage your technical knowledge and help you manage and minimize seams effectively.
Seam Position
Choosing the proper seam position is crucial for minimizing seam visibility. OrcaSlicer provides four options –
Aligned

In the aligned setting option, the new layer starts near the starting point of the previous layer. This results in the start-end point being the same, resulting in a straight seam line that runs along the height of the 3D print.
It’s an ideal option for models with uniform and edged surfaces where a straight seam can be easily hidden. However, on highly detailed or contoured models, this setting creates a visible line running along the entire print.
Nearest

With this setting, the nozzle begins extrusion at the nearest edge of the current layer. In models with sharp corners, the seam line is hidden along the edge of the 3D model. If the slicer does not find any sharp corners, it defaults to the aligned seam setting option.
This method effectively conceals seams on angular or complex models but may be less effective on smooth, curved surfaces.
Back

This option places seams on the back part of the model relative to the printer's perspective. Typically, it’ll align the seam near the end of the print bed (Y-axis).
You can choose the side and location of the seam by orienting the model in OrcaSlicer and reducing its visibility.
Random

This setting in OrcaSlicer randomizes the starting point for each layer, spreading the seams across the surface of the model. This option reduces the visibility of a continuous seam line, but it creates a rougher texture with small blobs and zits appearing randomly across the print.
This setting is helpful for 3D prints where a uniform surface is less critical, and you need to reduce the overall visibility of the seams.
Seam Gap

Source: Orca Slicer Wiki
A Seam Gap in OrcaSlicer reduces the visibility of a seam line or any potential bumps by shortening the layered loop. It ends the layered loop slightly before its actual endpoint and prevents overlapping layers.
Standard Value
By default, this value is set to 10%, which is sufficient for most prints to reduce the seam overlap and minimize visible bumps.
Recommended Adjustment
If the default value does not hide the seam line sufficiently, increase the seam gap to 15%. This introduces a larger gap between the start and end point of the layer, reducing the visibility of the seam line.
Note: Be careful while increasing the seam gap value. A higher number doesn’t necessarily improve the print quality and would instead lead to gaps in the print, resembling under-extrusion. If you encounter this issue, try reducing the seam gap or adjusting the extrusion control settings in OrcaSlicer.
Scarf Joint Seam
The scarf joint feature in OrcaSlicer reduces the visibility of a seam line by creating a unique overlap of layers. It’s rooted in the woodworking and metalworking techniques in which the two ends of a joint overlap each other. This feature modifies the flow of the filament to blend the start and end points of each layer, resulting in a smooth surface finish. Here’s how you can make the most of it:
Scarf Joint Type

There are two options here – Contour and Contour and Hole. Use the Contour option if you’re 3D printing a model with lots of irregular contours. In case the model also has a hole, use the latter option.
Conditional Scarf Joint

This option selectively applies the scarf joint settings based on the geometry of the models on the print bed. If you have one model with sharp edges, OrcaSlicer will use the regular seam settings. For the other model with a contoured shape, it’ll apply the Scarf joint settings.
Conditional Angle Threshold
It is at the angle above that OrcaSlicer applies the Scarf joint settings to the model. The default value of 155 degrees works fine for most models, and you shouldn’t need to change this setting.
Scarf Joint Speed

Keep this speed below 100 mm/s to get the best quality results. While printing the scarf joint, a slower speed allows for smoother flow, resulting in an ideal scarf joint. You can set it as a percentage of your printing speed as well.
Scarf Start Height
It adjusts the height of the scarf joint for the layer. This value should be lower than the layer height for the model, and changing it won’t significantly affect the quality of the print. Keep it at the default 0 setting.
Scarf Around the Entire Wall

This setting will apply the scarf joint around the length of the entire outer perimeter. It modifies the flow for the outside wall, converting the layer as a whole to a scarf joint. It’s less than ideal and is not guaranteed to give quality results; it's best to keep it default.
Scarf Length

You can set the scarf length value using this setting. It sets the length up to which the filament flow is to be modified and can improve the quality of joints. Start with the default 20 mm value and adjust according to the print results.
Scarf Joint For Inner Walls

This option lets you apply the scarf joint to the inner walls of the model as well. It won’t make a massive difference to the quality of the seam, and you can leave it at the default setting if unsure.
Wipe on Loops

Source: Orca Slicer Wiki
The Wipe on Loops setting in OrcaSlicer moves the nozzle slightly inwards during the end of an extrusion move. This movement reduces the chances of blobs forming on the model, reducing the seam visibility. Enable this setting if you’re noticing too many zits on your model.
Wipe before external loops
When this setting is enabled, the nozzle extrudes the material inwards at the start of the outer layer. It minimizes the over-extrusion of the filament, reducing the chances of a seam line. You can keep this setting as default (unchecked) if the blobs aren’t considerable.
Seam Painting

Using OrcaSlicer, you can even customize the location of the seam line in your 3D prints. The seam painting feature lets you paint the seam location on the 3D model according to your preferences.
A brush tool lets you easily draw the seam onto the 3D model. You can choose the size of the brush to adjust the precision of the seam. This is an excellent feature to use if you want extra control over the seam location and the aesthetics of the model are important to you.
Vase Mode - No Seam 3D Printing

The Vase Mode, also known as Spiralize Outer Contour, is a feature in OrcaSlicer that eliminates seams by creating a continuous spiral path for the nozzle. This continuous extrusion produces a single-wall object with a flawless and smooth surface finish. It’s an ideal printing mode for aesthetic prints such as vases, lampshades, and sculptures with simple geometries and thin walls.
To enable it in OrcaSlicer, navigate to the “Others” tab in the “Process” section and select “Spiral Vase.” For best print results, ensure the print temperature is set higher than normal, and the print speed is lower than average. This will help the material flow smoothly and allow the layers to bind well.
Obico With OrcaSlicer

OrcaSlicer integrates with Obico seamlessly. Using the Device Tab in OrcaSlicer, you can view a live feed of your 3D printing process right in the slicer window. Coupled with Obico, and you can access, monitor, and manage your 3D prints from anywhere in the world.
Obico uses sophisticated AI failure detection algorithms that can inform you of print failure. It acts like a remote assistant when you’re away from the printer and keeps you updated on the print’s progress.
With Obico, you can upload G-code files, record time-lapse videos, and share the printing progress with your friends remotely. It’s completely open-source, and you can choose to run it as a Cloud server or set up your own Obico server for more control and customization.
Calibrating Conclusion
A seam is an inevitable part of the 3D printing process; it’s how the FDM process works. However, using the above settings in OrcaSlicer, you can minimize the side effects of a seam in 3D printing and get better-quality parts.
Proper calibration is also essential to minimize the seam. To dial down the appearance of a seam line, calibrate the pressure advance, flow rate, and retraction settings in OrcaSlicer. Temperature tower tests and the Maximum Volumetric Speed Test in OrcaSlicer will also help you dial in the print quality for your 3D models.
Finally, carefully adjust seam positions to hide the seam line. Utilize features like seam gap and scarf joint to smoothen the 3D-printed surface. Enable the wipe-on loops option to reduce the blobs on the printed part, and experiment with seam painting for smoother and more aesthetically pleasing 3D prints.