Pressure advance calibration in OrcaSlicer: A Comprehensive Guide
Try JusPrin, the first GenAI 3D printing tool built on OrcaSlicer.
Overview of Pressure Advance
Imagine you're drawing with a pen that sometimes spills too much ink and other times barely any. In 3D printing, something similar could happen when your printer moves fast and changes its speed– it can mess up how much plastic comes out.
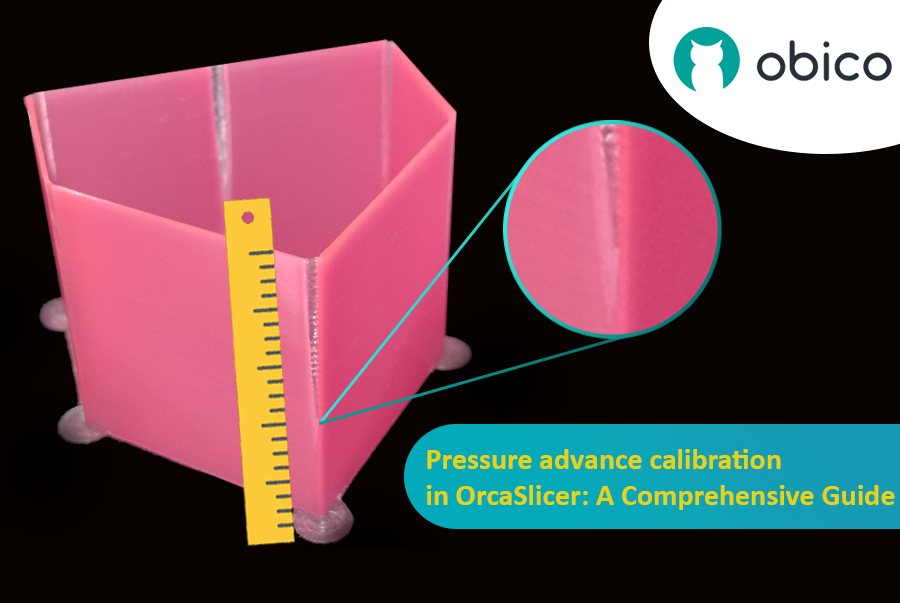
But why does your printer sometimes mess up how much plastic comes out?
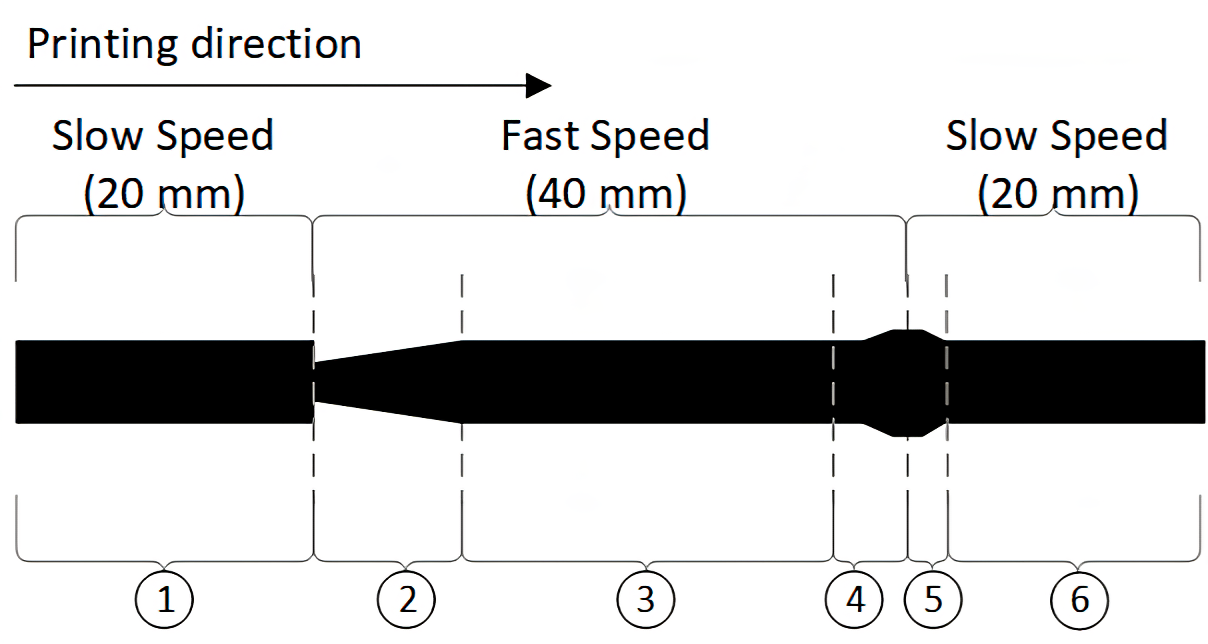
In a 3D printer, the filament comes out based on how much pressure is inside the nozzle. It's like a garden hose; you need enough water pressure before the water sprays out. When the printer speeds up or slows down, like when going around corners, it takes a bit for the nozzle pressure to catch up. If the printer moves too fast too soon, not enough filament comes out. And if it slows down too quickly, too much filament comes out. This can make the corners of your print look a bit messy because the printer didn't adjust the filament flow just right for the speed changes.
And here's where Pressure Advance steps in. It's a smart feature that compensates for these changes, ensuring the right amount of filament is extruded as the printer speeds up or slows down. With Pressure Advance, your printer can better handle speed transitions, leading to smoother, sharper prints, especially at those tricky corners.
You can see the following image for better understanding how under and over extrusion can happen during speed changes causing under extrusion or zits and blobs, and this is usually happening at the corners of the print where the printer changes its speed and direction.
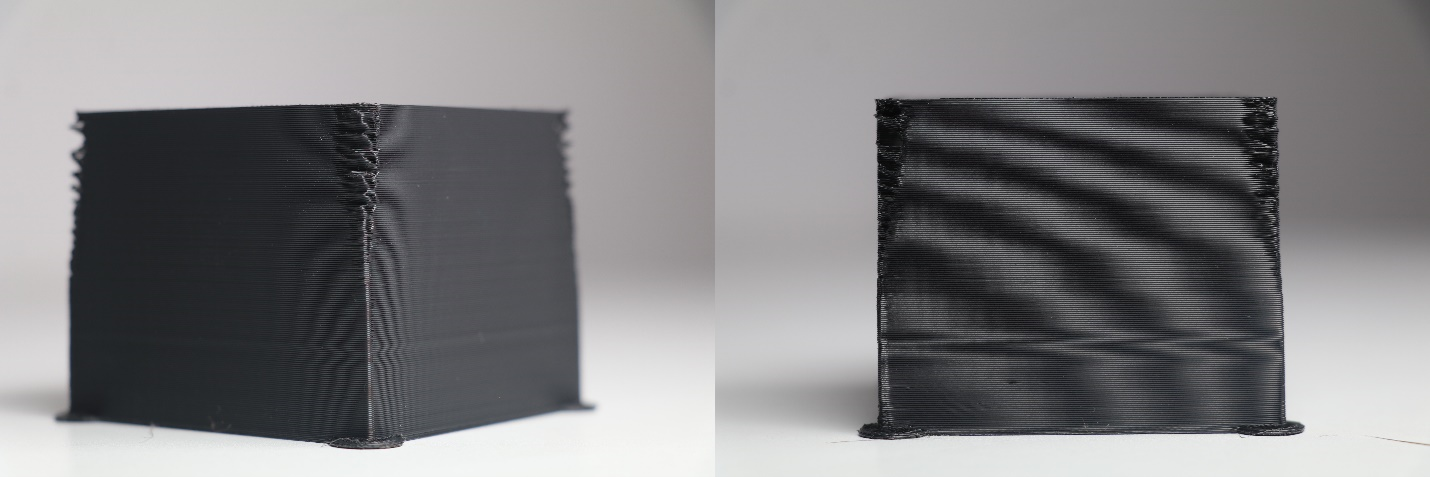
And for better understanding, let’s know what 0.016S pressure advance means?
The pressure advance value is measured by seconds. When Pressure Advance is set to 0.016s, think of it as telling your 3D printer to start getting ready 0.016 seconds before it needs to change speed. It's like giving your printer a tiny heads-up, so it can adjust how much plastic it pushes out, making sure it's just right for the speed it's going to be moving at. This helps your prints look cleaner and more detailed, especially when the printer is speeding up or slowing down.
In this guide, we will walk you through the steps to calibrate Pressure Advance in OrcaSlicer, explaining the importance of this process and how it can significantly enhance your 3D printing results. We'll cover different calibration methods available within OrcaSlicer, including their benefits and how to choose the right one for your setup. Plus, we'll touch on what OrcaSlicer is and why it's really handy for this kind of tuning.
Understanding OrcaSlicer and Its Role in Pressure Advance Calibration
OrcaSlicer is an open-source 3D printing slicer software designed specifically for FDM (Fused Deposition Modeling) printers. It has gained popularity within the 3D printing community due to its user-friendly interface and innovative features. Let’s explore what makes OrcaSlicer unique:
Origins and Development
OrcaSlicer is based on Bambu Studio, which itself originated from PrusaSlicer, which in turn evolved from Slic3r. This lineage highlights the collaborative power of open-source software in the 3D printing world. The mastermind behind OrcaSlicer is the GitHub user SoftFever. Since its first commit on July 16th, 2022, OrcaSlicer has become a highly-rated favorite among the community.
Clean and Modern UI
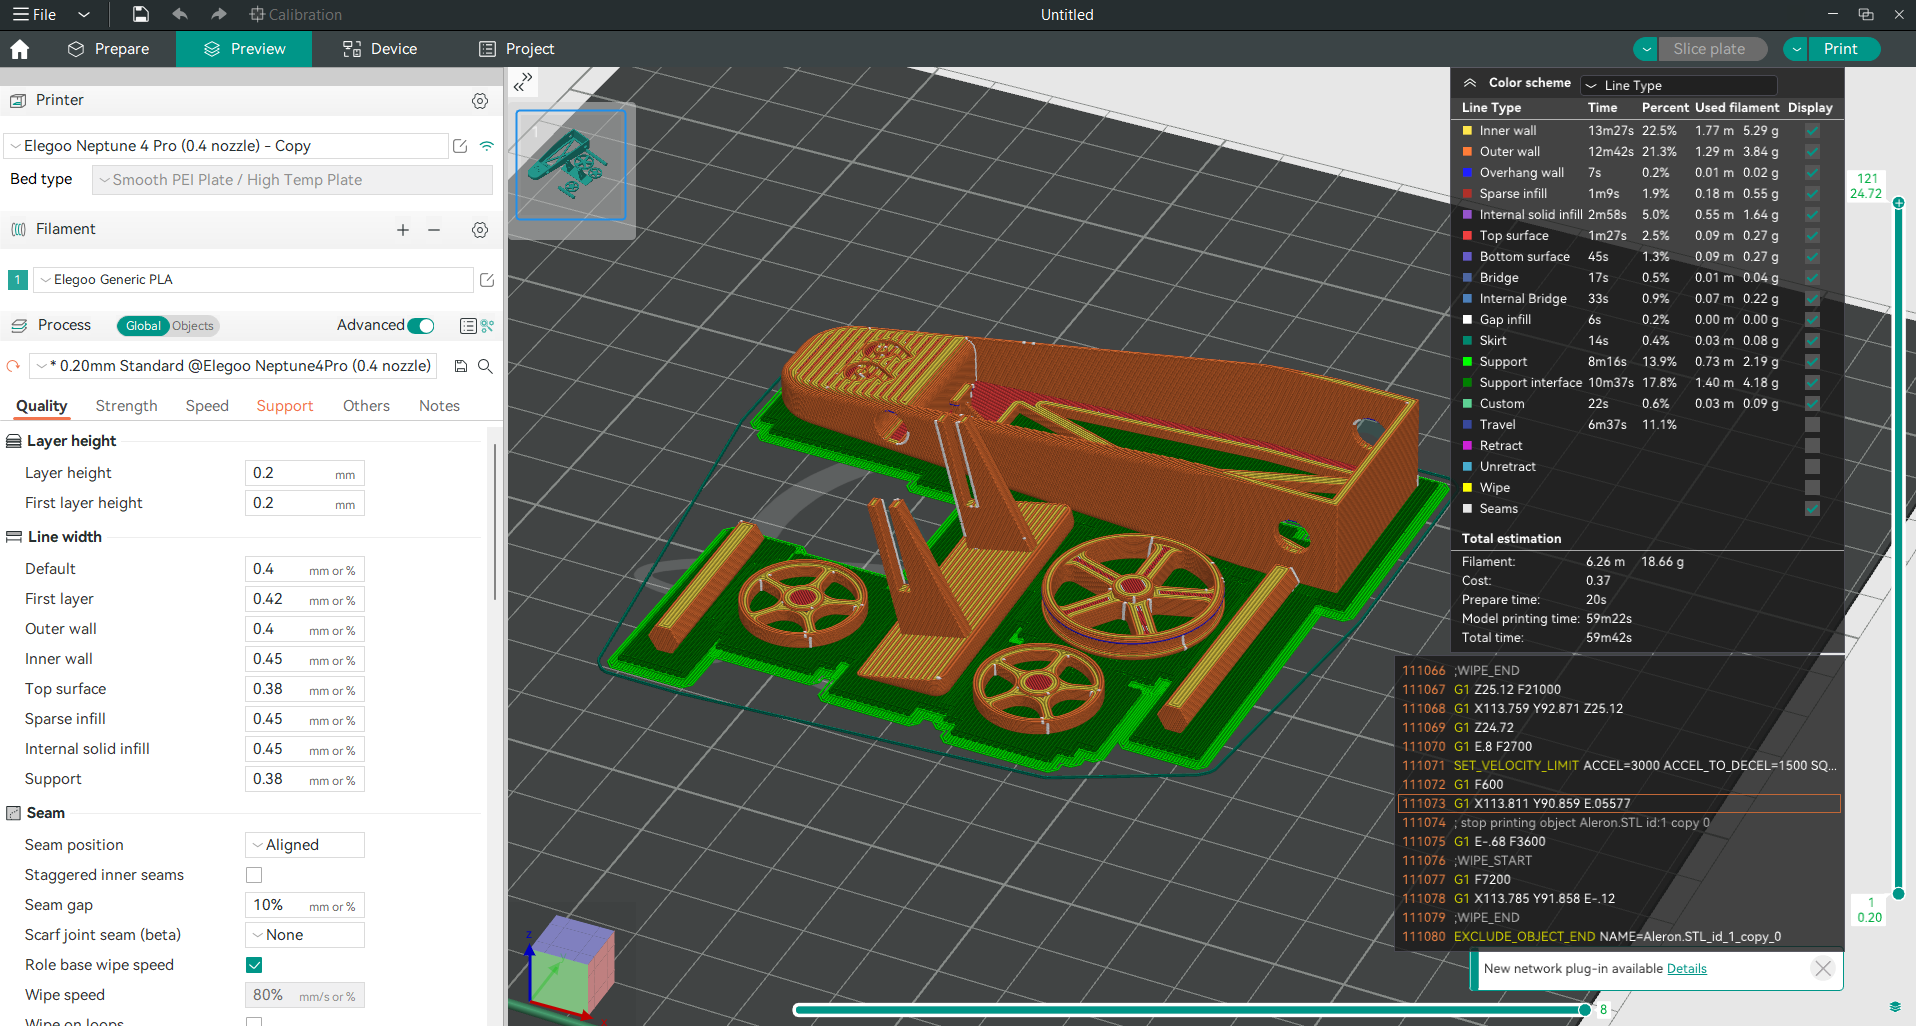
OrcaSlicer boasts an easy-to-use yet powerful interface suitable for both beginners and advanced users. Its all-in-one interface allows you to perform tasks such as positioning, slicing, preparation, sending, and monitoring your prints seamlessly.
Key Features
- Auto calibrations available for all printers.
- The Sandwich mode (an improved version of external perimeters first mode) enhances print quality.
- Precise wall settings ensure accurate results.
- Support for polyholes conversion simplifies complex geometries.
- Compatibility with the Klipper firmware expands its capabilities.
- Enjoy granular slicing controls for fine-tuning your prints.
- OrcaSlicer is also multi-language friendly.
OrcaSlicer is excellent for fine-tuning Pressure Advance because it includes several built-in tools for various calibration processes and provides three methods to calibrate Pressure Advance value in an easy way based on your printer setup. You can then update this value in OrcaSlicer and get awesome successful prints.
Platform Availability
OrcaSlicer is accessible on Windows, Mac, and Linux platforms. You can download the latest stable or nightly version directly from the GitHub page.
Comprehensive Guide
If you’re intrigued by OrcaSlicer and want to explore it further, check out our comprehensive guide. It covers the basics and offers links to additional articles that will help you advance your skills with OrcaSlicer.
What is Pressure Advance?
Pressure Advance is a control feature used in 3D printing to improve the quality of prints, especially at high speeds, by managing how filament is extruded during changes in print speed. Essentially, it adjusts the extrusion rate to compensate for the delay in pressure changes within the extruder. When your printer speeds up or slows down, Pressure Advance increases or decreases the amount of filament pushed through the nozzle slightly ahead of time. This anticipatory adjustment ensures a consistent filament flow, matching the printer's movements.
Difference between Pressure Advance and Retraction
Retraction
Purpose: Retraction is designed to combat oozing and stringing, which occur when excess filament leaks out of the nozzle as it moves between printing areas (non-print moves).
How It Works?
When the print head moves from one section of your model to another without extruding plastic, retraction pulls the filament back slightly. This temporary retraction of the filament prevents it from dripping out of the nozzle during the travel move. After reaching the start of the next print area, the filament is pushed back (re-primed) to resume printing.
Key Focus: Retraction mainly deals with reducing unwanted filament strings between separate parts of a print, ensuring cleaner finishes.
Pressure Advance
Purpose: Pressure Advance improves print quality by compensating for the inertia of filament flowing through the extruder and nozzle during speed changes. It’s particularly effective in managing issues related to the acceleration and deceleration of the extruder movement.
How It Works?
Pressure Advance adjusts the extrusion rate preemptively before speed changes occur. For instance, it increases extrusion slightly before a speed up and decreases it before slowing down. This proactive adjustment ensures consistent filament deposition, especially at the beginning and end of print moves.
Key Focus: Pressure Advance is focused on achieving uniform print quality and sharp corners by precisely controlling how much filament is extruded during the print’s dynamic speed changes.
If you're interested in exploring the advanced pressure features in depth, feel free to check out our comprehensive guide by following this link.
Benefits of Using the Right Value of Pressure Advance
Now that we understand what pressure advance is, let’s break down its benefits:
Sharper Corners
Without Pressure Advance, corners can become rounded or blobby as the printer slows down and changes direction. Pressure Advance keeps these corners crisp and clean by preventing excess filament from being extruded during deceleration.
Reduced Stringing:
Stringing occurs when filament oozes out of the nozzle while moving between sections of a print. Pressure Advance pulls back on the filament just enough during these sudden movements to minimize unwanted strings.
Consistent Extrusion:
By precisely controlling filament pressure, Pressure Advance ensures uniform extrusion across the entire print, leading to better surface quality and strength.
Improved Print Speeds:
With Pressure Advance, printers can operate at higher speeds without sacrificing print quality. It allows for faster print completion times without the usual drawbacks of increased speed, such as under-extrusion or blobbing.
Now that you know what pressure advance is, its benefits, and how it differs from retraction, let's move on to figuring out how to find the best pressure advance setting for your printer setup and material to achieve the best printing results.
Orca Slicer gives you three ways for pressure advance calibration. And it is important to note that each method has two versions: one for a direct drive extruder (DDE) and one for a Bowden extruder (Bowden). Make sure to select the appropriate version for your test.
Note: If you're using a Bambulab X1 or X1C printer, remember not to choose the 'Flow calibration' option while printing.
Calibration Methods for Pressure Advance in OrcaSlicer
1. The Line Method
The line method is a fast and simple way to calibrate your pressure advance value, but keep in mind, its precision relies a lot on the quality of your first layer. It's a good idea to enable bed mesh leveling and calibrate your first layer before starting this test.
Steps for the Line Method:
-
Choose Your Setup: Begin by selecting your printer, the type of filament, and the printing process you intend to use for the test.
-
Access Calibration Menu:
-
Open the calibration menu in OrcaSlicer.
-
Look for the pressure advance option.
-
A new window will appear, allowing you to specify whether you are using a Direct Drive Extruder (DDE) or a Bowden setup. Keep in mind that the test values depend on your extruder setup type.
-
For the line method test, choose PA line.
-
Leave the test values (start PA, end PA, and PA step) as they are.
-
Click OK to proceed.
-
-
Test Generation:
-
The test will be generated, but you won’t see it in the prepare window because it’s built as custom code.
-
Instead, navigate to the Preview tab. Here, you’ll find the sliced project, consisting of several lines with different pressure advance values.
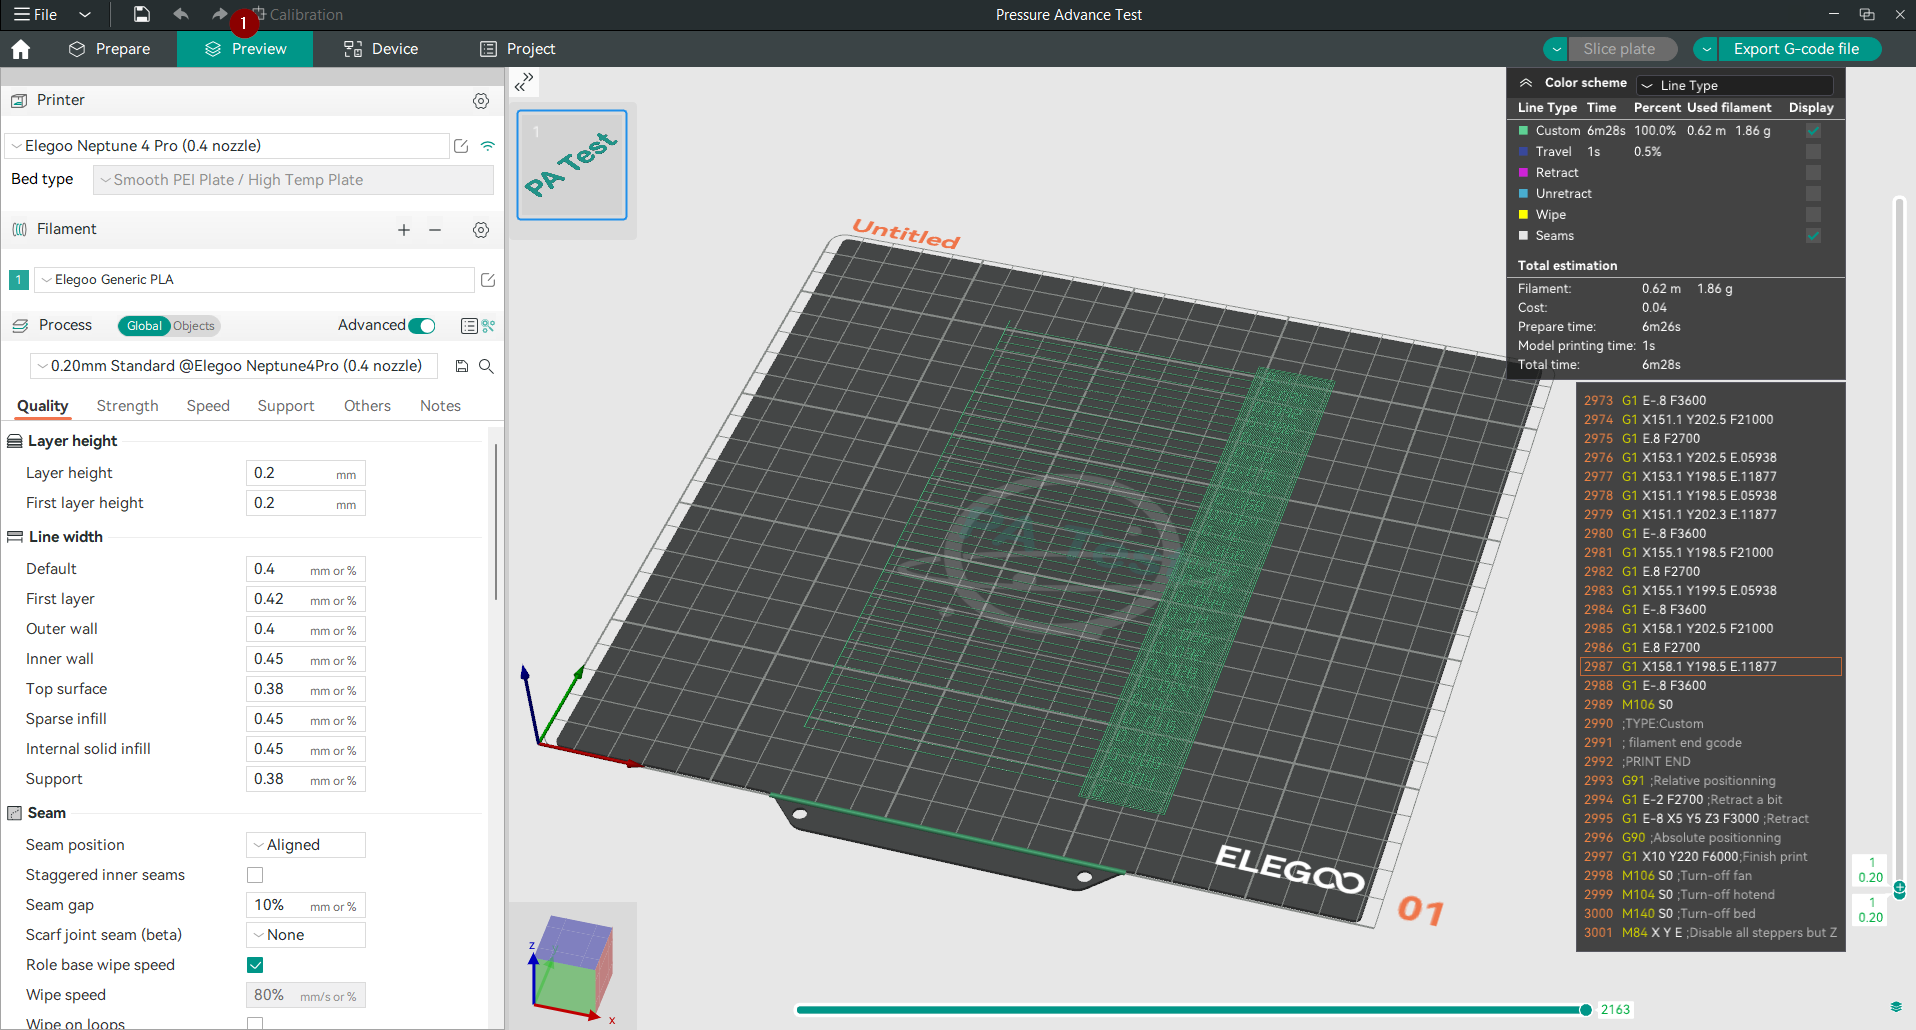
-
Next to each line, you’ll see the corresponding pressure advance value. This makes it easy to examine and recognize the best value after printing.
-
-
Print and Evaluate:
-
Print the test piece according to the settings you’ve chosen.
-
After printing, closely examine the results. Look for the line that appears the most uniform without over or under extrusion.
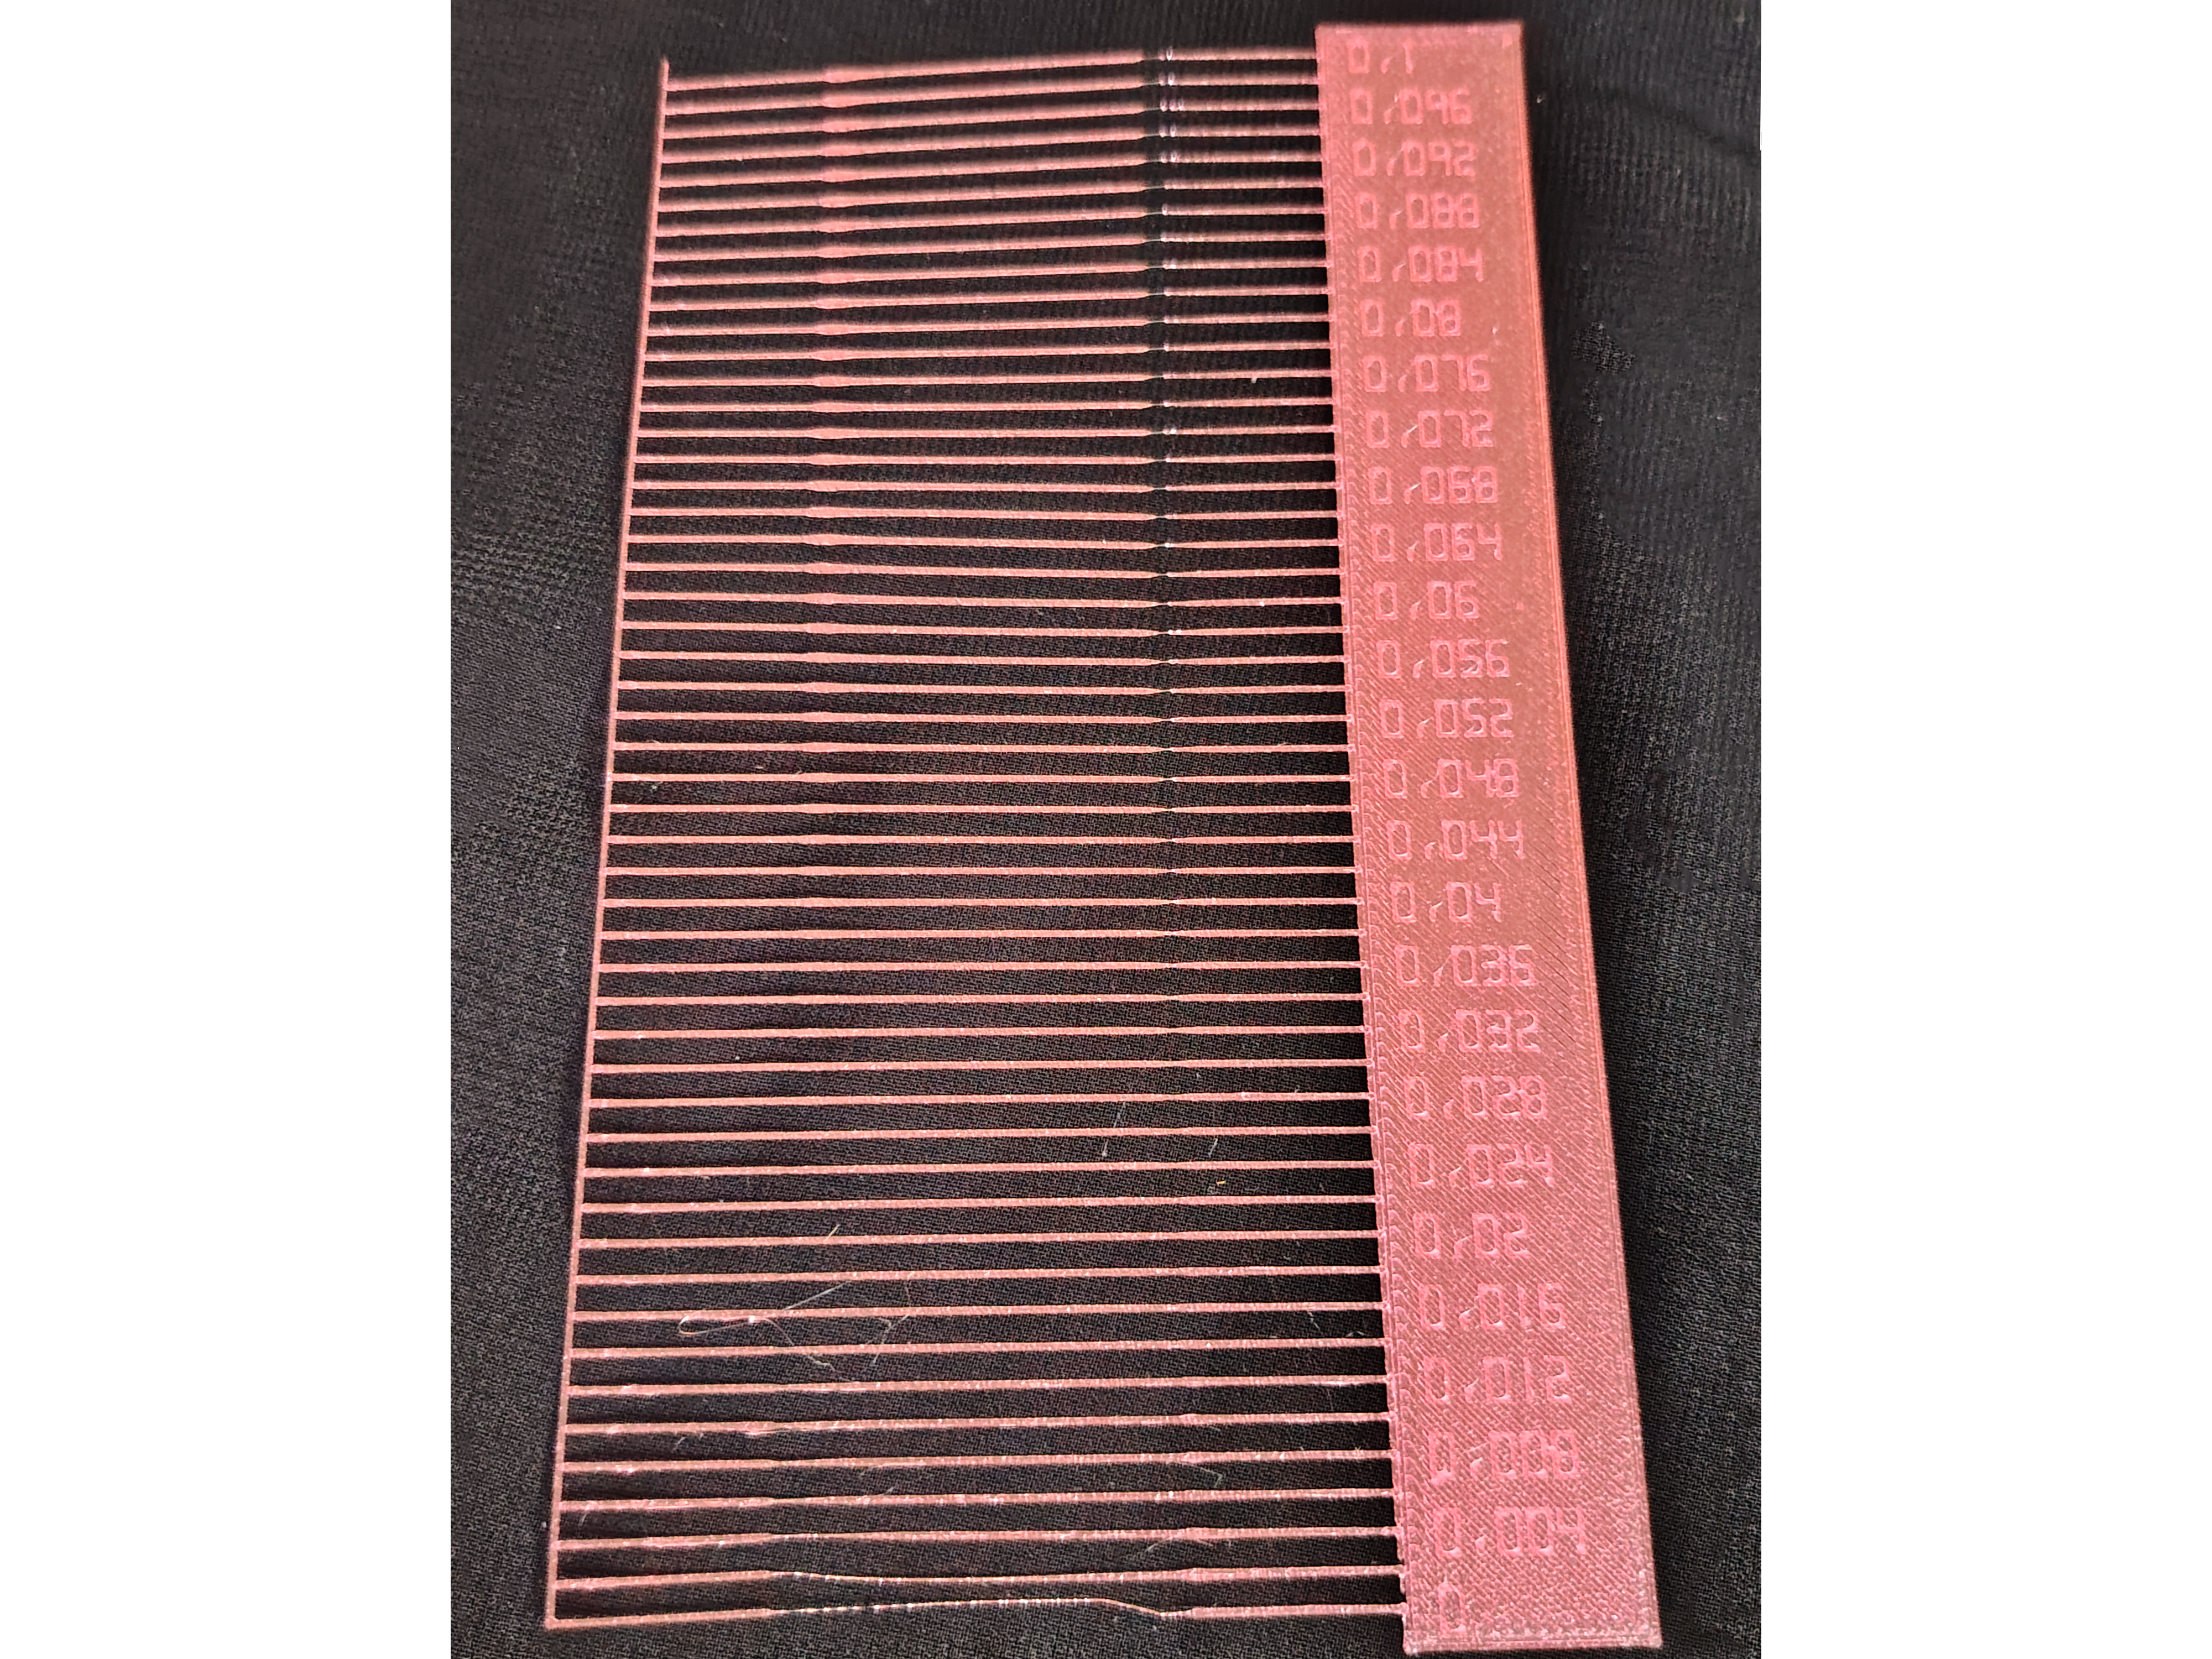
-
Based on your observation, adjust your printer’s Pressure Advance (PA) setting to match the value associated with the best-performing line. As we see here in our test, the test result is at 0.016 s pressure advance.
-
Note: Always choose the lower value if you are not entirely sure.
2. The Pattern Method
The Pattern Method is a more advanced way to adjust your printer’s Pressure Advance settings. It combines custom G-Code patterns and specific configurations. Before you start, make sure your first layer is calibrated well, as the Pattern Method’s accuracy also depends on that initial layer.
The pattern method is adapted from Andrew Ellis' pattern method generator, which was itself derived from the Marlin pattern method developed by Sineos. Instructions for using and reading the pattern method are provided in Ellis' Print Tuning Guide, with only a few OrcaSlicer differences to note.
Steps for the Pattern Method:
-
Choose Your Setup: Start by selecting the printer, filament type, and printing process you plan to use for the calibration test.
-
Access Calibration Menu:
-
Launch OrcaSlicer and head to the calibration menu.
-
Find and select the option for Pressure Advance.
-
A dialog box will pop up, prompting you to choose between a Direct Drive Extruder (DDE) or a Bowden setup, as the calibration values vary based on your extruder type.
-
Select the Pattern Method for your test.
-
Keep the initial test values (start PA, end PA, and PA step) unchanged.
-
Confirm by clicking OK.
-
-
Test Preparation:
-
Although the test pattern won't be visible in the preparation window because it is built with custom G-Code, you can view it in the Preview tab. This area will display the pattern resembling a prism, with each segment coded with different Pressure Advance values.
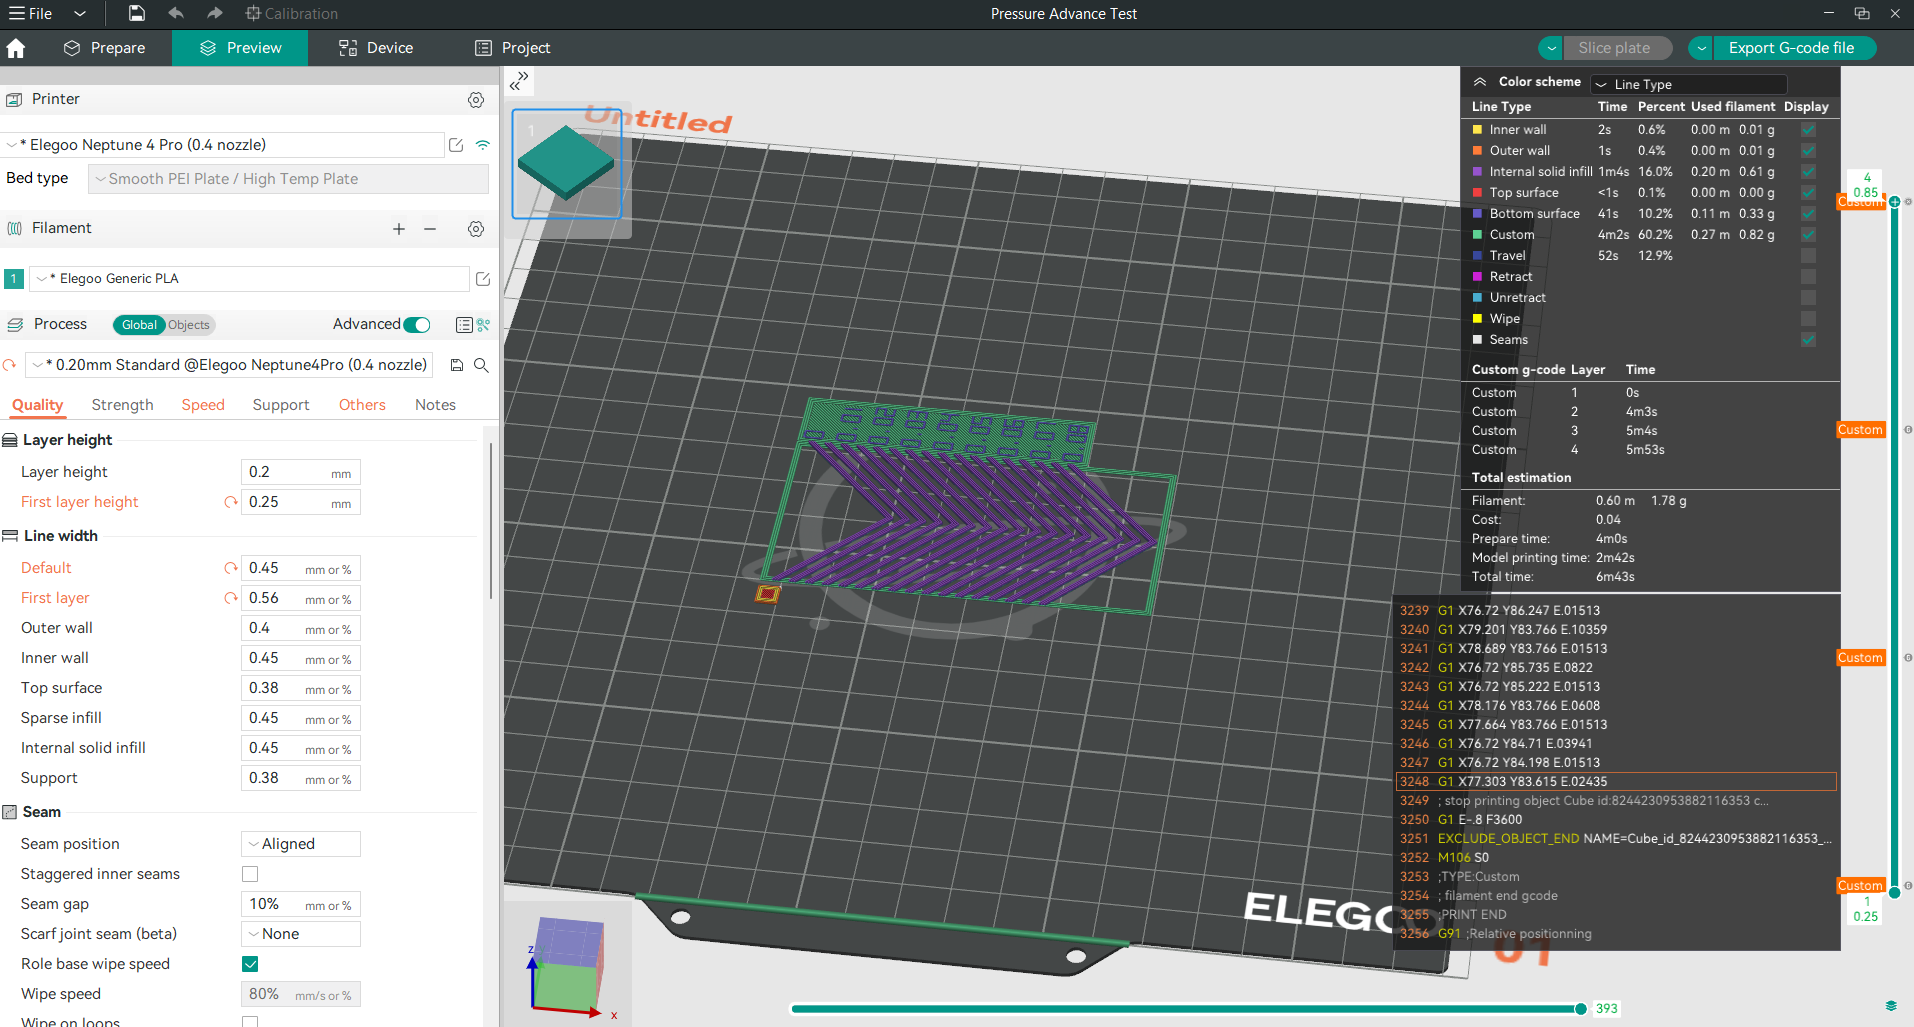
-
Each line segment will have the corresponding PA value labeled next to it, simplifying the process of identifying the most effective setting post-print.
-
-
Print and Evaluate:
-
Proceed to print the test pattern with the selected settings.
-
After printing, examine the outcomes closely. Focus on identifying the pattern section that demonstrates the most consistent extrusion quality.
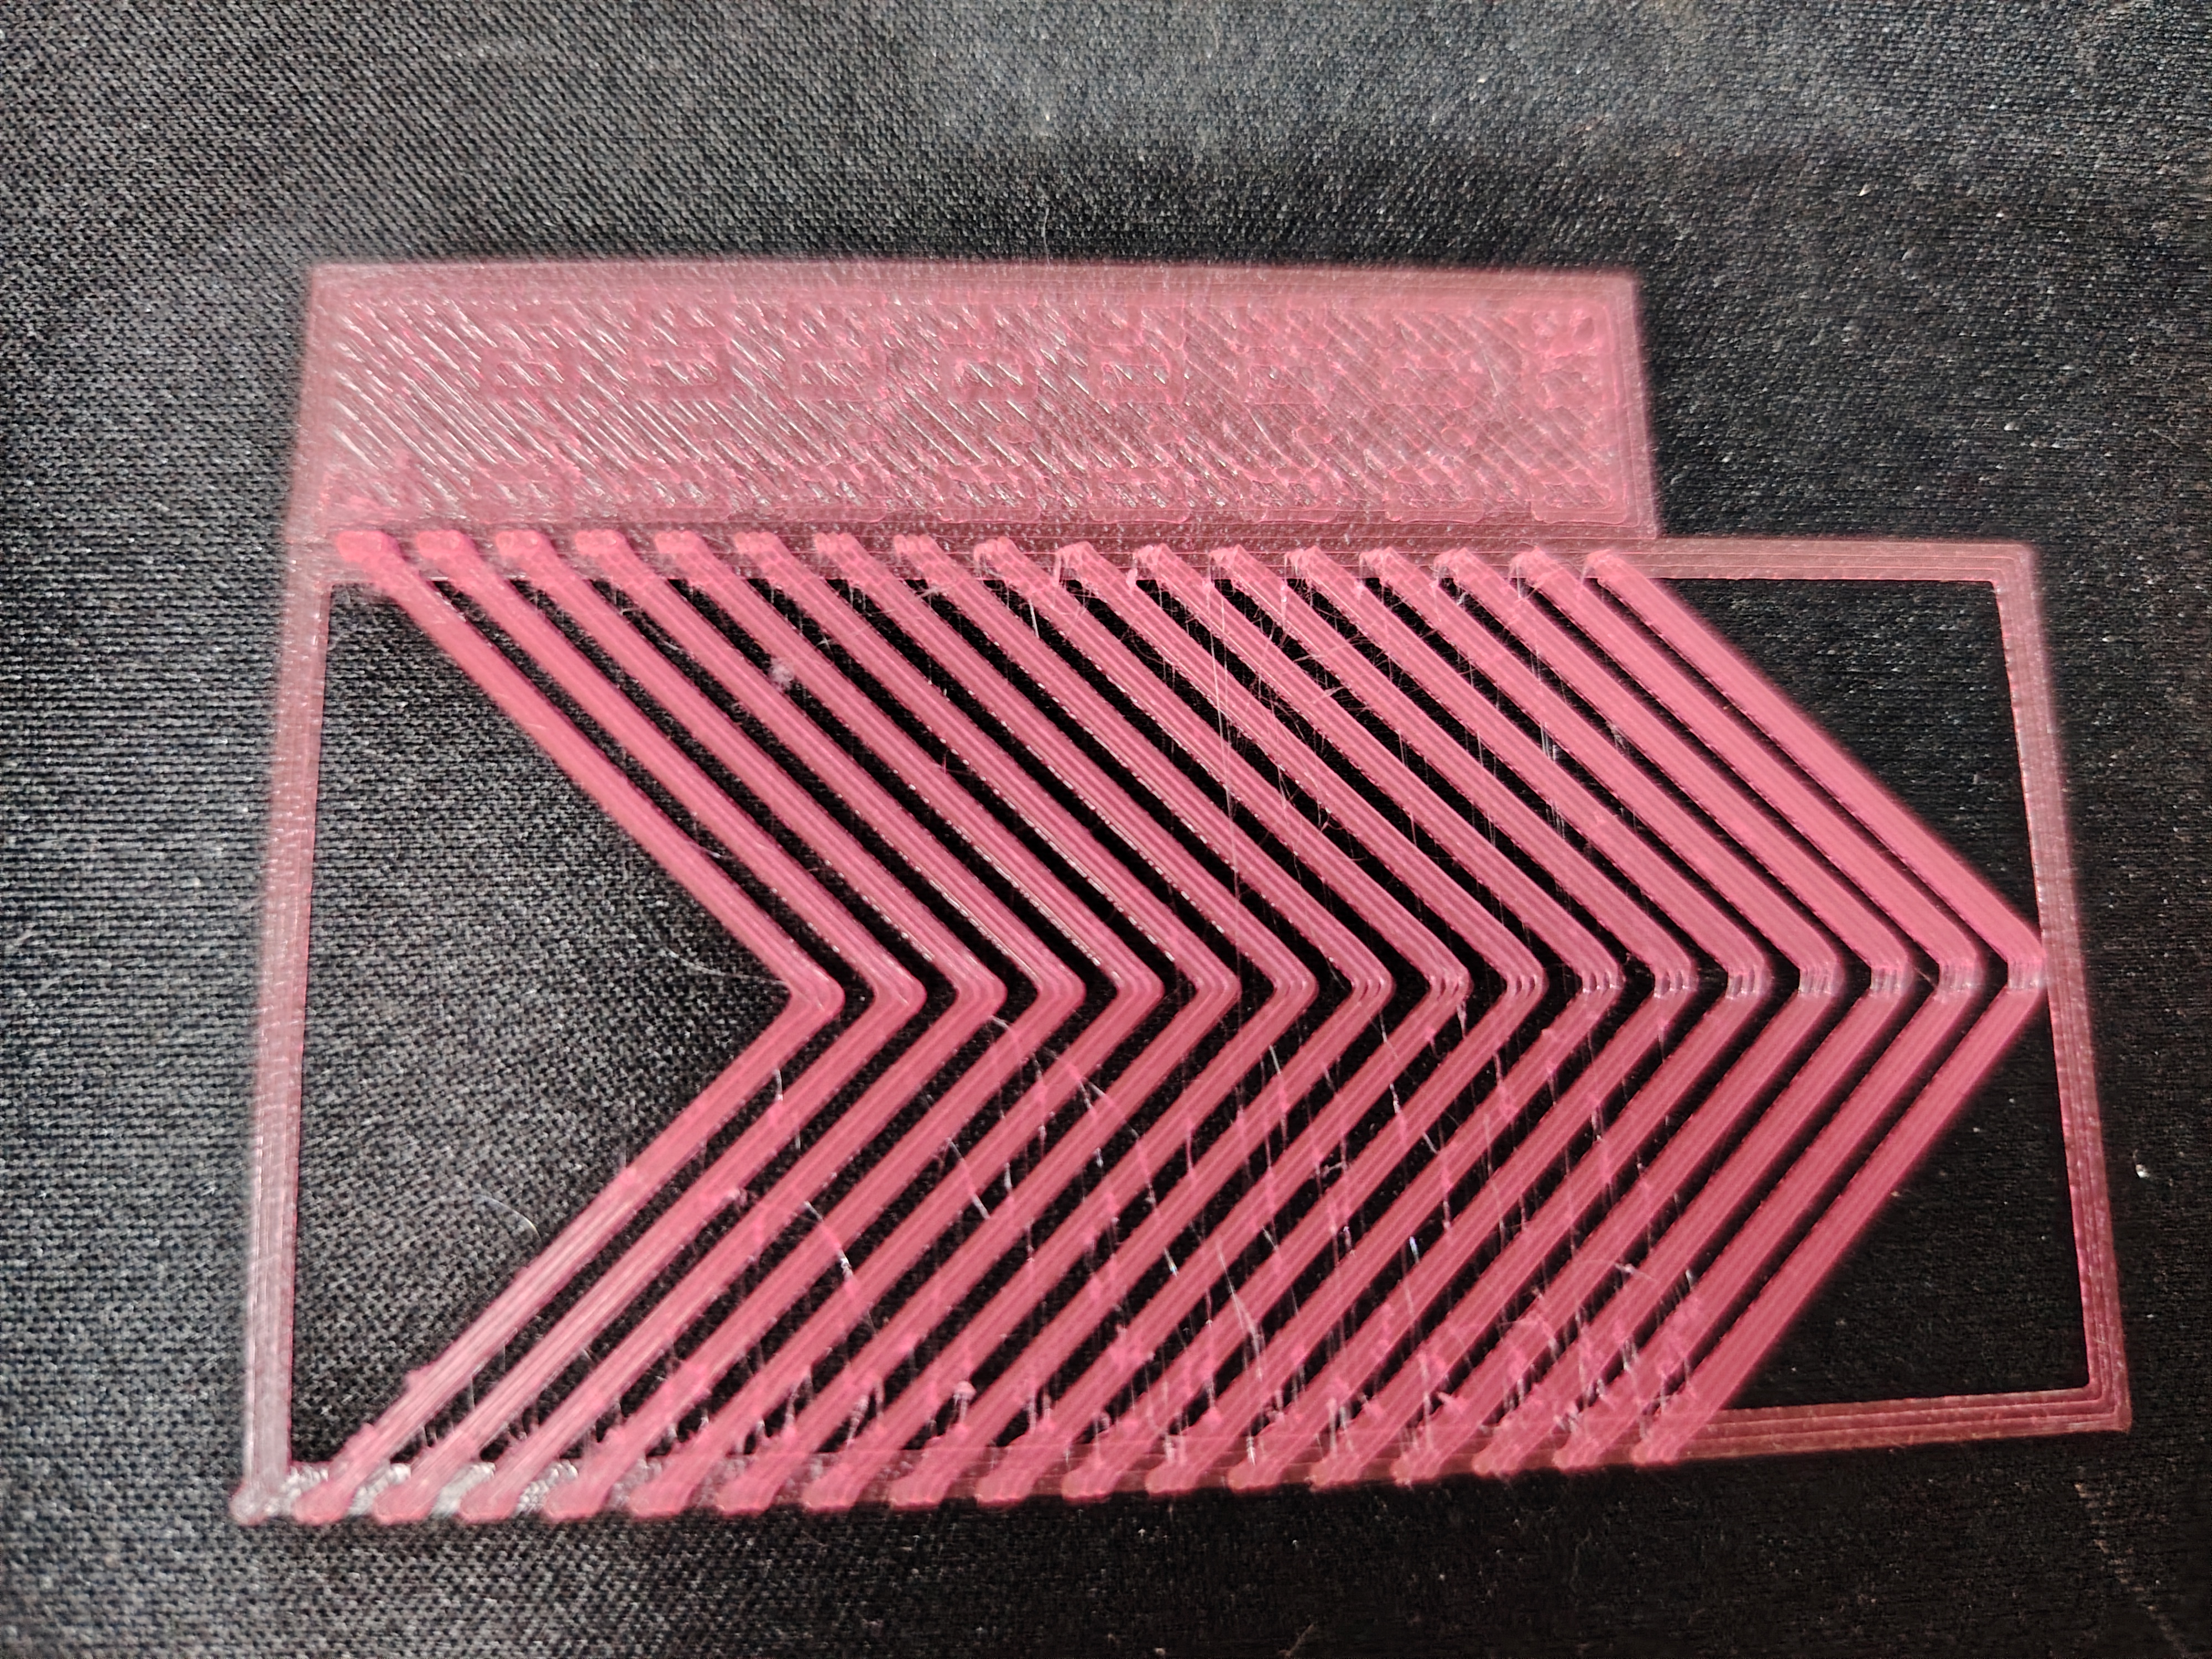
-
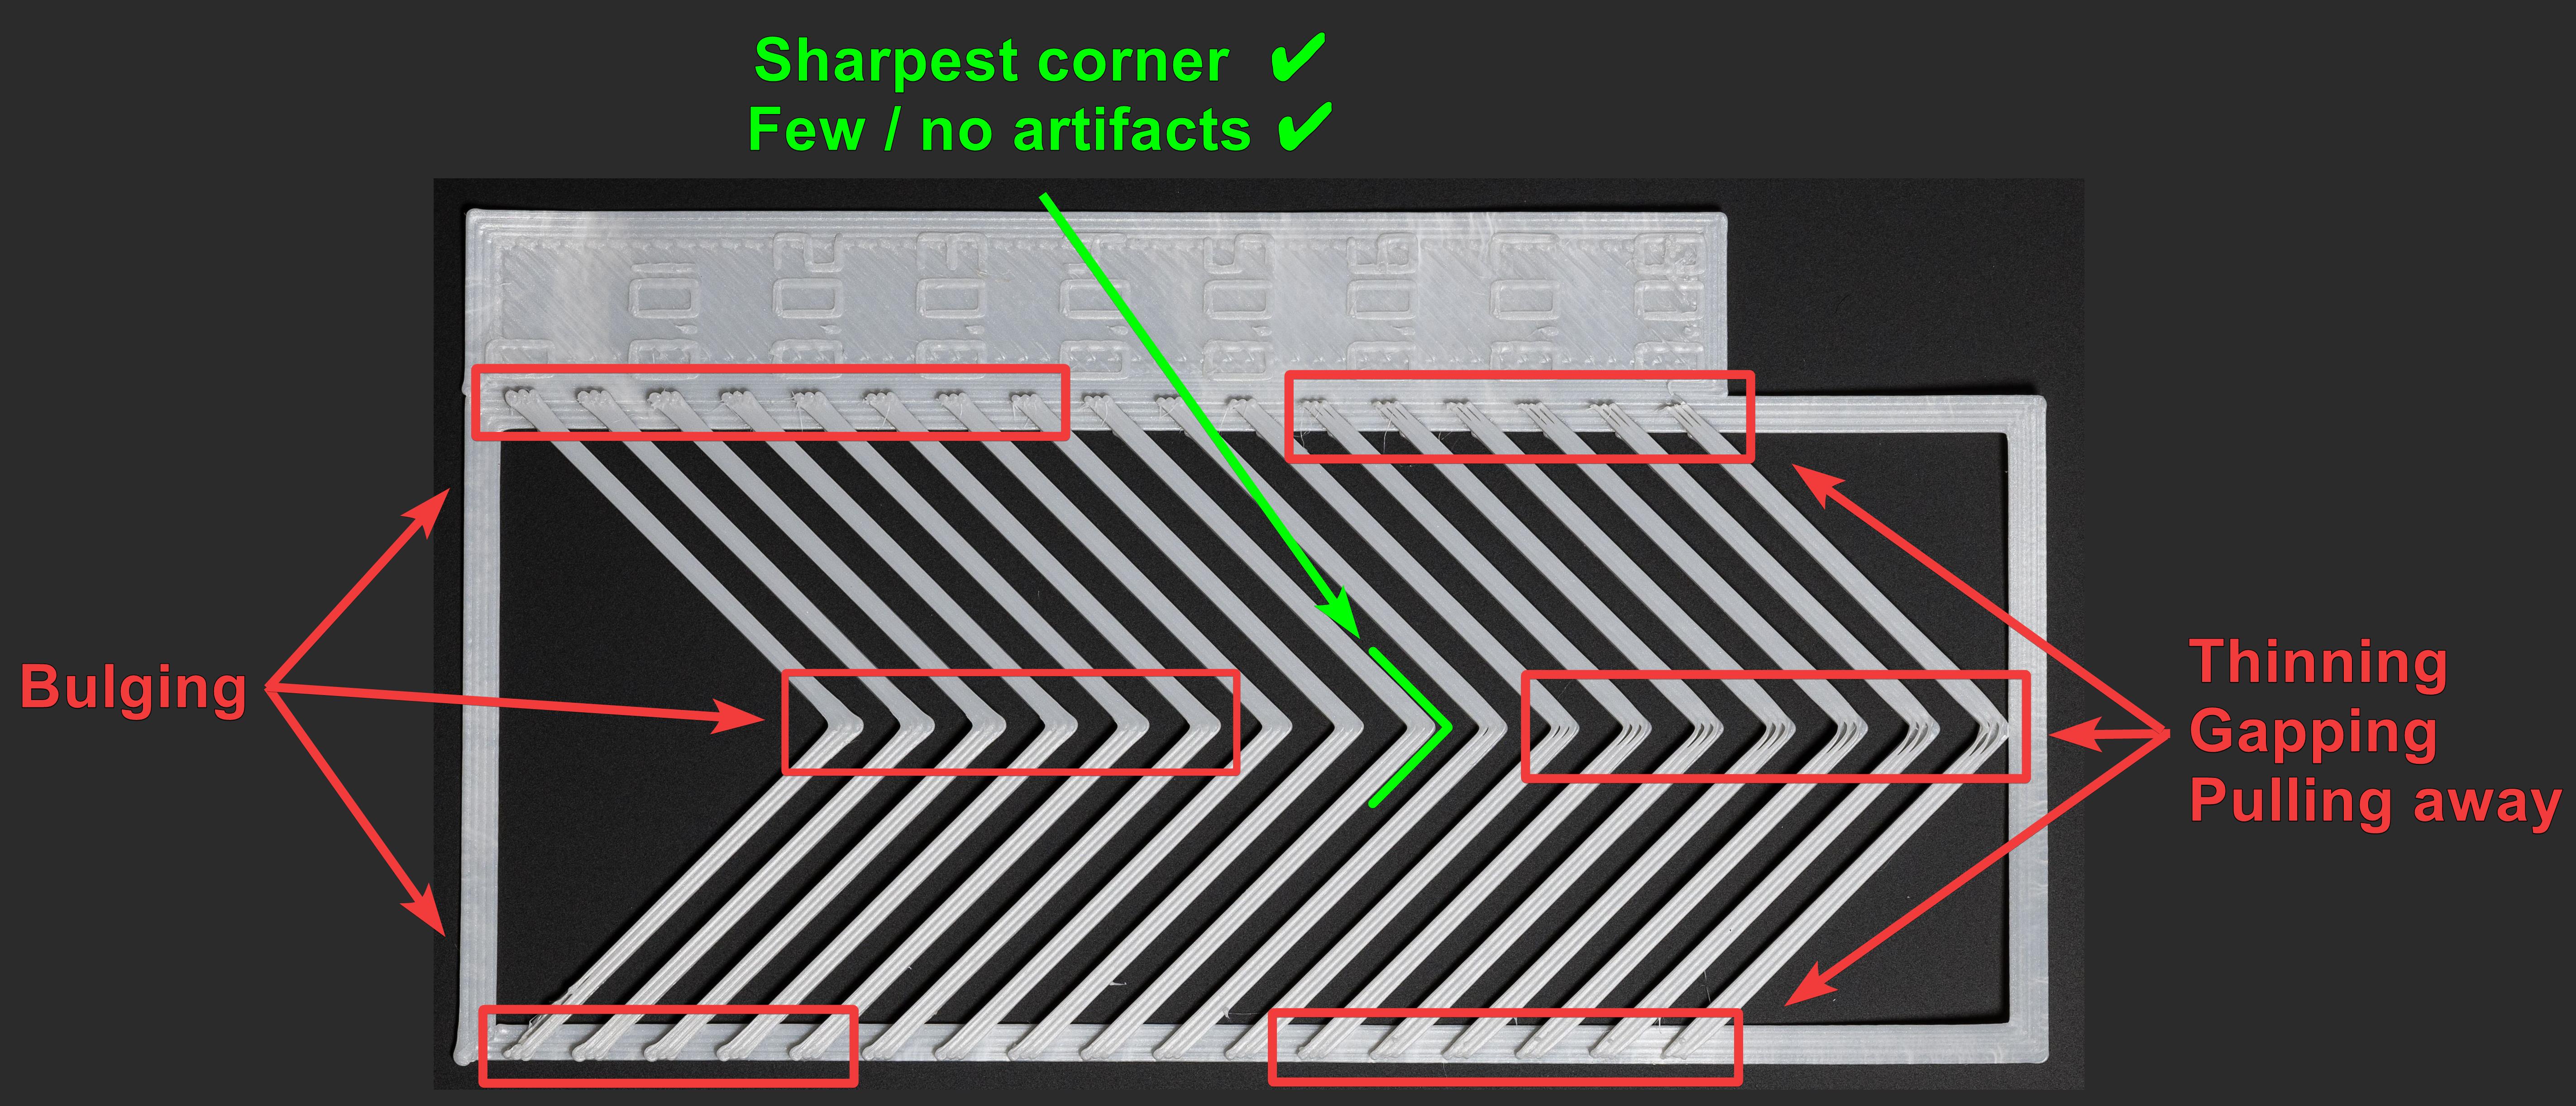
Look for the sharpest corner with the fewest artifacts (gaps, bulges, divots). As shown in the previous image, the best result is at 0.015 s, which is similar to the first test.
-
Adjust your printer's Pressure Advance (PA) setting according to the value that produced the best results in your test.
-
You can run the test again with more accurate intervals for better results.
-
Keep in mind, the aim is to discover the setting that gets you as close as possible to excellent print quality, rather than striving for absolute perfection. If you’re uncertain, it’s safer to lean toward a slightly lower value.
-
3. The Tower Method
The Tower Method takes a bit longer but is really handy because it doesn’t worry too much about how your first layer looks. Instead, it tweaks the Pressure Advance (PA) setting little by little as your print gets taller - by 0.002 for each millimeter (and 0.02 for Bowden setups).
Steps for the Tower Method:
-
Choose Your Setup: Start by selecting your printer, the filament type, and the specific printing process you want to use for the calibration.
-
Access Calibration Menu:
-
Launch OrcaSlicer and open the calibration menu.
-
Choose the Pressure Advance option.
-
A dialog box will prompt you to choose between a Direct Drive Extruder (DDE) or a Bowden setup, as the test adjusts based on the type of extruder you have.
-
Opt for the PA Tower for this method.
-
The default values for start PA, end PA, and PA step should work fine for most tests.
-
-
Test Generation:
-
After setting up, the software will generate the test, which won't be visible in the prepare window due to its custom code nature.
-
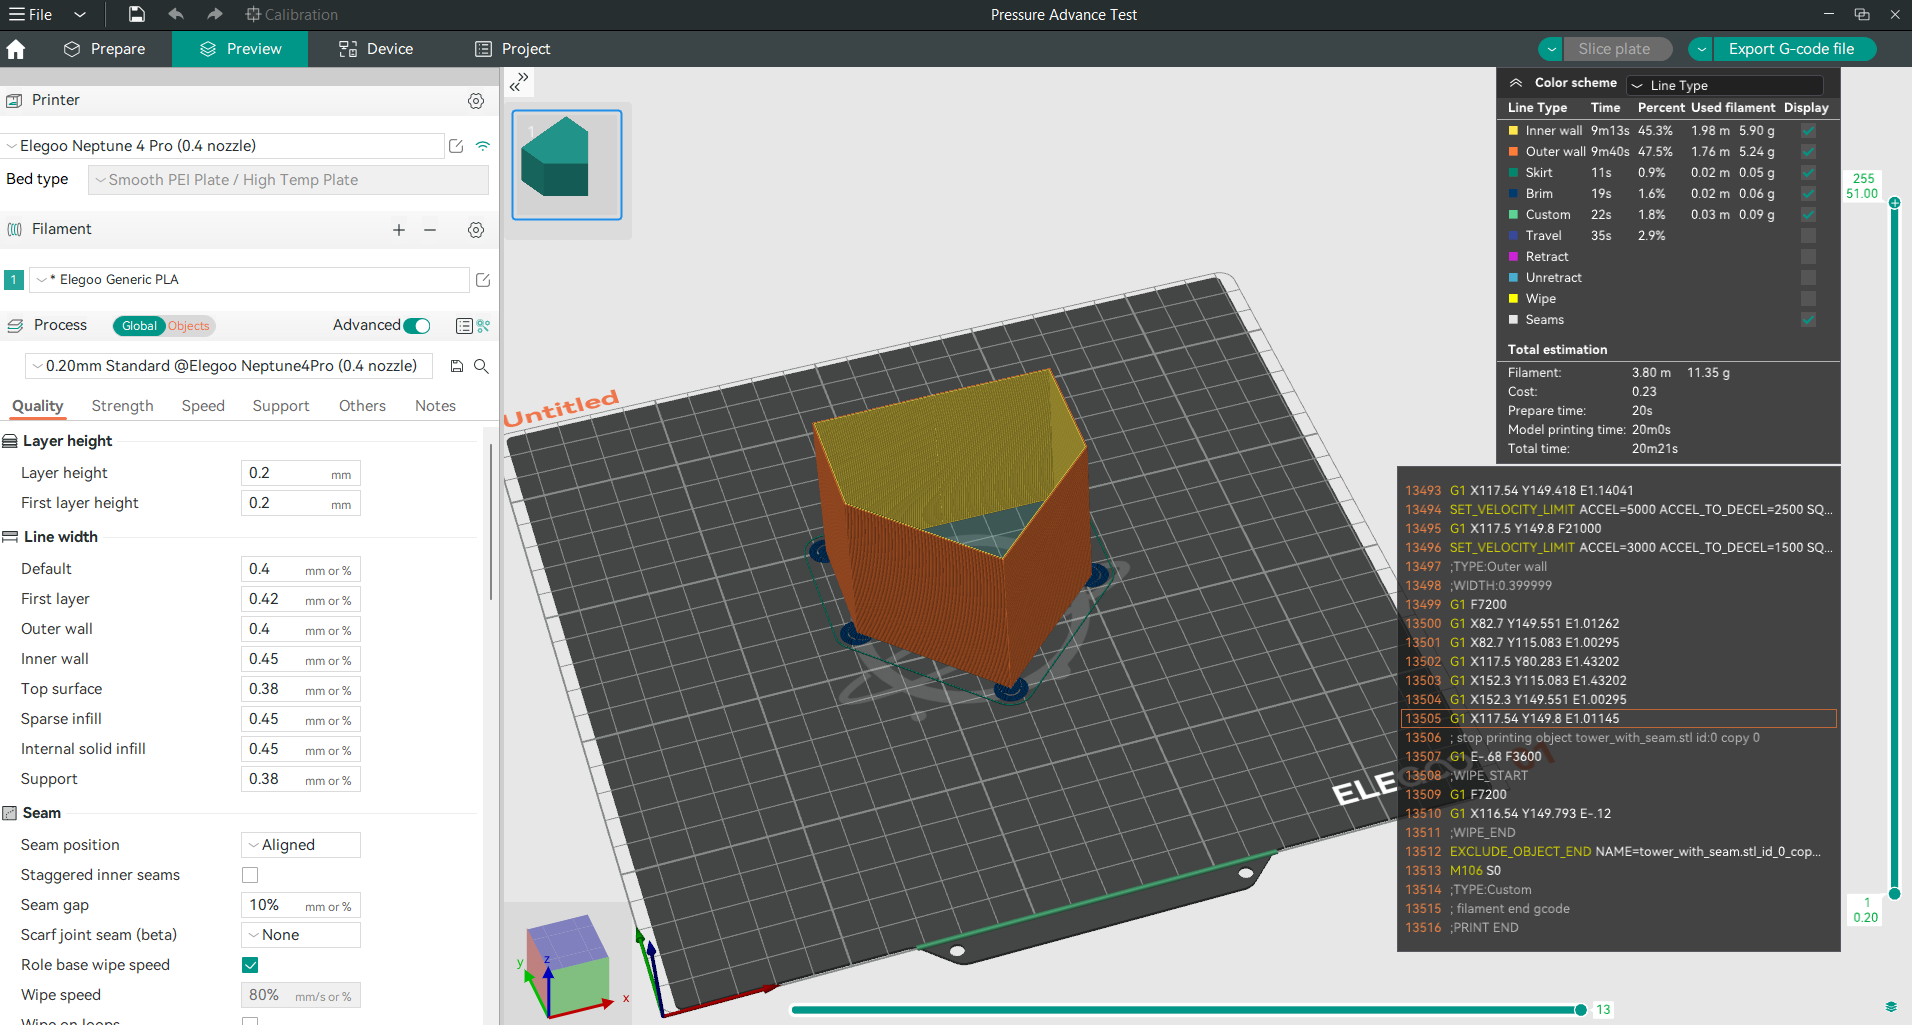
Switch to the Preview tab to see the sliced project, displaying a tower with varying PA values across its height.
-
For better results, it is recommended to print at quite a high speed above 120 mm/s.
-
-
Print and Evaluate:
- Print the test tower using the chosen settings.
Relax with Obico
Tip: Explore Obico for OctoPrint and Klipper!
While your pressure advance tower is printing, why not explore Obico, the ultimate Smart 3D printing software? With Obico, you can monitor and control your 3D printer from any device and anywhere. You can also relax with Obico's AI failure detection system that keeps an eye on your print and notifies you of any issues. Connect your printer to Obico for free and enjoy unlimited webcam streaming, 3D printer status notifications, 3D printer remote access, and more!

Obico also offers mobile apps for iOS and Android, so you can access and manage your 3D printer from any device and location. Join Obico for free and enjoy the ultimate 3D printing experience. - Carefully assess each corner of the tower. Identify the height where the print shows the best balance, marking it for reference.
- Carefully assess each corner of the tower. Identify the height where the print shows the best balance, marking it for reference.
- In this example, selecting a 9 mm height would suggest a PA value of 0.002x9 = 0.018 for direct drives (Note: Use 0.02 for Bowden extruders).
- Final Adjustment:
Calculate your new PA value based on the marked height and adjust your printer’s settings accordingly to achieve the best print quality.
Saving Your Value in OrcaSlicer
To save your pressure advance value, follow these steps:
-
Open your filament settings by clicking on the edit icon beside it.
-
In the filament setting window, scroll for the “Enable pressure advance” option and enable it.
-
Enter your new value for pressure advance, then click on save.
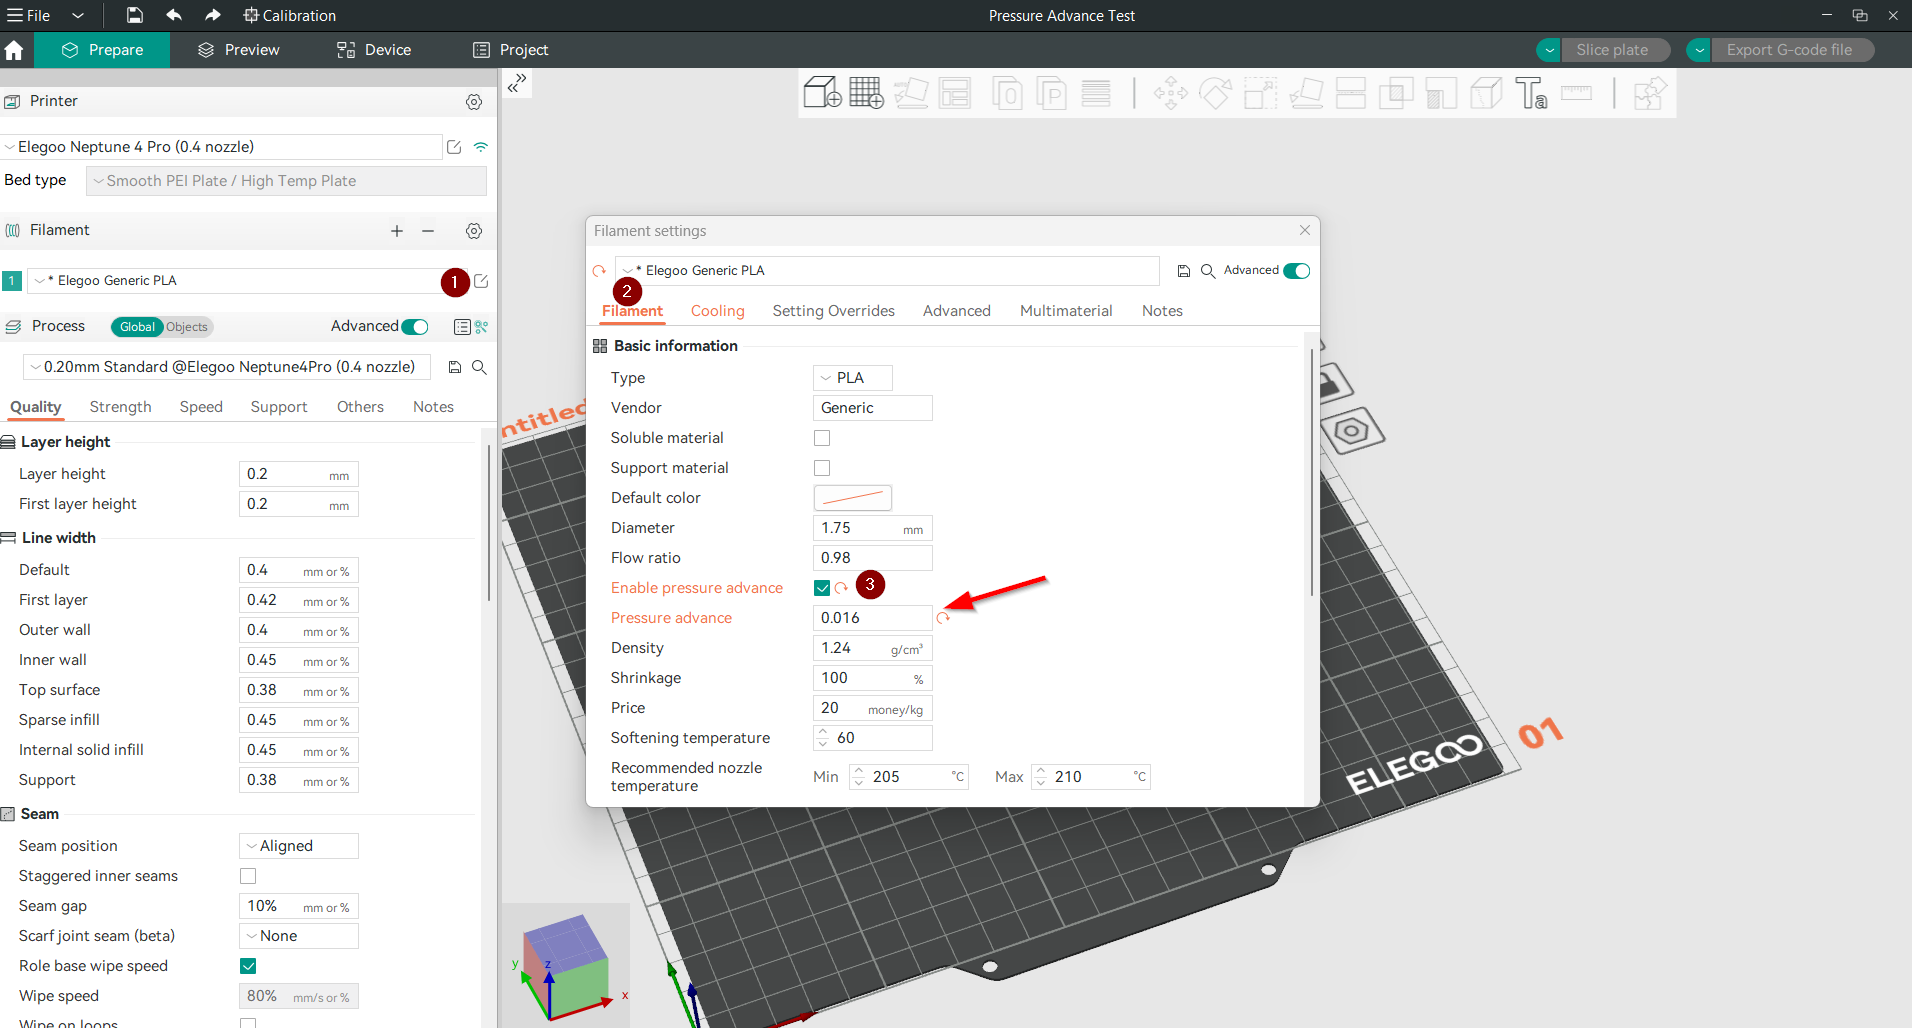
Now you have updated your new pressure advance value and are ready for printing awesome prints.
Tips for Better Results in Calibrating Pressure Advance with OrcaSlicer
After covering the main methods for calibrating Pressure Advance in OrcaSlicer, here are some additional tips to ensure you achieve even better results:
- Fine-Tune Your First Layer: Before starting any calibration tests, make sure your first layer is perfectly dialed in. A well-calibrated first layer sets the foundation for the rest of your print. Use bed mesh leveling and adjust your nozzle distance for a smooth, even first layer.
- Monitor Print Speed: While conducting tests, especially the Tower Method, consider printing at higher speeds (above 120 mm/s). This can help better identify the impact of Pressure Advance settings under conditions similar to your usual print jobs.
- Experiment with Different Filaments: Different materials may respond differently to the same Pressure Advance settings. Don’t hesitate to run separate calibration tests for each type of filament you regularly use. This can help tailor your PA settings for each material, leading to optimal print quality across the board.
- Use the Latest Version of OrcaSlicer: Make sure you're using the most recent version of OrcaSlicer. Updates often include improvements to calibration tools and overall slicing algorithms, which can significantly impact the quality of your calibration tests and final prints.
- Check for Hardware Issues: Before starting your calibration, ensure your printer is in good mechanical condition. Check for any loose belts, worn-out bearings, or other potential issues that could affect print quality. A well-maintained printer will respond better to fine-tuned Pressure Advance settings.
- Repeat Tests When Necessary: Don’t be afraid to rerun tests if you’re not satisfied with the results. Slight adjustments in settings or correcting any overlooked printer maintenance issues can make a big difference in your next test.
- Document Your Findings: Keep a record of your test results, settings used, and any observations. This documentation can be incredibly valuable for future reference or if you need to troubleshoot printing issues.
By following these additional tips and the step-by-step guide provided, you'll be well-equipped to fine-tune your Pressure Advance settings in OrcaSlicer, leading to smoother, sharper, and more reliable prints.
Understanding How Pressure Advance Can Vary
To get the most out of your calibration efforts, it’s important to recognize that Pressure Advance settings aren’t one-size-fits-all and can change under different circumstances:
Filament Type and Brand
The ideal Pressure Advance setting can vary from one filament to another, even among different brands. This variability is due to differences in filament composition and manufacturing processes.
Filament Color
Even different colors of the same filament brand can behave slightly differently due to the dyes and additives used. However, these differences are generally minor and not usually a cause for concern.
Nozzle Size
Changing the nozzle size affects the flow rate of the filament, necessitating adjustments to Pressure Advance settings to maintain optimal print quality.
Hotend Temperature Changes
Significant temperature changes can alter the filament’s viscosity, affecting how it moves through the extruder and nozzle. As viscosity changes, so does the required Pressure Advance setting to compensate for these variations in flow characteristics.
Input Shaper Adjustments
Enabling or disabling input shaping, a technique used to reduce printer vibrations, can impact how Pressure Advance should be set. Input shaping changes the dynamics of printer movement, which in turn affects filament flow.
Modifications to Printer Hardware
Any changes to the hotend, extruder, or the length of the Bowden tube (if applicable) can influence the Pressure Advance setting. It's crucial to recalibrate Pressure Advance after making hardware changes to ensure continued print quality. However, adjustments to a reverse Bowden setup don’t typically require changes to Pressure Advance settings.
FAQs
Q: What is Pressure Advance in 3D printing? A: Pressure Advance is a feature that improves print quality by adjusting the filament flow in response to changes in the printer's speed. It helps achieve sharper corners and reduces issues like stringing and blobbing.
Q: Why is calibrating Pressure Advance important? A: Calibrating Pressure Advance ensures that your printer extrudes the right amount of filament at all times, especially during speed changes. This leads to better-looking prints with more accurate details.
Q: Can I use OrcaSlicer for any type of 3D printer? A: OrcaSlicer is designed primarily for FDM (Fused Deposition Modeling) printers. It's versatile and supports a wide range of printer models, but it's always a good idea to check compatibility with your specific printer.
Q: How do I know which calibration method to use in OrcaSlicer? A: The choice depends on your printer setup (Direct Drive or Bowden) and your preference for the calibration process's complexity and duration. Each method has its own set of instructions and benefits, so you might want to try more than one to see which gives you the best results.
Q: Do I need to recalibrate Pressure Advance if I change my filament? A: Yes, different filaments and even different colors of the same brand can react differently. It's a good practice to recalibrate Pressure Advance when you switch filaments to ensure optimal print quality.
Q: Will changing my nozzle affect my Pressure Advance settings? A: Yes, changing the nozzle size can impact how filament flows, so you may need to adjust your Pressure Advance settings accordingly.
Q: How do temperature changes affect Pressure Advance? A: Significant changes in hotend temperature can alter the filament's viscosity, affecting its flow. You might need to tweak your Pressure Advance settings if you're printing at temperatures much higher or lower than usual.
Q: What should I do if I enable or disable input shaping in my printer firmware? A: Enabling or disabling input shaping can influence the printer's behavior, particularly in how it handles speed changes. It's advisable to check and possibly recalibrate your Pressure Advance settings after making such changes.
Q: How often should I calibrate Pressure Advance? A: Calibrate whenever you change something significant in your setup (like filament type, nozzle size, or printing temperature) or if you notice a drop in print quality. Regular calibration helps maintain the best possible print quality.
Conclusion
To wrap things up, using OrcaSlicer to fine-tune your Pressure Advance settings is a game-changer for enhancing the quality of your 3D prints. With options for both Direct Drive and Bowden setups and three distinct calibration methods, OrcaSlicer empowers you to find the perfect balance for your printer. Exploring different methods to see what works best for your setup and preferences is key. So, dive in, adjust your Pressure Advance, and look forward to smoother, more detailed prints.
Also available in: Deutsch | Español | Français | Italiano | Nederlands | Polski | Português | Русский
