Start G-Code in Orca Slicer: Start Your Print the Right Way
In the 3D printing world, the initial setup of your print is just as important as the model you’re trying to bring to life. One of the most critical and often overlooked components of this setup is the Start G-code, a set of instructions that prepares your 3D printer for the actual print. Whether you use Orca Slicer, a feature-rich slicing software that is based on Bambu Studio and PrusaSlicer, or another slicer, understanding and customizing the Start G-code can be the key to better prints and a smoother workflow.

In this article, we will go deep into what is Start G-code, why it’s important for perfect prints, how to edit it in Orca Slicer, and how to customize it for any 3D printer. We will also explain the Start G-code in the well-known Elegoo Neptune 4 Pro in Orca Slicer as an example for better understanding.
By the end of this article, you will know how Start G-code works, how to tweak it for best results, and how to use advanced techniques like Klipper macros to make your G-code simpler more readable and easier to update.
Let’s get started!
What is Start G-Code?
Let’s start with the basics: Start G-code is a set of commands that your 3D printer runs before it starts printing the actual model. It’s like the printer’s warm-up routine. Just like an athlete stretches before a race, the printer follows these initial commands to calibrate everything and be ready to go. Without proper Start G-code, you may encounter problems like bad bed adhesion, wrong extrusion, or even total print failure.

Start G-code usually includes:
- Home the printer’s axes to ensure the printhead and bed are in the correct position.
- Sets the nozzle and bed temperatures to the values for the filament or to a lower value to test the heating elements and sensors.
- Primes the filament so it’s ready to flow when you start printing.
- It calibrates the flow rates to get the right amount of filament extruded.
- Calibrates the bed leveling to ensure good adhesion and an even first layer.
Every 3D print starts with these commands, and they are important to prevent problems that can occur later in the print. A good Start G-code ensures that your print gets off on the right foot, lays down a smooth first layer, and avoids under extrusion or bad alignment.
So, the start G-code is a set of fixed commands that runs before your 3D printer starts executing your G-code with your adjusted settings, regardless of the sliced 3D model or other settings.
Why you need to understand and use start G-code?
Most slicing software like Orca Slicer has pre-configured printer profiles that include starting G-code for those printers. But you may need to modify the existing Start G-code to add more functions or to create a custom printer profile with your special requirements.
By understanding how start G-code works, you can adjust it for better performance or to fit your setup.
In the next section, we’ll show you the role of the Start G-code and how it can improve your prints:
1. Print Head Positioning
One of the first tasks of Start G-code is to position the print head and bed before the print starts. Most desktop 3D printers use stepper motors to move the print head and bed, but unlike servo motors, stepper motors don’t have feedback to tell the printer where they are. So, the printer doesn’t know where the print head or bed is until you tell it. That’s why you need to give the printer instructions before the print starts.
First, you need to set absolute positioning with G-code. This tells the printer that all movements will be relative to a fixed point. The command for this is G90, which sets the printer into absolute positioning mode.
Next, you need to home the printhead and bed with the G28 command. This moves the print head and bed to their “zero” positions (also known as the origin or starting point). Homing the axes is important because it tells the printer exactly where the print head and bed are, so everything starts in the correct position. Without homing, the printer wouldn’t know from where to start.
2. Filament Priming
Another task in Start G-code is filament priming. This pushes a small amount of filament through the nozzle before the print starts, to make sure the flow is smooth and consistent from the beginning. Without priming, you may get under extrusion or gaps in the first layer, which can lead to weak adhesion and affect the overall print quality.

By modifying your Start G-code, you can control how the filament is primed to make the filament ready to flow smoothly as soon as the first layer is printed.
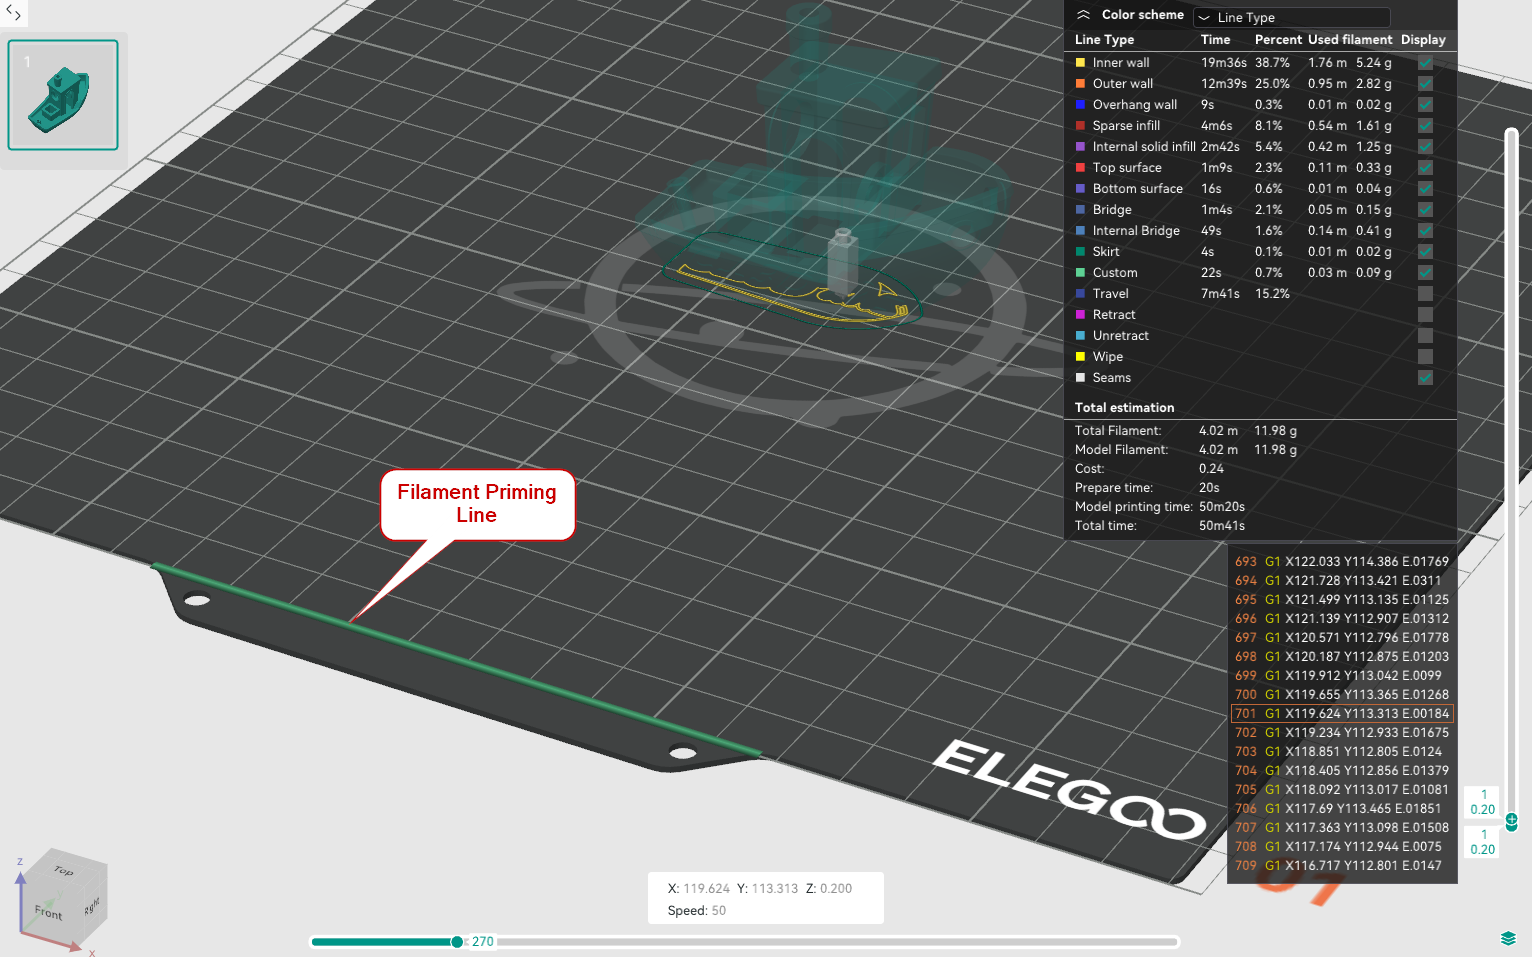
There are many ways to prime filament, and each printer has its own way, but the goal is the same: smooth and stable extrusion. Priming usually involves printing a small line or shape at the start of the print to clean the nozzle and get the filament flowing before the main print starts.
3. Flow Calibration
Flow calibration is key to getting good prints. Too much filament and you get blobs, over extrusion, or excess material buildup. Too little and you get gaps, weak layers, or poor adhesion.
To get consistent and correct extrusion, the flow rate needs to be set before the print starts using the M221 S100 command. This sets the flow rate to 100%, so you are starting from the baseline flow rate set in the slicer or printer firmware. Starting at 100% allows you to adjust as needed during the print based on the filament or print settings you are using.
4. Temperature Control
In your Start G-code, you can use the M104 command to set the nozzle temperature and the M190 command to set the bed temperature. You can set it to the same value as in your sliced files based on the material you are using or to a lower value to just test that both the nozzle and bed reach the target temperature before the print starts as a test for your printer’s heating elements and sensors.
Practical example of the start G-code
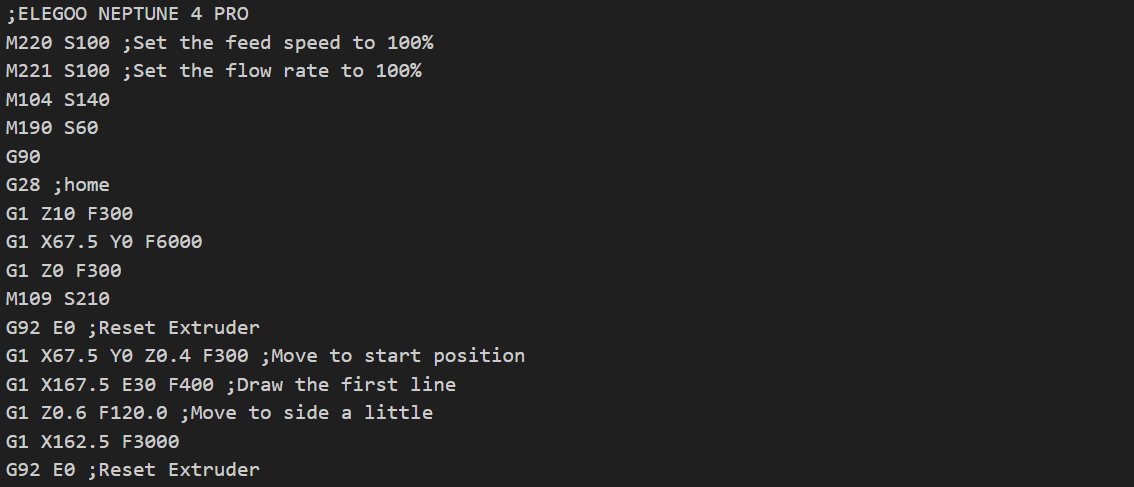
For better understanding of the start G-code, let’s walk through an example of the existing Start G-code of the ELEGOO Neptune 4 Pro in Orca Slicer.
ELEGOO NEPTUNE 4 PRO Start G-code:
; ELEGOO NEPTUNE 4 PRO Start G-code
M220 S100 ; Set the feed rate to 100%
M221 S100 ; Set the flow rate to 100%
M104 S140 ; Preheat the nozzle to 140°C
M190 S[bed_temperature_initial_layer_single] ; Set the bed temperature
G90 ; Use absolute positioning
G28 ; Home all axes (X, Y, Z)
G1 Z10 F300 ; Lift the nozzle to 10mm for clearance
G1 X67.5 Y0 F6000 ; Move to start position for filament priming
G1 Z0 F300 ; Lower nozzle to bed
M109 S[nozzle_temperature_initial_layer] ; Wait until the nozzle reaches the desired temperature
G92 E0 ; Reset the extruder position
G1 X67.5 Y0 Z0.4 F300 ; Move to priming start
G1 X167.5 E30 F400 ; Prime the nozzle by extruding a line of filament
G1 Z0.6 F120 ; Slightly lift the nozzle
G1 X162.5 F3000 ; Move nozzle to the start of the print area
G92 E0 ; Reset the extruder for the actual print
This G-code sequence covers essential steps like temperature control, priming, and positioning, ensuring that the print starts correctly.
Let’s break down each part of this Start G-code:
-
M220 S100 ; Set the feed rate to 100%This command sets the overall movement speed of the printer to 100% of the default speed, so the printer moves at the standard speed.
-
M221 S100 ; Set the flow rate to 100%This sets the extruder flow rate to 100% so the filament will extrude at the normal rate.
-
M104 S140 ; Preheat the nozzle to 140°CThis command starts heating the nozzle to 140°C, but don’t wait for it (move to the next G-code).
It ensures the nozzle is warming up to test that the hotend’s heater and temperature sensor work properly.
-
M190 S[bed_temperature_initial_layer_single] ; Set the bed temperatureThis command sets the bed temperature for the first layer. The variable
[bed_temperature_initial_layer_single]is set by the slicer based on the material and layer settings. -
G90 ; Use absolute positioningThe G90 command tells the printer to use absolute positioning for the X, Y, and Z axes. This means all movement commands will reference the printer’s zero point (home) as the origin.
-
G28 ; Home all axes (X, Y, Z)This command homes all axes (X, Y, Z) to their zero positions by moving them to the endstops so the printer can calibrate itself before printing.
-
G1 Z10 F300 ; Lift the nozzle to 10mm for clearanceThe printer moves the nozzle 10mm away from the print bed (Z-axis) at a speed of 300mm/min, ensuring the nozzle is clear of the bed for safe movement.
-
G1 X67.5 Y0 F6000 ; Move to start position for filament primingThis moves the nozzle to the X and Y coordinates (67.5, 0) at a speed of 6000mm/min, positioning it for priming (extruding filament to ensure consistent flow).
-
G1 Z0 F300 ; Lower nozzle to bedThe nozzle is lowered back to the print bed (Z = 0) to prepare for filament priming.
-
M109 S[nozzle_temperature_initial_layer] ; Wait until the nozzle reaches the desired temperatureThis command sets the final nozzle temperature (filled by the slicer as
[nozzle_temperature_initial_layer]) and waits until the nozzle reaches this target before proceeding with the print. -
G92 E0 ; Reset the extruder positionThis command resets the extruder's position to 0, ensuring that the next extruder movement is accurately tracked.
-
G1 X67.5 Y0 Z0.4 F300 ; Move to priming startThe nozzle is moved to X=67.5, Y=0, and Z=0.4mm (slightly above the bed) at a speed of 300mm/min, positioning it to begin priming the filament.
-
G1 X167.5 E30 F400 ; Prime the nozzle by extruding a line of filamentThe printer extrudes 30mm of filament while moving the nozzle from X=67.5 to X=167.5, creating a filament line to ensure the extruder is properly primed before printing.
-
G1 Z0.6 F120 ; Slightly lift the nozzleThis command raises the nozzle slightly to Z=0.6mm, preparing for the next movement and ensuring there’s no dragging filament on the bed.
-
G1 X162.5 F3000 ; Move nozzle to the start of the print areaThe nozzle moves quickly (at 3000mm/min) to the X=162.5 position, close to the starting point of the actual print.
-
G92 E0 ; Reset the extruder for the actual printThe extruder is reset again to ensure that the filament flow starts accurately for the actual print.
This Start G-code has your printer ready to go, with the printhead in position, filament primed, and temperatures set for the nozzle and bed.
Now you know how the start G-code works. You’re ready to make your own.
How to Edit Start G-Code in Orca Slicer
Editing Start G-code in Orca Slicer is easy.
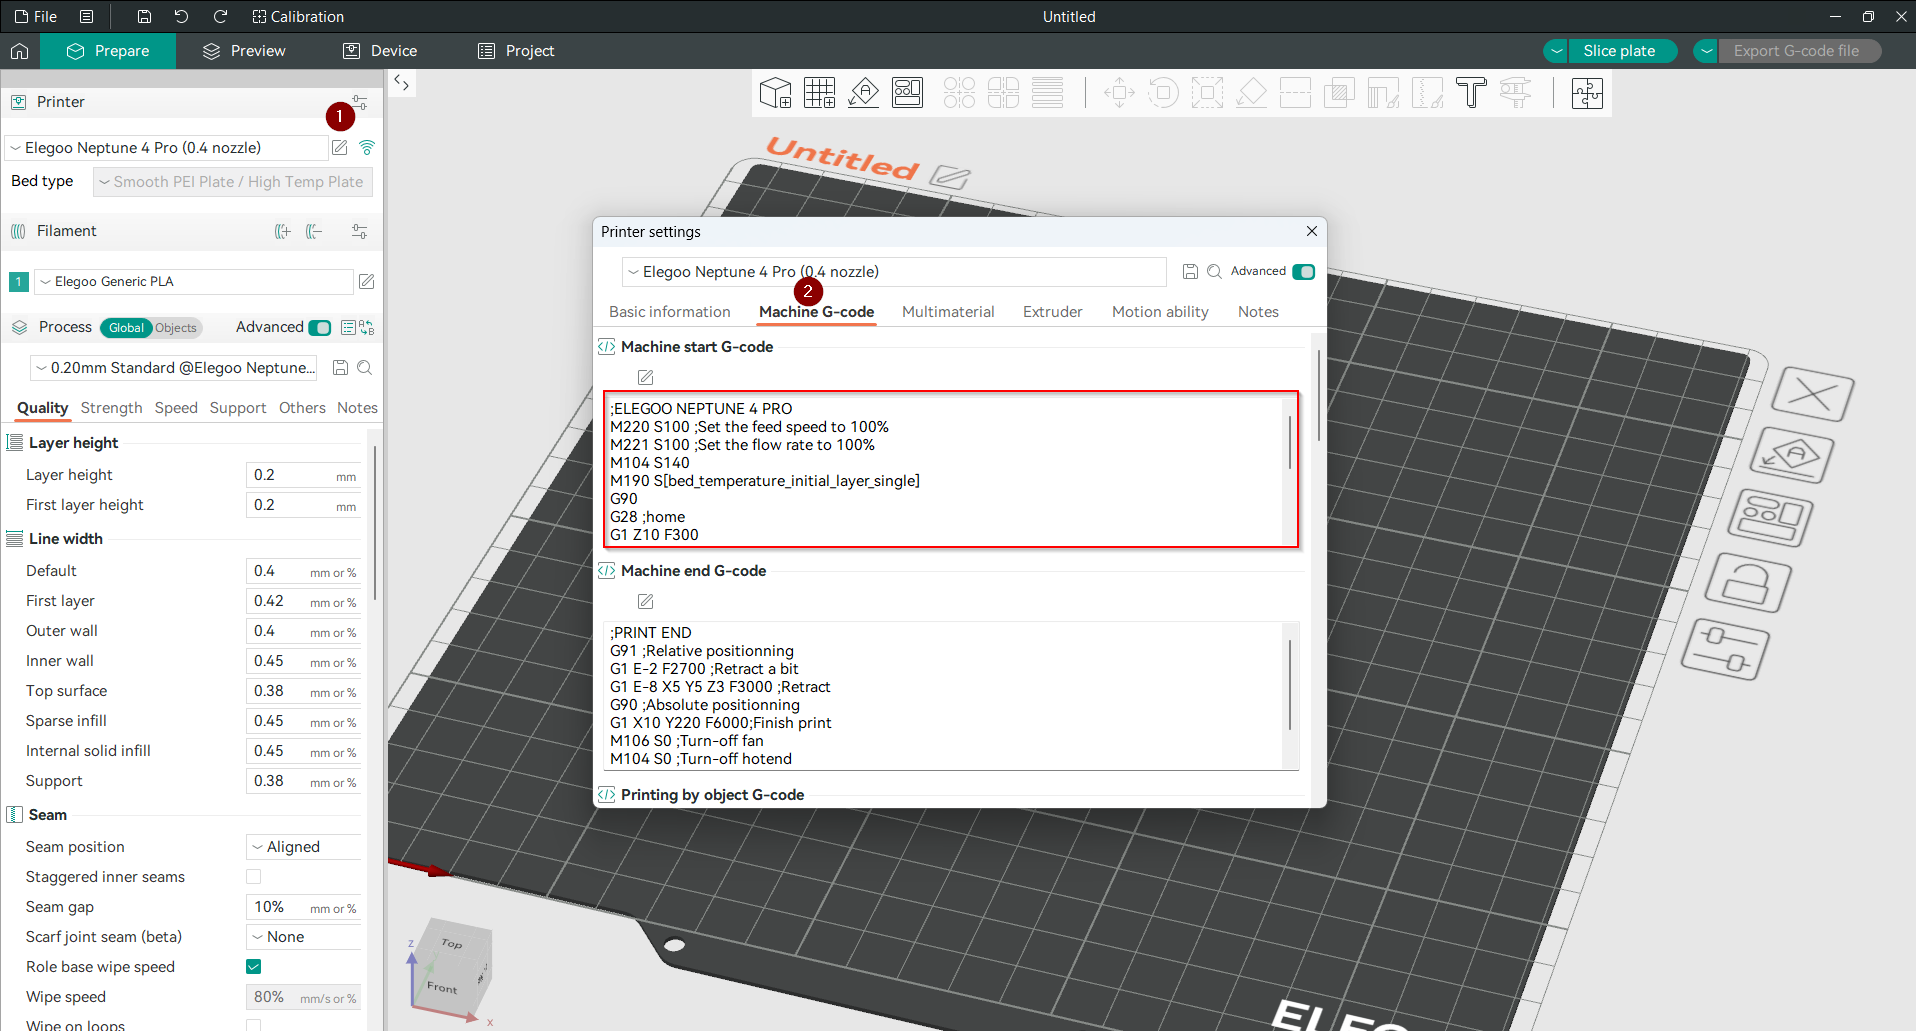
Here’s a step-by-step guide to editing the Start G-code for your printer:

-
Open Orca Slicer: Open the software and select the printer profile you want to edit.
-
Edit Printer Settings: Click the pencil icon next to your selected printer profile.
-
Go to Machine G-code: In the appeared window, find the “Machine G-code” tab. This is where the Start G-code is located.
-
Edit Start G-code: Make any changes to the Start G-code as needed. For example, you might change the temperatures, priming distance, or add new commands for bed leveling, etc.
Once you’ve made your changes, Save the profile, and you’re good to print with your custom Start G-code.
Advanced uses: Klipper Macros
Klipper macros are super powerful and can automate and simplify 3D printing tasks. If you don’t know what Klipper is, it’s an open-source 3D printer firmware that runs on an external processor like a Raspberry Pi while the printer’s microcontroller handles the physical stuff.
One of the coolest things about Klipper is that it can use macros to automate complex or repetitive tasks.
What Are Klipper Macros?
Klipper macros are custom scripts made up of multiple G-code commands that allow you to automate 3D printing tasks.
Macros can automate many things like bed leveling, filament changes, disabling steppers, or PID tuning. You can set up your custom macro to replace long, complex commands with a single line of code in your G-code, as each macro has a call name. When you write this call name anywhere in the G code, it will execute the G code inside the macro.
You can also add these macros as buttons in your Mainsail or Fluidd interface so you can control many tasks with just one click from your dashboard.

Why Use Klipper Macros?
Using macros in Klipper has many advantages:
- Klipper macros let you customize many processes without needing to change the G-code for each print (we will explain an example of this: the START_PRINT macro).
- You can automate tasks that aren’t directly supported by Klipper, like custom bed leveling tasks.
- Macros are easy to set up and adjust.
- You can group related tasks into one macro making everything organized, easy to access and make the G-code more readable.
Macros are written in Jinja2 template language. Many macros are shared by the community, and you can just copy and paste them into your Klipper’s macro configuration file to use them.
Practical Example: Using Klipper Macros with the Start G-Code
You can create a START_PRINT macro that contains all the start G-code commands. But why would you need to do that?
Imagine that you have an ELEGOO NEPTUNE 4 PRO printer and many G-code files on your PC ready to print. Now you want to modify your start G-code to add a beep tone at the end of the start G-code sequence before the actual print starts. Without macros, you would have to open each G-code file and edit it manually, or update the start G-code in Orca Slicer and re-slice all the files, which can take a lot of time. This is where macros come in!
By having a START_PRINT macro in your printer’s Klipper configuration, you can use it anywhere in your G-code files. Just add START_PRINT in the start G-code section of your Orca Slicer, and then you can edit or update this macro from one place in your Klipper’s macro configuration file, and it will apply to all the sliced files that have START_PRINT in the start G-code section.
This saves you time and makes updates easy.
Here’s an example of how a START_PRINT macro with Beep sound update might look:
[gcode_macro START_PRINT]
gcode:
    M220 S100 ; Set the feed speed to 100%
    M221 S100 ; Set the flow rate to 100%
    M104 S140 ; Set initial nozzle temperature
    M190 S{bed_temperature_initial_layer_single} ; Wait for bed to reach temperature
    G90 ; Set absolute positioning
    G28 ; Home all axes
    G1 Z10 F300 ; Move the printhead up 10mm
    G1 X67.5 Y0 F6000 ; Move to the edge of the bed
    G1 Z0 F300 ; Move down to bed level
    M109 S{nozzle_temperature_initial_layer} ; Wait for nozzle to reach temperature
    G92 E0 ; Reset extruder position
    G1 X67.5 Y0 Z0.4 F300 ; Move to start position
    G1 X167.5 E30 F400 ; Draw the first line of filament to prime
    G1 Z0.6 F120 ; Lift the nozzle slightly
    G1 X162.5 F3000 ; Fast move to reset position
    G92 E0 ; Reset extruder again
    M300 S1000 P500 ; Beep tone to indicate the end of the start G-code
As you can easily recognize, the macro has a specific syntax:
      [gcode_macro <macro_name>]
gcode:
  <gcode_command_1>
  <gcode_command_2>
  ...
  <gcode_command_n>
Let’s break it down:
-
[gcode_macro <macro_name>]:This line defines the start of the macro definition. Replace
<macro_name>with your chosen name for the macro. -
gcode:This keyword indicates that the following lines are G-Code commands for the macro to execute.
-
<gcode_command_1>through<gcode_command_n>:These lines are the individual G-Code commands that make up the macro.
For a more in-depth guide on Klipper macros and how to add your macro to Klipper, you can refer to this detailed article on Klipper macros that covers everything you need.
With this macro, all you need to do is include the START_PRINT command in your G-code, and Klipper will do the rest. You can modify this macro to add, remove, or adjust any commands as needed from the config file. This saves you time and ensures consistent print preparation without having to reslice your model.
FAQs
Q1: What is Start G-code in 3D printing?
Answer: Start G-code is a series of instructions that prepares your 3D printer before it starts printing. It homes the printhead, sets temperatures, primes the filament, and makes sure the printer is ready for a successful print.
Q2: Why is Start G-code important for print quality?
Answer: A good Start G-code will calibrate the printer and make it ready to start, which will prevent common issues like bad bed adhesion, incorrect extrusion, or uneven first layers, resulting in better prints.
Q3: Can I modify Start G-code in Orca Slicer?
Answer: Yes! Orca Slicer allows you to edit the Start G-code in the printer settings. You can change filament priming, bed leveling, and temperatures to suit your 3D printer.
Q4: How does Start G-code affect bed adhesion?
Answer: Start G-code sets the right temperatures and levels the print bed before printing starts. This prevents warping or the first layer not sticking to the bed.
Q5: What are common commands found in Start G-code?
Answer: Common Start G-code commands include:
G28: Home the printer’s axes.M104: Set nozzle temperature.M190: Set bed temperature.G92: Reset extruder position.G1: Move the nozzle to specific coordinates.
Q6: Can I use the same Start G-code for multiple printers?
Answer: No, each printer may require unique Start G-code settings. It’s important to customize the Start G-code based on your printer's hardware and specifications to ensure it works correctly.
Q7: How do Klipper macros work with Start G-code?
Answer: Klipper macros allow you to automate and simplify tasks in your Start G-code by grouping multiple commands into a single macro. This makes updating your Start G-code easier and faster.
Q8: What happens if I don’t configure Start G-code correctly?
Answer: Bad or missing Start G-code can cause all sorts of printing issues, like bad bed adhesion, under extrusion, wrong temperatures, or the printhead starting in the wrong position and ruining the print.
Q9: How can I optimize filament priming in Start G-code?
Answer: You can control how much filament is extruded before the print starts by adjusting your Start G-code. This prevents under-extrusion or gaps in the first layer, which can weaken the print.
Q10: Where can I find the Start G-code for my printer in Orca Slicer?
Answer: In Orca Slicer, go to your printer profile, click the pencil icon to edit it, and go to the "Machine G-code" tab. The Start G-code will be there, ready for customization based on your preferences.
Final Thoughts
Setting up Start G-code might seem daunting at first, but it’s a simple way to make sure your 3D printer is ready to go before each print. These basic settings will get your printer in the right position, heat up correctly, and get the filament flowing. By learning how to adjust this G-code, you can fix common issues like bad bed adhesion or uneven prints right from the start.
By editing the Start G-code in Orca Slicer, you can fine-tune your setup. With small changes, you can achieve better results. Using Klipper macros can also save time and make the whole process easier and more convenient.
In the end, knowing Start G-code gives you more control over your prints. It’s a simple way to improve print quality and avoid problems, so everything runs smoothly from the start.
Happy printing!
