Step-by-Step Guide: Unclogging Your 3D Printer Nozzle
Introduction
Have you ever wondered why sometimes your 3D prints just don't turn out right? The answer might be as simple as a clogged nozzle. In the world of 3D printing, the nozzle is like the tip of a pen. If it's clogged, nothing good comes out, and your printing turns into a bit of a mess. That's why keeping your nozzle clean is super important.
But how do you know if your nozzle is clogged? It's pretty easy to spot. Maybe your printer is acting like it's on a coffee break, not extruding any filament. Or perhaps the filament comes out all wonky, making your prints look sad and incomplete. Sometimes, your printer might even make a clicking sound – that's its way of telling you something's not right.
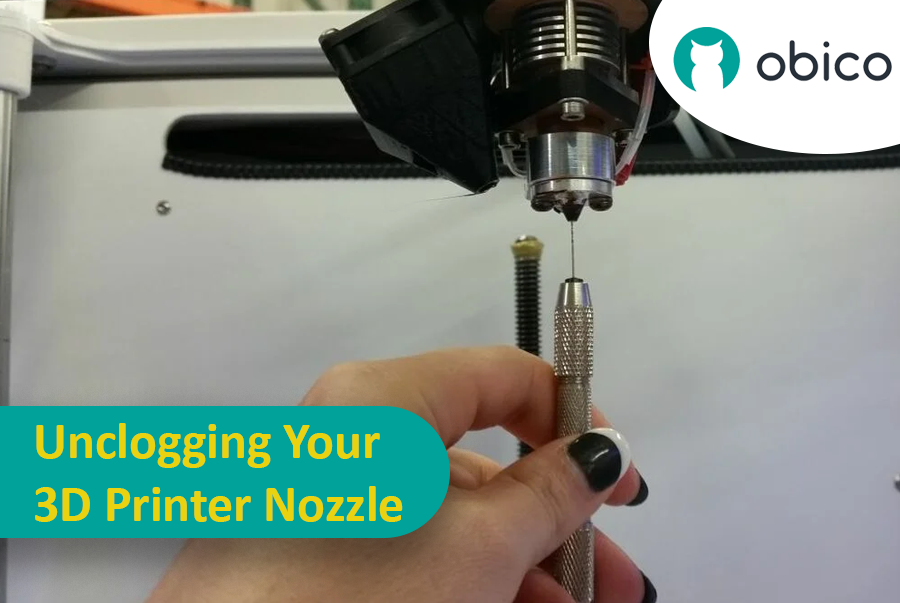
Don't worry, though. In this guide, we'll walk you through everything you need to know about keeping your nozzle clean and clear. Whether you're a 3D printing pro or just starting out, we've got you covered. We'll show you how to spot, fix, and prevent those pesky nozzle clogs so you can get back to printing cool stuff without any hiccups. Let's get started!
Understanding Nozzle Clogs
Before we jump into fixing clogged nozzles, let's take a moment to understand why they happen in the first place. Knowing what causes a clog can help you prevent it from happening again.
Common Causes of Nozzle Clogs
Filament Quality Issues
Ever picked up a bargain filament and then found your prints looking a bit off? That's often a sign of low-quality filament. Cheap filaments can be inconsistent in diameter or mixed with impurities, leading to clogs. It’s like trying to squeeze a chunky sauce through a tiny straw - it just doesn’t work. When the filament isn't smooth and uniform, it can easily get stuck in the nozzle or not melt properly, causing a traffic jam right at the exit.
Temperature Inconsistencies
Temperature plays a big role in 3D printing. If the nozzle is too cool, the filament won’t melt properly and will struggle to pass through, creating a clog. On the other hand, too hot, and you might face what's called 'heat creep'. This is when the filament melts too early before it reaches the nozzle, gumming up the works. It’s a bit like cooking: too hot and your food burns, too cold and it won’t cook properly. Finding the right temperature is key to smooth printing.
Nozzle Alignment Problems
Imagine trying to pour water through a hose that's bent or twisted – it just doesn't flow right. The same concept applies to your 3D printer nozzle. If the nozzle isn’t aligned properly with the rest of your printer setup, it can cause all sorts of trouble. This misalignment can lead to uneven extrusion of the filament, resulting in partial clogs or even complete blockages. It’s like trying to thread a needle with your eyes closed – pretty difficult, right? Ensuring your nozzle is perfectly aligned with the print bed is crucial for a smooth and clog-free printing experience.
Dust and Dirt Accumulation
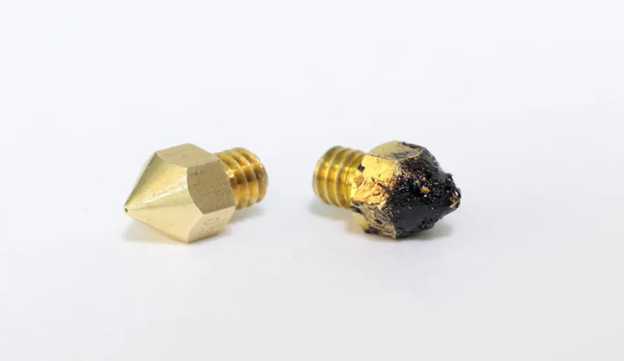
Your 3D printer isn't immune to the dust and dirt that accumulates around us. Over time, these tiny particles can stick to the filament and get dragged into the nozzle, gradually building up and causing a blockage. It's similar to how dust bunnies form under your couch. Even a small amount of this build-up can affect the quality of your prints and lead to clogs. Keeping your printing area and filament spools clean can help prevent this issue, ensuring that only clean and pure filament makes its way through your printer.
Recognizing a Clogged Nozzle
Knowing when you have a clogged nozzle is the first step in tackling the problem. Here are some clear signs to watch out for:
Visual Indicators
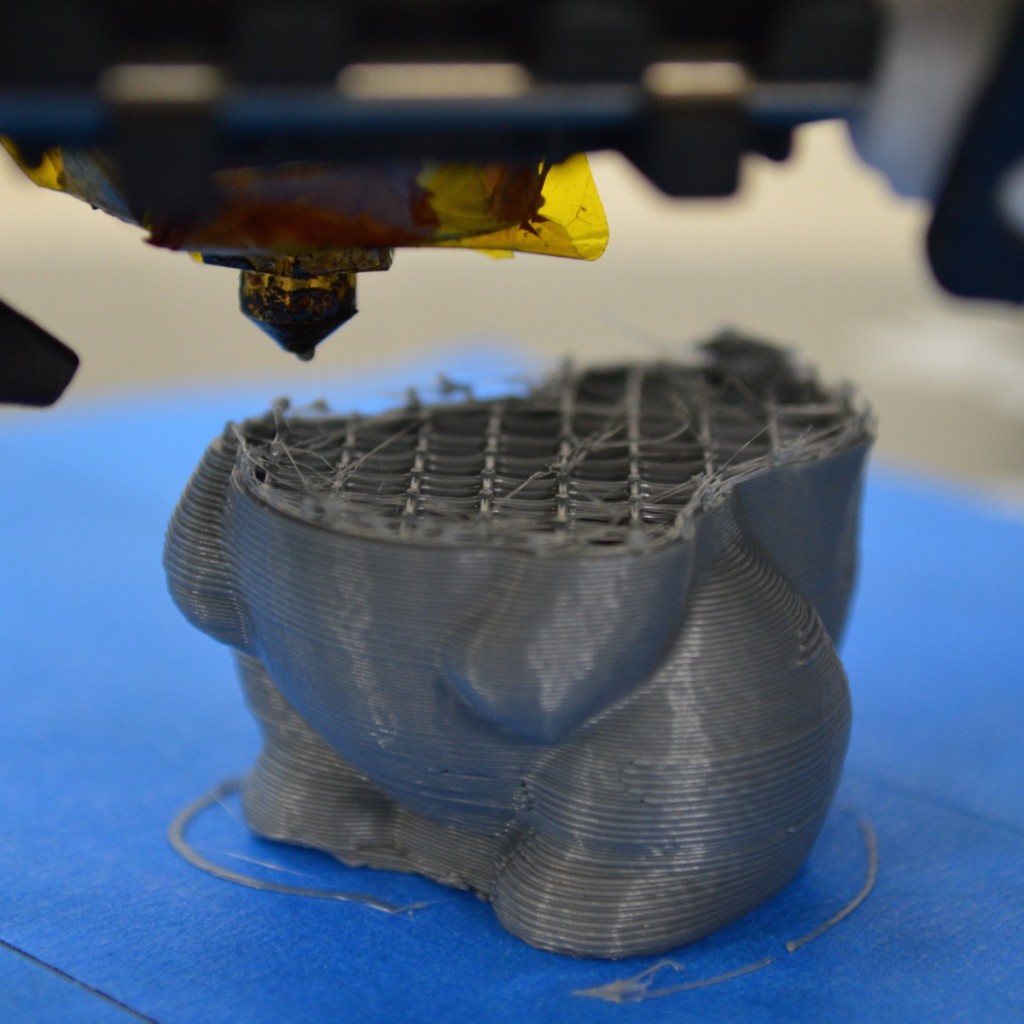
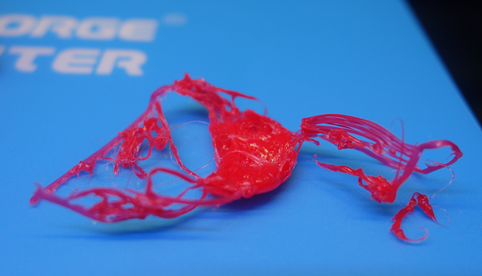
Sometimes, you can literally see the problem. A visual giveaway is when the filament isn’t extruding smoothly or consistently from the nozzle. It might come out in thin, weak streams, or in some cases, not at all. If you peek at the nozzle during a print and notice little to no filament coming out, or if the filament is curling upwards back onto the nozzle, it’s like a big neon sign saying, “Hey, I’m clogged!
Print Quality Issues
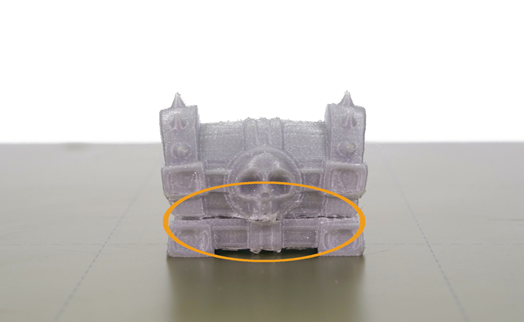
The quality of your prints can tell you a lot about the state of your nozzle. If you start noticing incomplete prints, gaps in layers, or the filament seems to be extruding unevenly, these are all red flags. It’s like when your favorite pen starts skipping while you’re writing. Inconsistent extrusion due to a partial clog can result in prints that look like they've been on a diet – sparse and not quite filled out. Full clogs, on the other hand, will stop your printing in its tracks.
The Sounds of Struggle
Your 3D printer usually hums along quietly during a print job. However, if you start hearing unusual sounds, like clicking or grinding noises from the extruder motor, it's time to pay attention. These sounds can be a distress signal, indicating that the motor is working overtime to push filament through a clog. It's similar to a car engine straining under stress – definitely something you can't ignore.
Inconsistent Filament Diameter
Sometimes, the filament itself can give you a hint. If you notice significant variations in the diameter of the filament as it's extruded, this inconsistency could lead to clogging. Think of it like trying to pass a chunky rope through a small tube – it's going to get stuck somewhere.
Excessive Filament Oozing or Leakage
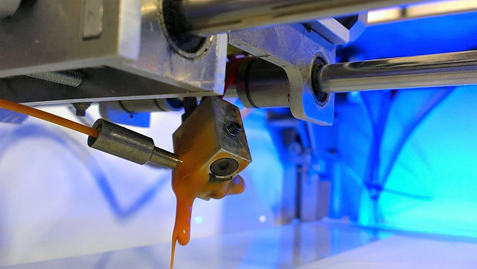
A clogged nozzle can cause the filament to ooze or leak out from the sides of the nozzle or even from other parts of the hotend assembly. This is often a sign that the internal pressure within the nozzle is not right, leading to filament finding the path of least resistance. It's a bit like a garden hose with a kink in it; the water has to go somewhere, and it might start leaking out from unexpected places.
Abrupt Stop in Filament Flow
If your printer starts a job well but suddenly stops extruding filament, it's a strong indication of a clog. This sudden halt in filament flow can be compared to a blocked water pipe; everything seems fine until the blockage is reached, and then the flow just stops.
Poor Adhesion and Warping
While these issues can be caused by other factors, they can also be a symptom of a partially clogged nozzle. If the extruded filament isn’t coming out evenly, it won't adhere properly to the build plate, leading to warping or misshapen prints.
Preparatory Steps Before Unclogging
Before diving into the unclogging process, it's important to prepare adequately. This preparation not only makes the process smoother but also ensures your safety and the safety of your 3D printer.
Safety Precautions
- Turn Off and Unplug the Printer: Always start by turning off and unplugging your 3D printer. This reduces the risk of electrical shock and injury.
- Allow the Nozzle to Cool: If the printer was in use, allow the nozzle to cool down before attempting any cleaning. Handling a hot nozzle can lead to severe burns.
- Use Protective Gear: Wear safety glasses to protect your eyes from potential filament debris, especially when using tools inside the nozzle. Gloves can also be helpful, particularly if you're dealing with a hot nozzle or using chemicals.
- Work in a Well-Ventilated Area: If you're going to use solvents or heat guns, make sure you’re in a well-ventilated area to avoid inhaling fumes.
- Keep a Clean Workspace: Ensure your workspace is clean and organized. Clutter can cause accidents, especially when working with small, intricate parts of a 3D printer.
Gathering Necessary Tools
Having the right tools at hand is essential for effectively unclogging your nozzle. Here’s a list of tools and materials you might need:
- Needle-Nose Pliers: Useful for gripping and pulling the filament out of the extruder.
- Tweezers: Great for removing small bits of filament and debris from the nozzle.
- Wire Brush: Used for cleaning the exterior of the nozzle and removing any debris.
- Acupuncture Needles or Fine Wire: These are perfect for gently poking through and dislodging clogs within the nozzle.
- Heat Gun or Hair Dryer: Helpful for warming up the nozzle for easier filament removal.
- Cleaning Filament: Special filament designed for cleaning out the interior of the nozzle.
- Wrench or Socket Set: Necessary for removing the nozzle, if required.
- Solvents like Acetone (for ABS) or ethyl acetate for PLA: Used for soaking the nozzle to dissolve certain types of filament clogs.
- Cotton Swabs and Cloth: Useful for cleaning and wiping the nozzle.
- Lubricant (Optional): Can be used for smooth reassembly of parts.
Gather these tools and have them within easy reach before you start the unclogging process. This preparation not only saves time but also ensures you can handle the task efficiently and safely. With your tools ready and safety precautions in place, you’re now set to tackle the clog in your 3D printer's nozzle.
Unclogging Techniques
Dealing with a clogged nozzle in your 3D printer can be frustrating, but with the right techniques, you can get back to printing smoothly. Here's how you can tackle those stubborn clogs.
Manual Filament Push
Sometimes, a simple manual push can clear the clog. Here's what to do:
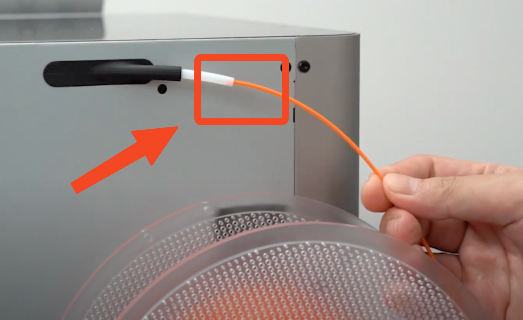
- Heat the Extruder: Start by heating your extruder to the normal printing temperature of the filament you're using.
- Release the Extruder Tension: If your printer has an idler arm on the extruder, release it to loosen the tension.
- Manually Push the Filament: Once the extruder is hot, gently push the filament through by hand. You're trying to push any clogged material through the nozzle.
- Observe the Extrusion: Watch the filament as it comes out of the nozzle. If it starts to extrude normally, the clog is cleared.
- Cool Down: Once unclogged, allow the extruder to cool back down before resuming normal operation.
The Cold Pull Method
The Cold Pull Method is effective for removing more stubborn clogs:
- Heat the Nozzle: Heat your nozzle to a temperature that's higher than the usual printing temperature of the filament.
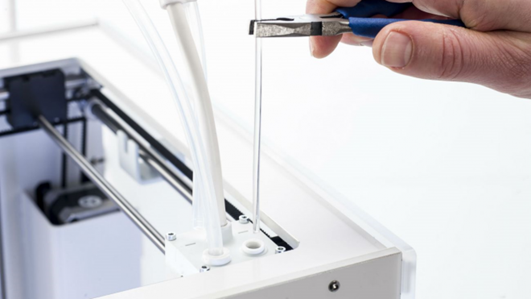
- Insert a Nylon Filament: Nylon works best for this method. Push it through until you see it extrude from the nozzle.
- Cool Down the Nozzle: Lower the temperature to allow the nylon filament to solidify inside the nozzle. This usually means going below the glass transition temperature of the filament.
- The Pull: Once the filament has solidified (but not completely cold), apply a steady pull on the filament. The goal is for the filament to bring the clog out as it's removed.
- Repeat if Necessary: Sometimes, you might need to repeat the process a few times for complete cleaning.
Using Cleaning Filaments
Cleaning filaments are specially designed to clean nozzles and are particularly useful for preventing clogs:
- Heat Up: Heat your nozzle to the recommended temperature for the cleaning filament.
- Insert Cleaning Filament: Feed the cleaning filament through the extruder until it starts coming out of the nozzle.
- Extrude and Retract: Keep extruding and then retracting the cleaning filament. This helps to remove any residues inside the nozzle.
- Remove the Cleaning Filament: Once you feel that the nozzle is cleaned, remove the cleaning filament.
- Final Check: Run some regular filament through the nozzle to ensure it’s extruding correctly.
The Needle or Guitar String Method
For more delicate unclogging, where you need to be gentle to avoid damaging the nozzle, the needle or guitar string method is quite effective.
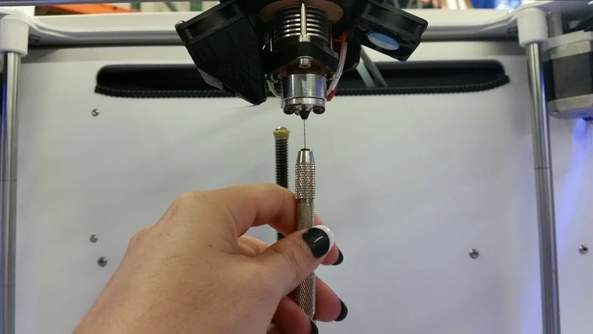
- Heat the Nozzle: Warm up the nozzle to the printing temperature of the filament you're using.
- Insert the Needle or Guitar String: Use a needle or a guitar string that's thin enough to fit into the nozzle. An acupuncture needle or a high E guitar string is usually a good fit for standard nozzles.
- Gentle Probing: Carefully insert the needle or string into the nozzle and gently move it around. The aim is to dislodge any particles that are causing the clog.
- Extrude Filament: After probing, try extruding some filament to see if the clog is cleared. Repeat the probing if necessary.
The Solvent Bath Method
When you're dealing with a stubborn clog caused by certain materials, a solvent bath can be an effective solution.
- Identify the Correct Solvent: For PLA, a soak in ethyl acetate can work, while ABS dissolves in acetone. Make sure to use the appropriate solvent for the filament type that caused the clog.
- Remove the Nozzle: Carefully detach the nozzle from the printer. This might require specific tools depending on your printer model.
- Soak the Nozzle: Place the nozzle in a container with the solvent. Let it soak for several hours, or even overnight for tough clogs.
- Clean and Dry: After soaking, remove the nozzle from the solvent. Use a needle or guitar string to remove any remaining residue. Allow the nozzle to dry completely before reattaching it..
Preventive Measures and Maintenance
Keeping your 3D printer's nozzle clear is essential for ensuring it continues to work well. Regular maintenance and being selective with your printing materials can help minimize how often clogs occur.
Regular Nozzle Cleaning
Keeping the nozzle clean is crucial for preventing clogs. You should regularly check the nozzle for any leftover bits or residue, especially after each printing session. It's also a good idea to run cleaning filaments through your printer now and then, particularly after using high-temperature or composite materials. If there's any gunk on the outside of your nozzle, gently clean it off with a small wire brush when the nozzle is slightly warm. Depending on how often you print, you should also schedule a deep clean of the nozzle every month or two, using methods like the Atomic Pull or Solvent Bath. And remember, keeping the extruder gear clean is just as important; this helps prevent the build-up of filament particles that could lead to future clogging.
Choosing the Right Filament
The type of filament you use can significantly impact the likelihood of clogs. Investing in high-quality filaments is wise as they are more consistent in diameter and less prone to contain impurities that could lead to clogging. Different filaments have different melting points and behaviors, so it's important to choose a filament that's compatible with your printer's capabilities. Store your filaments in a dry, dust-free environment to prevent moisture absorption, which can lead to printing issues and increase the likelihood of clogs. Whenever you're trying a new type of filament, it's beneficial to run a test print first to see how it behaves and make any necessary adjustments to the temperature and speed settings. Also, avoid mixing filaments; when switching between different types, make sure to completely clear out the previous filament from the nozzle to prevent any interaction and potential clogs.
Optimal Temperature and Speed Settings
Finding the right balance in temperature and speed settings is key to preventing nozzle clogs. Start with the temperature and speed settings recommended by the filament manufacturer, as these are usually a good baseline. Pay attention to how your filament behaves during printing and adjust the temperature accordingly. If you notice poor layer adhesion or under-extrusion, you may need to slightly increase the temperature. Conversely, if the filament oozes or strings, reducing the temperature might be necessary. When it comes to print speed, starting slow and gradually increasing while ensuring consistent filament extrusion is advisable. Remember, different materials may require different settings, so be prepared to make adjustments when switching from one filament type to another, like PLA to ABS or PETG. Keeping a log of the settings that work best for different materials can save time and reduce guesswork in future projects.
Ensuring Proper Nozzle Alignment
Proper nozzle alignment is crucial for avoiding clogs and ensuring high-quality prints. Make sure your print bed is level as a starting point. You can use a piece of paper to gauge the distance between the nozzle and the bed, adjusting until the nozzle lightly grips the paper. The nozzle should be close enough to the bed to effectively extrude filament but not so close that it scrapes the bed or blocks filament flow. Regularly inspect the nozzle for any signs of wear or damage, as a damaged nozzle can affect alignment and should be replaced. Some printers come with alignment tools or gauges to help set the correct nozzle height and alignment; use these tools if available. After making any adjustments, run a test print to check the first layer's adhesion and quality, making further adjustments if necessary.
By regularly checking and adjusting your printer's temperature, speed, and nozzle alignment, you can significantly reduce the likelihood of experiencing nozzle clogs and other printing issues. This proactive approach to maintenance will keep your 3D printer in top condition, ready for your next creative project.
Advanced Troubleshooting
When standard methods fall short in resolving nozzle clogs, advanced troubleshooting steps become necessary. These techniques are crucial for handling stubborn clogs and understanding when it’s time to replace the nozzle.
Dealing with Persistent Clogs
Persistent clogs can be particularly challenging. If you find yourself facing a clog that just won't clear, consider revisiting the manual filament push and the cold pull methods as a starting point. Sometimes, repeating these processes can dislodge clogs that weren’t removed during the first attempt.
If the clog remains, disassembling the hot end for a closer look might reveal underlying issues. Inspecting the internal components of the nozzle could uncover hidden problems like deformities or damage to the filament path. When using heat and mechanical cleaning, gently poke at the clog with a pin or needle after heating the nozzle. This requires care to avoid any damage to the nozzle itself.
When to Replace the Nozzle
Knowing when to replace a nozzle is key to maintaining the performance of your 3D printer. If repeated unclogging attempts have failed, the nozzle might be beyond repair. Physical damage to the nozzle, such as a misshapen or enlarged opening, or signs of cracking, are clear indicators that it’s time for a replacement. The age and usage of the nozzle should also be considered, as frequent printing, especially with abrasive materials, can lead to wear and tear over time.
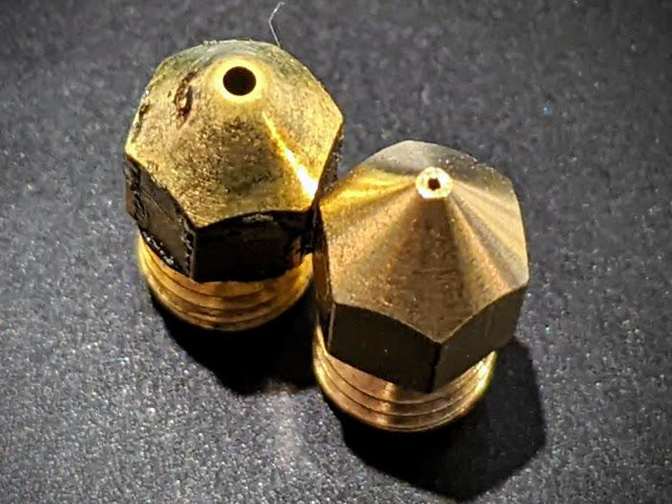
Another sign that the nozzle needs replacing is a consistent drop in print quality. If you’re experiencing issues like inconsistent extrusion or rough surface finishes even after thorough cleaning, this could signify that the nozzle is worn out. In such cases, replacing the nozzle is usually more effective and less time-consuming than attempting further repairs. Keeping a spare nozzle on hand is a good practice, and remember, different materials might require different types of nozzles.
FAQs
- Why does my 3D print keep clogging? Your 3D print may clog due to various reasons such as low-quality or contaminated filament, incorrect nozzle alignment, inadequate temperature settings, or insufficient cleaning practices.
- How do I know if my 3D printer nozzle is clogged? Signs of a clogged nozzle include inconsistent filament extrusion, poor print quality, strange noises from the extruder, or no filament extrusion at all.
- What’s the best way to clean a clogged 3D printer nozzle? Techniques like the manual filament push, the cold pull method, using cleaning filaments, or the needle/guitar string method are effective. For severe clogs, a solvent bath might be necessary.
- Can I prevent my 3D printer nozzle from clogging? Yes, regular maintenance, using high-quality filament, proper storage of materials, and correct temperature and speed settings can significantly reduce the chances of clogging.
- How often should I clean my 3D printer nozzle? It’s advisable to inspect and clean the nozzle regularly, especially after extensive printing sessions or when changing filaments. Deep cleaning every month or two is also recommended.
- What should I do if advanced unclogging methods don’t work? If methods like the Atomic Pull or solvent baths don’t work, it might be time to replace the nozzle, especially if it shows signs of physical damage or significant wear.
- Are there different cleaning methods for different filament types? Yes, different filaments might require specific cleaning methods. For example, PLA might be cleaned with different techniques or temperatures compared to ABS or PETG.
- Can a damaged 3D printer nozzle be repaired? Minor issues might be fixable, but if the nozzle is significantly damaged or worn out, it’s usually best to replace it.
- Do different 3D printers require different maintenance routines? While basic maintenance principles are similar, specific routines can vary based on the printer model and manufacturer guidelines. Always refer to your printer’s manual for the best practices.
- How can I tell if my printer’s temperature settings are correct? Start with the manufacturer’s recommendations and adjust based on the filament’s behavior during printing. Signs like poor adhesion or stringing can indicate the need for temperature adjustments.
Conclusion
Navigating the world of 3D printing brings its own set of challenges, and a clogged nozzle is definitely one of the more common issues. However, with the right knowledge and tools at your disposal, tackling a clogged nozzle doesn’t have to be a daunting task. Understanding the causes of clogs, coupled with regular maintenance and appropriate troubleshooting techniques, can greatly reduce the frequency and impact of these issues.
Remember, the key to a smooth 3D printing experience lies in preventive care. Regular cleaning, proper filament selection, and attention to temperature and speed settings are not just good practices but essential habits for any avid 3D printing enthusiast. Furthermore, being able to recognize the early signs of a clogging issue and knowing when it’s time to replace a nozzle can save you both time and resources in the long run.
Embrace these challenges as part of your 3D printing journey. Each clog you clear, and every issue you troubleshoot, adds to your experience and knowledge, making you more adept in the art of 3D printing. Happy printing!
