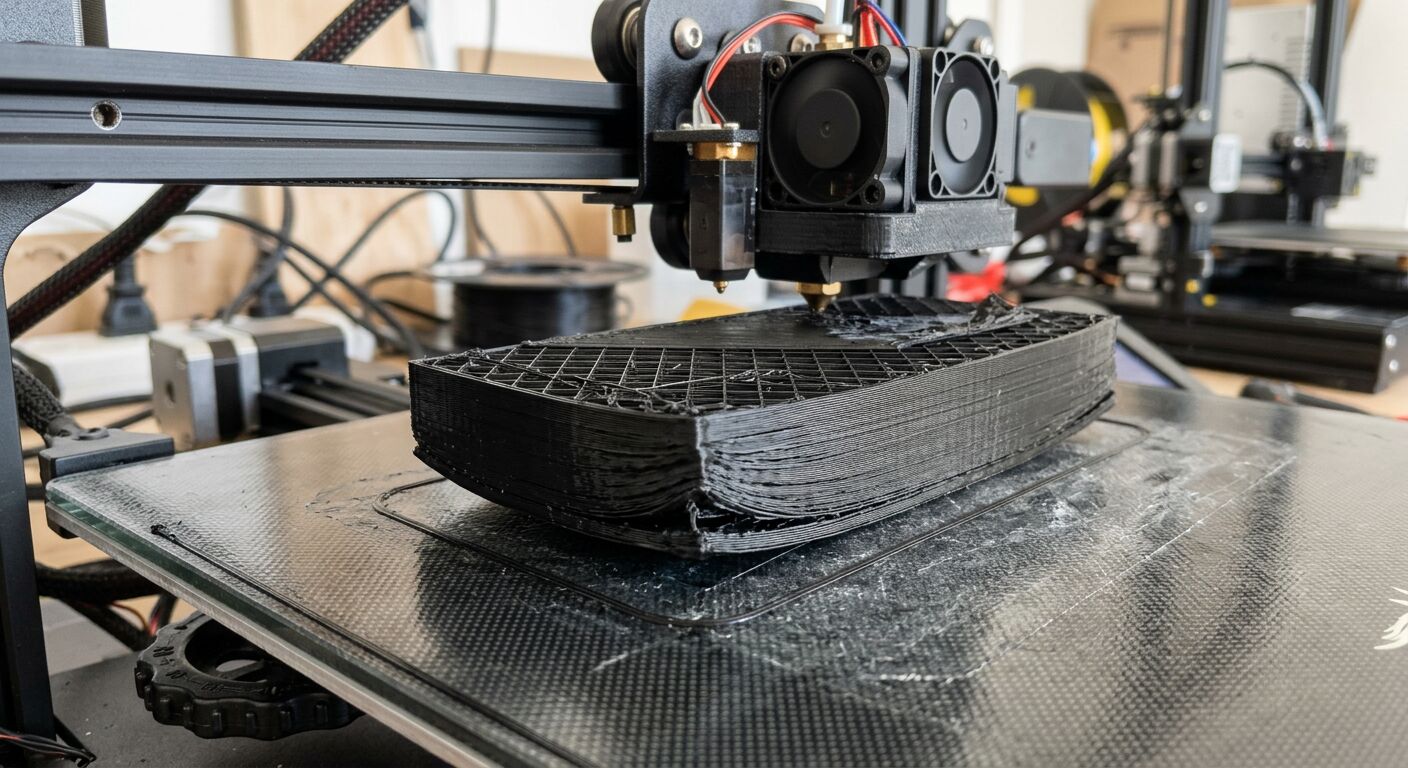
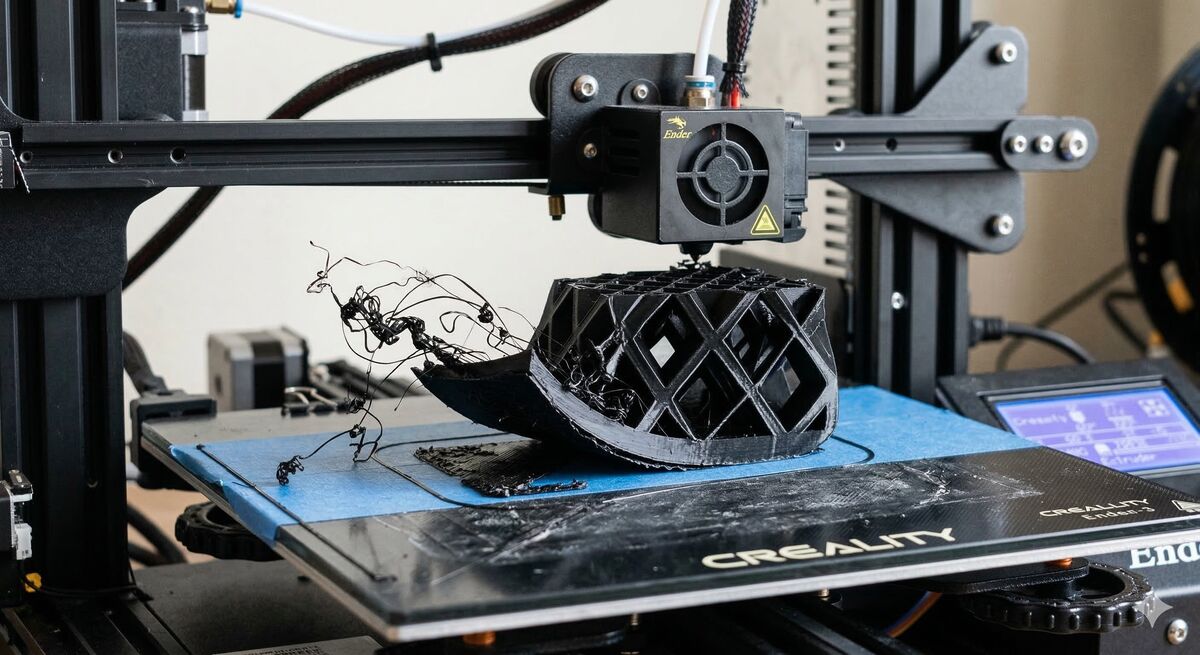
NOZZLE NINJA

First Layer AI Error Detection for OctoPrint & Klipper Now Available!

OBICO_NOZZLE_NINJA_COMPATIBLE_BADGE

41 posts tagged with "3D Printing"

View All Tags

Getting started with 3D printing, you’d expect to simply connect your 3D printer and send your 3D models for printing. Much like plug and play–except you’d need to slice your 3D model first.

3D printing works by printing layers, the slicer among many things, converts the 3D model into layers for the printer. The choice of printing slicer not only determines the quality but also the success rate of prints.

This guide will help you decide the best 3D printing slicer, whether just unpacking your 3D printer or looking to streamline your workflow.

What Is a 3D Printing Slicer?

A slicer gives a preview of your print, adjusting position and checking any errors on the build plate. It also gives you control over 3D printing parameters like print resolution, infill density, structures for overhangs, temperature controls, and any brims for adhesion. 

A 3D printing slicer works by detecting your 3D printer and using information like extruder, print material, and any inputs like nozzle diameter, creating an appropriate G-code from the print-ready STL file.

What Makes A Beginner-Friendly Slicer?

Several slicer features are essential for beginners to get started with printing projects. These criteria will help you identify the must-have features.

Ease of Use

A beginner friendly slicer should have a decluttered interface that makes it easy to navigate essential options and at the same time, offer the flexibility to switch between beginner and advanced modes.

Some slicers color code their printing settings and options to green, yellow, and red, (🟢🟡🔴) guiding users to toggle or change parameter settings.

Novice 3D enthusiasts can tinker with the green settings and advanced users modify the yellow and red parameters.

3D printer slicer modes

If you've been using 3D printers for a while, you'll know there's a way to remotely control prints, check on progress, and perhaps even optimize your printer's movement for smoother running.

But how exactly can you do that?

It's impossible without getting slightly technical, but it's all worth the faster print times and advanced motion control. The quickest answer is–Klipper firmware.

Klipper is an open-source firmware based on Python developed to handle the advanced changes in 3D printing hardware. Normally, 3D printers come with a standard firmware hardcoded onto the on-board memory and any configuration change requires firmware installation, like solving a labyrinth. Instead, Klipper firmware can be edited, and modified and a simple device restart applies the changes.

It's compatible with many 3D printers and you can check the complete list here. Klipper pairs with these common printers:

  • Creality

  • Sovol

  • Pursa

  • Anycubic

    You have set up Klipper and the Moonraker API correctly, and it is connected to your printer. An interface such as Mainsail/Fluidd is highly recommended.

Sovol SV06 Ace - Klipper remote control and AI

What Is Remote Access Using Klipper?

Remote access or remote controlling your 3D printer allows you to monitor (in real-time), control, manage print files, and receive updates about your print from a distance. Remote access using Klipper works through a web-based interface requiring your phone or computer and a 3D printer connected to the internet.

That's slightly unsecure, but there are other ways like port forwarding and bots and then there's Obico.

Obico offers everything that comes with remote access plus, smart monitoring, AI error detection, print optimization, file management, and cloud-based storage. It's entirely open-source and you can even set up your own local server and have hybrid access or a fall-back option.

SOVOL SV06 ACE Klipper Integration

Previous Sovol printers like the SV06 are based on a Marlin control board which runs entirely on the printer's micro-controller. Marlin is the old architecture for 3D printers and faces performance issues because Marlin firmware does not meet the advanced hardware capabilities of printers.

There are ways to upgrade to a Klipper firmware which involves using a Raspberry Pi controller, or a tablet. However, now you can also use Klipper touchscreens such as the one provided by Sovol which simplifies the upgrade.

Sovol SV06 ACE comes with pre-installed Klipper integration, so you don't have to go through the Raspberry Pi guides found on the internet for your Sovol printer.

Klipper Integration

What is Bambu Studio?

If you’re into 3D printing, or just dipping your toes into it, you’ve probably come across Bambu Studio.

But what is it, exactly?

In simple terms, Bambu Studio is a 3D printing slicer software that acts as the bridge between your creative ideas and your printer.

It’s designed to be user-friendly, so you don’t need anything like a PhD in 3D printing to get started. Yet, it’s packed with advanced features (like multi-material support) that will help you handle complex projects very easily. And its slicing engine? It’s not just fast, it’s also smart and is designed to ensure your prints come out just the way you envisioned them.

It’s also compatible with a variety of 3D printers, such as Bambu Lab’s X1 series and P1P, along with other popular models from brands like Creality and Prusa.

Let’s dive into how to get it up and running!

Bambu Studio, released back in 2022 alongside the Bambu Labs X1 3D printer, is an open sourced slicer software based on PrusaSlicer (which in turn, was based on Slic3r).

It is naturally, the weapon of choice for Bambu Labs 3D printers all around the world, due to its seamless integration with the entire range of Bambu Labs machines.

Back when it was released, it was exclusively available for computers running mac OS and Windows operating systems. If you wanted to run it on Linux, you were pretty much stuck with trying to get it to run on a compatibility layer (such as WINE), or on a virtual machine (think VMWare or VirtualBox).

The good news for certain Linux users is that since March 2023, Bambu Studio has been available explicitly for Ubuntu and Fedora. So if you are indeed a Fedora or Ubuntu user, looking to get Bambu Studio installed on your Linux-based system, then read on for information on where to obtain it from, and how to install it.

There are two ways you can install Bambu Studio on Linux:

  • Installing Bambu Studio with Flatpak
  • Installing Bambu Studio on Ubuntu / Fedora from an AppImage

Introduction

If you’ve ever wondered how people create those gorgeously smooth, hollow prints that look like ceramic vases straight from an artisan’s studio, you’re about to discover their secret. It’s called Spiral Vase Mode, and it can turn your 3D printer into a wizard of single-wall printing. Picture your extruder gliding in one continuous loop around a shape, steadily building a spiral from the bottom up. Gone are the days of multiple perimeters, infill grids, and cluttered top layers. In their place, you’ll find a single, graceful helix of filament that forms a delicate but surprisingly impressive object.

Orca Slicer’s Spiral Vase (Vase Mode): A Deep Dive

For many 3D printing enthusiasts, vase-mode prints represent a sweet spot between practicality and artistry. They can be quick to produce, visually striking, and mesmerizingly smooth on the surface. In short, they’re different from your average print. And thanks to Orca Slicer—a slicer admired for its user-friendly design and flexible feature set—accessing Spiral Vase Mode has never been simpler.

This guide will walk you through everything you need to know about Spiral Vase Mode in Orca Slicer. We’ll talk about what it is, why it’s so popular, and how to set it up. We’ll also cover vital details about nozzles, layer heights, water-tightness, tricky designs, and the all-important calibration steps. By the end, you’ll be ready to bring your own vase-mode dreams to life. Whether that’s a lamp, a prototype shell, a decorative piece, or an actual vase you can put flowers in, is entirely up to you.

So, you’ve got a Bambu Lab 3D printer—maybe a fancy X1 Carbon, or maybe a more modest A1 or P1P—and you’re absolutely in love with how quickly and smoothly it prints. These machines are kind of like the Ferraris of the consumer 3D printing world, right? Super-fast, often come with neat features like built-in cameras, enclosed builds, multi-color printing capabilities, and even some AI-based magic that tries to detect when your print turns into the dreaded “spaghetti monster.” You know what I’m talking about: that moment when your once-promising print becomes a pile of tangled filament resembling something you’d serve with meatballs.

 AI Failure Detection and Remote Control for Bambu Lab 3D Printers

But here’s the catch: Not all Bambu Lab printers have the same level of AI detection built in. Models like the Bambu X1 Carbon are decked out with advanced AI spaghetti detection and even LiDAR to inspect that first layer. Meanwhile, other models—like the Bambu A1 series or the P1P—lack AI features altogether. Maybe you went from a Creality printer that you’d meticulously set up with OctoPrint and had all sorts of plugins running, including advanced failure detection. Then you jumped ship to a Bambu Lab machine and realized you miss that robust ecosystem. Or maybe you just love tinkering and want to integrate Obico’s AI-based spaghetti detection and remote monitoring into your Bambu workflow.

Well, good news: With a bit of creativity, a spare single-board computer (like a Raspberry Pi or Orange Pi), a camera (such as a trusty old Logitech C920), and some software tweaking, you can get AI failure detection working via Obico on your Bambu printer—no matter which model you have. This can transform your Bambu printer setup into something that feels both luxurious and smart, catching failures before they waste days of print time and tons of filament.

In this “case study” or super-long how-to, I’ll walk you through a scenario: Let’s imagine you have a Bambu A1 printer. You love it, but you want AI failure detection similar to what you might have had with other printers integrated with Obico. We’ll talk about using OctoPrint as a virtual “bridge,” installing plugins, setting up a camera, and linking everything to Obico’s cloud so you can watch your prints from anywhere, get notifications if something goes wrong, and even pause or stop the printer remotely. And if you’re on a higher-tier Bambu like the X1 Carbon, you might not need this as much—but it’s still super cool to have another layer of AI detection from Obico’s machine-learning setup.

I’ll also share some links to relevant GitHub repos, documentation pages, and other helpful guides.

The 3D printing world has just got a new game changer: the Prusa Core One. This is not just a new printer; it’s a leap forward in design, functionality, and performance. The new CORE One printer offers a CoreXY design, active chamber temperature control, and a host of user-focused innovations. It combines speed, precision, and versatility in a sleek, compact package.

Prusa Core One: The Revolutionary 3D Printer

Whether you are a hobbyist looking to expand your creative possibilities, a professional engineer in need of reliable prototypes, or a teacher exploring 3D printing, the Prusa CORE One has something for everyone.

Let’s take a closer look together at what makes this new printer a true standout.

3D printing is more than a hobby; it’s a tool for innovation, design, and creativity. As technology gets better, the tools we use to optimize the print process get better. Orca Slicer is one of the best slicing software options out there for users who want precision, efficiency, and customization. One of its many features is the ability to create and manage your own filament profiles, and that’s a game changer for getting great results every time.

Orca Slicer Filament Profiles and How to Make Your Own

In this article we’ll go deep into filament profiles in Orca Slicer, what they are, why they matter, and how you can create, fine-tune, and optimize your own custom profiles for your material.

When you first get into 3D printing, the process of turning a digital model into a physical object can be both exhilarating and overwhelming. Every project starts with an idea, which is then turned into a digital 3D model that needs to go through the process of "slicing." Slicing is a crucial part of 3D printing, as it breaks down a 3D model into layers and converts them into instructions that a 3D printer can follow. But for this to be as smooth as possible, you need a good slicing tool, and that’s where Obico online slicer comes in.

Obico Online Slicer for 3D Printing

Obico offers an online slicing solution that’s easy, powerful and accessible from anywhere. This makes it perfect for both beginners and advanced users who want flexibility, control, and ease of use.

In this article, we’ll go into detail about Obico’s online slicer, from its features to a step-by-step guide on how to use it. Whether you want to print functional objects or creative sculptures, we’ll take you through the entire slicing process with Obico so you can get from model to print in no time.

In the 3D printing world, the initial setup of your print is just as important as the model you’re trying to bring to life. One of the most critical and often overlooked components of this setup is the Start G-code, a set of instructions that prepares your 3D printer for the actual print. Whether you use Orca Slicer, a feature-rich slicing software that is based on Bambu Studio and PrusaSlicer, or another slicer, understanding and customizing the Start G-code can be the key to better prints and a smoother workflow.

Start G-Code in Orca Slicer: Start Your Print the Right Way

In this article, we will go deep into what is Start G-code, why it’s important for perfect prints, how to edit it in Orca Slicer, and how to customize it for any 3D printer. We will also explain the Start G-code in the well-known Elegoo Neptune 4 Pro in Orca Slicer as an example for better understanding.

By the end of this article, you will know how Start G-code works, how to tweak it for best results, and how to use advanced techniques like Klipper macros to make your G-code simpler more readable and easier to update.