
NOZZLE NINJA

First Layer AI Error Detection for OctoPrint & Klipper Now Available!

OBICO_NOZZLE_NINJA_COMPATIBLE_BADGE

84 posts tagged with "3D Printing Tips"

View All Tags

Alt text

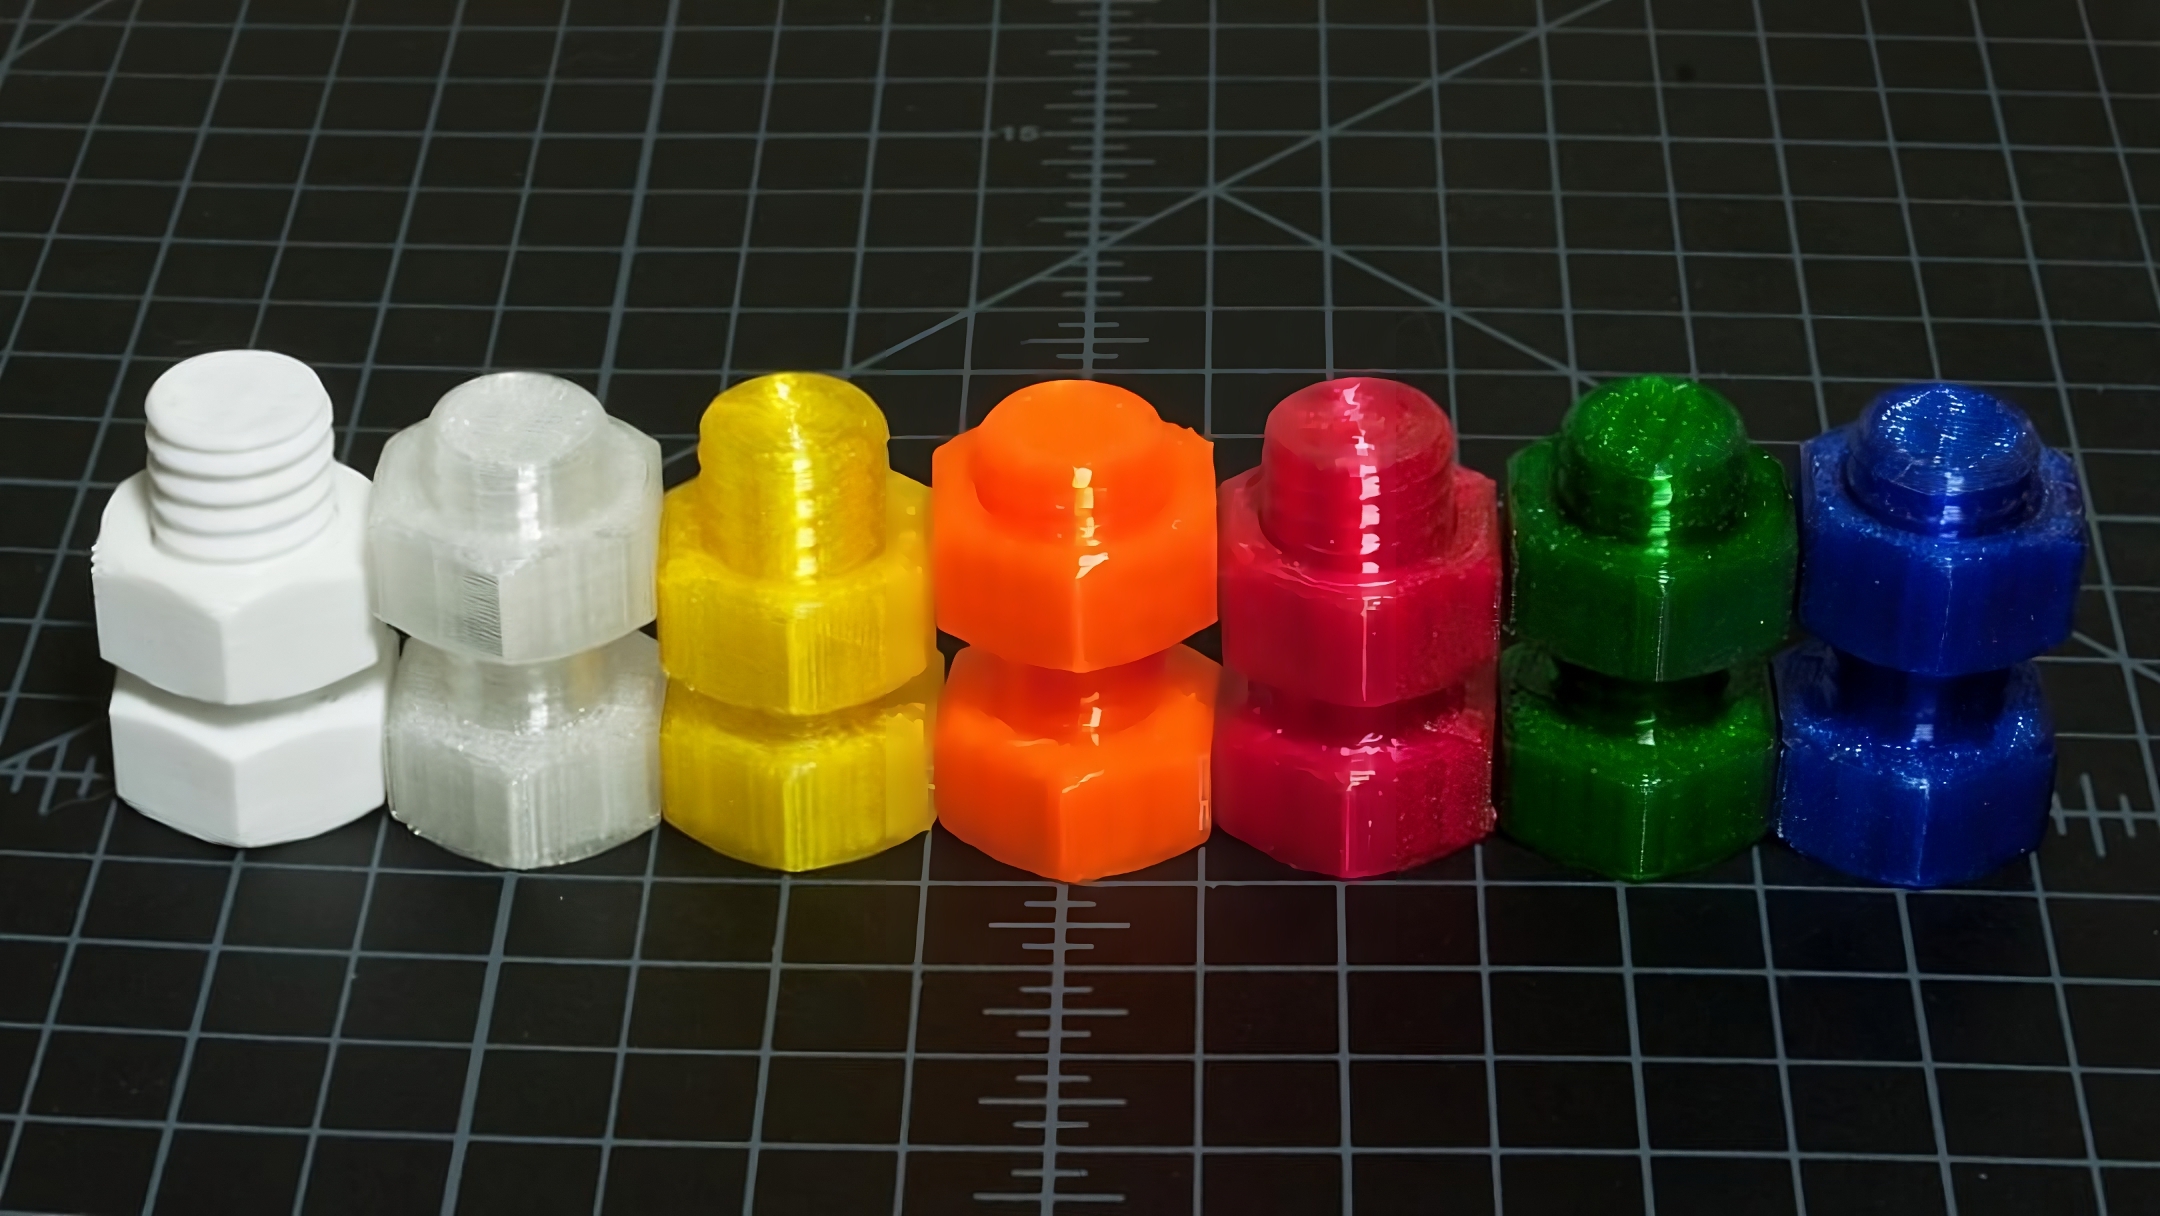
Picture courtesy : adonutforeveryone via Reddit

ABS is an amazing material for 3D printing. It's a type of industrial plastic that was used as one of the first materials for 3D printing in the 1990s. But even ABS can't escape the problem of FDM 3D printing: layer lines.

Fused deposition modeling inherently produces layer lines. It makes your 3D-printed parts special, but let's face it, layer lines don't look good on every model. They make your models look less professional and take away from their visual charm.

Thankfully, you can entirely conceal these layer lines in your ABS components with little post-processing. ABS Smoothing is a process in which the layer lines totally melt, giving your parts a smooth, shiny surface.

In this piece, we'll learn everything there is to know about this process and show you how to make professional-looking 3D prints. Let's print some ABSolutely amazing creations!

Introduction

Alt text

Picture Courtesy: Voron Design

Klipper is quickly becoming a popular 3D printing software among both hobbyists and pros. Klipper firmware for 3D printers has a bright future because of its high printing rates, impressive feature set, and open-source architecture.

In this piece, we'll surf this new wave of Klipper 3D printers. We'll go over the basics of Klipper firmware, look at what makes it so great, and find out which printers use Klipper as their default firmware.

Let’s Klipp some printers!

Introduction

Alt text

Klipper and Mainsail are one of the best software pairings for 3D printers you can find today. Both of these programs keep getting better over time so that users can have a better printing experience.

Today, we're going to look at the camera streaming part of Mainsail-Klipper. Mainsail's Crowsnest streaming service recently added the camera-streamer project. This makes it easy to get high-quality video from your webcam without using a lot of data.

Everything you need to know about this revision is included in this article. We'll look at how to add a single camera or multiple cameras, as well as how to get a high-quality video stream of your 3D printer to your laptop.

Let's set sail and get the cameras ready!

Alt text

Picture courtesy: Mainsail

Klipper is fast, it's smooth, and it's really cool. It is quickly becoming the most used software for 3D printers. More and more commercial printers are being built using Klipper, and even more and more printers are being upgraded by enthusiasts so they can use Klipper.

Every day, more and more people hop on the Klipper train, which means that customization is more important than ever. Why shouldn't the printer's firmware be personalized by the user, much like the printer's brand, symbol, and 3D prints?

Today, we'll talk about how you can change the look and feel of your Klipper 3D printer to make it your own. This piece will go over Themes in Mainsail and Fluidd and help you personalize your machine to your liking.

Let’s Klipp away and custom-fit your machine to your taste!

Introduction

The Bambu Slicer goes well with how fast and well the Bambu machines are. It has a lot of features, is easy to use, and produces high-quality prints. Still, it's not perfect and has some flaws of its own.

OrcaSlicer- An Introduction and How to Get Started

Orca Slicer comes into play at this point. OrcaSlicer adds some interesting features to the basic Bambu Studio. You get more printer presets, more detailed print settings, and a bunch of other advanced tools that all make 3D printing better.

This page will talk about everything Orca Slicer. What it is, why it exists, and why it is a good option to its original source. Hold on to your boats because we're going to go deep into Orca Slicer and look at it in detail.

Alt text

Photo Courtesy- 3D Benchy via Flickr

The 3D printer calibration is crucial to ensure that your machine creates parts as intended. To 3D print your part as closely as possible to the original design, you need to adjust the 3D printing temperatures, material flows, tolerances, and many other factors.

There are several calibration models you can use to find and tune your print settings. But not all of them are needed, and to be honest, some of them are not even good models.

This article aims to do two things. We want you to adjust your machine and make it as accurate as possible so you can make the best 3D prints. And we want to help you find the best calibration models among the hundreds that are already out there.

This will help you save valuable printing time, materials, and work while getting the best calibration results possible. So, without further ado, let's get your 3D printers squared away!

Alt text

The Klipper firmware is one of the most impressive pieces of software in the 3D printing community right now. It lets you print at insanely fast speeds and makes using the 3D printer a seamless experience. You can interact, monitor and control your machine wirelessly from your workstation.

The limiting factor is that, unlike Marlin firmware, Klipper displays limited interface options when you use your 3D printer's LCD display. You still need a laptop or a personal computer to access the full features of Klipper firmware and interact with your 3D printer. Enter KlipperScreen!

This guide will dive deep into every aspect of the Klipper screen. We will detail how to install a Klipper screen on a 3D printer and also look at some of the valuable tips and tricks that can come in handy. The goal is to familiarize you with a helpful accessory that goes well with Klipper and better your 3D printing experience.

Continue reading to find out how to Klipp up your 3D printing.

Alt text

Image Courtesy : Alan Chia via Wikimedia Commons

You've probably seen more ABS parts than any other kind of plastic. ABS, or acrylonitrile butadiene styrene, is the plastic used in manufacturing. It has been used for a long time to make toys, helmets, kitchen tools, and other things.

Its durability and ease of post-processing make it a popular 3D printing material for both pros and amateurs.

In this article, we’ll take a deep dive into the world of ABS 3D printing. We’ll learn everything there’s to know about the material - the benefits, challenges, and applications. We've also included some tips and tricks to help you confidently print ABS.

So keep reading and help get your 3D printer some ABS.

Alt text Picture courtesy : Keanu Dölle via Wikimedia Commons

A 3D printing slicer is undoubtedly one of the most important parts of the whole process of 3D printing. It takes your digital 3D models and gets them ready for the last step of printing. It is the slicer that affects (to an extent) how well your components print, how strong they are, and how they look.

With so many 3D printing slicers to choose from, you're virtually spoiled for choice. Knowing which one to use and which one is better for your 3D projects may have a big effect on how your 3D-printed items turn out.

In this post, we've done the research for you and put together a full guide to the finest 3D printer slicer software on the market. We'll look at their characteristics, strengths, and flaws to see what makes them different.

Read on to find out all you need to know about 3D printing slicers and select the appropriate one for you!

Alt text

Picture courtesy: CobaltEchos via Reddit

PolyEthylene Terephthalate Glycol, or PETG, is like the middle sibling in 3D printing. It gives you the strength of ABS while being as easy to print as PLA. PETG is known for its excellent impact resistance and toughness and is a great material for printing functional parts.

In this article, we'll look at everything there is to know about this material. We'll understand what exactly PETG is, what are its advantages and drawbacks and how to optimize your print settings for the best print quality with this material.

So bottle up your designs and get ready to print them with PETG.