
NOZZLE NINJA

First Layer AI Error Detection for OctoPrint & Klipper Now Available!

OBICO_NOZZLE_NINJA_COMPATIBLE_BADGE

52 posts tagged with "Tech"

View All Tags

Introduction

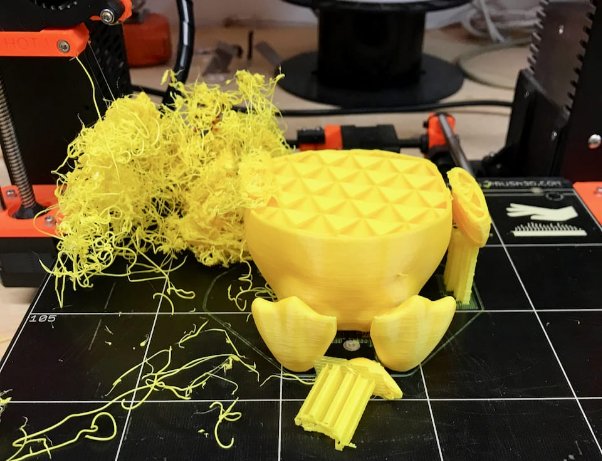
In the evolving world of 3D printing, the ability to remotely monitor and manage printers has become an indispensable feature for enthusiasts and professionals alike. As we delve into this guide, our primary intention is to empower users of the Creality K1 3D printer with the capability to access their devices remotely. Beyond mere convenience, this remote access can also harness the power of AI to detect potential print failures, ensuring smoother and more successful print jobs.

Central to our exploration is a tool named Obico. But what exactly is Obico?

Obico is an advanced software platform designed specifically to enhance the 3D printing experience. It's not just about remote access, though that's a significant feature. Obico integrates artificial intelligence mechanisms to monitor ongoing print jobs, detecting anomalies that could result in print failures. By notifying users of such potential disruptions in real-time, it drastically reduces wasted materials and time. Obico also has a fully featured mobile app available for both iOS and Android. Both the web app and mobile app also give you full remote access to the full Mainsail or Fluidd interface from anywhere through Obico’s tunneling feature. This blend of remote access and AI-driven insights underlines Obico's relevance and growing importance in the 3D printing community.

As we proceed through this guide, we will start with the initial steps of setting up Obico on the Creality K1, and then we will walk through some of the nuances of optimizing its features, ensuring you harness the full power of Obico.

Introduction:

3D printing is an incredible technology, allowing individuals to transform digital designs into tangible objects. With the rise in popularity of 3D printing, the need for mobility and ease of monitoring has become increasingly crucial. This is where mobile apps come into play, allowing users to manage, monitor, and even design 3D prints right from their smartphones. In this article, we delve deep into the world of 3D printing mobile apps, focusing on OctoPrint, Klipper related apps and others that have become essential tools for enthusiasts and professionals alike.

Why mobile apps for 3D printing are useful?

3D printing, once a niche hobby, has quickly expanded into various sectors such as healthcare, education, manufacturing, and even at-home projects. With the growth of this technology, the tools surrounding it, notably mobile apps, have seen a surge in development. Mobile apps for 3D printing have brought forth a revolution in how individuals interact with their printers. Here are compelling reasons why these mobile apps are becoming indispensable for 3D printing enthusiasts and professionals alike:

  1. Remote Monitoring: One of the most significant advantages of using mobile apps is the ability to remotely monitor print jobs. You don't need to be physically present near the printer. This is especially useful for lengthy print tasks, ensuring that you can keep an eye on the progress from anywhere, anytime.
  2. Instant Notifications: Many 3D printing apps come with push notification features. This means you'll be immediately informed of any errors, when a print job is complete, or if there's a need for intervention. It significantly reduces the chances of print failures and wasted material.
  3. Streamlined Workflow: Mobile apps often incorporate an end-to-end solution from design to print. You can tweak designs, adjust settings, and then directly send them to the printer, all from a single interface.
  4. Accessibility: Mobile apps offer unparalleled accessibility. Whether you're at home, in the office, or even on vacation, you can control and monitor your 3D print jobs. It's especially useful for professionals who manage multiple printers or run 3D printing businesses.
  5. Storage and Libraries: Some apps come with cloud storage, allowing users to store their designs online. This not only offers a backup for your projects but also allows you to access them from any device. Moreover, many apps provide integrated libraries with pre-designed models, saving time and effort.
  6. User-Friendly Interface: Mobile apps, designed for diverse user bases, often prioritize user-friendly interfaces. This means even if you're relatively new to 3D printing, you can navigate and use these apps with ease, making the printing process more approachable.
  7. Integration with Other Tools: Many 3D printing apps integrate seamlessly with design tools, scanners, and other software, creating a unified platform for all your 3D printing needs. This integration streamlines processes and enhances efficiency.
  8. Community and Support: Several mobile apps have built-in communities where users can share designs, offer solutions, and provide support. This collaborative approach accelerates learning and problem-solving.
  9. Cost Savings: By being able to closely monitor and control print jobs, users can reduce errors and material wastage. Instant notifications and real-time monitoring can prevent failed prints, ultimately saving costs in materials and energy.
  10. Scalability: For businesses or institutions with multiple 3D printers, mobile apps can offer centralized control. This means managing multiple print jobs across different devices becomes more straightforward and organized.

Gone are the days in 3D printing where you constantly need to be tethered to a 3D printer. There are now automated software tools that allow you to monitor and control your printer without being present in the same room. Some of these applications give you unrestricted access to your machines and let you operate them from anywhere in the world.

In this article, we’ll look at eight remote 3D printing software you can use to run your 3D printers remotely. These programs are suited equally well for hobbyists and professional 3D printing farms and can be a great way to ease out the manual workload in your workflow.

Let’s power up your remote 3D printing setup!

Update on the Orange Pi Zero 2 for OctoPrint Project

In an ongoing effort to get find an easy way for makers to install OctoPrint with the Raspberry Pi shortage ongoing, we developed an easy to install raspberry pi alternative for OctoPrint using the Orange Pi Zero 2.

Installation works similarly to installing OctoPi on a Raspberry Pi. You can get a complete OctoPrint Kit that includes a webcam and everything you need to get started, or just the Orange Pi Zero 2 Board in our online store (available for U.S and Canada only).

Introduction

Klipper is quickly ranking its position as one of the best 3D printing firmware in the community. Using a combination of Raspberry Pi and web interface, Klipper significantly improves your 3D printer’s speed, print quality, and user experience.

Pair it up with Cura, and you open up a world of new possibilities for your 3D printing workflow. Cura is one of the most widely used and popular 3D printer slicers with top-notch features that help you achieve high-quality 3D prints.

Yet, as good as they are, there are some pointers you need to be mindful of when using Cura and Klipper together. In this article, we’ll understand how you can use these two software side-by-side to get the best quality results from your 3D printer.

Let’s Klip and Slice.

Klipper as a 3D printer firmware and PrusaSlicer as a 3D printing slicer have become widely popular in the past few years. They’re both completely free to use and loaded with features, and you get the benefits of open-source development with either of these programs.

It makes sense to use them together to streamline your 3D printing workflow and make the most out of these two pieces of software. In this guide, we’ll go over the process of setting up Prusaslicer with your Klipper 3D printer. It’s simple and quick and can help save you from the hassle of manually uploading your print files.

We’ll begin with understanding the benefits of using these two software together and then look at the detailed setup process. Let’s begin!

Klipper firmware is getting all the praise lately owing to its vast range of features and top-notch performance. It also offers several configuration options to calibrate your printer to deliver high-quality 3D prints.

One crucial parameter we’ll be configuring today is PID tuning for your 3D printer. Setting the correct PID settings ensures that your hot end and print bed are heated in the least time possible and maintain the set temperature with great precision.

This article will guide you through the PID calibration process for your 3D printer using Klipper. It’ll help you to understand more about these PID settings and sort out any heating issues with your machine.

Let’s start tuning up these beds and hot ends!

Introduction

Pressure Advance in Klipper is designed to compensate for the side effects of instant speed changes that occur during fast print speeds. It reduces stringing, gives your prints sharp corners, and delivers a high print quality even at speeds above 100 mm/s.

But tuning pressure advance in Klipper and understanding its functioning can be puzzling to new Klipper users. So, in this article, we’ve gathered all the information you need to know about Pressure advance and set it up in Klipper. It’ll help you understand the benefits of this feature and how you can use it to sharpen up your 3D prints.

Let’s Advance!

Klipper firmware has been around since 2016 in the 3D printing community. It’s free, open-source, and has steadily become a mainstream 3D printing firmware, second only to Marlin.

Yet, Klipper’s earlier versions missed key features like the Octolapse, Exclude objects, and plug-in integration found on Octoprint and Marlin combo. This lack of certain valuable features restricted users from using Klipper as their primary 3D printing firmware.

However, since the recent updates, some of these features are slowly making their way into the Klipper firmware. For example, you can now shoot Octolapse-like videos on your 3D printer using the Klipper timelapse.

Likewise, Klipper now also supports the Exclude objects functionality to rescue you from failed prints. But, it needs some initial setup and configuration, which might be puzzling to new Klipper users.

So, this article will take you through the entire process of setting up Exclude objects for your Klipper 3D printer. We’ll look at this feature in detail and understand how you can use it in your 3D printing workflow.

Let’s exclude the failed prints.

3D Printer Failures/Courtesy: Fabbaloo

If you are new to 3D printing, we are sure you have encountered numerous print failures. Thankfully, this is not something new or unique. It happens to even the most seasoned users. But obviously everyone wishes to improve their 3D printing skills and so knowledge of 3D printer failure detection becomes essential, and this is exactly what we will cover in this article.

3D printing and failures

Because 3D printing is rapidly becoming popular in a variety of industries, it is critical that every student, as well as manufacturing and design professionals, understand the technology. Though you may not need to understand its complexities, having a working knowledge will help you in your career.

3D printing is a manufacturing process that converts a digital CAD file into a three-dimensional physical model by layering thin layers of material one on top of the other. This is also known as additive manufacturing because material is added rather than removed, as is the case with most conventional technologies.

However, 3D printing is still in its early stages and thus prone to failure. DIY and desktop 3D printing, in particular, frequently fails, and users must use a trial-and-error approach to eliminate or reduce failed prints.