Celestrius Data Collection Guide (OctoPrint)

This guide is only for the OctoPrint users. If you are using Klipper, please follow this guide.
This guide assumes you already have a nozzle camera installed on your 3D printer and connected to OctoPrint. If you have not installed a nozzle camera yet, follow the guide for Prusa Mini/Mini+ or Voron 2.4/Trident with Stealthburner :::
Required files/software
The following files (also linked throughout the document) are required.
Step 1. Download and configure the Celestrius plugin
1. Download the Celestrius Plugin and save it somewhere on your computer. You do not need to unzip the file.
2. Open the Octoprint interface in a web browser. Open the settings menu, scroll down and select the Plugin Manager.
3. Click get more. Scroll down until you see ... from an uploaded file. Click Browse and select the Celestrius Plugin on your computer. Click Install.
4. Once the plugin has finished installing, restart OctoPrint
Configure the Celestrius Plugin
Once OctoPrint has restarted, you will be greeted by the setup wizard.
Read the policy on how your data will be collected and sent to the server. Instead of some fancy legal language, we tried to phrase the policy understandable for everyone. We want to look at only the data that you approve of. Once your data is uploaded, we will wait a period of seven days before accessing it. If, during that time, you notice you have uploaded data unintentionally, send us an email and we will delete the requested data.
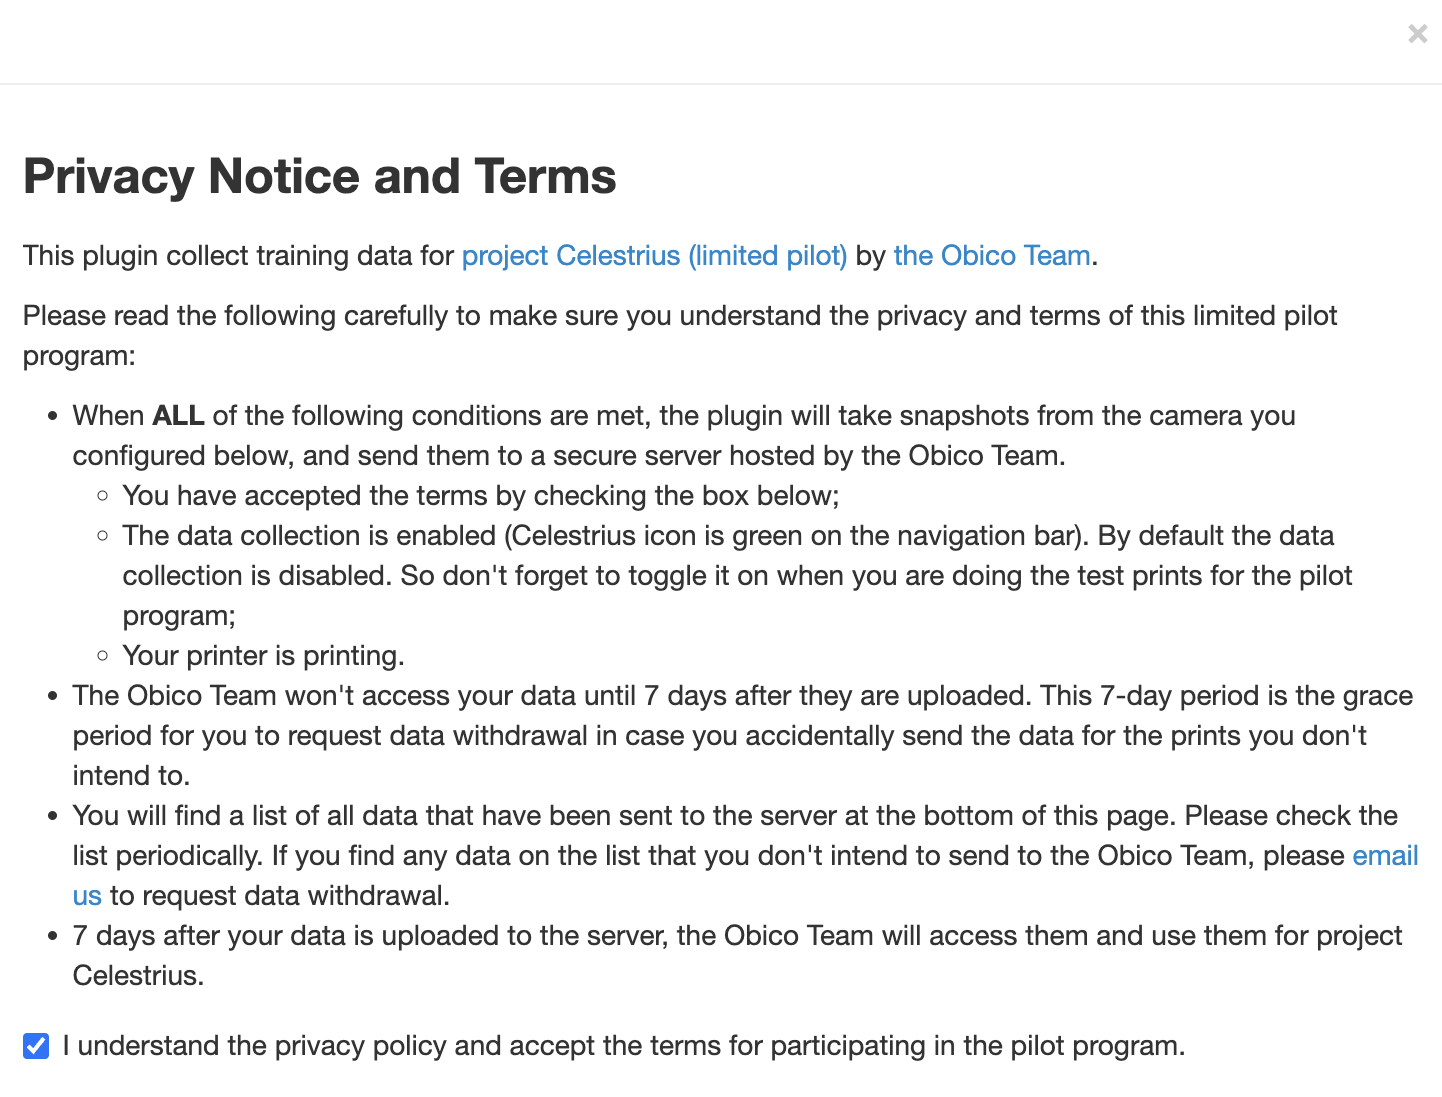
1. Click the check box to accept the terms.
2. Enter the email you used when completing the Celestrius interest form, check the box to confirm that you agree.
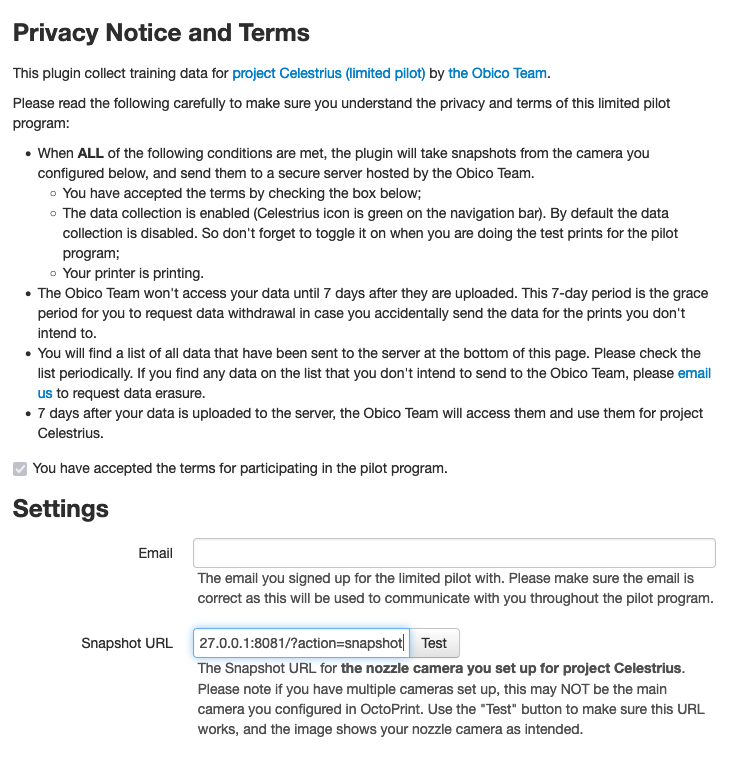
3. Enter in Snapshot URL the URL for the nozzle camera you set up for project Celestrius. Ensure Celestrius is using the proper camera. Especially if you have multiple cameras configured in OctoPrint, double-check to make sure you have entered the correct URL.
4. Click the "Test" button to verify this URL works, and the image shows your nozzle camera as intended.
5. Click Finish.
If setup wizard does not appear, you can access it by opening the OctoPrint settings and clicking Celestrius Data Collector
How data collection works
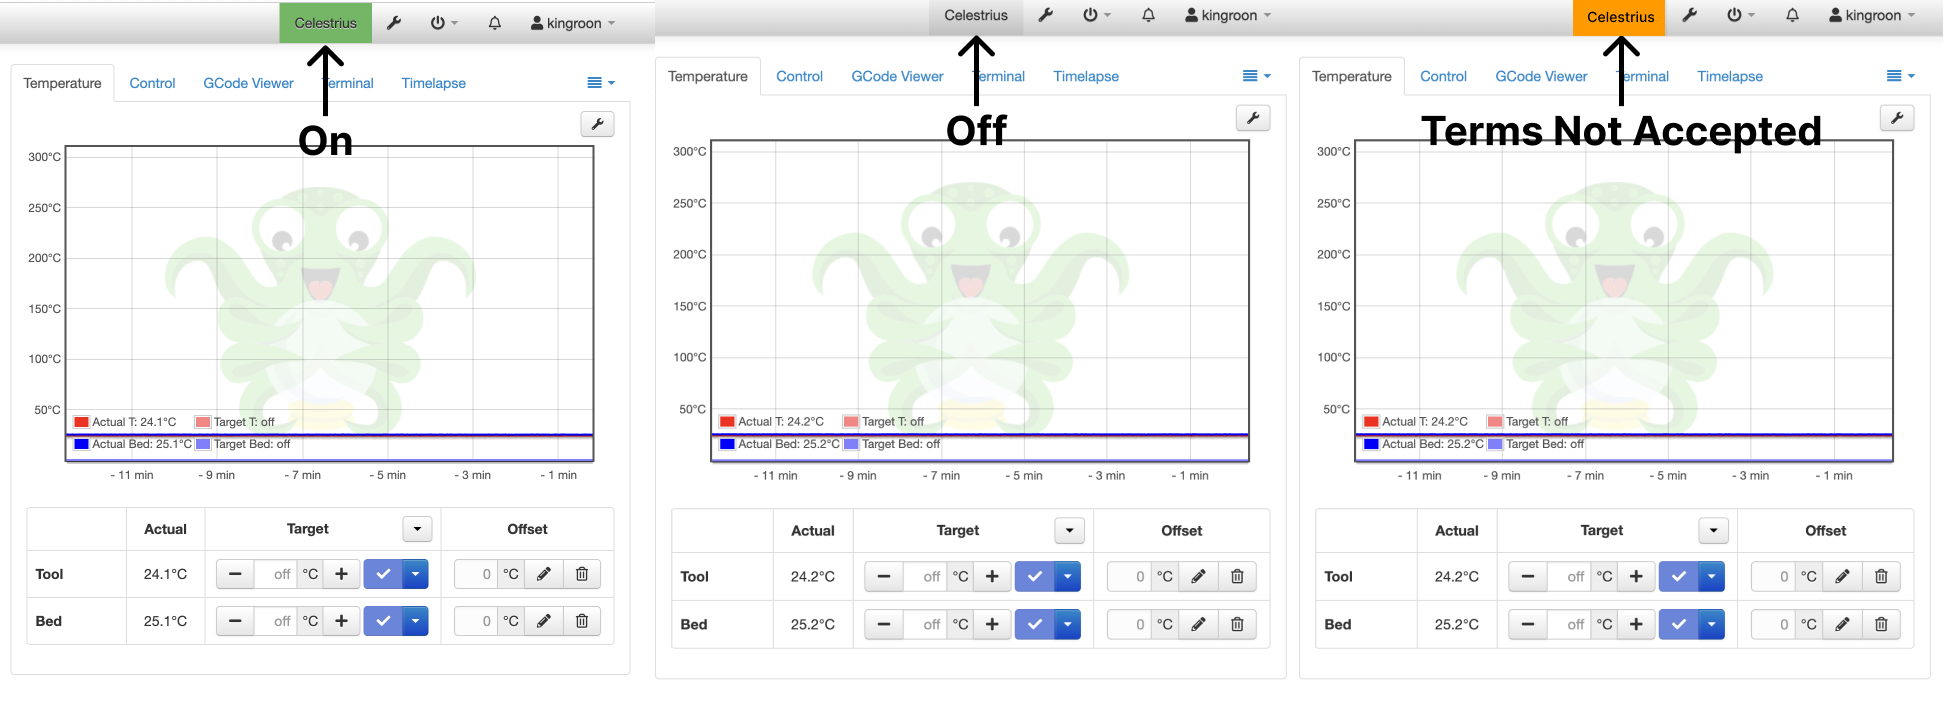
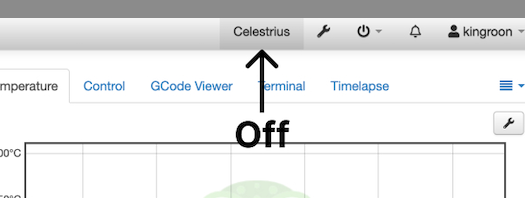
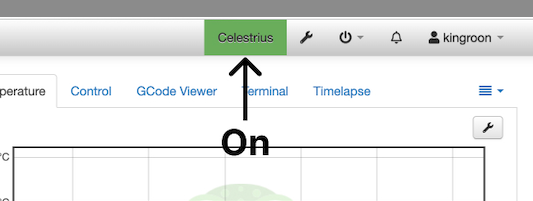
By default, the Celestrius button will be off (grey) and not collecting data. To enable data collection, simply click the Celestrius button at the top of the OctoPrint interface to turn on data collection (green).
If you do not accept the terms, data collection will not begin. In this case, attempting to turn on data collection will result in a yellow Celestrius button at the top of the OctoPrint interface.
Once turned on, data collection will remain on until you turn it off. Be sure to turn off Celestrius after running data collecting prints to avoid sending unwanted/unnecessary data.
Step 2. Insert the end G-Code in your slicer to add a first-layer scan
1*. Select the Appropriate G-Code based on the size of the build plate your 3D printer has. If you're build plate dimensions are not available, let us know in the Celestrius Discord Server.
- 180x180mm
- 250x250mm
- 300x300mm
- 350x350mm
G0 Y40 F1000
G0 X40 F1000
G0 Z 1.0
G0 X140 F300
G0 Y60 F300
G0 X40 F300
G0 X140 F300
G0 Y80 F300
G0 X40 F300
G0 X140 F300
G0 Y100 F300
G0 X40 F300
G0 X140 F300
G0 Y120 F300
G0 X40 F300
G0 X140 F300
G0 Y140 F300
G0 X90 Y90
G0 Z10
G0 X0 F1000
G0 Y0 F1000
G0 Y75 F1000
G0 X75 F1000
G0 Z 10.0
G0 X175 F300
G0 Y95 F300
G0 X75 F300
G0 X175 F300
G0 Y115 F300
G0 X75 F300
G0 X175 F300
G0 Y135 F300
G0 X75 F300
G0 X175 F300
G0 Y155 F300
G0 X75 F300
G0 X175 F300
G0 Y175 F300
G0 X90 Y90
G0 X0 F1000
G0 Y0 F1000
G0 Y100 F1000
G0 X100 F1000
G0 Z 10.0
G0 X200 F300
G0 Y120 F300
G0 X100 F300
G0 X200 F300
G0 Y140 F300
G0 X100 F300
G0 X200 F300
G0 Y160 F300
G0 X100 F300
G0 X200 F300
G0 Y180 F300
G0 X100 F300
G0 X200 F300
G0 Y200 F300
G0 X0 F1000
G0 Y0 F1000
G0 Y125 F1000
G0 X125 F1000
G0 Z 10.0
G0 X225 F300
G0 Y145 F300
G0 X125 F300
G0 X225 F300
G0 Y165 F300
G0 X125 F300
G0 X225 F300
G0 Y185 F300
G0 X125 F300
G0 X225 F300
G0 Y205 F300
G0 X125 F300
G0 X225 F300
G0 Y225 F300
G0 X0 F1000
G0 Y0 F1000
2. Open your slicing software of choice. In this example, I am using Prusa Slicer. 3. In the Printer Settings tab, click Custom G-Code In this example, I am using a Prusa Mini with unmodified end G-code. It looks like this:
G1 E-1 F2100 ; retract
{if max_layer_z < max_print_height}G1 Z{z_offset+min(max_layer_z+2, max_print_height)} F720 ; Move print head up{endif}
G1 X178 Y178 F4200 ; park print head

{if max_layer_z < max_print_height}G1 Z{z_offset+min(max_layer_z+30, max_print_height)} F720 ; Move print head further up{endif}
G4 ; wait

M104 S0 ; turn off temperature
M140 S0 ; turn off heatbed
M107 ; turn off fan
M221 S100 ; reset flow
M900 K0 ; reset LA
M84 ; disable motors
- We want to add the G-Code right after the print finishes, and the nozzle temperature has been turned off. I'll add my G-Code right after the line
M104 S0 ; turn off temperature. If you aren't sure what is happenning in your end G-Code, simply paste the G-code in after the last line.
Remember to remove the end G-Code from your slicer when you are finished collecting data for the Celestrius Pilot, or if you want to print a print unrelated to the Celestrius Pilot. This G-Code will cause collissions with any parts printed higher than 1mm.
Step 3. Calibrate your first layer
The most important thing before you do the test prints is to make sure your first layer is calibrated. Otherwise, it may signficantly impact the quality of the data collected from your nozzle camera.
1. Turn OFF Celestrius data collection
2 Download 1-t-rex.stl in this folder. Slice it with the settings you typically use when printing with PLA.
3 Check your print quality
Once the print finishes, compare your finished print with the one shown.
Keep an eye out for the following:
The view from the nozzle camera should look something like the image below.
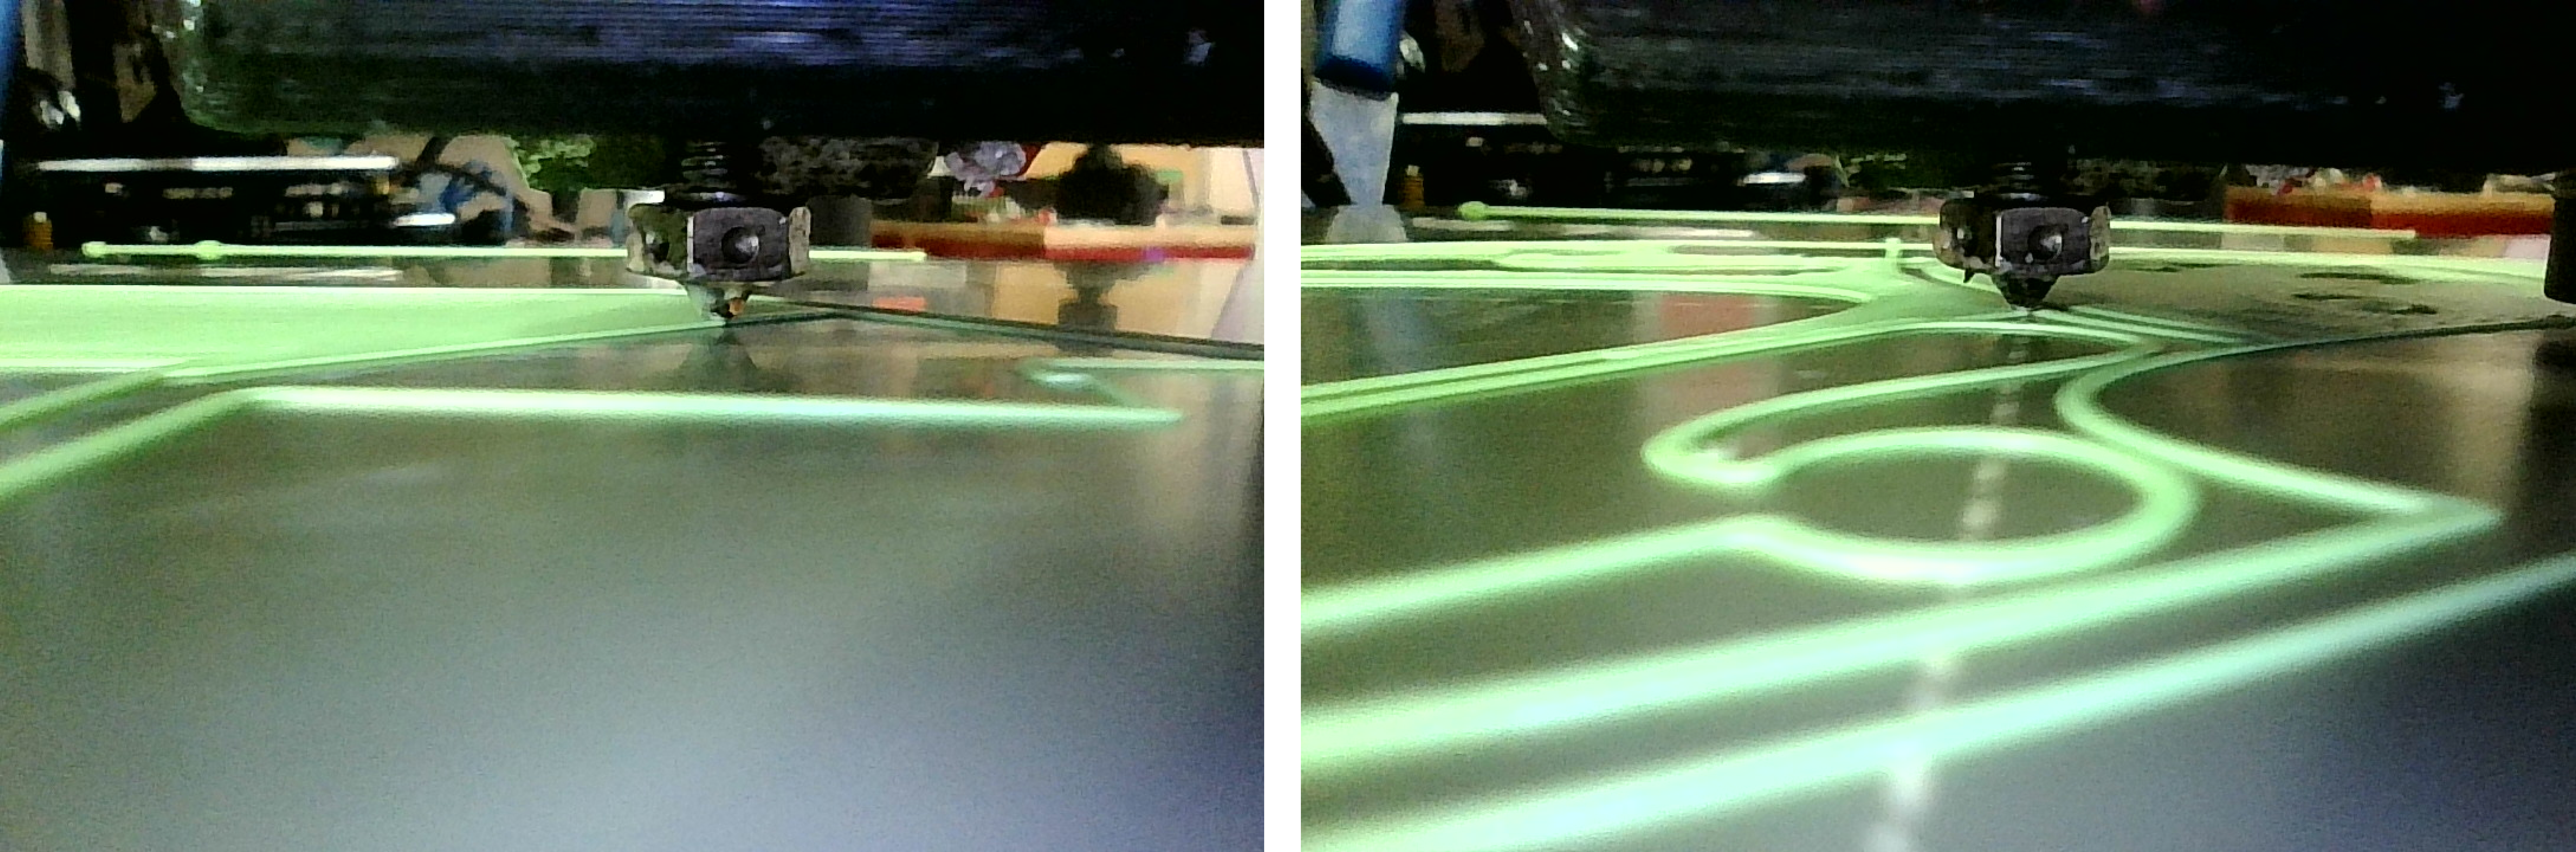
-
The lines should slightly overlap each other so that when you remove the print from the plate, it is one homogenous surface with no gaps or voids.
-
The overall surface is flat and smooth.
Improve Print quality
If your print is not one homogeneous smooth surface, or there are gaps or voids in the print, try the following in order:
1. Level the bed. Do this before adjusting any other settings as it is the most common issue.
2. Adjust the Z-offset slighlty.
3. Ensure the nozzle is not clogged, and it is free from debris.
4. Calibrate the flow rate using Teaching Tech's tutorial.
Once your print is close enough to the examples above, your 3D printer is properly calibrated for a good first layer with proper bed adhesion and adequate flow.
Step 4. Print the baseline test models
This folder contains five test models that only contain one .2mm layer. You will be asked to print each model twice. First, you will produce a high quality baseline print, and then you will adjust the flow rate to simulate a print with a poor first layer.
1. Turn ON Celestrius data collection
Please remember to turn on data collection. Otherwise your test print results won't get sent to the Obico Team.
2. Slice the file with the same properly calibrated settings from step 2.
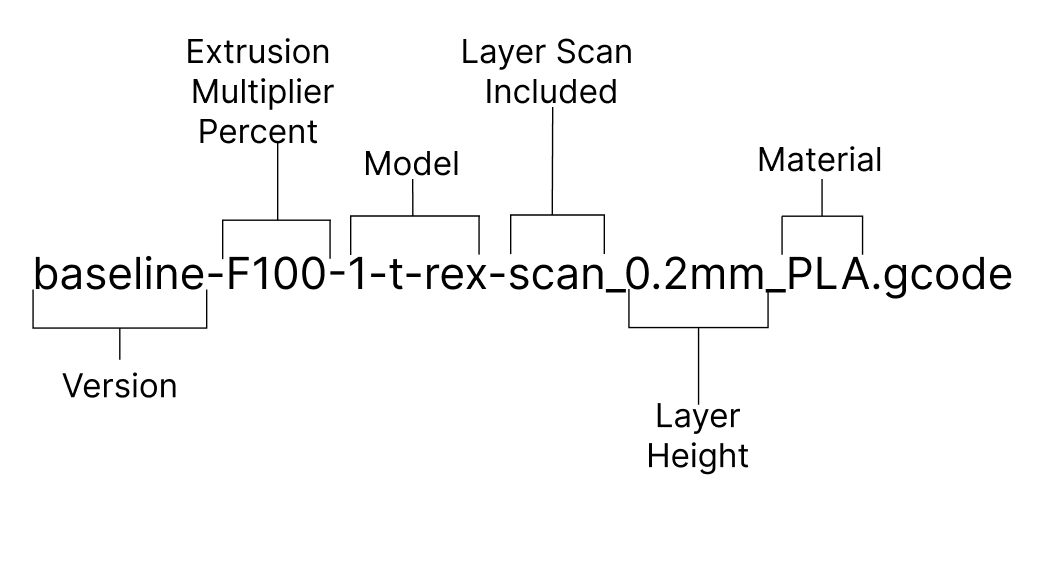
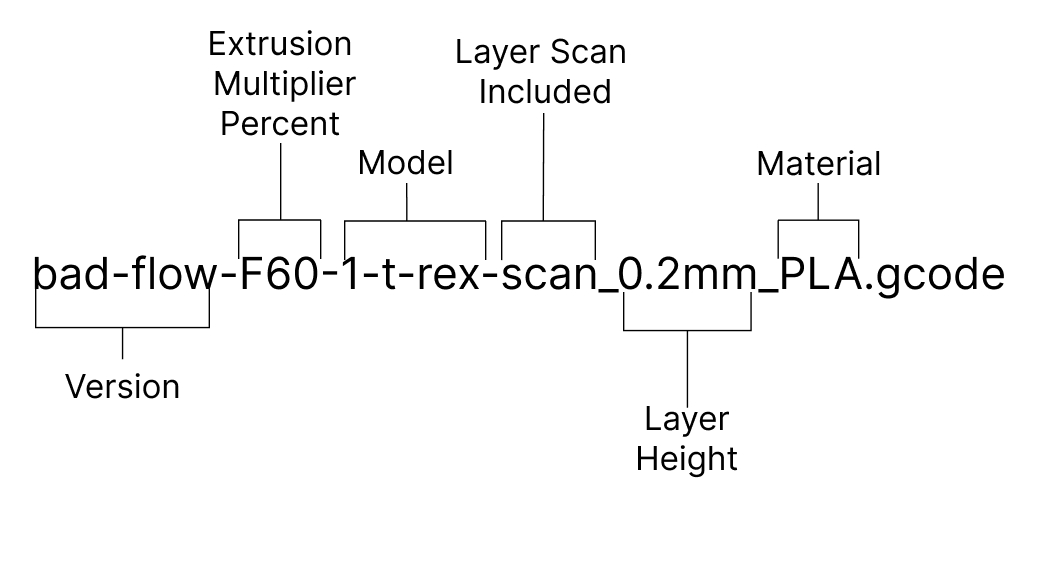
3. Save the file with the naming convention as shown. For instance:
The gcode name for 1-t-rex.stl will look like:
4. Print all 5 models. Please make sure the first layer quality is as good as in the calibration step. If not, please go back to the calibration step and start over. Consider wiping the bed clean with isopropyl alcohol and re-leveling the bed in between prints to ensure consistent bed adhesion.
Step 5. Adjust your flow rate to make sure your printer will produce bad first-layer
1. Turn OFF Celestrius data collection
2 Slice 1-t-rex.stl to produce an under-extruded g-code.
We will accomplish this by adjusting the extrusion multiplier in Prusa Slicer (called flow in Cura). Typically, your baseline prints will have used an extrusion multiplier ranging from 0.9-1.1.
Now, adjust the extrusion multiplier to 0.6. Depending on your setup, this may or may not be low enough to produce a significantly different result.
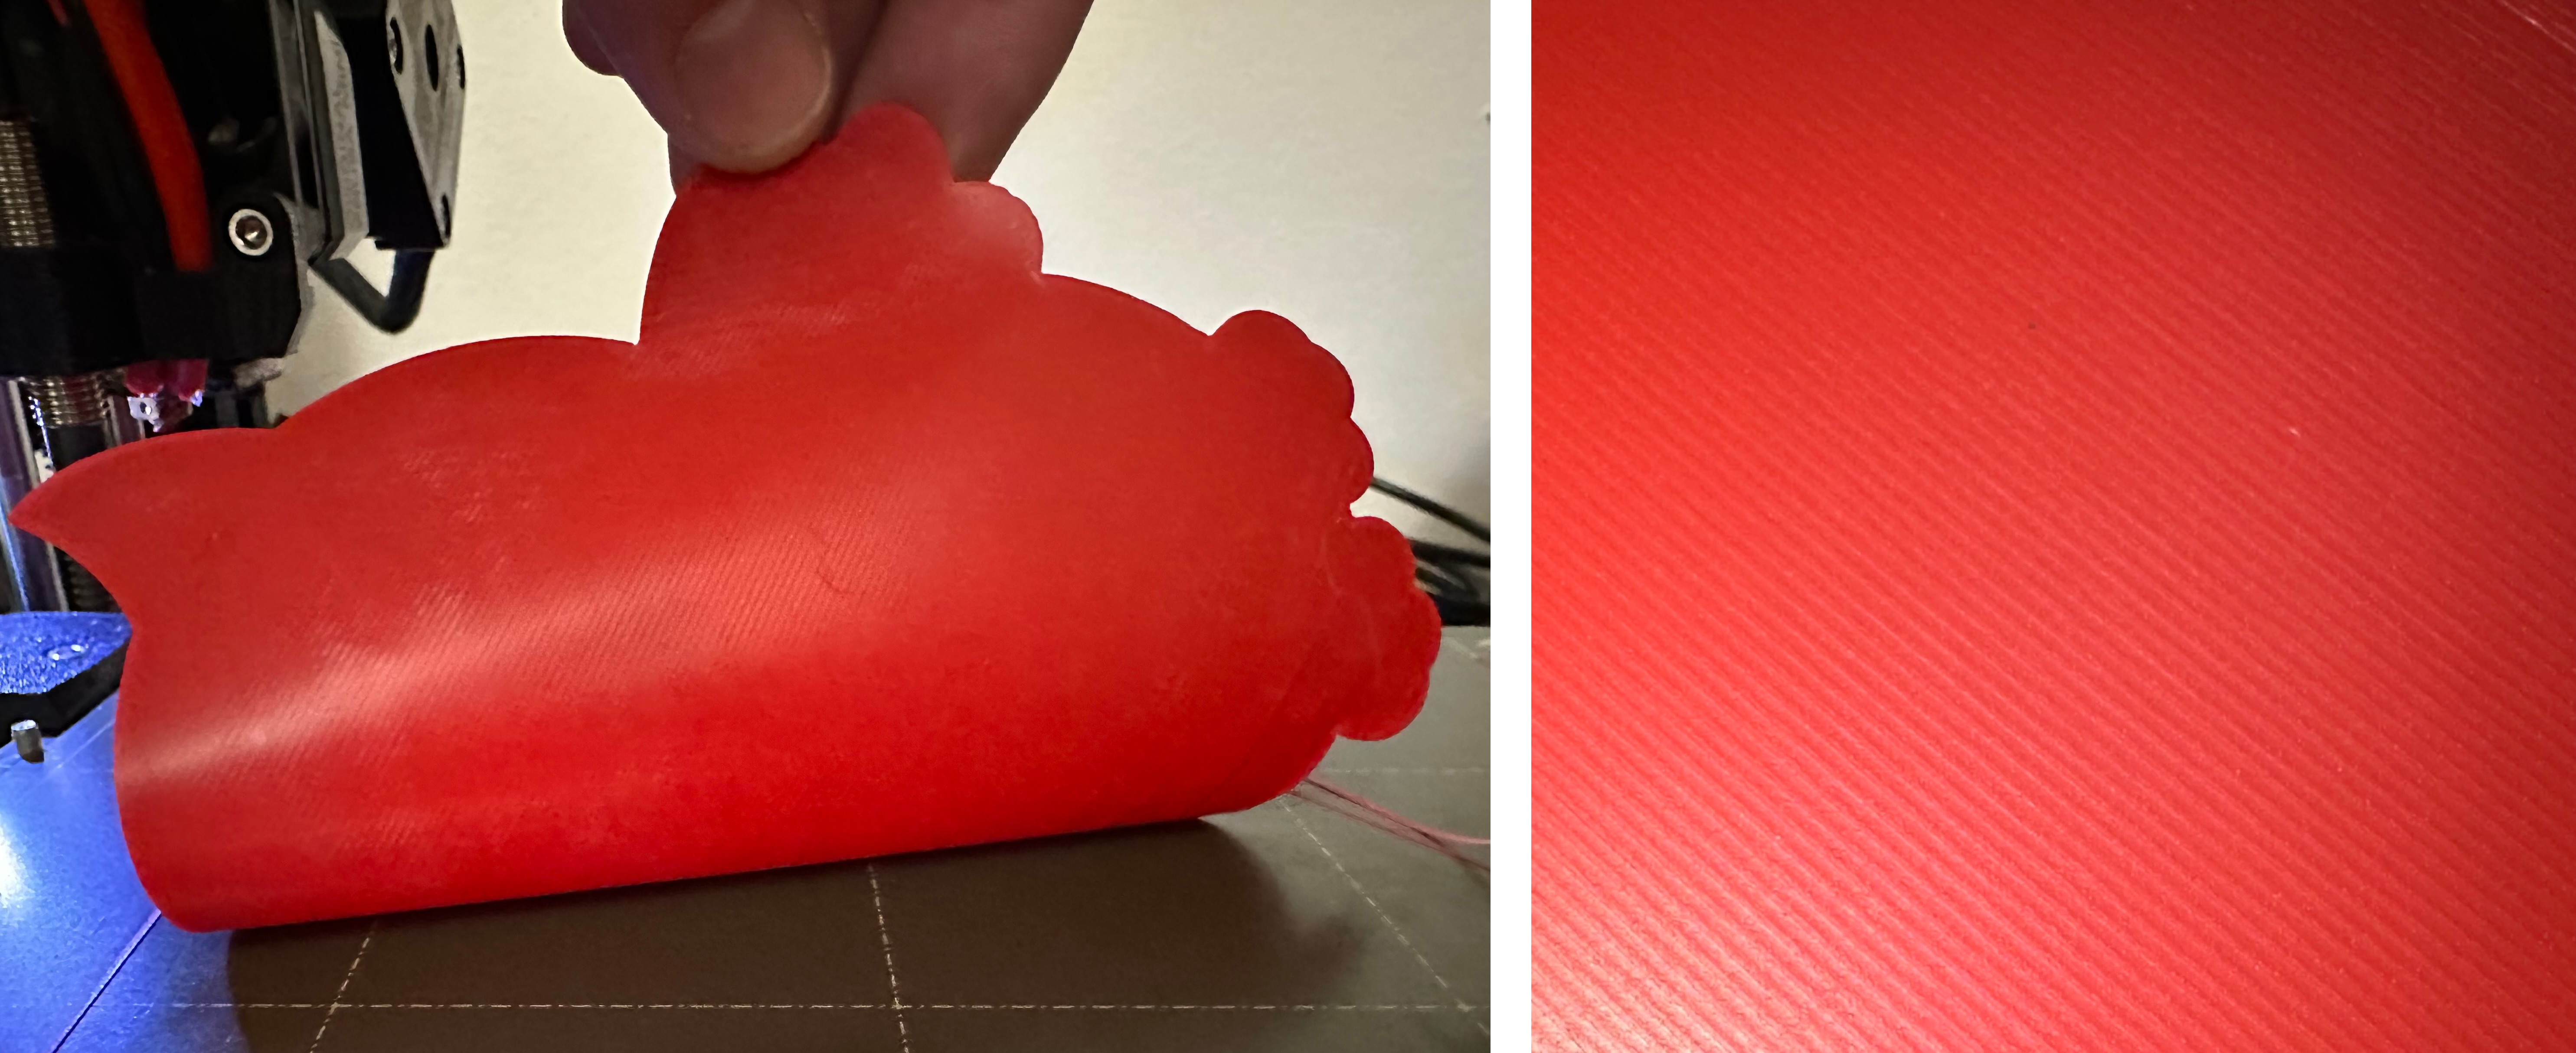
3 Print the gcode and compare the result to examples below
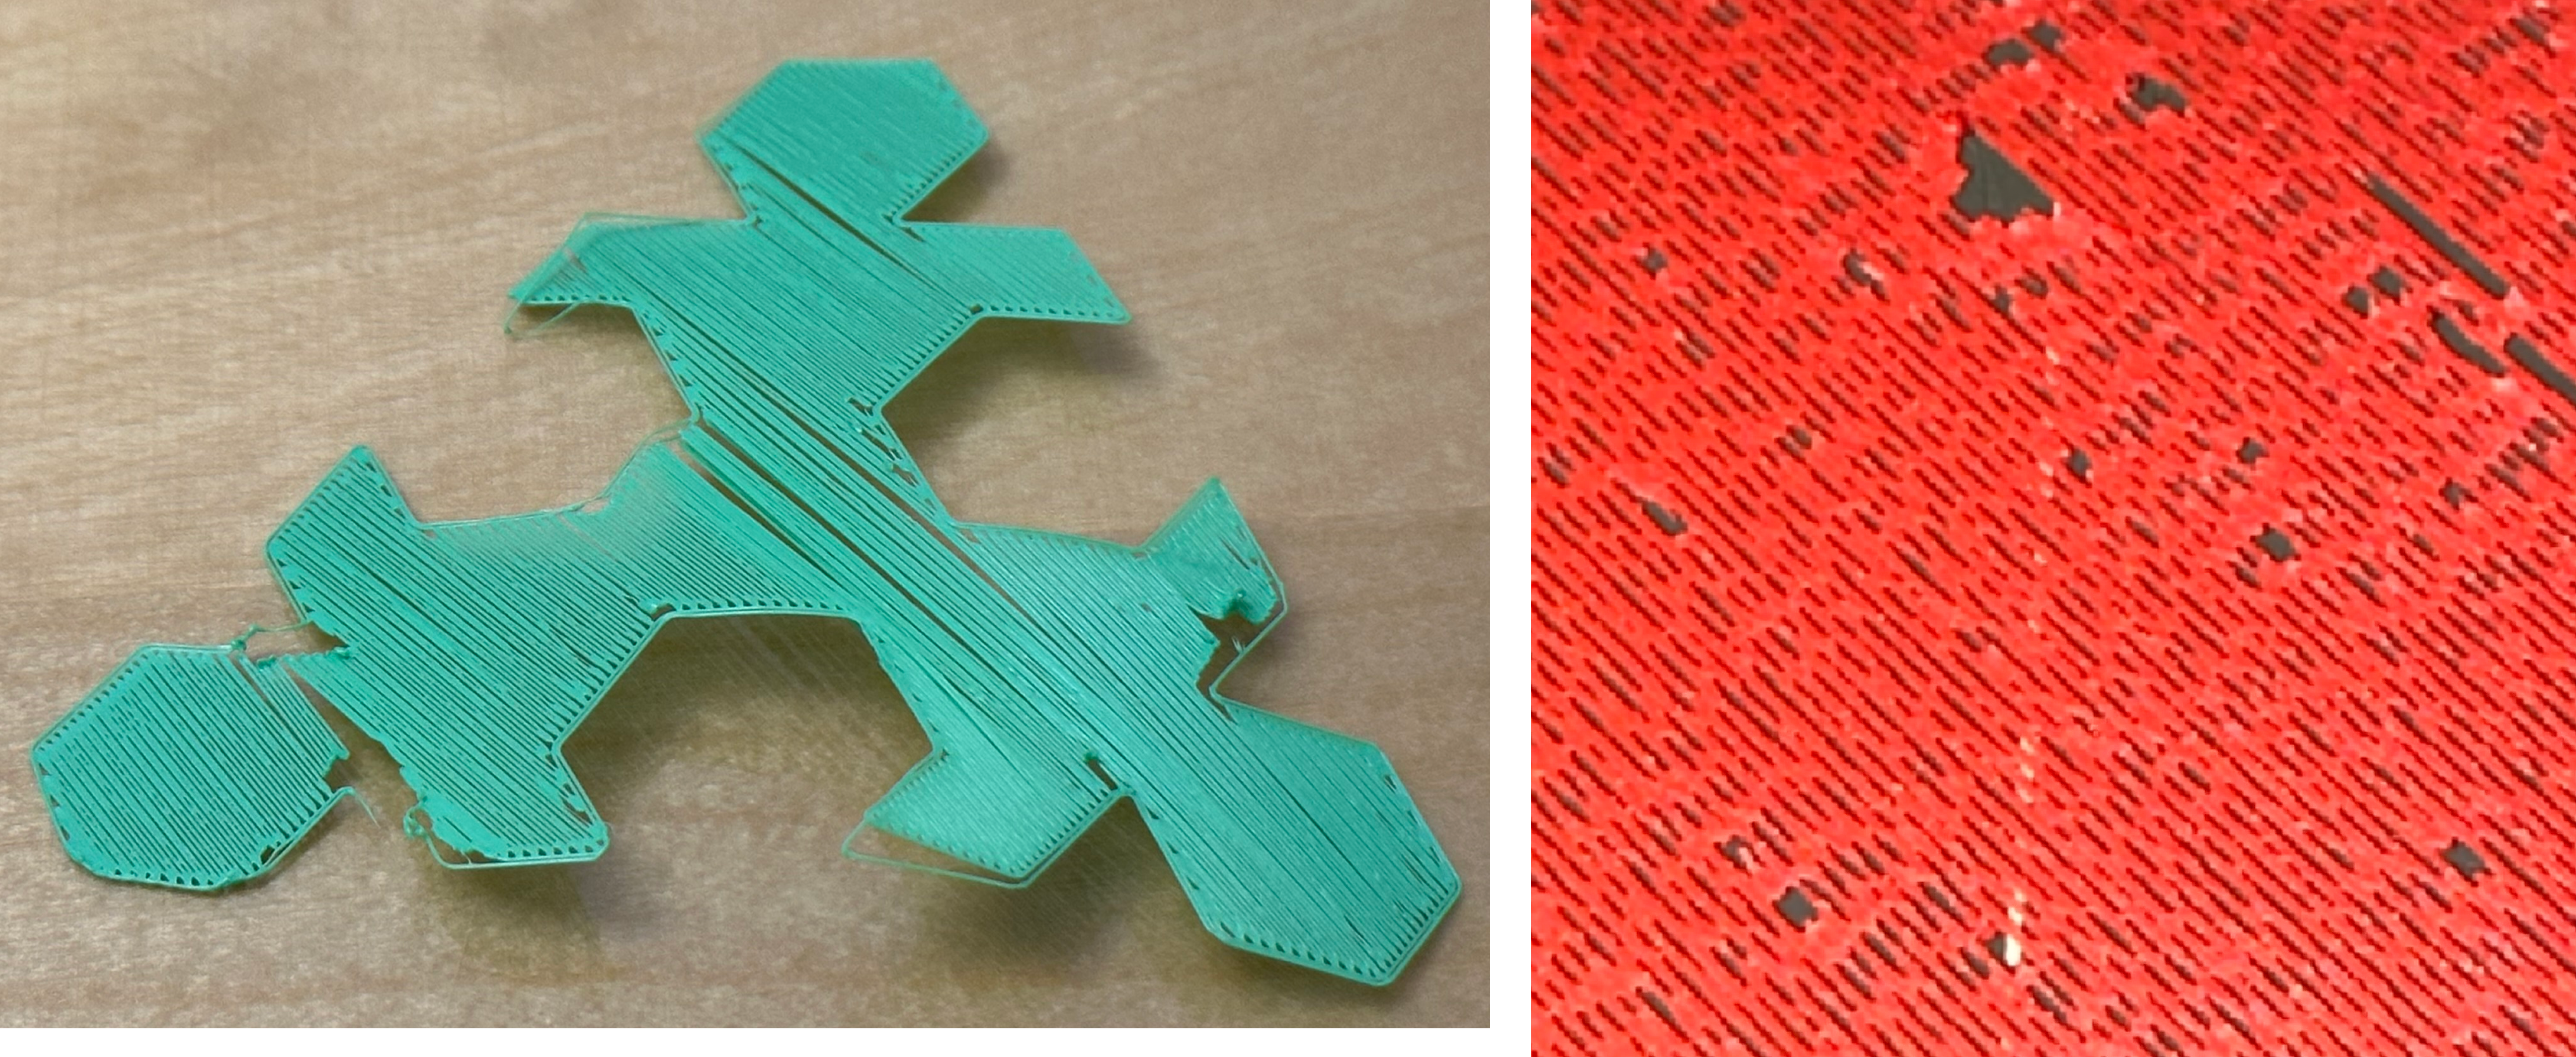
4 If the reduced flow does not result in an obvious difference from the baseline prints, adjust the extrusion multiplier from 0.6 to 0.5 and re-print the first model. Repeat the process until the print resembles the examples above. If you need to go lower than 0.5 extrusion width, reduce the extrusion width by 0.25. For example, go from 0.5 to 0.475.
The goal here is to ensure that the flow is obviously reduced so that the infill lines do not overlap or touch each other.
This will result in a print that is not a smooth homogeneous surface. Compare your model to the one shown above. If it is similar, move on to print the remaining models.
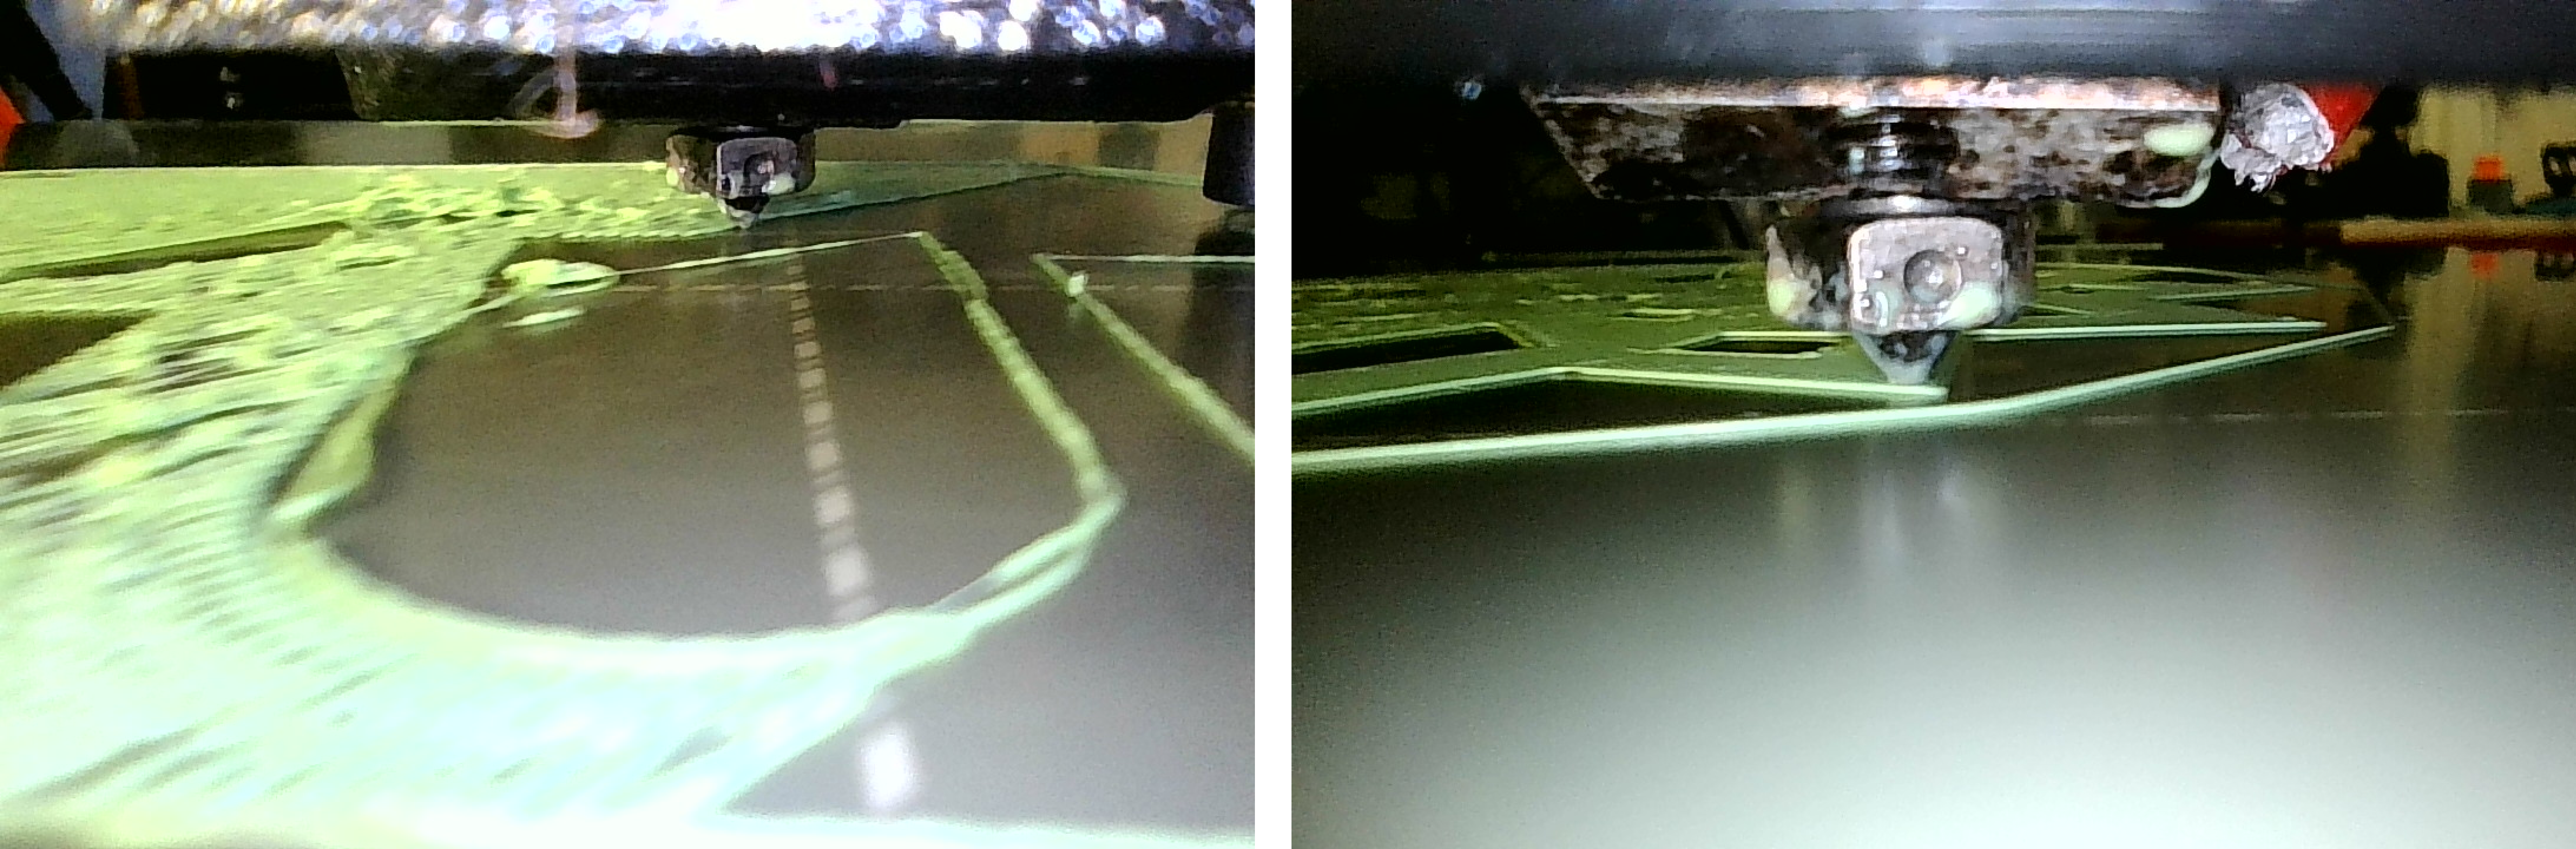
The view from the nozzle camera should look something like the image below.
Step 6. Print the test models again with the reduced flow rate
1. Turn ON Celestrius data collection
2. Slice the model with the same reduced flow rate settings from step 4.
3. Save the gcode file with a different naming convention. For instance:
The gcode name for 1-t-rex.stl will look like:
4. Print all 5 models. Please make sure the first layer for all 5 look similar to what the reduced flow rate examples. If not, please go back step 4 and start over. Consider wiping the bed clean with isopropyl alcohol and re-leveling the bed in between prints to ensure consistent bed adhesion.
Step 7. Turn off data collection.
Make sure you turn off data collection once you are done with step 1-6. Otherwise, the plugin may send unintended data to our server. Also, remember to remove the end gcode that you added in step 2 from your slicer.
Optionally, you can go Celestrius settings page to review all the prints that have been sent to the server. If you find any prints that you didn't intend to send and want us to delete them, please email us to request data erasure.
Your uploaded data won't be accessed by the Obico Team for 7 days. This is the give you a chance to request data erasure in case they are sent unintentionally.
Remember to remove the end G-Code from your slicer (added in step 2) when you are finished collecting data for the Celestrius Pilot, or if you want to print a print unrelated to the Celestrius Pilot. This G-Code will cause collissions with any parts printed higher than 1mm.