Prusa Slicer 2.6 - Organic Supports, Embossing and More!

The PrusaSlicer is quickly becoming one of the most popular slicers in the community. It is now one of the top 3D printing slicers due to its simple interface, lightweight design, and boatload of sophisticated capabilities.
The last PrusaSlicer 2.5 update added new features like the Lighting Infill and Arachne Perimeter Generator, to name a few. These were wonderful additions that were positively accepted by users.
The latest version, PrusaSlicer 2.6, kicks things up a level by including a slew of long-awaited features.
Read on to find out about its new features and how you can "support" your 3D prints in a better way with this upgrade.
What’s new in PrusaSlicer 2.6?
PrusaSlicer's 2.6 alpha 2 version was released a few days ago. The PrusaSlicer 2.6 is now available to the public for the first time (alpha 1 was only tested internally).This was the first time that people in the 3D printing community could use 2.6's new features. Let's take a closer look at them.
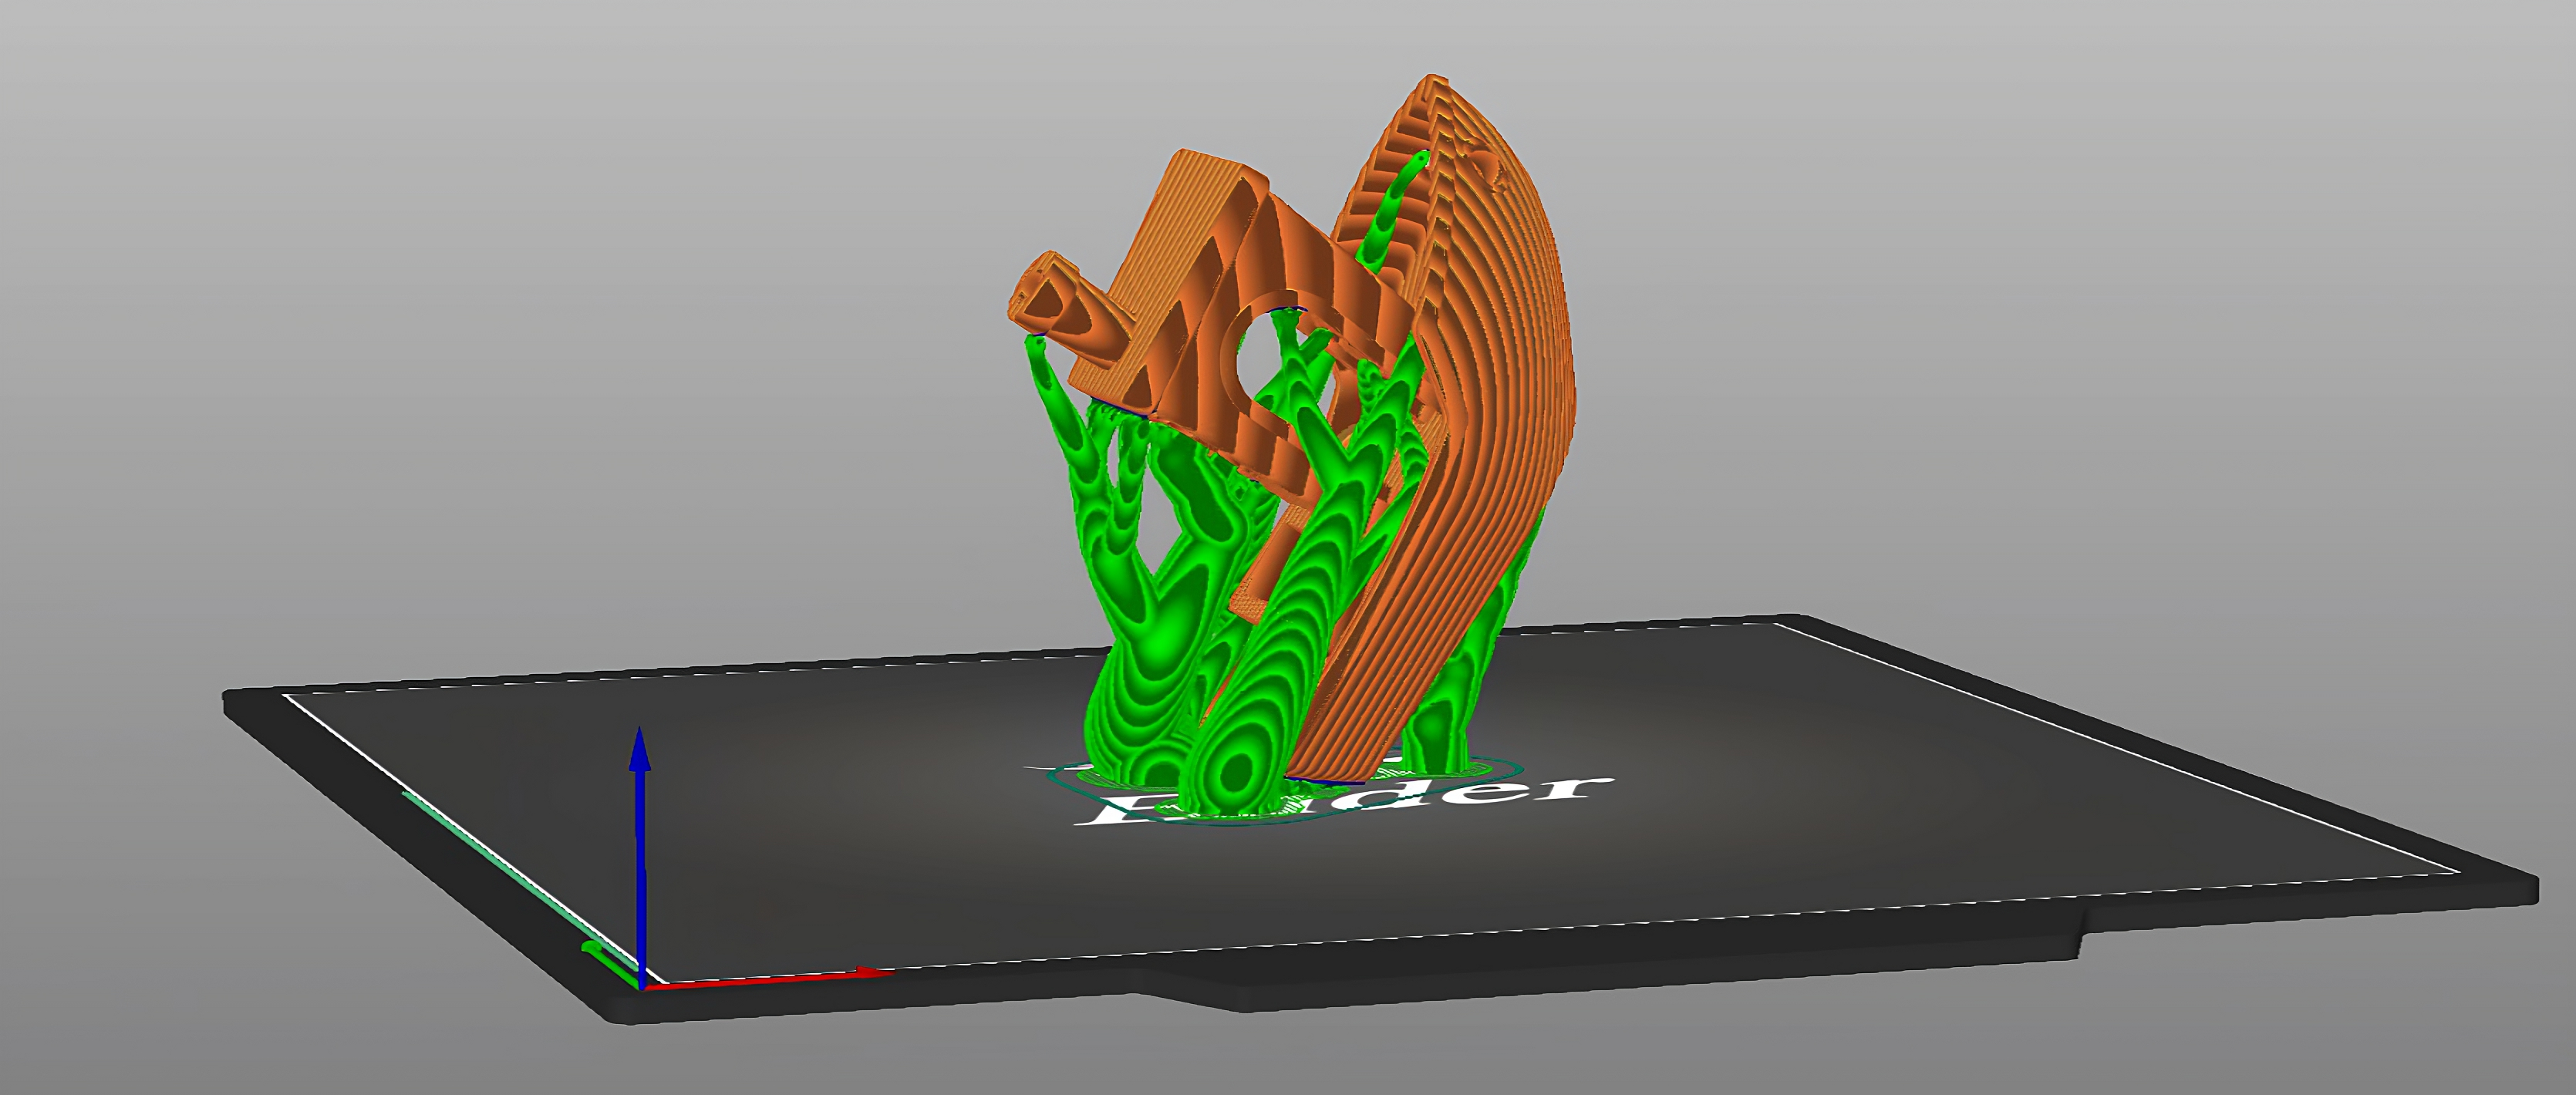
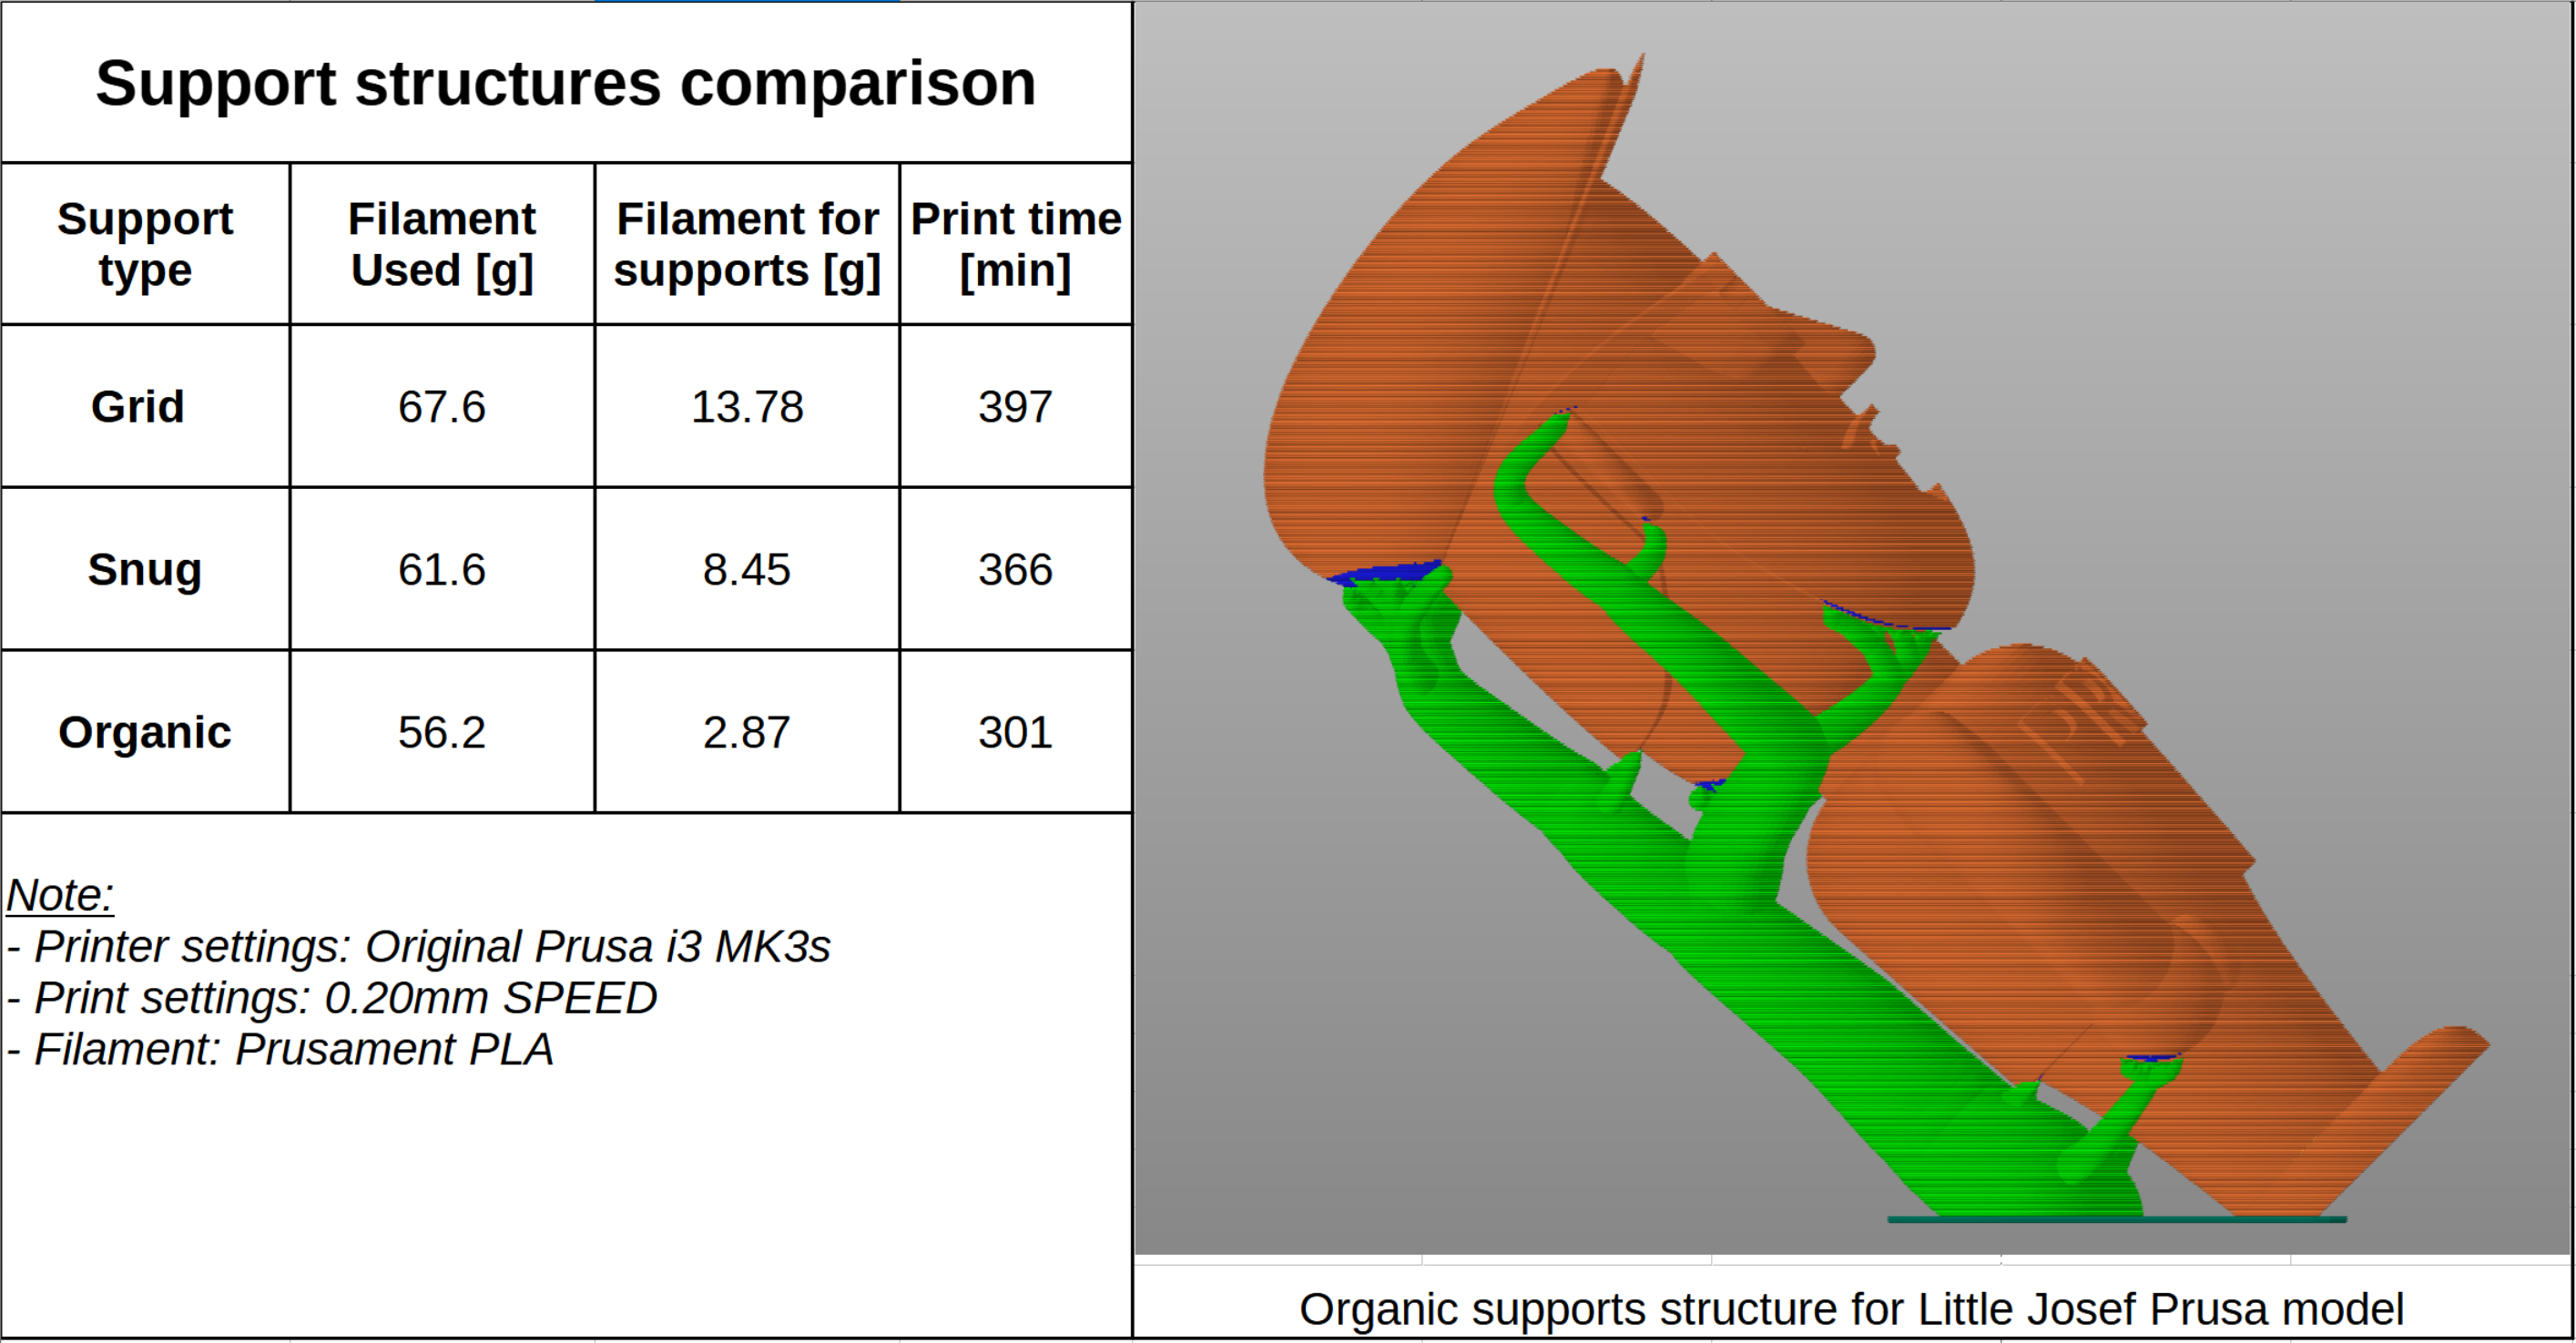
Organic Supports
 Picture Courtesy - Prusa3D via GitHub
Prusa3D first hinted at the organic supports in a YouTube livestream last year. We got a glimpse of these supports, and we saw how they are somewhat distinct from the tree supports that Cura provides.
Cura's and @ThomasRahm's algorithm for tree supports was used to modify PrusaSlicer's organic supports. These support structures are smoother, stronger, and more visually appealing.
Because the structure has branches, a lot less material is needed. It also helps to reduce printing time, which translates to higher production. The contact area with the actual model is so small, the support structure is easy to detach. With proper tuning, you can take out the whole support structure in one piece.
They are not perfect though. Organic supports require substantial computing resources. When working with big models, it can take a while to figure out these supports. Prusa recommends using at least 16 GB of RAM if you are using Organic supports for large models. You also can't use the "Variable Layer Height" feature with these supports.
Overall though, organic supports are quite good! These are great for making miniatures, sculptures of heads, and models of people. These supports can save you a lot of time and materials while improving the quality of your prints.
Measurement Tool
 Picture Courtesy - Prusa3D via GitHub
The measurement tool in PrusaSlicer is a cool little addition that helps you measure and adjust your 3D models. You no longer have to open another program or load a separate plug-in to measure your 3D prints.
The tool can calculate the distance between two edges, points, or surfaces on your 3D print. It is as simple as picking the two points on your model and selecting the measure option to use the tool.
You can even scale the model to the length you want by simply entering the custom dimensions. This makes it very easy to change the size of your 3D prints without having to mess around with percentages.
Limitations include the inability to measure the distance between two independent 3D models as well as the negative volumes in your prints. These are minor problems that might be fixed in future updates.
Embossing Tool for Text
Picture Courtesy - Prusa3D via GitHub
One of our favorite tools in the PrusaSlicer 2.6 release is the text embossing tool. It allows you to add text to your models. The slicer treats the text as a separate 3D part, and you can change it to fit your needs.
You can add signs, names, special numbers, etc. directly to your 3D prints. The tool gives you the option to change the size, depth, and font of your texts. Whether your model is flat or round, you are free to put the text wherever you like. And moving it is as easy as dragging it.
The tool allows you to add and save presets as well as alter existing ones. It's useful for making quick changes to your text and adding it to your models. You can also choose the text to be an additional part of your 3D print, or subtract it from your piece.
This feature is great because it makes it easy to add your own touch to your models quickly. You can add text to your gifts, personal belongings, and trophies right away to make them more meaningful and unique.
Downloads from Printables
Picture Courtesy - Prusa3D Blog
You can now go to the Printables website and open your 3D models in PrusaSlicer right away. It's a time-saving feature that saves you from having to manually download and open your files.
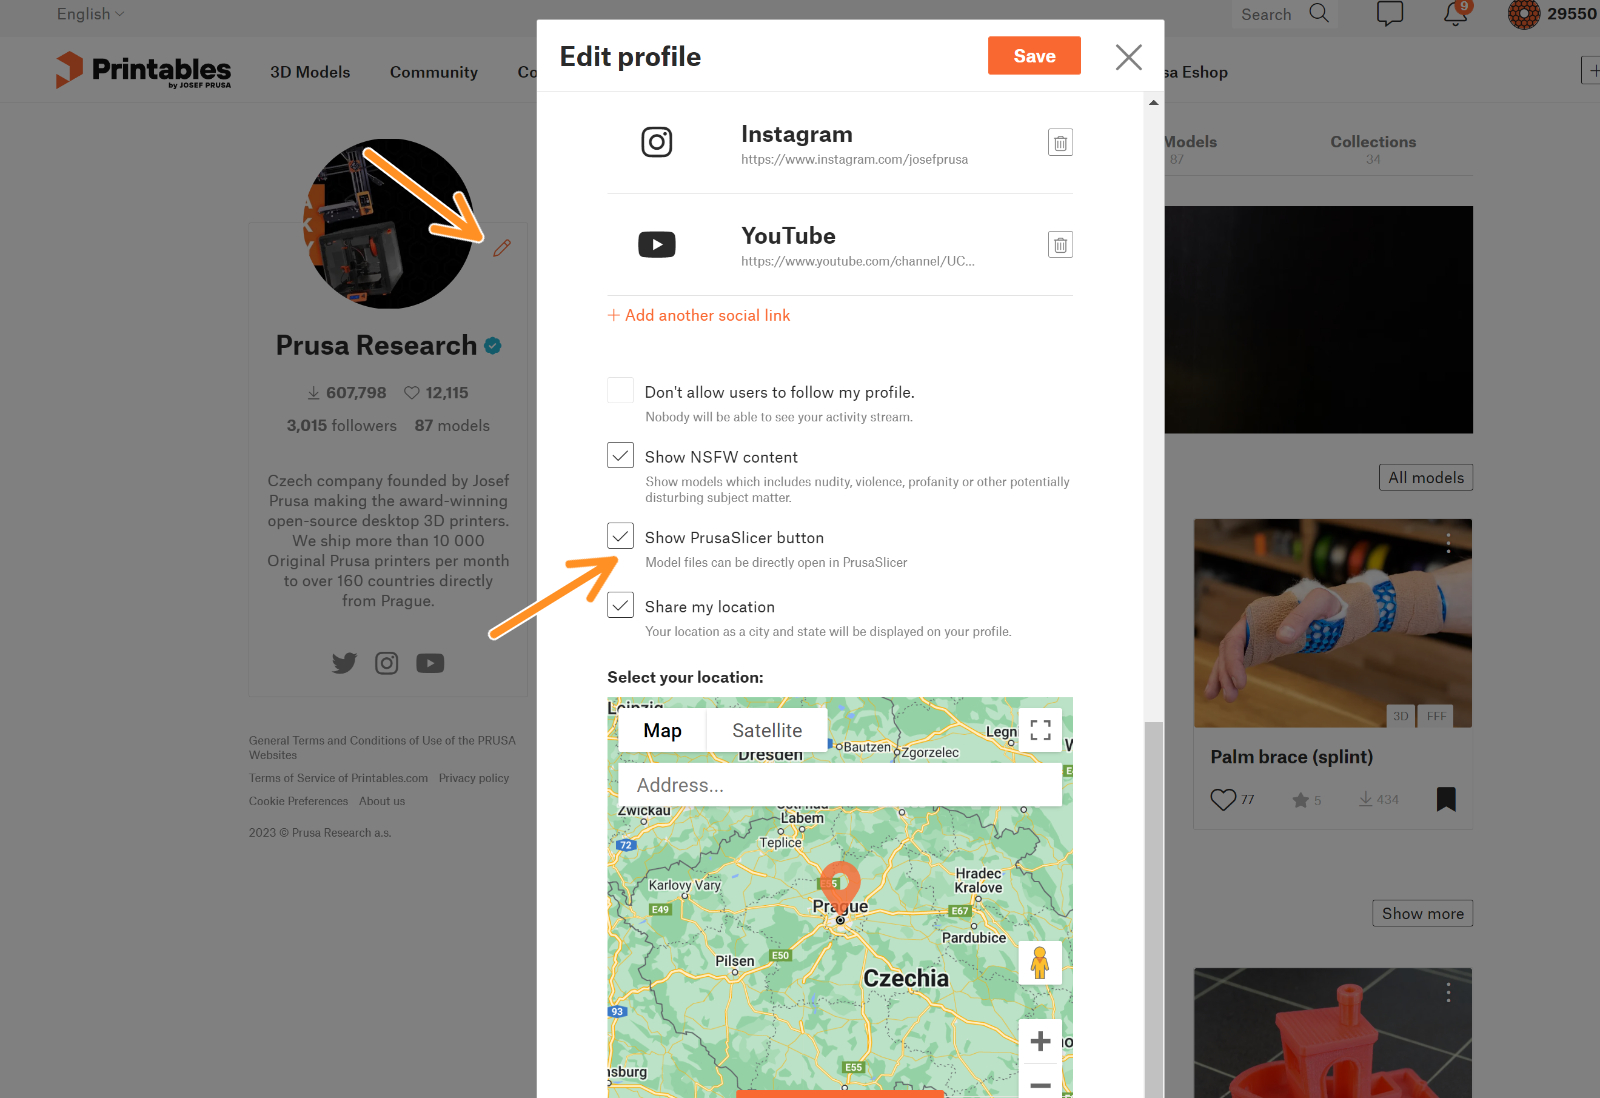
It is a one-time setup. First, you'll need to enable the "Show PrusaSlicer" button in your Printables profile. Following that, navigate to PrusaSlicers >> Configuration >> Preferences >> Other and enable Printables downloads.
Next time you go to the files section of a 3D model in Printables, there will be a PrusaSlicer icon next to the download button. It will open your PrusaSlicer and automatically load the model.
It's a minor but useful upgrade that integrates Printables with PrusaSlicer and improves the overall user experience.
Dynamic overhang speeds
Picture Courtesy - Prusa3D via GitHub
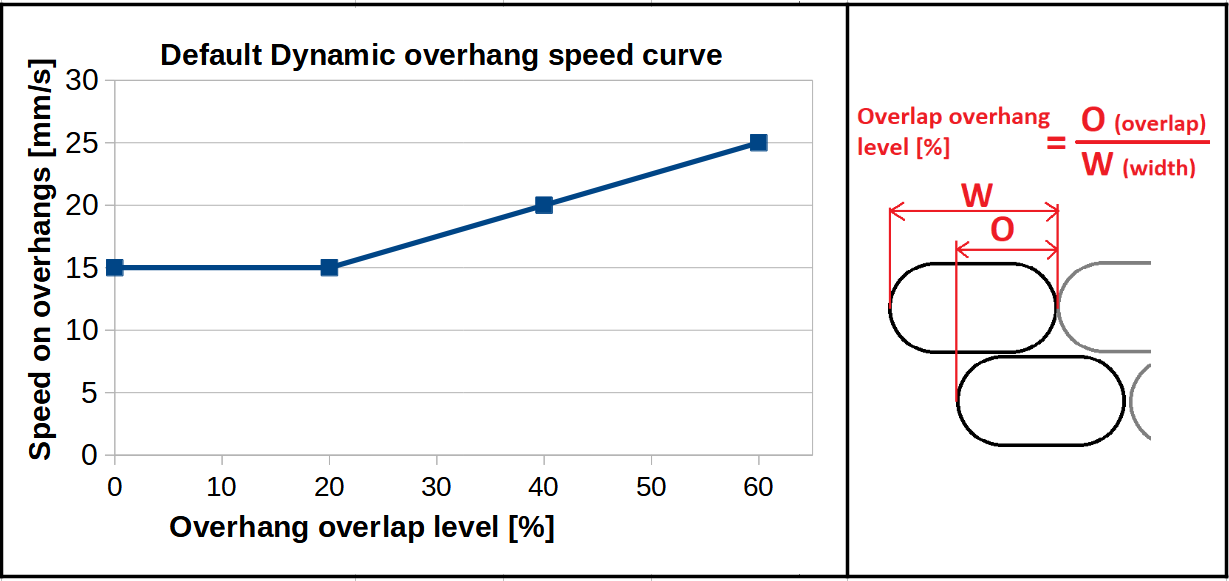
You can set the extrusion speeds for the overhanging parts of your model. PrusaSlicer 2.6 allows you to slow down printing speeds based on the overhang you're using.
It figures out the speed by taking into account how much the extrusion overlaps with the layer below it. This allows you to switch between different speeds based on the overlap levels.
This feature might not make a big difference in how your overhang looks. But it will make them a little better and give you more control over how fast your model prints.
Experimental Features
These new features are still being tested, so they might have bugs. Still, putting it out to the public is a great way to test them. If the response is good, Prusa could very well add these functions to the next PrusaSlicer release.
Extra perimeters on overhangs
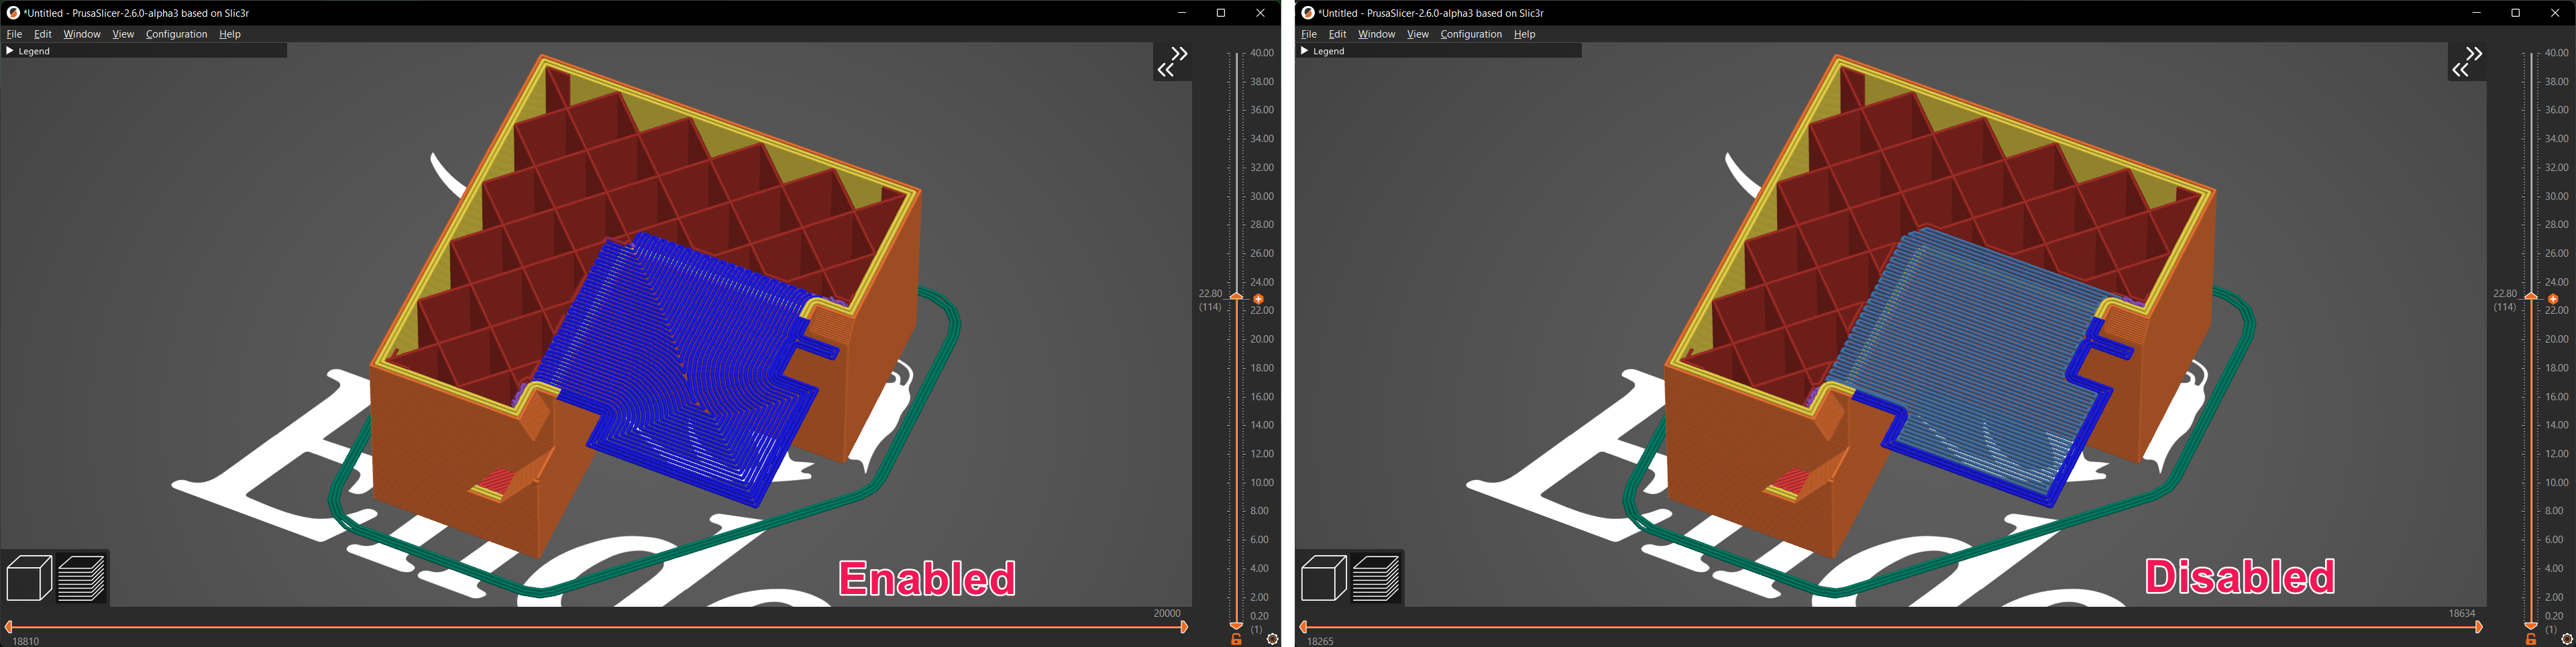
In a typical overhang, the slicer connects the area without a base to the two support points, which are usually the edges of your model. If the distance between these support points is too far, you need to put support structures below your perimeters. Without support, your print will either fail or have a bad overhang.
This feature in PrusaSlicer detects such excessive overhang places. It breaks up the overhangs such that the perimeters (lines) link to your model's nearest edge.
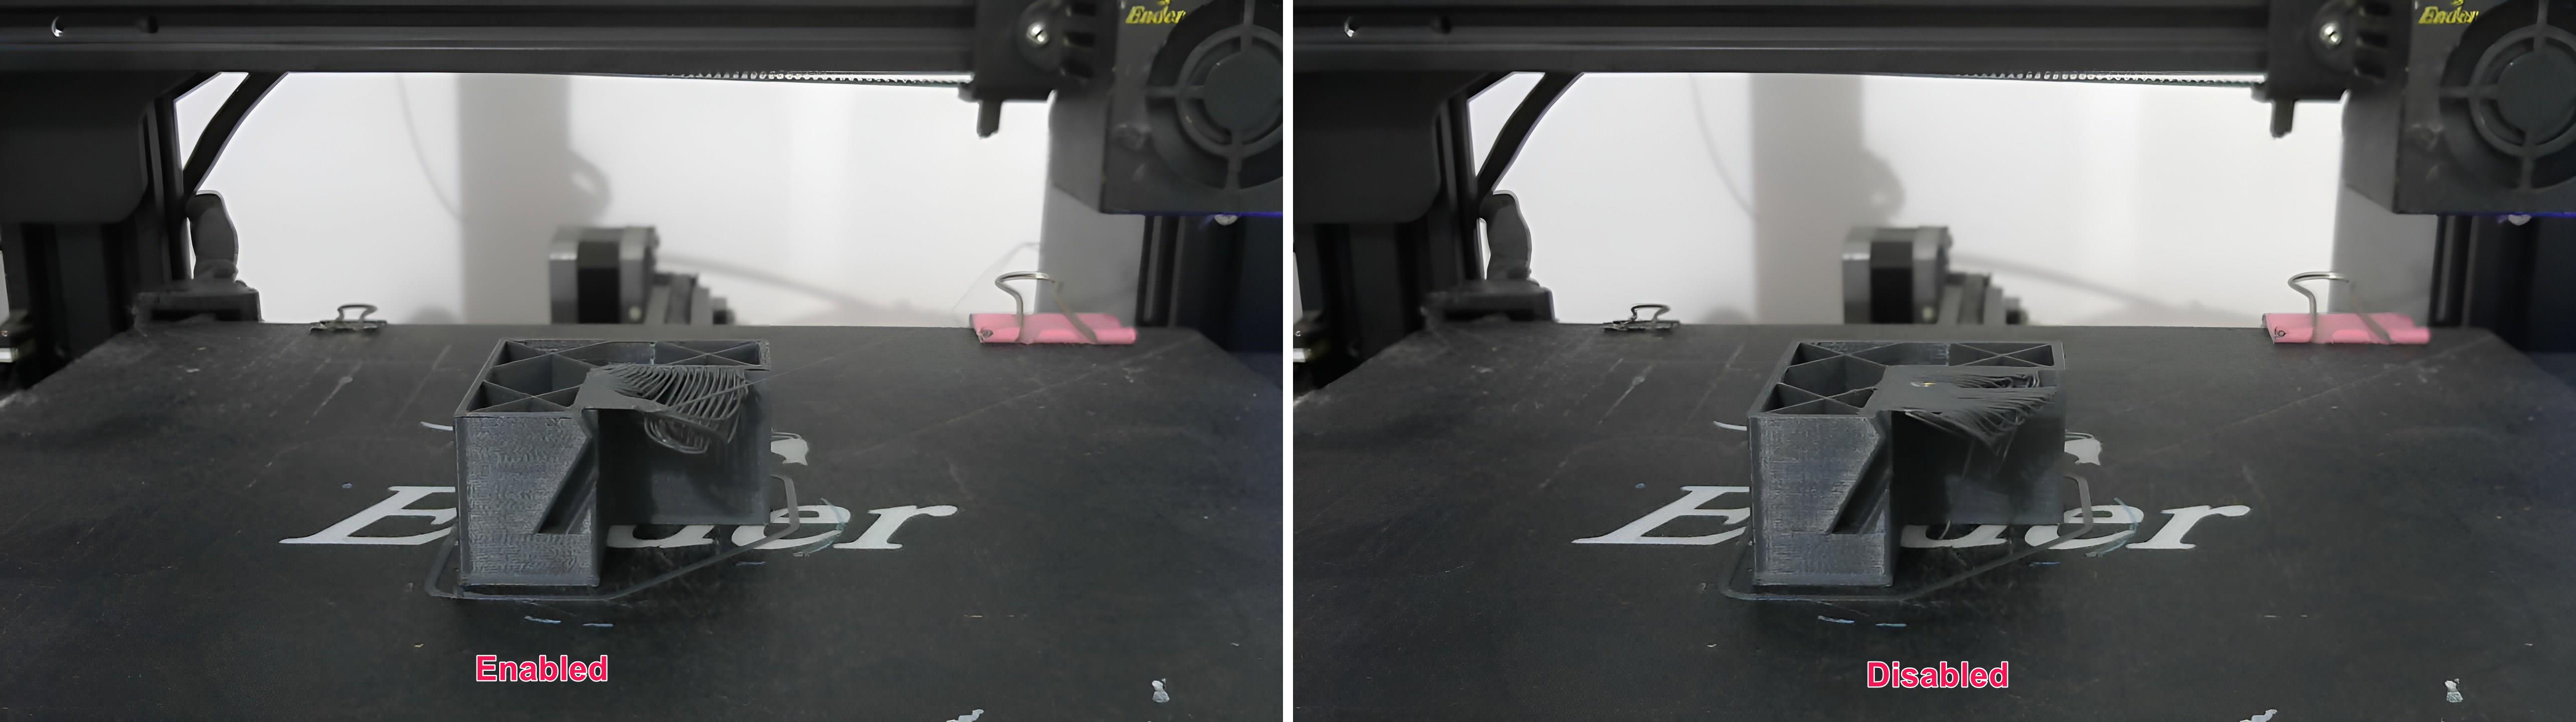
It also joins the adjoining lines, producing a continuous loop. The resulting overhang is smaller and has a better chance of being printed without any support structures. It should, ideally, help make better overhangs and limit the use of support structures in some overhang areas.
As it's still being tested, you shouldn't depend on it too much just yet. Still, it's an interesting idea, and it'd be great if PrusaSlicer made it a stable feature.
Avoid crossing curled overhangs
Picture Courtesy - timyoungenator via Prusa3D Forums
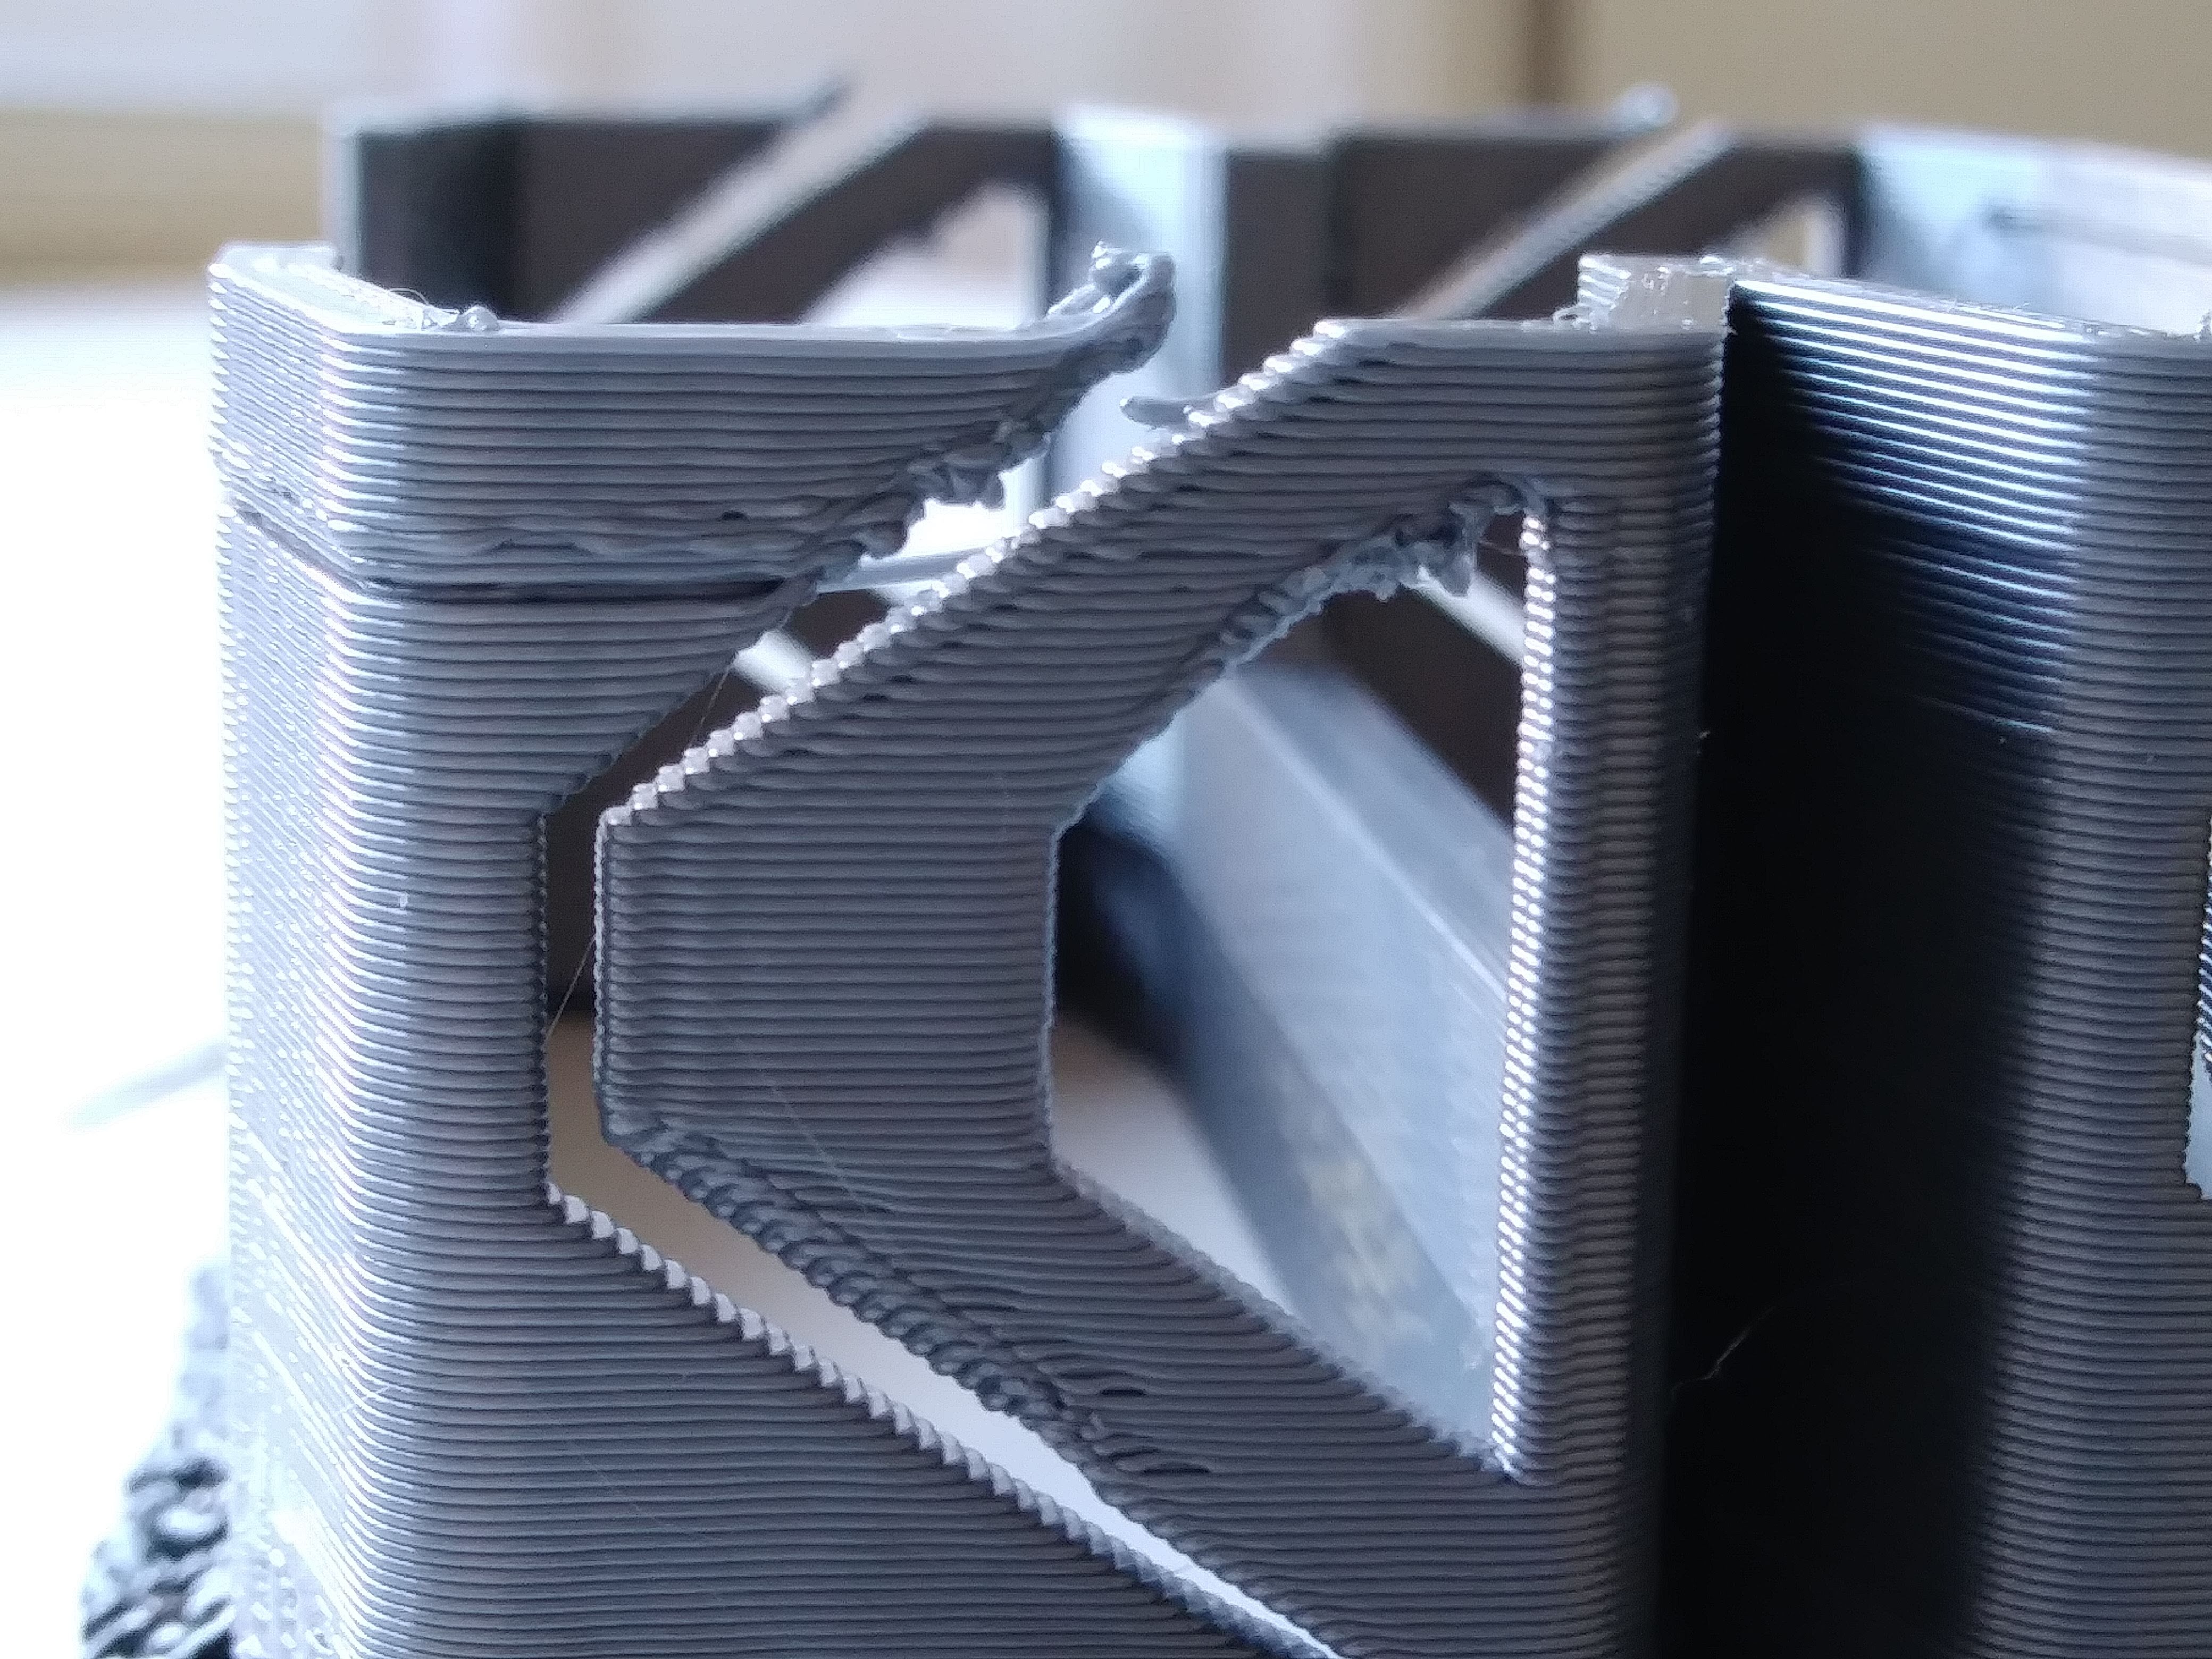
The curled overhang problem is talked about a lot in the Prusa forum. It's a very annoying problem that hurts the quality of your prints and, in the worst cases, makes it impossible to print at all.
Curled overhangs can be caused by a number of things, such as a high printing temperature, fast printing speeds, and not enough cooling. Curling can happen because of the way the overhang is made. Curled overhangs are commonly found in corners or stairs in 3D prints.
These become a problem when the nozzle adds another layer or moves from one print to the next. If the nozzle strikes the hardened overhang, it can entirely remove your print from the print bed.
The Prusa team hopes to fix this problem by figuring out the best way for the nozzle to move. The plan is to optimize the travel moves so that the nozzle doesn't strike your models, minimizing the risks of print failure. It's not a perfect solution, and you can't be sure that it will work. Still, it's a step in the right direction and might keep your prints from failing.
What's Updated?
Cut-tool
Picture Courtesy - Prusa3D via GitHub
One of the most important changes in PrusaSlicer 2.6 has to be the cutting tool. It's a huge upgrade over the previous cut-tool and adds some seriously useful features that should streamline your job.
You can now move the cutting plane along all three axes, which wasn't possible before. There are now gizmos on all of the X, Y, and Z axes that can be used to precisely rotate and position the cutting plane. The Z-value can also be numerically specified.
You can now choose any two points on your model to be the cutting plane's starting and ending points. You can accurately cut your 3D part using these points without having to mess with manipulating the cutting plane.
Prusa has incorporated the option to add connectors to your cut items. You can choose between two types of connectors, Plug and Dowel, and change their shape and size to fit your needs.
After printing, the connectors make assembling your parts very simple. This improves user convenience and brings PrusaSlicer one step closer to being an all-in-one 3D printing slicer.
Print checker and automatic FDM support painter
Picture Courtesy - Prusa3D via GitHub
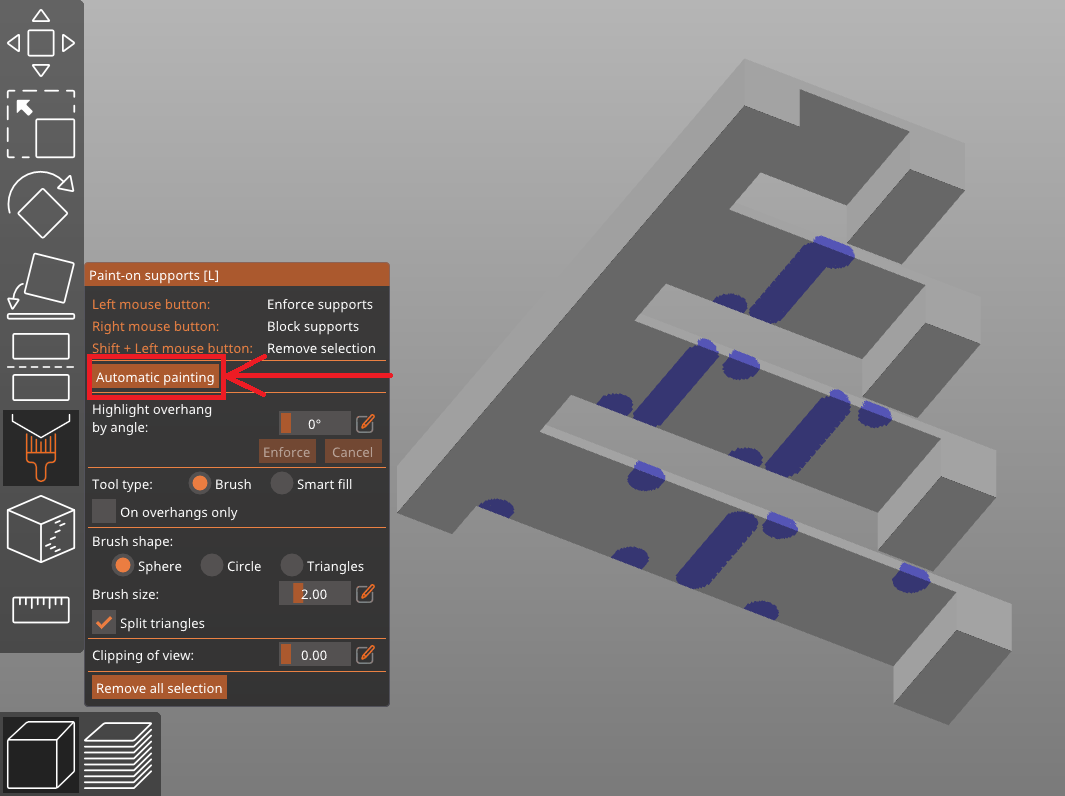
The Paint-on supports in PrusaSlicer are one of the easiest customizable supports to use across all slicers. The Prusa team has updated them to make them easier to use.
You can choose to have paint-on supports for your 3D print made automatically. The slicer looks at the overhangs and automatically figures out where support enforcers would be helpful.
It gives you a basic framework of paint-on supports to work with. This reduces your manual work and saves you time when it comes to print preparation. You can further tweak these supports if necessary, or you can press Print to begin printing your model.
"Monotonic lines" top/bottom fill pattern
Picture Courtesy - Prusa3D via GitHub
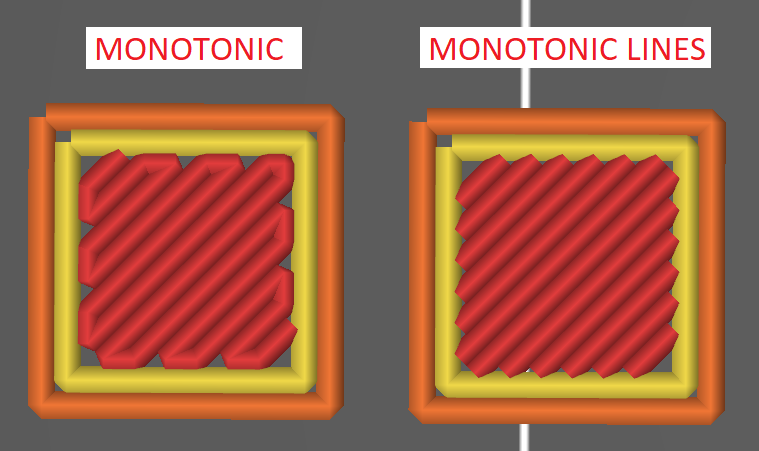
The "monotonic lines" are identical to the already existing monotonic pattern, except that the two consecutive extrusions are not connected to each other.
Each line in this top-and-bottom infill pattern is a separate extrusion. Prusa claims that this increases the print's dimensional accuracy and improves the top- and bottom-layer filling. The monotonic lines also allow for less overlap between the perimeter and the infill, reducing over-extrusion in prints.
Should you upgrade to PrusaSlicer 2.6?
In a nutshell, yes! You can, however, wait until the final release of the 2.6 version.
The PrusaSlicer 2.6 release provides users with some much-needed functions. In particular, the organic supports, the modernized cutting tool, and the text embossing tool are all great additions. These capabilities, in addition to the other new features, significantly improve the PrusaSlicer's usefulness and experience.
The most recent release of PrusaSlicer is version alpha-3. It fixes some of the problems in the original 2.6 release and makes the slicer more dependable to use. You can download the PrusaSlicer 2.6 slicer from the GitHub page and take your 3D printing skills to the next level.
Should You Also Upgrade To Obico?
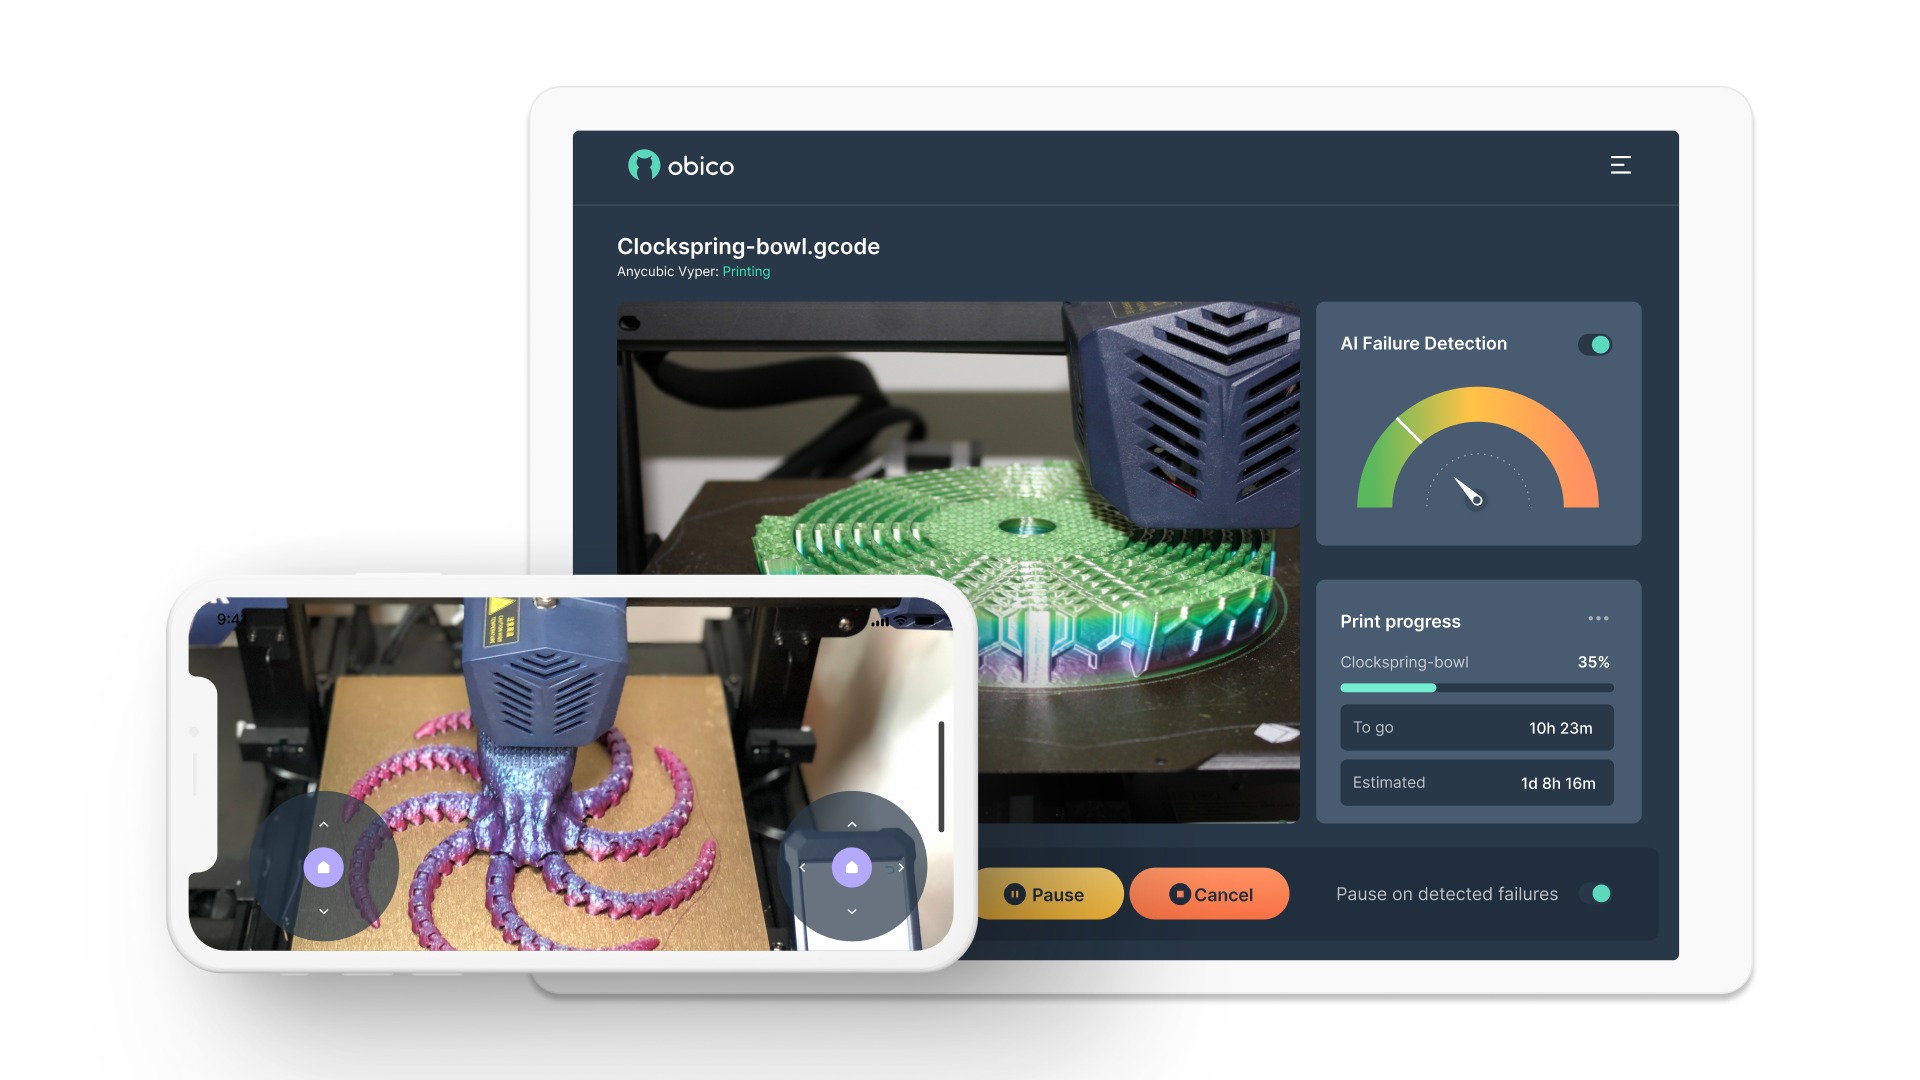
Yes! Obico is the revamped version of the popular ‘Spaghetti Detective.’ It goes beyond merely detecting print failure and aims to make your 3D printer a smart machine.
Obico is free, open-source software for 3D printing that lets you control and monitor your printers from anywhere in the world. You can use it on your smartphones, iPads, and desktop computers without any problems.
It connects to your Octoprint or Klipper 3D printer and gives you full control of your printers from afar. You can watch a livestream of your prints as they happen and record time-lapse videos to share later.
Obico has viewed tens of millions of hours of 3D printing footage. This footage is used to teach Obico's deep-learning algorithms how to find print failures as they happen. Its AI failure detection system finds print failures automatically and lets you know right away. You can set up Obico to stop the print job for you, or you can do it yourself through the Obico app.
This feature helps you save a lot of filament and printing time, which is useful for 3D printing jobs that can take all day.
Obico improves your printing experience by acting as a 3D printing assistant while you focus on other things. Start for free, and tell us what you think.