Mintion Camera Mount Design Guide
This guide provides a detailed step-by-step process for designing a 3D printable mount for the Mintion camera tailored to work with the Nozzle Ninja AI feature from Obico. Nozzle Ninja is a powerful tool that uses AI to monitor your 3D printer's first layer, providing insights and grades on print quality. This guide covers everything from understanding the importance of a custom mount, tips for optimal design, selecting suitable materials, optimizing the design for printability, and testing the final product.
Why Nozzle Ninja?
Traditional webcam-based AI systems are effective at identifying major 3D printing errors like spaghetti but fall short when it comes to detecting more subtle issues, particularly during the first layer. The first layer is foundational, and any flaws here can compromise the entire print. Nozzle Ninja employs a dedicated nozzle camera to closely monitor this layer, catching problems early in the process.
What is a Nozzle Camera?
A nozzle camera is a specialized USB camera designed to capture a close-up view of the 3D printer nozzle and the first layer of the print. Unlike standard webcams, which offer a broad view of the entire print bed, the nozzle camera focuses on a narrow, zoomed-in perspective, making it ideal for monitoring the critical first layer.
Why a Custom Mount is Essential?
It's important to have a custom mount for the Mintion camera to get the best performance from the Nozzle Ninja AI. This mount helps position the camera just right so it can capture a clear view of the 3D printer's nozzle, especially during the crucial first layer of printing. The camera should see both the nozzle and as much of the print bed as possible, which helps the AI spot any issues early on. A good mount keeps the camera steady, lines it up correctly, and doesn’t get in the way, all of which leads to better monitoring.
Now that we've introduced the Nozzle Ninja, the camera, and the camera mount, let's delve into the tools and materials you'll need to gather before beginning your camera mount design project.
Tools and Materials
- 3D Modeling Software: SolidWorks, Fusion 360, or similar CAD software that can work with STEP files.
- 3D Printer: You need this printer to print the designed mount and test it. You can use the same printer that you are designing the mount for.
- Mintion Camera 3D Model: We have designed it for you; it is available for download in STEP format from this link. The design includes the camera ribbon cable and PCB design in one file.
- Printer Extruder Head Design: You need to search for your printer extruder head design. If your printer is open source, like the Voron 3D printer, it would be very easy to find and download the design. If it is not open source, try to search for it; you can ask the community in forums or check the manufacturer’s Discord server. In the worst case, if you cannot get it, you will need to reverse engineer it. You do not need to design it as a full design; exactly what you need is to fix the nozzle in the right position relative to the part that you will fix the mount to. And then start your design from this part.
- Measuring Tools: You may need calipers; they will help you in reverse engineering or in checking dimensions and clearances.
- Suitable 3D Printing Material: Choose materials like PETG, ABS, ASA, or Nylon for the mount because they can handle heat well. This is important as the mount will be close to the printer's hot parts, and the camera flash also gets very hot. These materials are also strong and last a long time.
Now that you're all set, let's dive into the most exciting part—designing the camera mount!
Designing the Camera Mount
Positioning the Camera
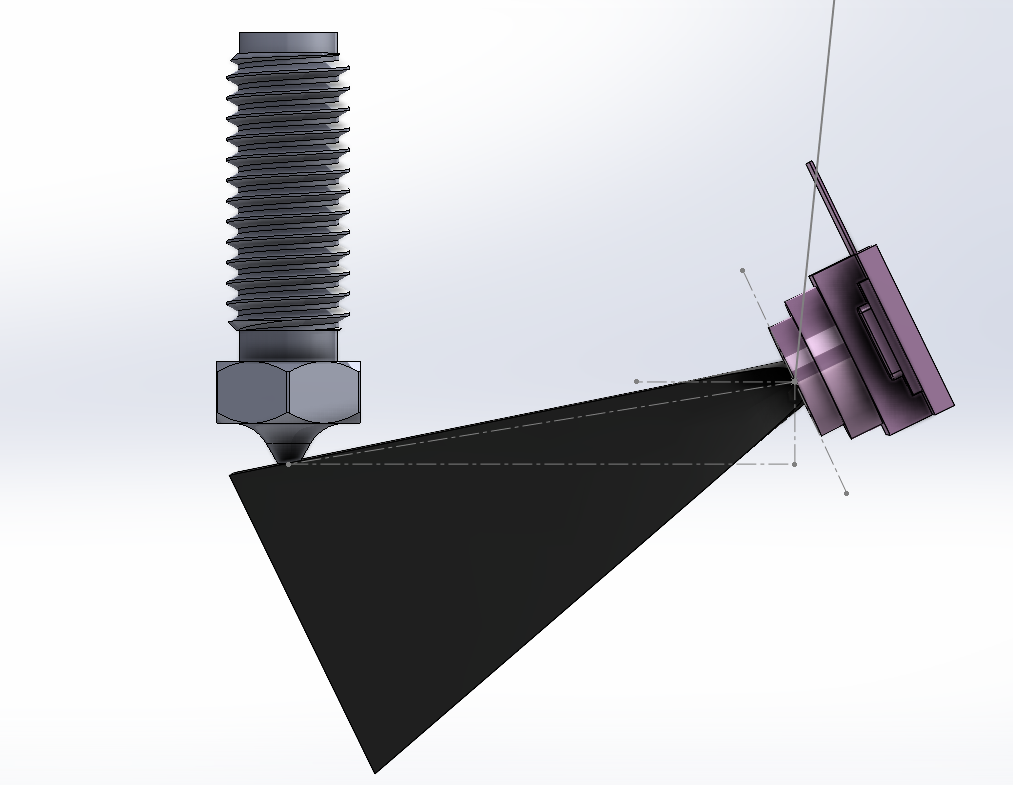
Once you have the extruder head design and downloaded the Mintion camera model, import the Mintion camera model into your 3D modeling software. Use relations and parameters to accurately position the camera relative to the nozzle. It’s crucial to ensure that the camera lens is perfectly aligned to capture the first layer without obstructions and with the right view.
You can follow the following illustration that shows the dimensions and relations between the camera lens and the nozzle to have a fully defined position.
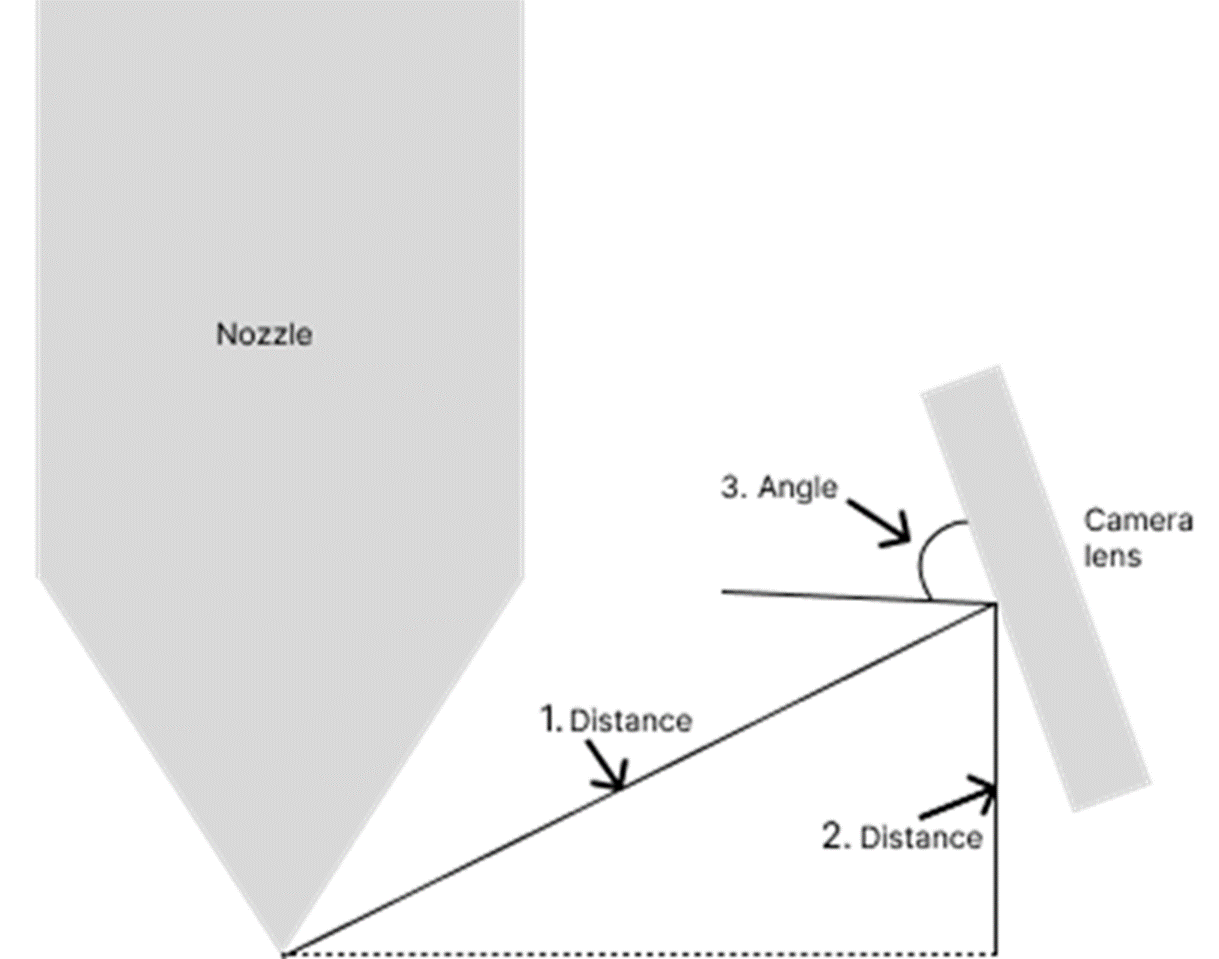
- Distance: 20-30mm
- Height: ~4mm
- Angle: ~65 degrees
To be accurate, you need to draw the exact dimensions as construction lines in your design just to make sure the lens of the camera is in the exact right position as you can see in the following image.
Design Considerations
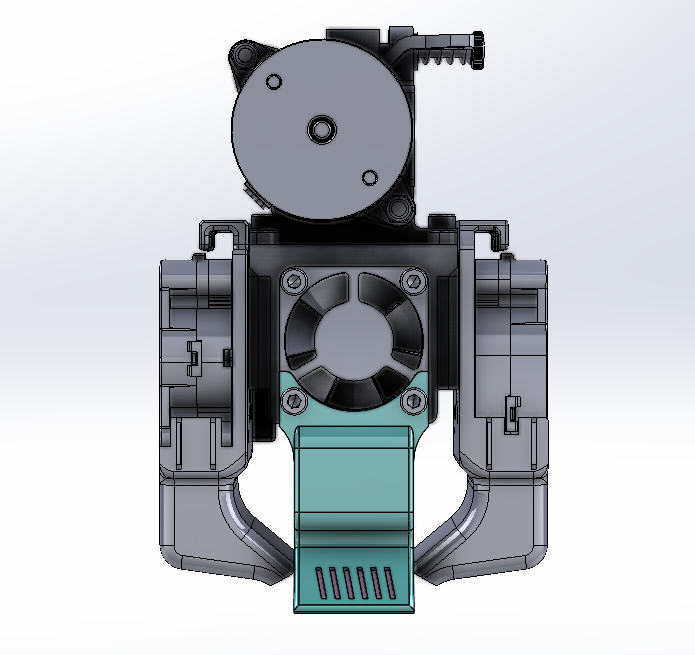
When designing the mount, prioritize a design that provides a clear view of the nozzle while still allowing the user to see the nozzle with the naked eye during printing.
Bad Design Example:
The following design is not recommended as it blocks the user from seeing the nozzle with his naked eye while printing, which could be annoying and make it hard for troubleshooting.
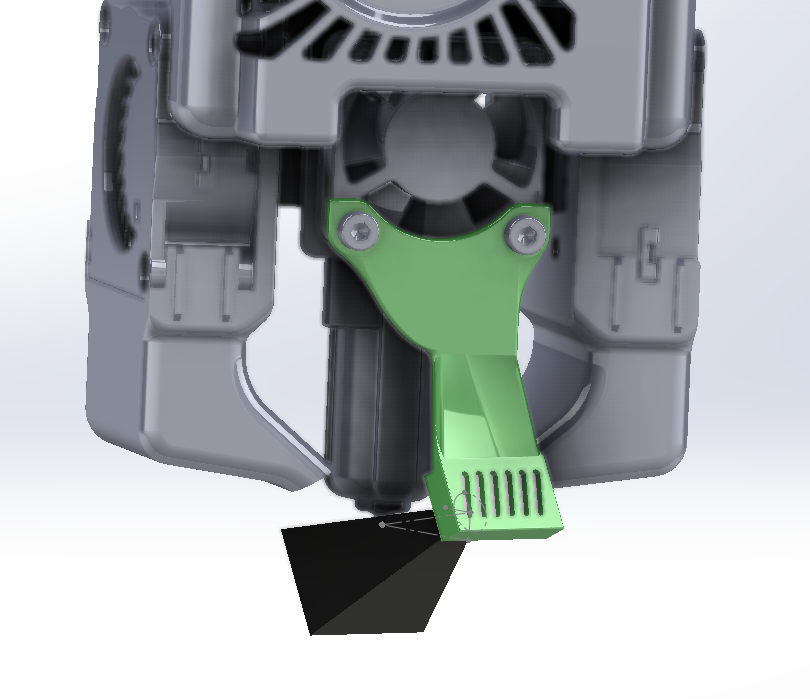
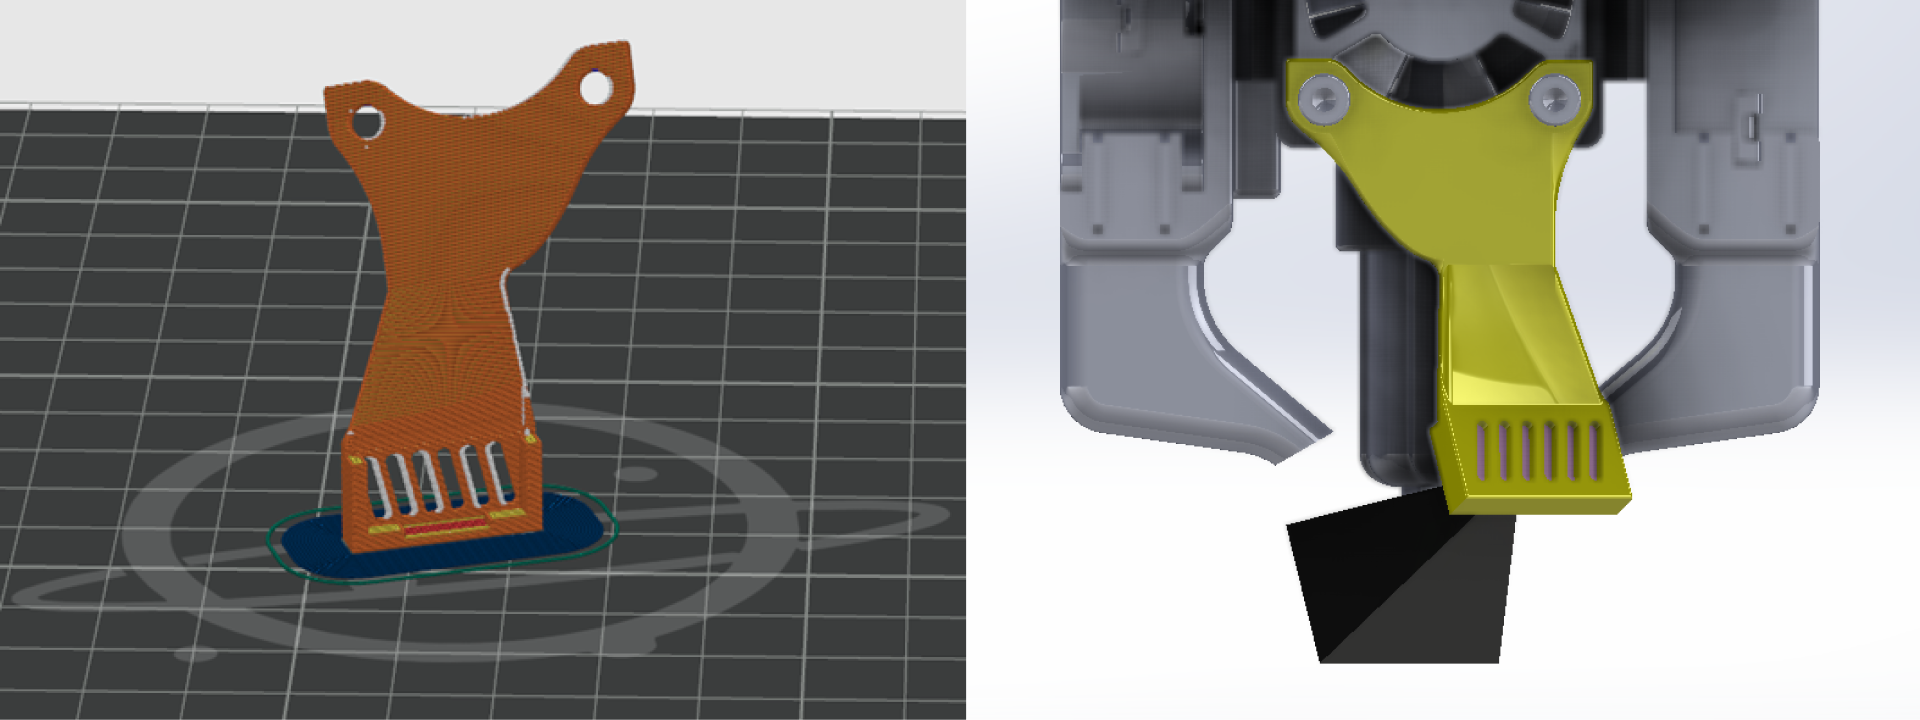
Recommended Design Example:
While this other design for the same head is acceptable and recommended. It gives the user a clear view of the nozzle during printing as well as a good view from the camera.

Consider printability, aiming for little to no support during printing. You can achieve this by incorporating design features like chamfers, fillets, and overhangs with angles less than 65 degrees. This approach not only makes the mount easier to print but also enhances its overall reliability.
The following design is an identical example of a good printable design that requires no support at all:
Also, consider adding ventilation holes from the back of the mount to reduce the emitted heat from the camera flash.
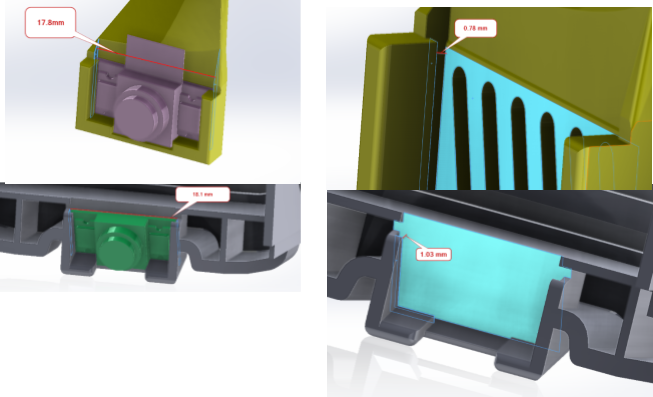
Clearance Considerations
Clearance is another important factor in your design. The required clearance can vary between different printers, as not all printers are capable of printing with the same precision. To ensure a proper fit, you can conduct a tolerance test and adjust your design based on the results.
Keep in mind that print material, temperature, and slicing orientation can all impact the final clearances, so fine-tuning may be required.
In the following images, we show the most critical dimensions for the camera mount, including clearances. As you can see, these dimensions may vary from one design to another depending on factors like the printer used and the printing orientation. We arrived at these dimensions through trial and error and fine-tuning.
You can consider any of them as a starting point, but be aware that you may need to fine-tune them.
Recommended Materials
Selecting the right material for your mount is crucial, especially since it will be located near the printer’s hot end. Materials like ABS, PETG, ASA, or Nylon are recommended because they offer the necessary heat resistance and durability.
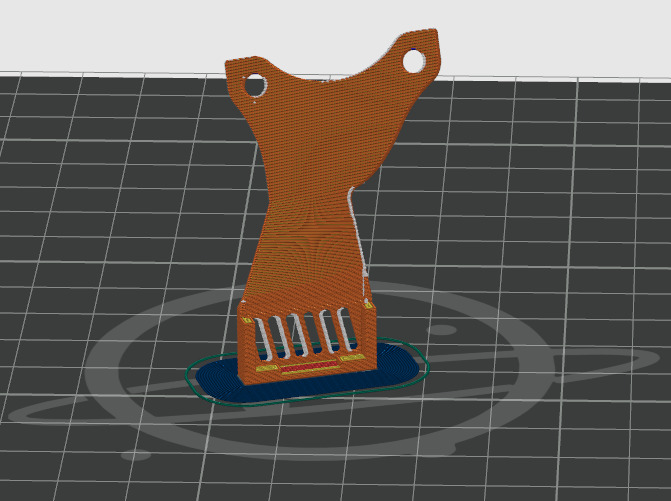
Orientation and Strength
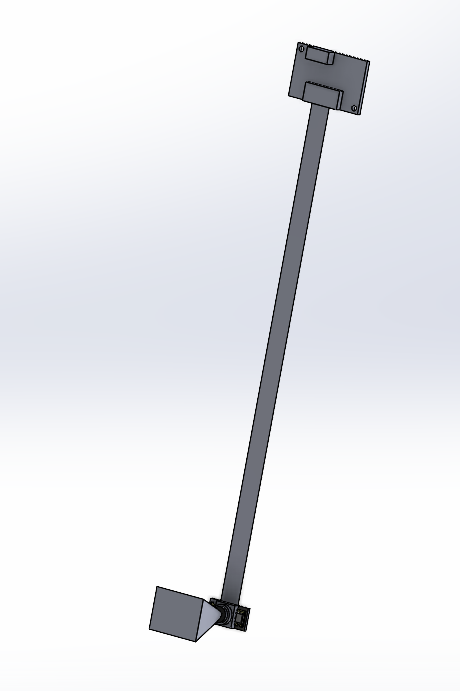
Consider the orientation of the printed part as this can affect both the strength of the mount and the required clearance. Printing the mount in the correct orientation will reduce the need for supports and ensure a better fit and function.
The following image shows a good printing orientation (for this design).
PCB Attachment and Cable Management
When it comes to attaching the camera’s PCB to the mount, it’s best to design a hidden compartment that provides secure mounting and efficient wire routing. Proper cable management is important not only for aesthetics but also for ensuring the longevity of the camera and its connections. Given the delicate nature of the Mintion camera, it’s advisable to push and pull from the ribbon cable rather than the camera body itself to avoid damage.
Testing the Camera
After designing and printing the mount, it’s important to test the camera to ensure it functions as expected. You can use the camera as a webcam to verify that it provides a clear, unobstructed view of the first layer. You should see the nozzle with a clear view of the heat bed.
You can use this website to test the Mintion camera as a webcam on your PC.
Important Note: The camera is weak, and the best method to push and pull it back is from the ribbon cable, not from the camera itself. As the design will not be perfect the first time, especially the clearances, you may be required to fix the camera at a tight clearance. So please be careful with this step.
Conclusion
Designing a 3D printable mount for the Mintion camera involves careful consideration of several factors, including material selection, print orientation, clearance, and overall ease of printing. By following this guide, you can create a mount that is both functional and easy to print, helping you maximize the benefits of the Nozzle Ninja AI feature.
Remember, iteration is key. Don’t hesitate to refine your design until it meets your needs perfectly. Sharing your design with the community can also provide valuable feedback and suggestions for further improvements.
CAD Files for Select 3D Printers
Below is a selection of CAD models for various 3D printers to aid in designing your nozzle camera mount.
Creality K1: https://makerworld.com/en/models/171995
Creality Ender 3 V2: https://grabcad.com/library/ender-3-v2-3d-printer-1
Creality Ender 3: https://github.com/CrealityOfficial/Ender-3/tree/main/Ender-3%20Mechanical
Sovol SV06: https://github.com/Sovol3d/SV06-Fully-Open-Source
SV06 Plus: https://github.com/Sovol3d/SV06-PLUS
Sovol Sv08: https://github.com/Sovol3d/SV08
Elegoo Neptune 3 Pro: https://github.com/elegooofficial/neptune3pro/tree/main/3D