Server configurations
There are a few server configurations you may want to do to make the server reasonably helpful.
Change admin password
- Open Django admin page at http://localhost:3334/admin/.
If the browser complains "Can't connect to the server", wait for a couple more minutes. The web server container may still be starting up. Wait for a bit longer and try it again.
- Login with the default username
root@example.com, passwordsupersecret. Once logged in, you should change the admin password using this link: http://localhost:3334/admin/app/user/1/password/.
Email (SMTP)
The following is using gmail as an example. Other web mail services may vary slightly, such as EMAIL_PORT
-
In
obico-serverdirectory, make a copy ofdotenv.exampleand rename the copy as.env. -
Open
.envusing your favorite editor. -
Find the following lines, and set them to the correct values of your email account (make sure to remove the pound "#" symbols):
EMAIL_HOST=

EMAIL_HOST_USER=
# Such as your email address for a Gmail account

EMAIL_HOST_PASSWORD=
# Your email account password

EMAIL_PORT=587
# Check with your email provider to make sure.

EMAIL_USE_TLS=True
# Set it to False if your email provider doesn't use TLS, which is uncommon
- Restart the server
docker compose up --build -d.
You can follow this guide if you want to use a Gmail account to send emails.
If you run into issues with Email server settings, please follow this Email server trouble-shooting guide. *Note: Make sure to to remove the # or else it will not work.
Django Site
The Django site is what you enter in the browser address bar to open the server page.
If you are running the Obico Server on your laptop and enter http://localhost:3334 in your browser to open the server page, there is nothing you need to do about the Django site. But if Obico Server is running on another computer, you will need to configure a Django site that matches your server's IP address or host name.
In this case, follow the steps below:
1. Determine the address part of the Django site
The address part depends on how you want to access your Obico Server:
-
You want to access your Obico Server using a LAN IP address. In this case, obtain the server's IP address. We will call it
server_ip_addressfor the remaining of this guide. -
You want to access your Obico Server from outside of your LAN using a public IP. We will call it
server_ip_addressfor the remaining of this guide. Exposing your Obico Server outside your LAN is beyond the scope of this guide. You may find useful info in the advanced server configurations section. -
You want to access your Obico Server using a domain name. It can be an mDNS address, or a domain name that can be resolved by a DNS server. We will call it
server_domain_namefor the remaining of this guide. How to obtain the domain name is beyond the scope of this guide.
2. Determine the port part of the Django site
By default, the Obico Server listens on port 3334.
However, if you have set up a reverse proxy, e.g., in the case when you want to access the server outside the LAN, the port will be the port of your reverse proxy.
We will use server_port to represent the port part for the remaining of this guide.
3. Put the address part and the port part together to be the Django site
-
If the address part is an IP address, either LAN IP address or a public IP address, the Django site is
server_ip_address:server_port. -
If the address part is an domain name, the Django site is
server_domain_name:server_port.
Counter-intuitively, the Django site should NOT include http:// or https://. Otherwise your server will not run correctly.
4. Add a site to your Obico Server
There are 2 ways to add a new site to your Obico Sever.
4.1 If you can access your Obico Server using http://localhost:3334
In this case, the easiest way is to add the site in Django Admin.
- Login as Django admin at http://localhost:3334/admin/sites/site/.
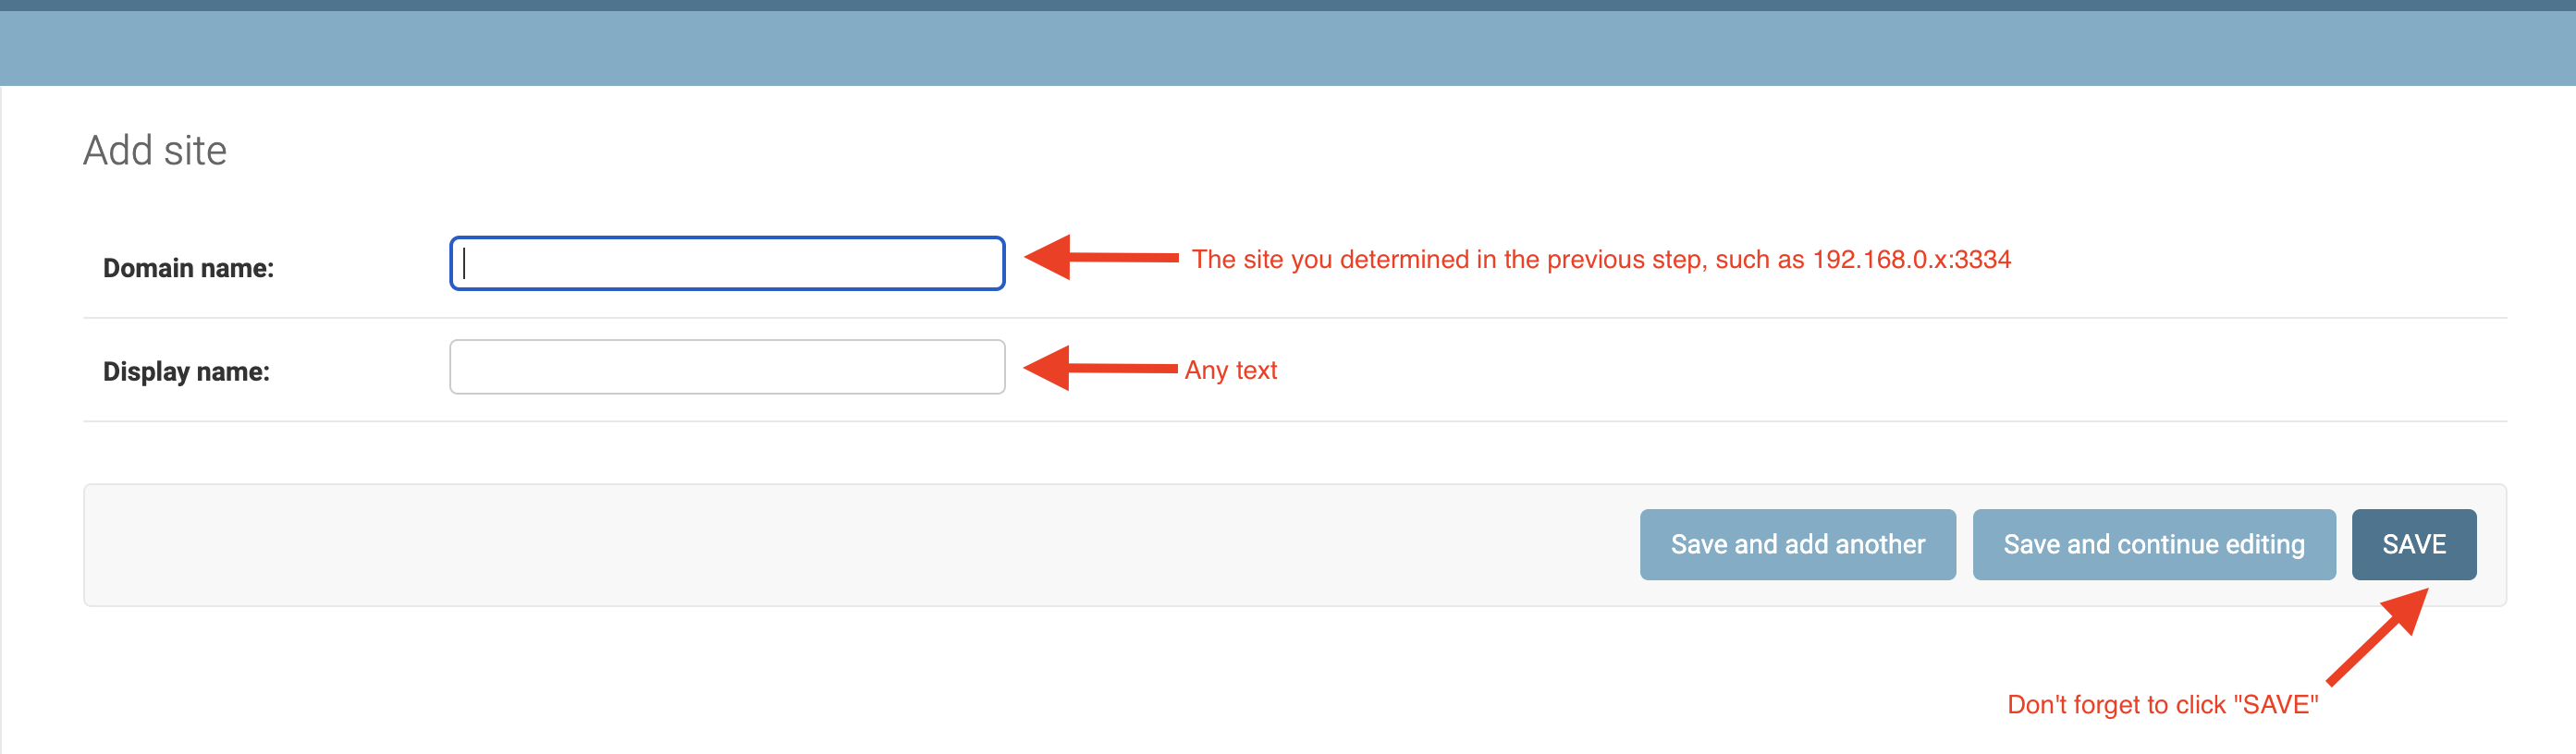
- Click "ADD SITE".
- Fill in the "Domain Name" field with the Django site determined in the previous step.
- Click "Save".
4.2 If you can NOT access your Obico Server using http://localhost:3334
This method works no matter if your Obico Server is running on the localhost. This is especially useful for cases such as running your Obico Server in the cloud.
cd obico-server && docker compose run web ./manage.py site --add server_ip_address:server_port # server_ip_address:server_port is the Django site determined in the previous step.
Replace xxxx in the command with the Django site determined in the previous step.
If you set up your Obico Server before June 5th, 2024, you may need to run the following command after the server is upgraded:
cd obico-server && docker compose run web ./manage.py site --fix
(Re-)generate DJANGO_SECRET_KEY
This step is optional. But you are highly recommended to generate DJANGO_SECRET_KEY and rotate (re-generate) it periodically, especially if you have your Obico Server exposed to the Internet via reverse proxy.
If this step is omitted, the Obico Server will use the default value, which is not recommended unless your intention is just to quickly spin up an temporary Obico Server for evaluation or testing.
If you are upgrading the Obico Server from a version before October 20th, 2023, you need to go through these steps. Otherwise, all of your previous prints and G-Code files will be unusable.
- Randomly generate the next
DJANGO_SECRET_KEY:
docker compose exec web ./manage.py gen_site_secret
-
Copy the
DJANGO_SECRET_KEY=xxxline in the output of the previous command into.env -
Restart the Obico Server:
docker compose stop && docker compose up -d
- Re-sign all media URL. This step is important, otherwise all of your previous prints and G-Code files will be unusable.
docker compose exec web ./manage.py resign_media_urls
What's next?
Advanced server configuration
Ready for some advanced server chops? Feel free to dive into the advanced server stuff.
Keep your server up to date
The Obico Server is designed to be backward compatible, not forward compatible. This means the server can work with the old client versions released in the past, but not the client versions that will be released in the future.
The clients here include the Obico mobile app, Obico for OctoPrint and Obico for Klipper
Always upgrade your self-hosted Obico Server before you upgrade the Obico mobile app, Obico for OctoPrint or Obico for Klipper to a new version.